background image

21

DE

UTSCH

EN

GLIS

H

FRAN

ÇAIS

ESP

AÑOL

IT

A

L

IANO

JAP

A

NESE

COMPL & 

W

ARR

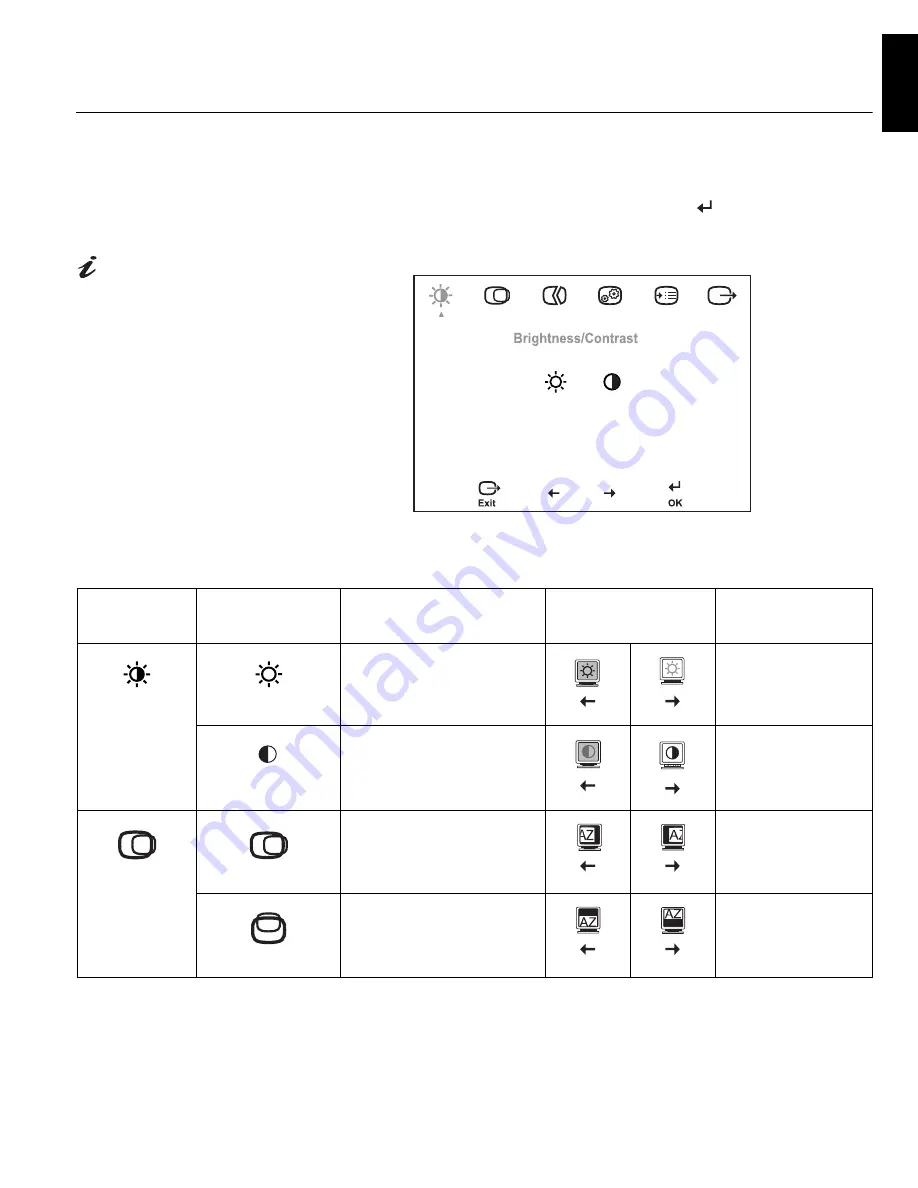
On-screen display (OSD) controls

The settings adjustable with the user controls are viewed through the On-

Screen Display (OSD). Press the OSD Enter button (

) to activate the 

OSD.

The LCD monitor needs 
time to become thermally 

stable the first time you turn it on 
each day. Thus, to achieve more 
accurate adjustments for 
parameters, allow the LCD 
monitor to warm up (be On) for at 
least 15 minutes before making 
any screen adjustments.

Initial appearance of OSD

OSD functions

 OSD Icon on 

Main Menu

Submenu

Description

Controls and 

Adjustments (Analog)

Controls and 

Adjustments (Digital)

Brightness/

Contrast

Brightness

Adjusts brightness. 

Same as Analog

Contrast

Adjusts contrast.

Controls Locked

Image Position

Horizontal Position

Moves the screen left or right.

Controls Locked

Vertical Position

Moves the screen up or down.

Controls Locked

Summary of Contents for 6135AB1

Page 1: ...L191p User s Guide IBM ThinkVision L191p Monitor English ...

Page 2: ...First Edition May 2004 Note For important information refer to the Monitor Safety and Warranty manual that comes with this monitor T750_Sep fm Page 2 Wednesday May 22 2002 10 13 AM ...

Page 3: ...e Driver Installation 10 Windows XP 10 Windows Millennium 10 Windows 2000 11 Windows 98 11 Windows 95 12 Auto Image Setup Analog Only 14 Auto Image Setup 14 Auto Image Setup for DOS 15 Auto Image Setup for Windows 3 1 Windows 95 Windows 98 Windows 2000 Windows NT Windows Me or Windows XP 16 Manual Image Setup 18 Adjusting Your LCD Monitor 19 User controls 19 On screen display OSD controls 21 Furth...

Page 4: ...2 í í í ...

Page 5: ...to your monitor your option package includes the followings User s Guide and Installation Files CD Monitor Warranty and Safety manual IBM ThinkVision L191p Monitor Setup Guide Power Cord IBM ThinkVision L191 p Monitor Analog Interface Cable Attached to Monitor Digital Interface Cable Detached from Monitor Handling Instructions Do not support the monitor within the screen area The Liquid Crystal Di...

Page 6: ...ld consider before you set up your monitor Height Position the monitor so that the top of the screen is slightly below your eye level when you sit at your workstation Orientation Choose a position that gives the least reflection from lights and windows usually at a right angle to any windows Position the monitor directly in front of you so that you do not have to twist your body to use it Tilt the...

Page 7: ...eaks Vary your posture stand up and stretch occasionally as prolonged use of computer workstations can be tiring Back Sit back in your chair and use the backrest Hands Adjust the seat height so that your forearms are approximately horizontal and your wrists are straight when using the keyboard Your upper arms should be relaxed with your elbows near your body Use a light touch on the keyboard keepi...

Page 8: ... controls section on page 19 for more information Caring for your Monitor Be sure to turn off the power before you perform any maintenance on the monitor Clean your monitor as follows Gently wipe the device covers and the screen with a soft cloth Remove finger marks and grease with a damp cloth and mild detergent do not use solvents or abrasives Never use flammable cleaning material to clean your ...

Page 9: ...our computer This port might be directly attached to your computer figure A or it might be part of a video adapter card figure B The video port on your computer or video adapter card might be blue to match the blue connector on your monitor s video cable 3 Connect the power cord to the power port on the back of your monitor if the power cord supplied is not attached to the monitor Then insert the ...

Page 10: ...puter and all attached devices 2 Tilt monitor all the way forward 3 Connect the DVI connector at the end of the DVI D signal cable shipped with your Monitor to the DVI port located on the back of the Monitor See picture below Connecting DVI Cable DVI Cable a ...

Page 11: ...bles 7 Switch on the power source and your computer To turn on the monitor push and release the power switch To switch it off push and release the power switch again Switching on your Monitor 1 Switch on the power source and your computer 2 Switch on your monitor by pushing and releasing the power switch marked To switch off your monitor push and release the power switch again 3 To update or insta...

Page 12: ...complete the installation 6 Close the Display Properties window 7 Remove the User s Guide and Installation Files CD from the computer CD ROM drive Installing the Windows Me device driver To manually install or update the device driver for the Microsoft Windows Millennium Edition operating system perform the following steps 1 Click Start Settings Control Panel and then double click Display 2 In the...

Page 13: ...he computer CD ROM drive type d change the drive letter to match your CD ROM drive if it is not drive D in the Copy manufacturer s files from box click Next and then Finish to complete the installation 6 Close the Display Properties window 7 Remove the User s Guide and Installation Files CD from the computer CD ROM drive Installing the Windows 98 device driver Windows 98 automatically detects the ...

Page 14: ... the Display Properties window click the Settings tab and then click Change Display Type 3 In the Change Display Type window click Change and then click Have Disk 4 Insert the User s Guide and Installation Files CD into the computer CD ROM drive type d change the drive letter to match your CD ROM drive if it is not drive D in the Copy manufacturer s files from box and click OK 5 In the Select Devi...

Page 15: ...pe d change the drive letter to match your CD ROM drive if it is not drive D in the Copy manufacturer s files from box and click OK 6 In the Select Device window click the appropriate monitor model and then click OK 7 In the Advanced Display Properties window click Close 8 In the Display Properties window click OK 9 Remove the User s Guide and Installation Files CD from the computer CD ROM drive ...

Page 16: ...follow the appropriate instructions You can choose to run AUTO IMAGE SETUP for each operating system that you use This means that if you sometimes use your monitor while running any version of Windows and sometimes also use it from within DOS not a DOS window you must run AUTO IMAGE SETUP for both Windows and DOS You can run versions of AUTO IMAGE SETUP in any order Before you begin AUTO IMAGE SET...

Page 17: ... press ENTER 7 Select from the screen the number for the color or text mode you want to set up 8 Select from the screen the number for the video mode you want to set up You can repeat this process for as many of the color and video modes as you need The size and diversity of the dot pattern varies with the screen resolution 9 When the dot pattern appears press the OSD Enter button at the bottom of...

Page 18: ...r CD ROM drive The size and diversity of the dot pattern varies with the screen resolution 5 Check the operating system installed on your computer and follow the instructions from the table below Operating system installation steps 6 When the test pattern appears press the OSD Enter button at the bottom of the monitor to display the initial OSD menu Position the mouse pointer at the bottom center ...

Page 19: ...d off several times and you might notice small changes to the test pattern To abort the AUTO IMAGE SETUP function press the ESC key 9 When finished the OSD main menu returns Press the Exit button once to exit from the OSD 10 Press the ESC key to return to Windows You have completed the monitor setup for Windows If you are using the DOS operating system go to ...

Page 20: ...t frequently use on the screen 3 Press the OSD Enter button at the bottom of the monitor to display the initial OSD menu 4 Use an Arrow button or to select the Image Setup icon and press the OSD Enter button to access the function 5 Using an Arrow button or select MANUAL press and then press again to access the Clock function see page 22 6 Use the Arrow buttons or to manually adjust the image as m...

Page 21: ...age adjustment Inactive Brightness Directly accesses to Brightness on the OSD main menu Active OSD Enter Displays the OSD main menu Active Power Switch Switches the monitor on and off Icon Control Description OSD Exit Exits from menus and sub menus Exits the OSD Active Left Arrow Moves the cursor to highlight icons and other options Active Right Arrow Moves the cursor to highlight icons and other ...

Page 22: ...n Use the Arrow buttons to make adjustments Press the button to save The settings are saved after adjustment and when exiting the OSD and will be effective thereafter Press the Exit button to move backwards through the sub menus and exit from the OSD OSD Lock Unlock This feature allows you to secure the current control settings while allowing the user to adjust Brightness and Contrast so that they...

Page 23: ...eve more accurate adjustments for parameters allow the LCD monitor to warm up be On for at least 15 minutes before making any screen adjustments Initial appearance of OSD OSD functions OSD Icon on Main Menu Submenu Description Controls and Adjustments Analog Controls and Adjustments Digital Brightness Contrast Brightness Adjusts brightness Same as Analog Contrast Adjusts contrast Controls Locked I...

Page 24: ...gs 9300K adjusts the screen more blue 2 Mode 2 Custom Red Green Blue Increases or decreases red Increases or decreases green Increases or decreases blue Sharpness 1 Mode 1 adjusts the image softer 2 Default returns the image sharpness to the default settings 3 Mode 2 adjust the image sharper Input video signal This monitor can accept video signals through two different connectors Most desktop comp...

Page 25: ...creen does not allow any changes to the settings Same as Analog Language The language chosen affects only the language of the OSD It has no effect on any software running on the computer Select one of the 5 languages English French Italian German and Spanish to use for the OSD ENGLISH ...

Page 26: ...gs Accessibility Changes button repeat rate and menu time out setting Button repeat rate Selects or button repeating rate Off increases by 1 each time the button is pressed Default increases continuously while the button is pressed Slow increases by 1 every 2 seconds while the button is pressed Menu time out Sets the length of time the OSD will remain active after the last time a button is pressed...

Page 27: ... position and shape might change when the display mode changes This is normal and the image can be readjusted using AUTO IMAGE SETUP and the monitor controls Unlike CRT monitors which require a high refresh rate to minimize flicker TFT technology is inherently flicker free If possible configure your computer for 1280 1024 addressability at 60Hz vertical refresh rate For the display modes listed on...

Page 28: ... 31 5 kHz Yes Yes 640 480 72 Hz 37 8 kHz Yes Yes 640 480 75 Hz 37 5 kHz Yes Yes 720 400 70 Hz 31 4 kHz Yes Yes 800 600 60 Hz 37 8 kHz Yes Yes 800 600 72 Hz 48 0 kHz Yes Yes 800 600 75 Hz 46 8 kHz Yes Yes 1024 768 60 Hz 48 4 kHz Yes Yes 1024 768 70 Hz 56 5 kHz Yes Yes 1024 x 768 75 Hz 60 0 kHz Yes Yes 1280 x 1024 60 Hz 48 4 kHz Yes Yes 1280 x 1024 75 Hz 80 0 kHz Yes Yes 640 480 66 Hz MAC 35 0 kHz Y...

Page 29: ...oked when the computer recognizes that you have not used your mouse or keyboard for a user definable period There are several states as described in the table below As an ENERGY STAR Partner IBM has determined that this product meets the ENERGY STAR guidelines for energy efficiency For optimal performance switch off your monitor at the end of each working day or whenever you expect to leave it unu...

Page 30: ...o disable the built in adapter Connecting your Monitor for Analog section on page 7 The screen image is garbled or unusable rolling screen images overlapping screen images or a blank screen The display driver is trying to use a setting your monitor does not support Select the correct monitor again Connecting your Monitor for Analog section on page 7 Screen is blank and power indicator is off No po...

Page 31: ...or for Analog section on page 7 The monitor is in the Power Management Suspend or Off state Press any key on the keyboard or move the mouse to restore operation Check the Power Management software on your computer Power Management section on page Power Management2 7 Screen is blank and power indicator is Flashing green every 0 5 second Display mode of the computer is outside the range of the monit...

Page 32: ...D contains over 3 900 000 thin film transistors TFTs A small number of missing discolored or lighted dots may be present on the screen which is an intrinsic characteristic of the TFT LCD technology and is not an LCD defect Problem Possible Cause Suggested Action Reference ...

Page 33: ... during the call In other countries contact your dealer retailer or other IBM authorized Servicer Before calling please have available as much of the following information as possible More help late breaking news and details of the latest accessories for these products may be found on the worldwide web at http www pc ibm com us accessories 1 Model and serial number from the label on your monitor 2...

Page 34: ...2 W for Analog 3 W for Digital 2 W for Analog 3 W for Digital 2 W for Analog 3 W for Digital Video Input Analog Input Signal Horiz Addressability Vert Addressability Clock Frequency Analog Direct Drive 75 ohm 0 7 V 1280 pixels max 1024 lines max 135 MHz Video Input Digital Interface Input Signal Horiz Addressability Vert Addressability Clock Frequency DVI VESA TMDS Panel Link TM 1280 pixels max 10...

Page 35: ...RANÇAIS ESPAÑOL ITALIANO JAPANESE COMPL WARR Environment Temperature Operating Storage Shipping Humidity Operating Storage Shipping 10 to 35 C 50 to 95 F 20 to 60 C 4 to 140 F 20 to 60 C 4 to 140 F 10 to 80 5 to 95 5 to 95 ...

Page 36: ...e customer warranty Parts are for service use only Model Type 9419 73P3890 9419 HB7 HK7 Monitor Business Black 73P3891 9419 HG7 Monitor Ash Grey 73P3893 9419 HB7 HG7 HK7 Stand Business Black 73P3895 9419 HB7 HG7 HK7 Video Cable Black 73P3897 9419 HB7 HG7 HK7 User s Guide CD 73P3899 9419 HB7 HG7 HK7 Setup Guide ...

Page 37: ... following paragraph does not apply to the United Kingdom or any country where such provisions are inconsistent with local law INTERNATIONAL BUSINESS MACHINES CORPORATION PROVIDES THIS PUBLICATION AS IS WITHOUT WARRANTY OF ANY KIND EITHER EXPRESS OR IMPLIED INCLUDING BUT NOT LIMITED TO THE IMPLIED WARRANTIES OF NON INFRINGEMENT MERCHANTABILITY OR FITNESS FOR A PARTICULAR PURPOSE Some states do not...

Page 38: ... or both HelpCenter IBM ENERGY STAR is a U S Govt registered trademark Microsoft Windows and Windows NT are trademarks of Microsoft Corporation in the United States other countries or both Other company product and service names may be trademarks or service marks of others Copyright International Business Machines Corporation 2004 All rights reserved ...

Reviews: