background image


© Copyright IBM Corporation 2019, 2020, 2021      Customer Install Guide, 1U Chassis 

24 

Chassis Installation Procedure 


Pay Attention! 


All components must have the same airflow direction when installed in the rack. 

Cold air enters at the front of the rack and exits at the rear of the rack.   A mismatch in 
the air flow direction will affect the heat dissipation.   Switches must plan for power 
supply-to-connector airflow.  i.e. switch network connections must be facing the rear of 
the rack. 

Read the 

Rack safety notices

, Pub # G229-9054 included with the unit. 


This unit weighs approximately 22 kg (49 lb).  


Rack rail parts inventory 


Rack rail parts inventory 


The enclosure comes with all of the hardware that is necessary for you to install 


the enclosure in the rack cabinet. The following illustrations display the items that 


you need to install the enclosure in the rack cabinet. If any items are missing or 


damaged, contact your place of purchase. 


The slide box kit includes the following parts. This kit comes with the enclosure. 


Two slides (Left & Right) 


Two Velcro straps 
Summary of Contents for 3455-D3E

Page 1: ...or Data system Customer Install Guide Chassis 3455 D3E Version 1 4 Note Before using this information and the product it supports read the information in Safety notices on page 5 Notices on page 39 the IBM Systems Safety Notices manual G229 9054 and the IBM Environmental Notices and User Guide ...

Page 2: ...e 1U Chassis 2 This edition applies to IBM Cloud Pak for Data System Components Revised November 2021 Copyright IBM Corporation 2019 2020 2021 US Government Users Restricted Rights Use duplication or disclosure restricted by GSA ADP Schedule Contract with IBM Corp ...

Page 3: ...System 1U server chassis 17 Operating Environment 18 Rack Requirements 19 Rack Space 19 Location in the Rack 20 Package Contents 23 Chassis Installation Procedure 24 Rack rail parts inventory 24 Install slide rails into the rack 25 Install the enclosure on the slide rails 27 Slide the enclosure into the rack 28 Install the cable management arm 28 Electronic Emissions Notices 33 Regulatory and Comp...

Page 4: ... sikkerhedsforskrifterne før du installerer dette produkt Lees voordat u dit product installeert eerst de veiligheidsvoorschriften Ennen kuin asennat tämän tuotteen lue turvaohjeet kohdasta Safety Information Avant d installer ce produit lisez les consignes de sécurité Vor der Installation dieses Produkts die Sicherheitshinweise lesen Prima di installare questo prodotto leggere le Informazioni sul...

Page 5: ... in this documentation is labeled with a number This number is used to cross reference an English language caution or danger statement with translated versions of the caution or danger statement in the Safety Notices Translation document PN G229 9054 For example if a caution statement is labeled D005 translations for that caution statement are in the Safety Notices Translation document under D005 ...

Page 6: ...at the outlet supplies proper voltage and phase rotation according to the system rating plate For racks with a DC power distribution panel PDP connect the customer s DC power source to the PDP Ensure that the proper polarity is used when attaching the DC power and DC power return wiring Connect any equipment that will be attached to this product to properly wired outlets When possible use one hand...

Page 7: ...bles from the connectors Remove all cables from the devices To connect Turn off everything unless instructed otherwise Attach all cables to the devices Attach the signal cables to the connectors For AC power attach the power cords to the outlets For racks with a DC power distribution panel PDP restore the power from the Customer s DC power source and turn on the circuit breakers located in the PDP...

Page 8: ...e device Use of the controls or adjustments or performance of procedures other than those specified herein might result in hazardous radiation exposure C026 IBM servers can use I O cards or features that are fiber optic based and that utilize lasers or LEDs Laser compliance IBM servers may be installed inside or outside of an IT equipment rack All lasers are certified in the U S to conform to the ...

Page 9: ...s 1M laser Do not view directly with optical instruments C028 CAUTION Some laser products contain an embedded Class 3A or Class 3B laser diode Note the following information laser radiation when open Do not stare into the beam do not view directly with optical instruments and avoid direct exposure to the beam C030 CAUTION To reduce the risk of electric shock or energy hazards This equipment must b...

Page 10: ...r AC powered racks be sure to disconnect all power cords in the rack cabinet when directed to disconnect power during servicing For racks with a DC power distribution panel PDP turn off the circuit breaker that controls the power to the system unit s or disconnect the customer s DC power source when directed to disconnect power during servicing Connect all devices installed in a rack cabinet to po...

Page 11: ...hat has this label attached Do not open any cover or barrier that contains this label L001 L002 DANGER Rack mounted devices are not to be used as shelves or work spaces Do not place objects on top of rack mounted devices In addition do not lean on rack mounted devices and do not use them to stabilize your body position for example when working from a ladder L002 ...

Page 12: ... Copyright IBM Corporation 2019 2020 2021 Customer Install Guide 1U Chassis 12 L003 or or ...

Page 13: ...ve all hazardous voltages disconnect all power cords and power cables L003 Product Safety Notifications Japan English translation If this product comes with power cords such cords should be used exclusively for the applicable product but not for other devices English translation After providing the main product if additional power cord is required the cord is handled for repair maintenance mending...

Page 14: ...EH Component Racks Component Specific Install Guides Customer Install Guide 100G Switch 3454 CAC Customer Install Guide 2U Chassis 3453 C2E Customer Install Guide 1G Switch 3454 A3C Customer Install Guide 25G Switch 3454 B8C 3454 C8C Customer Install Guide Power Distribution Unit PDU 3454 FCE FCG Customer Install Guide 1U Chassis 3455 D3E this document Customer Install Guide Connector Node 3453 F7...

Page 15: ...cold air inlets used to draw in cold air from the front of the rack DO NOT BLOCK ANY INLET OR EXHAUST DUCTS VENTS OR PORTS Blocked cooling access will adversely affect the performance of your Cloud Pak for Data System and may void your warranty Power can be supplied by the available IBM Cloud Pak for Data System PDUs and line cords or by customer supplied PDUs meeting the power requirements of the...

Page 16: ...iant These ports enable you to connect USB devices to the system 5 VGA port Enables you to connect a display device to the system 6 Serial port Enables you to connect a serial device to the system 7 iDRAC9 dedicated network port Use the iDRAC9 dedicated network port to securely access the embedded iDRAC on a separate management network 8 System status indicator cable port Enables you to connect th...

Page 17: ...e Notes 1 2 3 Table 1 Width Depth Height EIA units Weight Amperage Max Power Max Cooling Max 482 mm 19 0 in 809 mm 31 9 in 43 mm 1 70 in 1 21 9 kg 48 3 lb 5 5 amps 1100 watts 3750 BTU Hr Notes 1 The power supplies automatically accept any voltage within the 200 240 V AC 50 60 Hz rated voltage range If dual power supplies are installed and operating the power supplies draw approximately equal curre...

Page 18: ...35C 50F 95F 1 5 5C 45C 41F 113F Humidity 25 60 noncondensing 2 4 20 80 noncondensing 2 4 8 85 4 Maximum Operating Altitude 3050m 10 000 ft 1 Shipping Temperature 40C 60C 40F 140F 3 4 Shipping relative humidity 8 90 4 1 Derate maximum allowable dry bulb temperature by 1C 1 8F per 300m 984 ft increase in altitude above 950m 2 953 ft 2 Maximum dewpoint 21 C 70 F 3 Short term temperature only for serv...

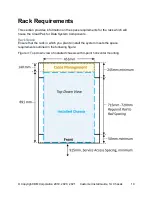
Page 19: ... information on the space requirements for the rack which will house the Cloud Pak for Data System Components Rack Space Ensure that the rack in which you plan to install the system meets the space requirements outlined in the following figure Figure 3 Top down view of installed chassis with 4 point horizontal mounting ...

Page 20: ...the figure below Other configurations can be used if IBM Safety Notices translations Pub G229 9054 rules are followed and the lengths of the supplied cables are not exceeded The Cloud Pak for Data System requires all IBM supplied and serviceable components to be installed below the 42U height Components on slides such as server chassis and connector nodes must be located at or below U26 Figure 4 F...

Page 21: ...install the 1G switch in any convenient location see Figure 2 for recommended switch location U28 PDUs Install horizontally at U33 U34 for easy cable routing and service access Additional PDUs should be installed above the PDUs at locations U35 U36 Other components should be installed per the specific install guide included with those components Installation Notes Servers are preconfigured for the...

Page 22: ...requires all IBM supplied and serviceable components to be installed below the 42U height Components on slides such as server chassis and connector nodes must be located at or below U26 Labeled expansion Labeled MGT1A Labeled expansion Labeled FAB1A Labeled expansion Labeled expansion Labeled expansion Labeled expansion Labeled expansion Labeled expansion Labeled 4 Labeled 3 Labeled 2 Labeled 1 ...

Page 23: ...o straps Four Nylon cable tie wraps Two slide mounting clips One status indicator cable Slide box kit The slide box kit includes the following parts One right slide One left slide Two hook and loop straps I O kit DO NOT DISCARD Keep with chassis after it is installed in the rack The I O kit includes the following parts Two grey RJ45 cables Four 3m fiber cables Eight Transceivers One Safety DVD Thi...

Page 24: ...ork connections must be facing the rear of the rack Read the Rack safety notices Pub G229 9054 included with the unit This unit weighs approximately 22 kg 49 lb Rack rail parts inventory Rack rail parts inventory The enclosure comes with all of the hardware that is necessary for you to install the enclosure in the rack cabinet The following illustrations display the items that you need to install ...

Page 25: ...Tool less Rails Square and Round Hole Racks Position the left and right rail end pieces labeled FRONT facing inward and orient each end piece to seat in the holes on the front side of the vertical rack flanges 1 Align each end piece in the bottom and top holes of the desired U spaces 2 Engage the back end of the rail until it fully seats on the vertical rack flange and the latch clicks into place ...

Page 26: ...ins from the front and rear mounting brackets using a flat tipped screwdriver 1 Pull and rotate the rail latch subassemblies to remove them from the mounting brackets 2 Attach the left and right mounting rails to the front vertical rack flanges using two pairs of screws 3 Slide the left and right back brackets forward against the rear vertical rack flanges and attach them using two pairs of screws...

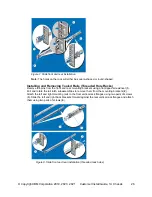
Page 27: ...t of the rack until they lock into place 1 Locate the rear rail standoff on each side of the system and lower them into the rear J slots on the slide assemblies 2 Rotate the system downward until all the rail standoffs are seated in the J slots 3 Push the system inward until the lock levers click into place Press the slide release lock buttons on both rails and slide the system into the rack 4 Fig...

Page 28: ...atch and tighten each screw with a 2 Phillips screwdriver 3 Figure 10 Enclosure installation Install the cable management arm NOTE These management arms are an integral component of the system design Their use is critical for effective installation for reliability of operation and for ease and effectiveness of service The cable management arms allow for orderly routing of cables in system racks th...

Page 29: ...re the CMA for shipment in the rack loop the tie wraps around both the baskets and the tray and cinch them firmly Securing the CMA in this manner secures your system in unstable environments Figure 11 Cable management components Installing and Removing the CMA Tray NOTE The CMA tray provides support and acts as a retainer for the CMA Align and engage each side of the tray with the receiver bracket...

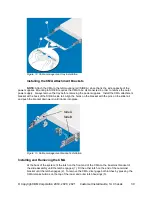
Page 30: ...all the CMA attachment bracket at the back of the SIDE A side rail Align the holes on the bracket with the pins on the slide rail and push the bracket downward until it locks into place Figure 13 Cable management bracket installation Installing and Removing the CMA At the back of the system fit the latch on the front end of the CMA on the innermost bracket of the slide assembly until the latch eng...

Page 31: ...amage from protruding cables secure any slack in the status indicator cable after routing this cable through the CMA Using the tie wraps provided bundle the cables together as they enter and exit the baskets so they do not interfere with adjacent systems 1 With the CMA in the service position route the cable bundle through the inner and outer baskets 2 Use the preinstalled hook and loop straps on ...

Page 32: ... Copyright IBM Corporation 2019 2020 2021 Customer Install Guide 1U Chassis 32 Figure 15 Add Cables ...

Page 33: ... equipment in a residential area is likely to cause harmful interference in which case the user will be required to correct the interference at his own expense Properly shielded and grounded cables and connectors must be used in order to meet FCC emission limits Proper cables and connectors are available from IBM authorized dealers IBM is not responsible for any radio or television interference ca...

Page 34: ...esidential areas Such use must be avoided unless the user takes special measures to reduce electromagnetic emissions to prevent interference to the reception of radio and television broadcasts Warning This equipment is compliant with Class A of CISPR 32 In a residential environment this equipment may cause radio interference Germany Notice Deutschsprachiger EU Hinweis Hinweis für Geräte der Klasse...

Page 35: ...Richtlinie 2014 30 EU in der Bundesrepublik Deutschland Zulassungsbescheinigung laut dem Deutschen Gesetz über die elektromagnetische Verträglichkeit von Geräten EMVG bzw der EMC Richtlinie 2014 30 EU für Geräte der Klasse A Dieses Gerät ist berechtigt in Übereinstimmung mit dem Deutschen EMVG das EG Konformitätszeichen CE zu führen Verantwortlich für die Einhaltung der EMV Vorschriften ist der He...

Page 36: ...S C 61000 3 2 適合品 本装置は 高圧又は特別高圧で受電する需要家の高調波抑制 対策ガイドライン 対象機器 高調波発生機器 です 回路分類 6 単相 PFC回路付 換算係数 0 Japan Voluntary Control Council for Interference VCCI Notice この装置は クラス A 情報技術装置です この装置を家庭環境で使用すると電波妨害 を引き起こすことがあります この場合には使用者が適切な対策を講ずるよう要求され ることがあります VCCI A Korea Notice 이 기기는 업무용 환경에서 사용할 목적으로 적합성평가를 받은 기기로서 가정용 환경에서 사용하는 경우 전파간섭의 우려가 있습니다 People s Republic of China Notice 警 告 此为 A 级产品 在生活环 境中 该产品可能会造成...

Page 37: ...使用時 可能會造成射 頻擾動 在此種情況下 使用者會被要求採取某些適當的對策 IBM Taiwan Contact Information United Kingdom Notice This product may cause interference if used in residential areas Such use must be avoided unless the user takes special measures to reduce electromagnetic emissions to prevent interference to the reception of radio and television broadcasts ...

Page 38: ... Copyright IBM Corporation 2019 2020 2021 Customer Install Guide 1U Chassis 38 Regulatory and Compliance ...

Page 39: ...s and services offered in the U S A IBM Director of Licensing IBM Corporation North Castle Drive Armonk NY 10504 1785 U S A For license inquiries regarding double byte DBCS information contact the IBM Intellectual Property Department in your country or send inquiries in writing to IBM World Trade Asia Corporation Licensing 2 31 Roppongi 3 chome Minato ku Tokyo 106 0032 Japan The following paragrap...

Page 40: ...under terms of the IBM Customer Agreement IBM International Program License Agreement or any equivalent agreement between us Any performance data contained herein was determined in a controlled environment Therefore the results obtained in other operating environments may vary significantly Some measurements may have been made on development level systems and there is no guarantee that these measu...

Page 41: ...f data and reports used in daily business operations To illustrate them as completely as possible the examples include the names of individuals companies brands and products All of these names are fictitious and any similarity to the names and addresses used by an actual business enterprise is entirely coincidental ...

Page 42: ...rograms conforming to the application programming interface for the operating platform for which the sample programs are written These examples have not been thoroughly tested under all conditions IBM therefore cannot guarantee or imply reliability serviceability or function of these programs Each copy or any portion of these sample programs or any derivative work must include a copyright notice a...

Page 43: ...nd or other countries Microsoft Windows Windows NT and the Windows logo are trademarks of Microsoft Corporation in the United States other countries or both Linux is a registered trademark of Linus Torvalds in the United States other countries or both UNIX is a registered trademark of The Open Group in the United States and other countries Oracle and Java are registered trademarks of Oracle and or...

Page 44: ...technical questions and information about products and prices please contact your IBM branch office your IBM business partner or your authorized remarketer When you send comments to IBM you grant IBM a nonexclusive right to use or distribute your comments in any way it believes appropriate without incurring any obligation to you IBM or any other organizations will only use the personal information...

Page 45: ... Copyright IBM Corporation 2019 2020 2021 Customer Install Guide 1U Chassis 45 ...

Page 46: ... Copyright IBM Corporation 2019 2020 2021 Customer Install Guide 1U Chassis 46 Part Number 03GJ009 Printed in Mexico ...

Reviews: