Attaching the Speaker to the Monitor
To install the Business Audio Speaker, follow these steps.
1. First, attach the mounting bar to either side of the monitor. This
is done by pressing the elbow-shaped endpieces into the
indentions which are on the sides of your monitor.
2. Next, mount the speaker on the bar using the mounting clips.
Press the speaker's mounting clips onto the accessory bar until
they snap into place. Make sure that the accessory bar stays
firmly attached to the monitor.
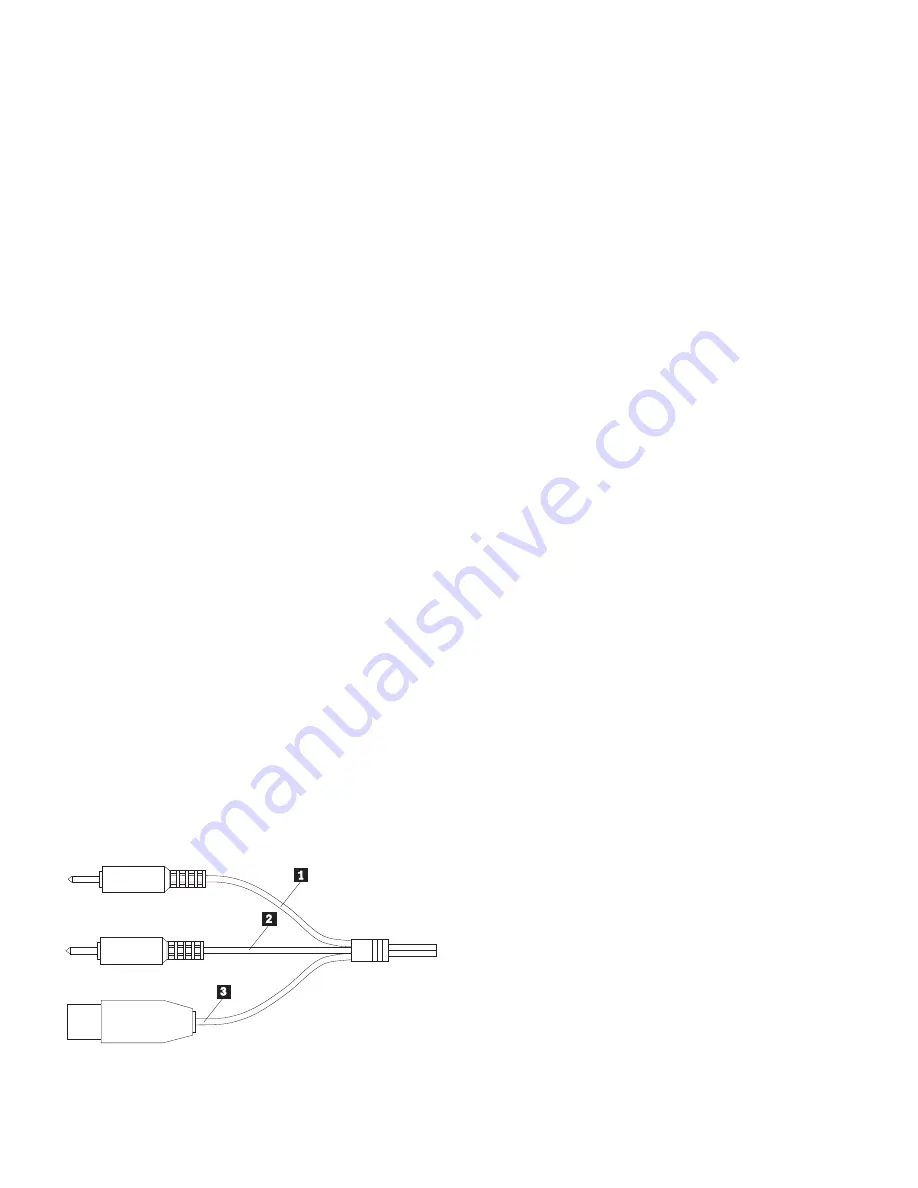
3. Locate the cable which is attached to the speaker, and which
terminates in three plugs. It looks like the following illustration.
4. Locate the “Line” output jack on your computer. Connect the
purple plug
.1/
to this output jack.
5. Locate the “Microphone” input jack on your computer. Connect
the orange plug
.2/
to this input jack.
6. Locate the Universal Serial Bus (USB) port, and plug in the green
part
.3/
of the cable. When you attach this final plug, the
speaker will have a power source. There is no separate power
cable for the speaker.
7. If you want to listen to sounds privately, you can plug a set of
headphones equipped with a 3.5 mm mini-plug into headphone
jack “1” on the side of the speaker. You can plug a second set of
headphones into headphone jack “2”. When headphones are
plugged into jack “1”, the speaker is muted. It is not muted by
plugging headphones into headphone jack “2”.
8. There is a T-shaped hanger at the top-rear of the speaker, which
provides a place to hang your headphones when you are not using
them. You can attach this hanger at either end of the speaker,
depending on whether you mount the speaker on the left or right
side of your monitor.
1-20 Business Audio Speaker
Summary of Contents for 05L1596
Page 1: ...Business Audio Speaker User s Guide OPTIONS by IBM...
Page 6: ...vi Business Audio Speaker...
Page 62: ...56 Business Audio Speaker...
Page 63: ...Part 2 Appendixes Copyright IBM Corp 1998 2 1...
Page 69: ......
Page 70: ...IBM Part Number 05L1596 Printed in U S A 5L1596...


