background image

MANUAL - CDS-200

5

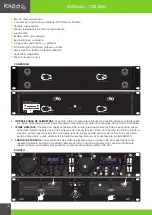
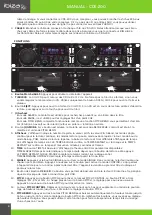
4. 

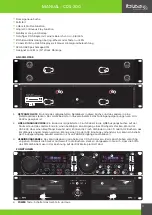
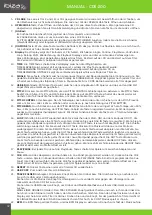
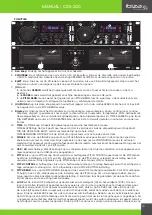
POWER

 button: Press to switch the unit on or off.

5. 

DISC TRAY

: The disc tray can hold 8 and 12cm CD. Don't force the disc tray to close otherwise you will 

damage the CD mechanism. Use only the OPEN/CLOSE button to open and close the tray.

6. 

EJECT

 button: Press to open or close the CD tray. If a CD is playing, stop the play first and then press the 

button to open the tray.

7. 

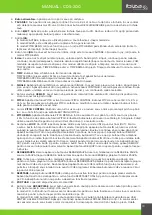
JOG wheel:


In SEARCH mode, the jog wheel is used to search forwards or backwards in the music track.  

In PAUSE mode, it is used for fine adjustments of a CUE point.  

In PITCH BEND mode, the jog wheel will work like a PITCH BEND function allowing you to speed up (forward 

rotation) or slow down (rewind=backward rotation) the music.

8. 

JOG MODE

 button: If this button is lit, the jog wheel is in SEARCH mode. When it is off, the jog wheel is in 

PITCH BEND mode.

9. 

Display

: The display shows the track number, pitch value, pitch bend, single, continu (for continuous play), 

play/pause modes, fast forward/reverse modes, loop mode, reloop mode, PGM, repeat modes, the playback 

display bar and three different time displays. These time displays are: TIME ELAPSED on the track, TIME RE-

MAINING on the disc and TIME REMAINING on the track. Time is measured in minutes, seconds and frames.

10. 

TIME

: The TIME button switches the time display between three available sources:  

TIME ELAPSED on the track shows how much time has currently gone by since the play button was pressed. 

TIME REMAINING ON THE DISC will count the time remaining on the entire disc 

TIME REMAINING ON TRACK counts down the time that is left before the end of the track.

11. 

SINGLE

: Pressing the SINGLE button activates the SINGLE mode. In this mode, the player will play one song 

and then stop. Press the button again to activate the CONTINUOUS mode causing the unit to play conti-

nuously. After the last track, the unit will return to the first track on the disc and continue to play.

12. 

USB/SD

 select button: This button allows you to toggle between the internal CD drive and the mass storage 

device connected to the USB port.

13. 

PITCH

: Pushing the PITCH button activates the PITCH CONTROL slider. The PITCH button has three settings: 

4%, 8% and 16%. At every push on the PITCH button, the setting changes to the next level. Push the PITCH 

button again to deactivate this mode.

14. 

PITCH CONTROL

 slider: Moving the slider up or down will lower or raise the pitch percentage up to + or 

-16% depending on the PITCH BUTTON setting.

15. 

PITCH BEND

: Pressing the PITCH BEND buttons will automatically bend the pitch up to +16% or bend down 

to -16% depending on the setting of the PITCH button. Releasing the buttons will return to the original pitch 

setting. You can use this function to match the beat when mixing from one song to another.

16. 

LOOP

 section: A LOOP repeats the section between the starting point (IN) and the end point (OUT). To set 

a loop while the unit is playing, start by pressing the IN button (it will light up) and when you reach the 

desired end loop point, press the OUT button (it will also light up). The loop will continue to play until you 

press the OUT button again allowing the music to continue from that point on. Press the RELOOP button if 

you wish to re-engage the loop. Once you have released your loop, the OUT button will turn off and the IN 

button will remain lit to indicate that your loop is stored in the memory. Pressing the IN button again while 

the unit is playing, will erase the previously saved loop while saving your new loop starting point. Press 

OUT to exit the loop and save a new complete loop. During normal play, press RELOOP to return to the 

beginning of the previously saved loop. Press RELOOP repeatedly to cause the loop to stutter.

17. 

PLAY/PAUSE

: Each press of the PLAY/PAUSE button causes the player to change from PLAY to PAUSE or from 

PAUSE back to PLAY. The PLAY/PAUSE button remains lit when in PLAY mode, whereas it blinks in PAUSE 

mode.

18. 

CUE

: While the unit is playing and after having programmed a cue point, press CUE to switch the player 

into PAUSE mode (PLAY/PAUSE button blinks) at the programmed cue point (the CUE led is lit). Holding 

down the CUE button changes the function to preview and allows you to stutter start or play from the 

programmed CUE point. Releasing the CUE button will return the CD to the preset CUE point.

19. 

REPEAT

: Press the REPEAT button once to activate the function and repeat the selected track. Press REPEAT 

again to activate the REPEAT ALL function and repeat all tracks on the CD. Press the REPEAT button again 

to deactivate the repeat function.

20. 

USB PORT

: Connect your USB mass storage device.

21. 

TRACK FOLDER

 rotary knob: This knob allows you to browse through folders or search through tracks 

depending on whether you are in USB or in CD mode: 

In CD mode, rotate the knob clockwise to search forward or counterclockwise to search backwards through 

the CD tracks. 

In USB mode, rotate the knob to search through folders and browse through music libraries on your USB 

device. 

TO CHOOSE A FOLDER

: Press and hold the TRACK FOLDER knob and turn it clockwise or counterclockwise 

to the folder you wish to search through. Once you have found the desired folder, release the knob and the 

display will show the first song in that folder. Once in a folder, you can turn the knob to the song you wish 

to play and the CDS-200 will either automatically load the song when in single mode or play the song when 

Summary of Contents for CDS-200

Page 1: ...Istruzioni p 24 ES Manual de instrucciones p 28 GB DUAL CD USB PLAYER WITH SCRATCH F DOUBLE LECTEUR CD USB AVEC SCRATCH D DUAL CD USB PLAYER MIT SCRATCH NL DUBBELE CD USB PLAYER MET SCRATCH RO CD USB...

Page 2: ...MANUAL CDS 200 2...
Page 3: ...isolation and no protective earth terminal Power supply cords should be routed so that they are not likely to be walked on or pinched by items placed upon or against them Pay particular attention to c...

Page 4: ...the rear panel Plug the other end into any available line input jacks on your mixer If you are connecting the CDS 200 via a receiver you can plug the RCA plugs into the CD or AUX input jacks on your r...

Page 5: ...on Releasing the buttons will return to the original pitch setting You can use this function to match the beat when mixing from one song to another 16 LOOP section A LOOP repeats the section between t...

Page 6: ...appareil proximit d eau p ex proximit d une baignoire d un lavabo d un vier de cui sine sur un sol humide ou proximit d une piscine ou autre Ne pas placer ou monter l appareil sur un support inappropr...

Page 7: ...E FEATURES Double lecteur CD compatible MP3 et CD R BPM M moire anti chocs de 40 sec 2 modes de fonctionnement pour la molette Jog Pitch Bend Recherche Recherche pr cise la trame pr s D marrage instan...

Page 8: ...il est teint la molette est en mode PITCH BEND 9 Afficheur L afficheur indique le num ro de piste la valeur pitch la valeur Pitch Bend les modes single continu pour la lecture continue les modes lect...

Page 9: ...ver la fonction REPEAT ALL et r p tez toutes les titres du CD Appuyez nouveau sur le bouton REPEAT pour d sactiver la fonction de r p tition 20 PORT USB Connectez votre p riph rique de stockage de mas...

Page 10: ...r dem Ger t Das Ger t darf nur an eine 100 240VAC 50 60Hz Netzspannung angeschlossen werden Das Ger t geh rt zur Schutzklasse II und besitzt eine Doppelisolierung ohne Schutzkontakt Verlegen Sie die N...

Page 11: ...re Ende in einen beliebigen Line Eingang eines Mischpults stecken Wenn der CDS 200 ber einen Empf nger benutzt wird k nnen die Cinch Verbinder in die CD oder AUX Buchsen des Empf ngers angeschlossen w...

Page 12: ...Tonlage um 16 bzw 16 je nach Einstellung der PITCH Taste Sobald die Tasten losgelassen werden kehrt der Spieler wieder zur Originalgeschwindigkeit zur ck Mit dieser Funktion k nnen die Takte von 2 Tit...

Page 13: ...buurt van water zoals nabij het bad de lavabo de afwasbak de wasmachine op een vocht vloer or nabij een swimmingpool De set niet op een instabiele standaard tafel of niet geschikte vlakte stellen Het...

Page 14: ...uiteinde in een stopcontact Het apparaat heeft een universele voeding die elke wisselspanning van 100 tot 240Vac kan accepteren 2 LINE OUTPUT JACK Steek het ene uiteinde van de meegeleverde RCA kabel...

Page 15: ...d op de hele schijf TIME REMAINING ON TRACK telt de tijd af die nog resteert voor het einde van de track 11 SINGLE Als u op de SINGLE knop drukt wordt de SINGLE modus geactiveerd In deze modus speelt...

Page 16: ...met de klok mee om vooruit of linksom om achterwaarts door de CD tracks te zoeken Draai in USB modus aan de knop om door mappen en door muziekbibliotheken op uw USB apparaat te bladeren OM EEN MAP TE...

Page 17: ...o surs de alimentare AC 100 240V 50 60 Hz Aparatul are clasa de protec ie II cu dubl izolare f r terminal de p m ntare Cablurile de alimentare trebuie aranjate astfel nc t s nu poat fi c lcate sau ag...

Page 18: ...nie jack de pe panoul din spate Conecta i cel lalt cap t la una din intr rile jack de linie de la mixer Dac v conecta i la CDS 200 printr un receptor pute i conecta cablul RCS la intrarea jack de la C...

Page 19: ...de setarea butonului PITCH Eliber nd butoanele ve i reveni la set rile pitch originale Pute i utiliza aceast func ie pentru a potrivi ritmul c nd mixa i o melodie cu alta 16 Sec iunea LOOP Un LOOP rep...

Page 20: ...viteza medie a b t ilor pe minut ale piesei SPECIFICA II Alimentare 100 240Vac 50 60Hz Dimensiuni 482 x 89 x 254mm Greutate 5 4kg RECICLAREA CORECTA A ACESTUI PRODUS Simbolul al turat indic faptul c...

Page 21: ...o biti name eni tako da se ne sprehajate po njih ali zatekajo predmeti postavljeni na njih ali proti njim Posebno pozornost posve ajte icam na vtika ih in mestu kje izhajajo kabli iz naprave Napravo i...

Page 22: ...abite kateri koli vhod na ravni linije ne priklju ite na PHONO vhode 3 KONTROLNI KABLI Priklju ite krmilni kabel na vsako stran CDS 200 Bodite previdni pri priklopu teh kablov Nikoli ne potiskajte kab...

Page 23: ...ete elen kon ni loop pritis nite tipko OUT tudi zasveti Loop se bo e naprej predvajal dokler ponovno ne pritisnete na tipko OUT in tako glasbo nadaljujete od te to ke naprej Pritisnite gumb RELOOP e...

Page 24: ...mento affidabile evitando il surriscaldamento Queste aperture non devono essere bloccate n coperte Il dispositivo non deve essere integrato in un installazione chiusa come una libreria o un rack a men...

Page 25: ...TO CONTROL UNIT 1 CONNECT TO CONTROL UNIT 2 CONNECT TO CONTROL UNIT 1 1 2 3 3 2 1 INGRESSO ALIMENTAZIONE DI RETE Inserire il cavo di alimentazione in dotazione in questo ingresso e l altra in una pre...

Page 26: ...premuto il pulsante play IL TEMPO RIMANENTE SUL DISCO conter il tempo rimanente sull intero disco TEMPO RIMANENTE SULLA PISTA conta alla rovescia il tempo che rimane prima della fine della traccia 11...

Page 27: ...io per cercare all indietro attraverso le tracce del CD In modalit USB ruotare la manopola per cercare tra le cartelle e sfogliare le librerie musicali sul disposi tivo USB PER SCEGLIERE UNA CARTELLA...

Page 28: ...rga el ctrica a personas Si un objeto penetra dentro del equipo desench felo y ap guelo inmediatamente y contacte con su vende dor Para desconectar el enchufe estire siempre de la clavija jam s del ca...

Page 29: ...ntaci n suministrado en esta entrada y el otro extremo en una toma de corriente La unidad tiene una fuente de alimentaci n universal que puede aceptar cualquier voltaje de CA de 100 a 240Vac 2 JACK DE...

Page 30: ...UESTO en la pista TIEMPO RESTANTE en el disco y TIEMPO RESTANTE en la pista El tiempo se mide en minutos segundos y cuadros 10 TIME El bot n HORA cambia la visualizaci n de la hora entre tres fuentes...

Page 31: ...n el CD Presione nueva mente el bot n REPETIR para desactivar la funci n de repetici n 20 PUERTO USB Conecte su dispositivo de almacenamiento masivo USB 21 Bot n giratorio TRACK FOLDER Esta perilla le...

Page 32: ...Copyright LOTRONIC 2018 View the product on our website Imported from China by LOTRONIC S A Avenue Z nobe Gramme 9 B 1480 Saintes www ibiza light com...

Reviews: