background image


10 

SI-62S User Manual 


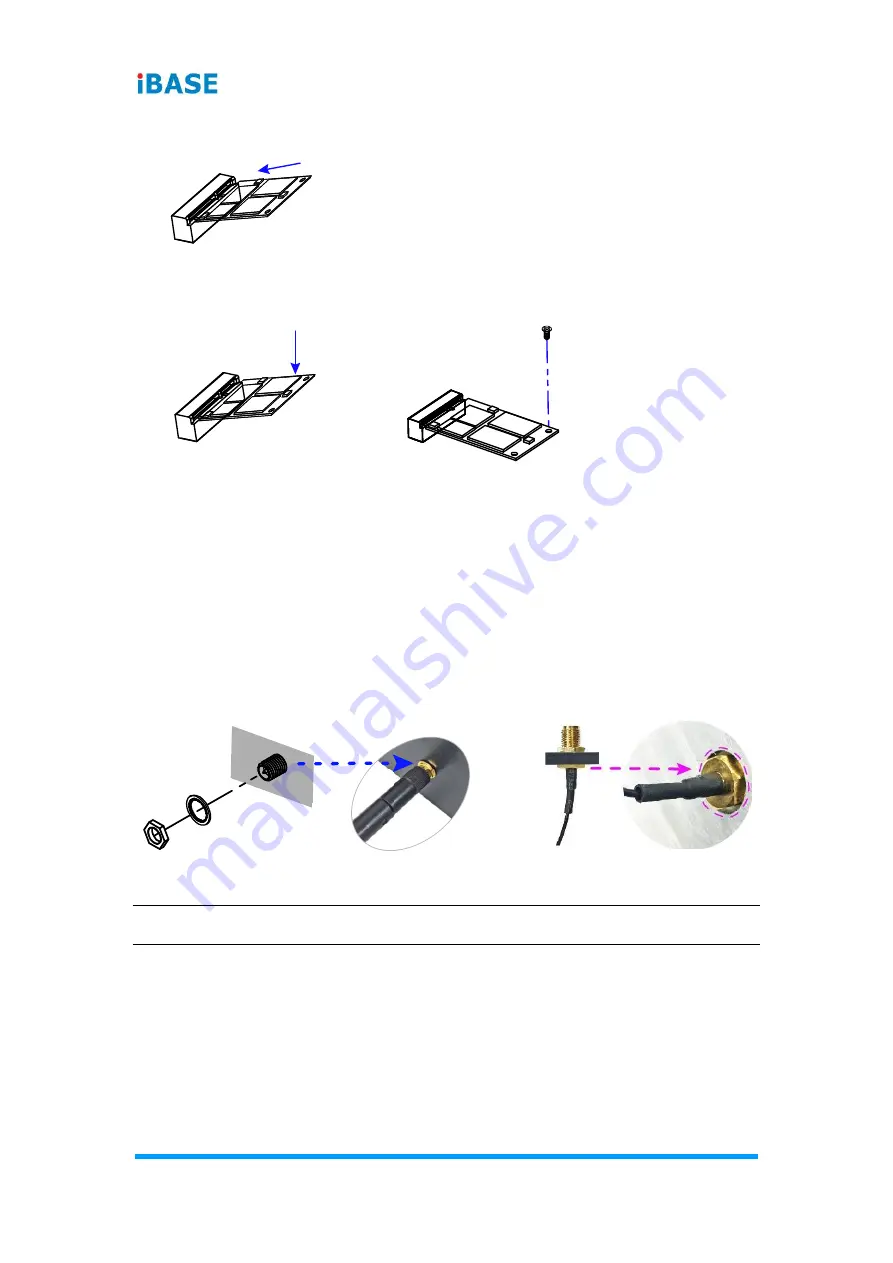
1.  Align the mini-PCIe card

’s bus connector with the mini-PCIe slot, and 

insert the card slantwise.   


2.  Push the mini PCIe card downwards as shown in the picture, and fix it with 

a screw. 


2.1.3 

WiFi / 3G / 4G Antenna Installation 

Insert the WiFi / 3G / 4G antenna extension cable through the antenna hole of 
the front I/O cover and fasten the antenna as shown below. Then apply 
adhesive around the hex nut behind the front I/O cover to prevent the 
extension cable from falling off if the cable becomes loose. 
 

1.  Fasten the hex nut and the washer.   

Then install the antenna.   

2.  Apply adhesive around here. 


Info:


The diameter of the nut is around 6.35 mm (0.25”-36UNC). 


Summary of Contents for SI-62S

Page 1: ...SI 62S Digital Signage Player User s Manual Version 1 2 Oct 2020...

Page 2: ...ements to the products described in this document without prior notice Every effort has been made to ensure the information in the document is correct however IBASE does not guarantee this document is...

Page 3: ...energy and if not installed and used in accordance with manufacturer s instructions may cause harmful interference to radio communications WEEE This product must not be disposed of as normal househol...

Page 4: ...t walk on the power cord or allow anything to rest on it If you use an extension cord make sure the total ampere rating of all devices plugged into the extension cord does not cord s ampere rating Do...

Page 5: ...S OUT OF WARRANTY AND CUSTOMERS SHALL BE BILLED FOR REPAIR AND SHIPPING CHARGES Technical Support Services 1 Visit the IBASE website at www ibase com tw to find the latest information about the produc...

Page 6: ...9 2 1 2 Mini PCIe Card Installation 9 2 1 3 WiFi 3G 4G Antenna Installation 10 2 1 4 Mounting Installation 11 2 1 5 Pin Assignment for Power Input Connector 11 2 2 Setting the Jumpers 11 2 2 1 How to...

Page 7: ...ion 51 4 4 6 Fintek Super IO Configuration 52 4 4 7 Fintek Super IO Hardware Monitor 54 4 4 8 USB Configuration 55 4 4 9 Network Stack Configuration 56 4 4 10 CSM Configuration 57 4 4 11 NVMe Configur...

Page 8: ......

Page 9: ...1 Chapter 1 General Information The information provided in this chapter includes Features Packing List Specifications Optional Accessories Product View Dimensions...

Page 10: ...ction It comes with a standard system bracket and measures 436 x 93 x 345 mm 1 2 Features 9th 8th Gen Intel Core Pentium Celeron processors 2x DDR4 SO DIMM Max 32GB ECC compatible Intel Processor inte...

Page 11: ...t x 1 Screws for Wall Mount Kit M3 x 12 mm x 8 1 4 Specifications Product SI 62S System Mainboard MI998AF Operating System Windows 10 Enterprise 64 bit Windows 8 1 64 bit for Intel Skylake solution se...

Page 12: ...electable and configurable in BIOS COM2 RS 232 only USB 6 x USB 3 0 2 x USB 2 0 Digital I O 1 x GPIO 4 In 4 Out Audio Jack 1 x Line In 1 x Line Out 1 x Mic In Power Jack 1 x DC in power jack Expansion...

Page 13: ...nformation SI 62S User Manual 5 1 1 5 Product View Top View Front View No Name No Name 1 Power Button 4 GPIO 4 In 4 Out Port 2 LED Indicators for Power HDD 5 DC In 12V Connector 3 USB 2 0 Ports 6 Rese...

Page 14: ...COM2 Ports 15 HDMI Input 9 DVI D Port 16 2 Pin Terminal Block For remote power button 10 HDMI Output 17 Expansion Slots for PCIe x16 or PCIe x8 11 DisplayPort 18 Antenna Holes 12 USB 3 0 Ports 19 Mou...

Page 15: ...General Information SI 62S User Manual 7 1 Unit mm...

Page 16: ...8 Chapter 2 Hardware Installation Motherboard Information This section contains general information about Installations Jumper and connectors...

Page 17: ...d perform the following steps 1 Press the ejector tab of the memory slot down and outwards with your fingertips 2 Hold the memory module and align the key of the module with that on the memory slot 3...

Page 18: ...tallation Insert the WiFi 3G 4G antenna extension cable through the antenna hole of the front I O cover and fasten the antenna as shown below Then apply adhesive around the hex nut behind the front I...

Page 19: ...ble to support weight of the SI 62S plus the weight of the suspending cables attached to the system Use the following methods for mounting your system Wall Mounting Installation 1 Turn your device ups...

Page 20: ...ps are placed or removed on the pins to enable or disable functions or features If a jumper has 3 pins you can connect Pin 1 with Pin 2 or Pin 2 with Pin 3 by shorting the jumper A 3 pin jumper A jump...

Page 21: ...Motherboard Information SI 62S User Manual 13 2 MI998AF...

Page 22: ...JP8 ATX AT Power Mode Select JP1 LVDS Panel Brightness Selection JP4 LVDS Panel Power Selection JP6 PCIe Bifurcation Selection JP2 JP3 Factory Use Only JP7 Note The board drawings below include all t...

Page 23: ...Motherboard Information SI 62S User Manual 15 2 2 4 2 Clear CMOS Data JP9 Function Pin closed Illustration Normal default 1 2 Clear CMOS 2 3 1 1 1...

Page 24: ...16 SI 62S User Manual 2 4 3 Clear ME Register JP8 Function Pin closed Illustration Normal default 1 2 Clear ME 2 3 1 1 1...

Page 25: ...Motherboard Information SI 62S User Manual 17 2 2 4 4 ATX AT Power Mode Selection JP1 Function Pin closed Illustration ATX Mode default 1 2 AT Mode 2 3 1 1 1...

Page 26: ...18 SI 62S User Manual 2 4 5 LVDS Power Brightness Selection JP4 Function Pin closed Illustration 3 3V default 1 2 5V 2 3 1 1 1...

Page 27: ...Motherboard Information SI 62S User Manual 19 2 2 4 6 LVDS Panel Power Selection JP6 Function Pin closed Illustration 3 3V default 1 2 5V 2 3 1 1 1...

Page 28: ...ual 2 4 7 PCIe x16 Bifurcation Selection JP2 JP3 JP3 JP2 Function Pin closed Illustration 1 x PCIe x16 default JP3 Open JP2 Open 2 x PCIe x8 JP3 Open JP2 Close 1 x PCIe x8 2 x PCIe x4 JP3 Close JP2 Cl...

Page 29: ...ATX 12V Power Connector ATX_12V_2X1 Dual USB 2 0 Connector J14 Front Panel Audio Connector J16 Front Panel Settings Connector J18 LVDS Connector J11 J12 Fan Power Connector CPU_FAN1 SYS_FAN1 RTC Lith...

Page 30: ...6 DSR Data set ready 2 RXD Receive data 7 RTS Request to send 3 TXD Transmit data 8 CTS Clear to send 4 DTR Data terminal ready 9 RI Ring indicator 5 Ground Pin Signal Name RS 232 RS 422 RS 485 1 DCD...

Page 31: ...S 232 Ports J5 J6 J5 COM3 J6 COM4 Pin Signal Name Pin Signal Name 1 DCD Data carrier detect 2 RXD Receive data 3 TXD Transmit data 4 DTR Data terminal ready 5 Ground 6 DSR Data set ready 7 RTS Request...

Page 32: ...DP VCC 23 Ground 4 eDP VCC 24 AUXP 5 eDP VCC 25 AUXN 6 Ground 26 X 7 Ground 27 3 3V 8 Ground 28 12V 9 Ground 29 X 10 Hot Plug detect 30 Ground 11 Ground 31 5V 12 NC 32 X 13 NC 33 Back Light Control 14...

Page 33: ...l I O Connector J2 4 In 4 Out Pin Signal Name Pin Signal Name 1 Ground 2 5V 3 OUT3 4 OUT1 5 OUT2 6 OUT0 7 IN3 8 IN1 9 IN2 10 IN0 2 5 5 LCD Backlight Connector J10 Pin Signal Name Pin Signal Name 1 12V...

Page 34: ...ector J7 Pin Signal Name Pin Signal Name 1 3 3V 13 3 3V 2 3 3V 14 12V 3 Ground 15 Ground 4 5V 16 PS ON 5 Ground 17 Ground 6 5V 18 Ground 7 Ground 19 Ground 8 Power good 20 5V 9 5VSB 21 5V 10 12V 22 5V...

Page 35: ...X 12V Power Connector ATX_12V_2x1 Pin Signal Name Pin Signal Name 1 Ground 5 12V 2 Ground 6 12V 3 Ground 7 12V 4 Ground 8 12V 2 5 8 Dual USB 2 0 Connector J14 Pin Signal Name Pin Signal Name 1 VCC 2 G...

Page 36: ...28 SI 62S User Manual 2 5 9 Front Panel Audio Connector J16 Pin Signal Name Pin Signal Name 1 MIC IN_L 2 Ground 3 MIC IN_R 4 DET 5 LINE_R 6 Ground 7 Sense 8 Key 9 LINE_L 10 Ground 9 1 10 2...

Page 37: ...for the system that connects to the power switch on the case When pressed the power switch will force the system to power on When pressed again it will power off the system Hard Disk Drive LED Connec...

Page 38: ...11 J12 J12 2nd channel J11 1st channel Pin Signal Name Pin Signal Name 1 TX0P 2 TX0N 3 Ground 4 Ground 5 TX1P 6 TX1N 7 Ground 8 Ground 9 TX2P 10 TX2N 11 Ground 12 Ground 13 CLKP 14 CLKN 15 Ground 16 G...

Page 39: ...herboard Information SI 62S User Manual 31 2 2 5 12 Fan Power Connector SYS_FAN1 CPU_FAN1 SYS_FAN1 CPU_FAN1 PWM mode only Pin Signal Name Pin Signal Name 1 Ground 3 Rotation detection 2 12V 4 Control...

Page 40: ...tion provided in this chapter includes Intel Chipset Software Installation Utility Intel HD Graphics Drivers HD Audio Drivers LAN Network Drivers Intel Management Engine Components Drivers ASMedia USB...

Page 41: ...Intel Chipset Software Installation Utility first before proceeding with the drivers installation 3 2 Intel Chipset Software Installation Utility The Intel Chipset drivers should be installed first b...

Page 42: ...34 SI 62S User Manual 4 On the Readme File Information screen click Install 5 Installation is now complete Restart the system for changes to take effect...

Page 43: ...file 2 When the Welcome screen appears click Next to continue 3 Click Yes to agree with the license agreement and continue the installation 4 On the Readme File Information and Setup Progress screen...

Page 44: ...llation 1 Run the Setup exe file and the wizard starts 2 On the Welcome screen of the InstallShield Wizard click Next to start installing the audio driver on your system 3 Installation is now complete...

Page 45: ...n 1 Run the Setup exe file 2 Click Install Drivers and Software 3 On the Welcome screen of the InstallShield Wizard click Next to continue 4 Accept the license agreement and click Next 5 On the Setup...

Page 46: ...38 SI 62S User Manual 6 Click Install 7 Installation is now complete Restart the system for changes to take effect...

Page 47: ...agement Engine Components Drivers Installation 1 Run the Setup exe file 2 When the Welcome screen appears click Next 3 Accept the license agreement and click Next for installation 4 Installation is no...

Page 48: ...nstallation 1 Run the Setup exe file 2 On the Welcome screen of the InstallShield Wizard click Next to continue 3 Accept the license agreement and click Next 4 Click Install 5 Installation is now comp...

Page 49: ...41 3 3 8 Fintek 8150x Serial Port Drivers Installation 1 Run the Setup exe file 2 On the Welcome screen of the installer click Next to continue 3 Click Install 4 Installation is now complete Restart...

Page 50: ...apter describes the different settings available in the AMI BIOS that comes with the board The topics covered in this chapter are as follows Main Settings Advanced Settings Chipset Settings Security S...

Page 51: ...est will continue with its test routines thus preventing you from invoking the Setup If you still need to enter Setup restart the system by pressing the Reset button or simultaneously pressing the Ctr...

Page 52: ...User Manual 4 3 Main Settings BIOS Setting Description System Date Sets the date Use the Tab key to switch between the data elements System Time Set the time Use the Tab key to switch between the data...

Page 53: ...BIOS Setup SI 62S User Manual 45 4 4 4 Advanced Settings This section allows you to configure improve your system and allows you to set up some system features according to your preference...

Page 54: ...of UART type for WiFi side band communication Options ISH UART0 SerialIO UART2 UART over external pads Not connected CoExistence Manager CoEx Manager mitigates radio coexistence issues between Intel...

Page 55: ...BIOS Setup SI 62S User Manual 47 4...

Page 56: ...cessor package Options All 1 2 3 4 5 AES Enables Disables Advanced Encryption Standard Hyper Threading Enabled for Windows XP and Linux OS optimized for Hyper Threading Technology and Sisabled for oth...

Page 57: ...ables SHA256 PCR Bank Pending operation Schedule an operation for the security device Note Your computer will reboot during restart in order to change state of security device Platform Hierarchy Enabl...

Page 58: ...restrict support to TPM 2 0 devices only Auto will support both with the default being set to TPM 2 0 deices if not found and TPM 1 2 device will be enumerated 4 4 4 ACPI Settings BIOS Setting Descri...

Page 59: ...BIOS Setup SI 62S User Manual 51 4 4 4 5 LVDS eDP DP Configuration...

Page 60: ...Shutdown the Standby power Power Failure Options are Always on default Always off Serial Port 1 Configuration Set parameters of Serial Port 1 COMA Serial Port 2 Configuration Set parameters of Serial...

Page 61: ...BIOS Setup SI 62S User Manual 53 4 Serial Ports Configuration BIOS Setting Description Serial Port Enables Disables the serial port Change Settings Auto default...

Page 62: ...d 50 C 60 C 70 C 80 C Temperatures Voltages These fields are the parameters of the hardware monitoring function feature of the motherboard The values are read only values as monitored by the system an...

Page 63: ...ownership change should be claimed by XHCI driver USB Mass Storage Driver Support Enables Disables the support for USB mass storage driver USB Transfer time out The time out value for Control Bulk and...

Page 64: ...56 SI 62S User Manual 4 4 9 Network Stack Configuration BIOS Setting Description Network Controls the execution of UEFI and Legacy PXE OpROM...

Page 65: ...GA20 but is useful when any RT code is executed above 1 MB INT19 Trap Response Sets how BIOS reacts on INT19 trap by Option ROM Immediate executes the trap right away Postponed executes the trap duri...

Page 66: ...58 SI 62S User Manual 4 4 11 NVMe Configuration...

Page 67: ...BIOS Setting Description System Agent SA Configuration System Agent parameters PCH IO Configuration PCH parameters 4 5 1 Graphics Configuration BIOS Setting Description Graphics Configuration Configu...

Page 68: ...m Auto skips GPIO based Power Enable to dGPU E1k Creek 4 DGPU Power Enable Active Low PEG Eva1 DGPU Power Enable Active High Internal Graphics Keep IGFX enabled based on the setup options Options Auto...

Page 69: ...Enable Enables Disables PS_ON support a new C10 state from the CPU on desktop SKUs that enables a lower power target that will be required by the California Energy commission CEC 4 5 2 1 SATA and RST...

Page 70: ...ot is enabled Platform Key PK Is enrolled and the system is in User mode The mode change requires platform reset Secure Boot Mode Secure Boot mode options Standard or Custom In Custom mode Secure Boot...

Page 71: ...ure Boot Key databases Enroll Efi Image Allow the image to run in Secure Boot mode Enroll SHA256 Hash certificate of a PE image into Authorized Signature Database db Restore DB defaults Restore DB var...

Page 72: ...te waiting Bootup NumLock State Selects the keyboard NumLock state Quiet Boot Enables Disables Quiet Boot option Boot Mode Select Selects a Boot mode Boot Option Priorities Sets the system boot order...

Page 73: ...em after saving the changes Discard Changes and Reset Resets system setup without saving any changes Save Changes Saves changes done so far to any of the setup options Discard Changes Discards changes...

Page 74: ...ppendix This section provides the mapping addresses of peripheral devices and the sample code of watchdog timer configuration I O Port Address Map Interrupt Request Lines IRQ Watchdog Timer Configurat...

Page 75: ...2 0x00000092 Motherboard resources 0x000000B2 0x000000B3 Motherboard resources 0x00000680 0x0000069F Motherboard resources 0x0000164E 0x0000164F Motherboard resources 0x00000020 0x00000021 Programmabl...

Page 76: ...resources 0x00000000 0x00000CF7 PCI Express Root Complex 0x00000D00 0x0000FFFF PCI Express Root Complex 0x000000F0 0x000000F0 Numeric data processor 0x00004090 0x00004097 Standard SATA AHCI Controller...

Page 77: ...11 Gigabit Network Connection IRQ 4294967292 Intel R PCI Express Root Port 12 A333 IRQ 4294967294 Intel R PCIe Controller x16 1901 IRQ 4294967293 Intel R PCIe Controller x8 1905 IRQ 14 Intel R Serial...

Page 78: ...the timer counts to zero Sample Code THIS CODE AND INFORMATION IS PROVIDED AS IS WITHOUT WARRANTY OF ANY KIND EITHER EXPRESSED OR IMPLIED INCLUDING BUT NOT LIMITED TO THE IMPLIED WARRANTIES OF MERCHAN...

Page 79: ...01 enable timer bBuf Get_F81846_Reg 0xF5 bBuf 0x0F bBuf 0x52 Set_F81846_Reg 0xF5 bBuf count mode is second Set_F81846_Reg 0xF6 interval set timer bBuf Get_F81846_Reg 0xFA bBuf 0x01 Set_F81846_Reg 0xFA...

Page 80: ...Init_F81846 void unsigned int result unsigned char ucDid F81846_BASE 0x4E result F81846_BASE ucDid Get_F81846_Reg 0x20 if ucDid 0x07 Fintek 81846 goto Init_Finish F81846_BASE 0x2E result F81846_BASE...

Page 81: ...TA_PORT Lock_F81846 return Result THIS CODE AND INFORMATION IS PROVIDED AS IS WITHOUT WARRANTY OF ANY KIND EITHER EXPRESSED OR IMPLIED INCLUDING BUT NOT LIMITED TO THE IMPLIED WARRANTIES OF MERCHANTAB...

Reviews: