background image

iB-WRA300N

300M Wireless-N ADSL2+ Router User Guide


17 


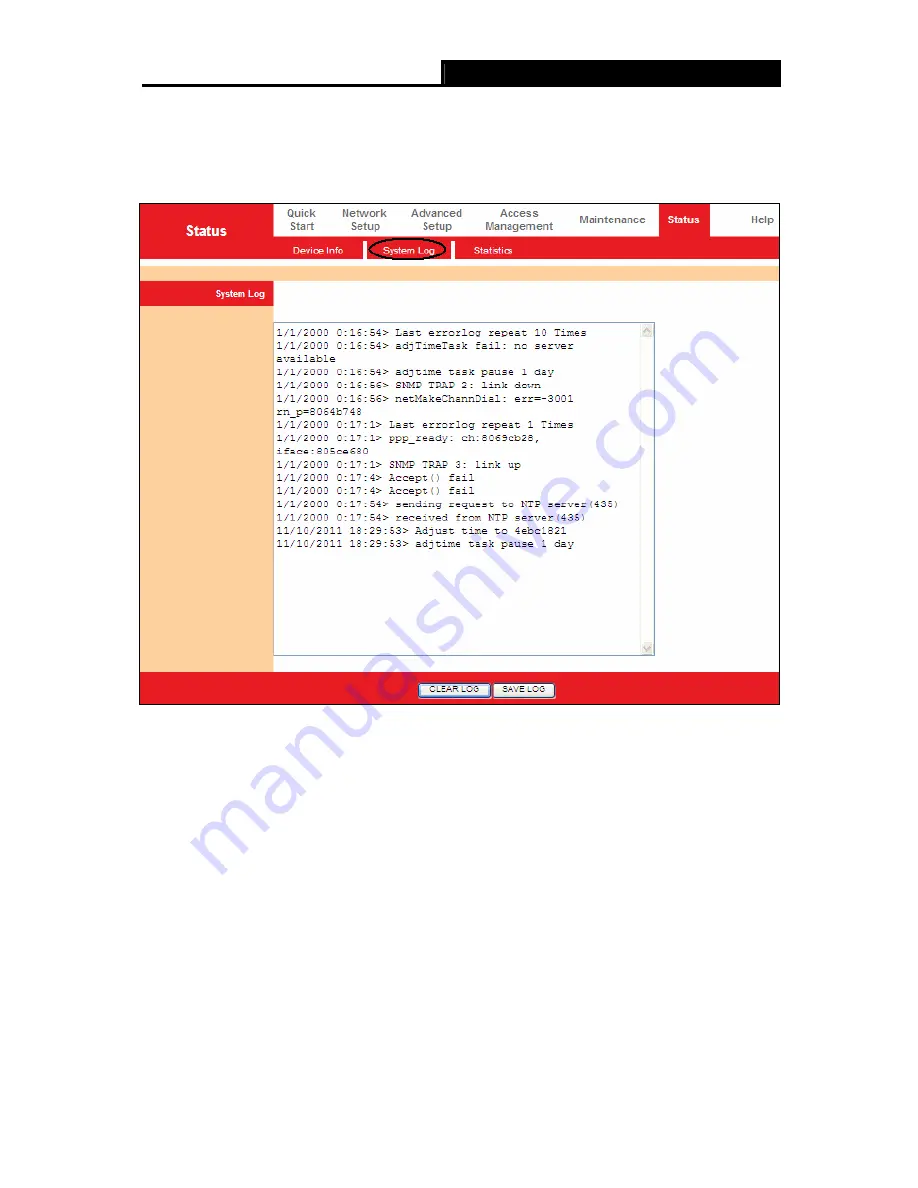
4.1.2 System Log 

Choose “

Status

 System Log

” menu, and you will be able to query the logs of the Router. 


Figure 


4-3 

The Router can keep logs of all traffic. You can query the logs to find what happened to the 
Router. 

Click the 

CLEAR LOG

 button to clear the logs. 

Click the 

SAVE LOG

 button to save the logs. 

4.1.3 Statistics 

Choose “

Status

 Statistics

” menu, and you will be able to view the network traffic over Ethernet, 

ADSL and WLAN. 

Summary of Contents for iB-WRA300N

Page 1: ...300M Wireless N ADSL2 Router Model No iB WRA300N User Guide Ver 1 0 0 ...

Page 2: ...correct the interference by one or more of the following measures Reorient or relocate the receiving antenna Increase the separation between the equipment and receiver Connect the equipment into an outlet on a circuit different from that to which the receiver is connected Consult the dealer or an experienced radio TV technician for help This device complies with part 15 of the FCC Rules Operation ...

Page 3: ...nment 5 2 4 Connecting the Router 6 Chapter 3 Quick Installation Guide 8 3 1 Configure PC 8 3 2 Login 11 Chapter 4 Software Configuration 15 4 1 Status 15 4 1 1 Device Info 15 4 1 2 System Log 17 4 1 3 Statistics 17 4 2 Quick Start 20 4 3 Network Setup 20 4 3 1 Internet 20 4 3 2 LAN 26 4 3 3 Wireless 30 4 4 Advanced Setup 40 4 4 1 Firewall 40 4 4 2 Routing 41 4 4 3 NAT 42 4 4 4 QoS 45 4 4 5 VLAN 4...

Page 4: ...lter 51 4 5 3 SNMP 60 4 5 4 UPnP 60 4 5 5 DDNS 61 4 5 6 CWMP 62 4 6 Maintenance 63 4 6 1 Administration 64 4 6 2 Time Zone 64 4 6 3 Firmware 66 4 6 4 SysRestart 68 4 6 5 Diagnostics 69 Appendix A Specifications 70 Appendix B Contact Information 70 ...

Page 5: ...d in your package 300M Wireless N ADSL2 Router Power Adapter Quick Installation Guide RJ45 cable RJ11 cables ADSL splitter One Resource CD which includes this User Guide Note Make sure that the package contains the above items If any of the listed items are damaged or missing please contact your distributor ...

Page 6: ...ddress The advanced security enhancements IP MAC Application and URL Filtering can help to secure your network Quick Start of the Web based Utility is supplied and friendly help messages are provided for the configuration Network and Router management is done through the Web based Utility which can be accessed through local Ethernet using any web browser ADSL iB WRA300N complies with latest ADSL s...

Page 7: ...stablishing WPA2 encryption security Wi Fi Button Allows users to turn off the wireless function as not in use Supports Multiple PVC Permanent Virtual Circuit Triple Active Firewall SPI NAT Packet filter IP Domain Mac Application filtering Wireless MAC filtering DHCP Server Built in firewall supporting IP MAC filter Application filter and URL filter Virtual Server DMZ host and IP Address Mapping D...

Page 8: ...ash Green Colour Data is being transferred over the Internet Internet Off There is no data transmission over the internet On There is a successful connection on the corresponding Ethernet port but no activity Flash Data is being transferred over the Ethernet port LAN Ethernet Off There is no connection on the corresponding Ethernet port or the connection is abnormal On The wireless function is ena...

Page 9: ...ault settings Method two Restore the default setting from Maintenance SysRestart of the Router s Web based Utility Ethernet Through the port you can connect the Router to your PC or the other Ethernet network devices ON OFF Switch ON OFF the router 2 3 Installation Environment The Product should not be located where it will be exposed to moisture or excessive heat Place the Router in a location wh...

Page 10: ...he Internet and make calls at the same time The external splitter has three ports LINE Connect to the wall jack PHONE Connect to the phone sets MODEM Connect to the ADSL LINE port of iB WRA300N Plug one end of the twisted pair ADSL cable into the ADSL LINE port on the rear panel of iB WRA300N Connect the other end to the MODEM port of the external splitter Step 2 Connect the Ethernet cable Attach ...

Page 11: ...iB WRA300N 300M Wireless N ADSL2 Router User Guide 7 Figure 2 3 ...

Page 12: ...or connect your adapter to a Hub Switch which has connected to the Router you need to configure your PC s IP address Follow the steps below to configure it Step 1 Click the Start menu on your desktop right click My Network Places and then select Properties shown in Figure 3 1 Figure 3 1 Step 2 Right click Local Area Connection LAN and then select Properties ...

Page 13: ...iB WRA300N 300M Wireless N ADSL2 Router User Guide 9 Figure 3 2 Step 3 Select General tab highlight Internet Protocol TCP IP and then click the Properties button Figure 3 3 ...

Page 14: ... and Obtain DNS server address automatically in the screen above Now you can run the Ping command in the command prompt to verify the network connection Please click the Start menu on your desktop select run tab type cmd or command in the field and press Enter Type ping 192 168 1 1 on the next screen and then press Enter If the result displayed is similar to the screen below the connection between...

Page 15: ...2 Is the TCP IP configuration for your PC correct If the Router s IP address is 192 168 1 1 your PC s IP address must be within the range of 192 168 1 2 192 168 1 254 3 2 Login Once your host PC is properly configured please proceed as follows to use the Web based Utility Start your web browser and type the private IP address of the Router in the URL field 192 168 1 1 After that you will see the s...

Page 16: ... tab then click RUN WIZARD and you will see the next screen Click the NEXT button Figure 3 8 Step 2 Configure the time for the Router and then click the NEXT button Figure 3 9 Step 3 Select the connection type to connect to the ISP We select PPPoE PPPoA as BSNL ISP and then click the NEXT button ...

Page 17: ... Router User Guide 13 Figure 3 10 Step 4 Configure the following options provided by your ISP Username Password VPI VCI and Connection Type Then click NEXT Figure 3 11 Step 5 Configure the rules for the WLAN and click NEXT Figure 3 12 ...

Page 18: ...s Point is activated the wireless function will be available even without the external antenna because of an additional printed antenna To adopt the wireless security protection measures please refer to Section 4 3 3 Step 6 Click NEXT to finish the Quick Start Figure 3 13 ...

Page 19: ...ll be available after you click one of the main menus On the center of the Web based Utility there are the detailed configurations or status information To apply any settings you have altered on the page please click the SAVE button 4 1 Status Choose Status you can see the next submenus Device Info System Log and Statistics Click any of them and you will be able to configure the corresponding func...

Page 20: ...0N 300M Wireless N ADSL2 Router User Guide 16 Figure 4 2 Note Click the other submenus System Log or Statistics in Figure 4 2 and you will be able to view the system log and traffic statistics about the Router ...

Page 21: ...gs of the Router Figure 4 3 The Router can keep logs of all traffic You can query the logs to find what happened to the Router Click the CLEAR LOG button to clear the logs Click the SAVE LOG button to save the logs 4 1 3 Statistics Choose Status Statistics menu and you will be able to view the network traffic over Ethernet ADSL and WLAN ...

Page 22: ...ransmitted over the Ethernet port Transmit Collision The collision occurred over the Ethernet port when data is being transmitted Transmit Statistics Transmit Error Frames The error frames over the Ethernet port when data is being transmitted Receive Frames The frames received over the Ethernet port Receive Multicast Frames The multicast frames received over the Ethernet port Receive total Bytes T...

Page 23: ...ived Select WLAN and you will see the statistics table as below Statistics Table Tx Frames Count The frames transmitted over the WLAN when wireless data is being transmitted Tx Errors Count The errors occurred over the WLAN when wireless data is being transmitted Transmit Statistics Tx Drops Count The drops occurred over the WLAN when wireless data is being transmitted Rx Frames Count The frames r...

Page 24: ...Network Setup Choose Network Setup you can see the next submenus WAN LAN and Wireless Figure 4 5 Click any of them and you will be able to configure the corresponding function 4 3 1 WAN Choose Network Setup WAN menu you can configure the parameters for WAN ports in the next screen shown in Figure 4 6 ...

Page 25: ...iB WRA300N 300M Wireless N ADSL2 Router User Guide 21 Figure 4 6 ...

Page 26: ...32 to 65535 1 to 31 is reserved for well known protocols Please input the value provided by your ISP PVCs Summary Click the button and you can view the summary information about the PVCs QoS Select the Quality of Service types for this Virtual Circuit including CBR Constant Bit Rate UBR Unspecified Bit Rate and VBR Variable Bit Rate These QoS types are all controlled by the parameters specified be...

Page 27: ... RIP1 RIP2 B and RIP2 M RIP2 B and RIP2 M are both sent in RIP2 format the difference is that RIP2 M using Multicast while RIP2 B using Broadcast format Direction Select this option to specify the RIP direction None is for disabling the RIP function Both means the ADSL Router will periodically send routing information and accept routing information and then incorporate them into routing table IN o...

Page 28: ...must be in the appropriate IP form which is four IP octets separated by a dot x x x x such as 192 168 1 100 The Router will not accept the IP address if it is not in this format 3 PPPoA PPPoE Select this option if your ISP requires you to use a PPPoE connection This option is typically used for DSL services Select Dynamic PPPoE to obtain an IP address automatically for your PPPoE connection Select...

Page 29: ...A connection you need to specify the type of Multiplexing either LLC or VC Mux Bridge Interface Activate the option and the Router can also work in Bridge mode Connection For PPPoE PPPoA connection you can select Always on or Connect on Demand or Connect Manually Connect on demand is dependent on the traffic If there is no traffic or Idle for a pre specified period of time the connection will tear...

Page 30: ...ng and enter a MAC address to configure the WAN port It makes your inside network appear as a device with this MAC address to the outside world 4 Bridge Mode If you select this type of connection the modem can be configured to act as a bridging device between your LAN and your ISP Bridges are devices that enable two or more networks to communicate as if they are two segments of the same physical L...

Page 31: ...Subnet Mask the default value is 255 255 255 0 Dynamic Route Select this option to specify the RIP Routing Information protocol version for LAN interface including RIP1 RIP2 B and RIP2 M RIP2 B and RIP2 M are both sent in RIP2 format the difference is that RIP2 M using Multicast while RIP2 B using Broadcast format Direction Select this option to specify the RIP direction None is for disabling the ...

Page 32: ...device must be set as a DHCP client to obtain the IP address automatically By default the DHCP Server is enabled The DHCP address pool contains the range of the IP address that will automatically be assigned to the clients on the network Figure 4 12 Starting IP Address Enter the starting IP address for the DHCP server s IP assignment Because the default IP address for the Router is 192 168 1 1 the...

Page 33: ...Server Only is selected in DNS Relay it is necessary for you to enter the primary and optional secondary DNS server IP addresses After type in the address click SAVE button to save it and invoke it DHCP Relay Select Relay then you will see the next screen shown in Figure 4 13 and the Router will work as a DHCP Relay A DHCP relay is a computer that forwards DHCP data between computers that request ...

Page 34: ...less N ADSL2 Router User Guide 30 4 3 3 Wireless Choose Network Setup Wireless menu and you will see the Wireless screen shown in Figure 4 14 Please configure the parameters for wireless according to the descriptions below ...

Page 35: ... receiving an RTS the wireless station responds with a Clear to Send CTS frame to acknowledge the right to begin transmission In most cases keep its default value of 2347 Fragmentation Threshold This value specifies the maximum size for a packet before data is fragmented into multiple packets If you experience a high packet error rate you may slightly increase the Fragmentation Threshold Setting t...

Page 36: ... default setting If you don t want to broadcast the Router s SSID select No Use WPS Use WPS Wi Fi Protected Setup function you can add a new wireless device to an existing network quickly To Use WPS keep the default setting and configure the parameters in WPS Settings If you don t want to Use WPS select No then you will see the screen as shown below Figure 4 15 SSID Wireless network name shared am...

Page 37: ...n the IEEE 802 11g standard Figure 4 16 2 WEP 128Bits To configure WPA 64Bits settings select the WPA 64Bits option from the drop down list The menu will change to offer the appropriate settings 128 bit is stronger than 64 bit Figure 4 17 3 WPA PSK To configure WPA PSK settings select the WPA PSK option from the drop down list The menu will change to offer the appropriate settings WPA PSK requires...

Page 38: ...s It must have 8 63 ASCII characters or 64 Hexadecimal digits 4 WPA2 PSK3 To configure WPA2 PSK settings select the WPA2 PSK option from the drop down list The menu will change to offer the appropriate settings WPA2 PSK requires a shared key and does not use a separate server for authentication PSK keys can be ASCII or Hex type Figure 4 19 5 WPA PSK WPA2 PSK To configure WPA PSK WPA2 PSK settings ...

Page 39: ... and Router using either Push Button Configuration PBC method or PIN method please select the one you want WPS progress Show the current WPS progress 1 PBC If the wireless adapter supports Wi Fi Protected Setup PBC method you can add it to the network by PBC with the following method Figure 4 21 Step 1 Press the WPS button on the Top panel of the Router or click Start WPS WLAN button in Figure 4 2...

Page 40: ... you can add it to the network by PIN with the following two methods Click PIN code you will see the screen as shown below Figure 4 22 Method One Enter the PIN into my Router Step 1 For the configuration of the wireless adapter please choose Enter a PIN into my access point or a registrar in the configuration utility of the WPS and get the PIN code on the screen as below then click Next ...

Page 41: ...Figure 4 23 Method Two Enter the PIN from my Router Step 1 Get the Current PIN code of the Router from AP self PIN code in Figure 4 23 each Router has its unique PIN code Here takes the PIN code 11930464 of this Router for example Step 2 For the configuration of the wireless adapter please choose Enter a PIN from my access point in the configuration utility of the WPS as below and enter the PIN co...

Page 42: ...a wireless network The SSID must be identical for all devices in the wireless network It is case sensitive and must not exceed 32 characters use any of the characters on the keyboard Make sure this setting is the same for all stations in your wireless network Type the desired SSID in the space provided Authentication Type Select an authentication type from the drop down list which allows you to co...

Page 43: ...tive If you wish to filter users by MAC Address select Activated and Deactived for don t Action To filter wireless users by MAC Address select Allow Association or Deny Association the follow Wireless LAN station s association MAC Address Enter the MAC Address you wish to filter in the field Note For most users it is recommended to use the default Wireless LAN Performance settings Any changes made...

Page 44: ...ponding function 4 4 1 Firewall Choose Advanced Setup Firewall menu and you will see the next screen shown in Figure 4 25 Figure 4 25 Firewall Select this option can automatically detect and block Denial of Service DoS attacks such as Ping of Death SYN Flood Port Scan and Land Attack SPI If you enable SPI all traffics initiated from WAN would be blocked including DMZ Virtual Server and ACL WAN sid...

Page 45: ... same segment as your Router over Internet WAN the gateway must be the IP address of one of the remote nodes Metric Metric represents the cost of transmission for routing purposes IP Routing uses hop count as the measurement of cost with a minimum of 1 for directly connected networks Enter a number that approximates the cost for this link The number need not to be precise but it must between 1 and...

Page 46: ...e IP or multiple IPs We select Multiple to explain Note For VCs with single IP they share the same DMZ and Virtual servers for VCs with multiple IPs each VC can set DMZ and Virtual servers Furthermore for VCs with multiple IPs they can define the Address Mapping rules for VCs with single IP since they have only one IP there is no need to individually define the Address Mapping rule 4 4 3 1 DMZ Cho...

Page 47: ... same Virtual Server rules Application The Virtual servers can be used for setting up public services on your LAN Protocol The protocol used for this application Start End port number Enter the specific Start and End Port number you want to forward If it is one port only you can enter the End port number the same as Start port number For example if you want to set the FTP Virtual server you can se...

Page 48: ...in Figure 4 28 and choose Advanced Setup NAT IP Address Mapping for Multiple IP Service You can configure the Address Mapping Rule in the next screen The IP Address Mapping is for those VCs that configured with multiple IPs The IP Address Mapping rule is per VC based only for Multiple IPs VCs Figure 4 31 Rule Index Select the Virtual server rule index for this VC You can specify 8 rules in maximum...

Page 49: ...y take effect Other operations for the entries as shown in Figure 4 31 Select the index of assigned entry and click the DELETE button to delete the entry Click the BACK button to return to the previous screen Click the CANCEL button to cancel the configuration which is made just now 4 4 4 QoS Choose Advanced Setup QoS you can configure the QoS in the next screen QoS helps to prioritize data as it ...

Page 50: ... and DiffServ Summary Click the button to view the configurations of QoS Rule Configure the rules for QoS If the traffic complies with the rule then the Router will take the corresponding action to deal with it Rule Index Select the index for the rule you want to configure Active Activate the rule The rule can take effect only when it is activated ...

Page 51: ...work resource and usage control to the Network operator IP Precedence Range Enter the IP precedence range that the Router takes to differentiate the traffic Type of Service Select the type of service that the Router takes to deal with the traffic 802 1p Select the priority range for the rule When you select DSCP you can assign the priority via DHCP the header of IP group It maps the IP group into ...

Page 52: ...nections it is very flexible for user host management bandwidth allocation and resource optimization There are two types of VLAN as follows Port Based VLAN Each physical switch port is configured with an access list specifying membership in a set of VLANs ATM VLAN Using LAN Emulation LANE protocol to map Ethernet packets into ATM cells and deliver them to their destination by converting an Etherne...

Page 53: ...mes frames with null 0 VID received on this port 2 Define VLAN Group Click Define VLAN Group in Figure 4 33 you can define VLAN groups in the next screen shown in Figure 4 35 Figure 4 35 VLAN Index Select the VLAN index for this VC You can specify 8 groups in maximum VLAN ID This indicates the VLAN group ATM VCs Select the ATM VCs as members of VLAN and if you leave the Tagged blank the ...

Page 54: ...e VLAN Groups 4 4 6 ADSL Choose Advanced Setup ADSL you can select the ADSL Type and ADSL Mode in the next screen The ADSL feature can be selected when you meet the physical connection problem Please check the proper settings with your Internet service provider Figure 4 36 ADSL Mode Select the ADSL operation mode which your ADSL connection uses ADSL Type Select the ADSL operation type which your A...

Page 55: ... addresses which are permitted to access to the Router remotely With the default IP 0 0 0 0 any client would be allowed to remotely access the ADSL Router Application Select the application for the ACL rule and then you can access the Router through it Interface Select the interface for access LAN WAN or Both Access Control of Listing This displays the information about the ACL Rules 4 5 2 Filter ...

Page 56: ...re the filter rules based on IP address The filtering includes Outgoing and Incoming the detailed descriptions are provided below Figure 4 39 Filter Type Selection Select the filter type for the configuration below IP MAC Filter Set Index Select the Set index for the IP Filter entry This index can match with six IP MAC Filter Rule Indexes Interface Select the interface for the entry ...

Page 57: ...Yes to make the rule to take effect Source IP Address Enter the source IP address for the rule You can enter 0 0 0 0 it means that all IP addresses are controlled by the rule Destination IP Address Enter the destination IP address for the rule You can enter 0 0 0 0 it means that all IP addresses are controlled by the rule The set of Subnet Mask and Port Number are same as Source IP Address Subnet ...

Page 58: ...ect the IP as the Rule Type on the Filter screen then you can configure the specific rule for the example Step 2 Select the IP MAC Filter Set Index and IP MAC Filter Rule Index for the rule then select the Interface PVC0 and select the Direction Both for the first rule Note If you want to make the rule take effect please select Yes to active the rule Step 3 Enter the Source IP Address Destination ...

Page 59: ...he Filter list will show as follows You can enter the IP MAC Filter Set Index to view the information about the rule Other operations for the entries as shown in Figure 4 39 Select the IP MAC Filter Set Index and IP MAC Filter Rule Index to view or modify the entry Select the IP MAC Filter Set Index and IP MAC Filter Rule Index to locate the specific rule and then click the DELETE button to delete...

Page 60: ...ter rule show in Filter list to match IP MAC Filter Listing This displays the information about the MAC Filter rules To add a MAC Address filtering entry For example If you want to block the PCs with MAC addresses 00 0A EB 00 07 BE and 00 0A EB 00 07 5F to access the Internet you can configure as follows Presume the rules are both aimed at the interface PVC0 and their indexes are 1 1 and 1 2 Step ...

Page 61: ...h MAC address 00 0A EB 00 07 5F to access the Internet Note After you complete the MAC filter rules for the example the Filter list will show as follows You can enter the IP MAC Filter Set Index to view the information about the rule Other operations for the entries as shown in Figure 4 39 Select the IP MAC Filter Set Index and IP MAC Filter Rule Index to view or modify the entry Select the IP MAC...

Page 62: ...ct the Application Filter for the next configuration Application Filter Activate or deactivate the function ICQ MSN Real Audio Video Select Allow or Deny for these applications If you select Allow the Router will accept the application if you select Deny the Router will forbid the application ...

Page 63: ...r Type Selection Select the URL Filter for the next configuration Active Select Yes to make the rule to take effect URL Index Select the index for the URL Filter entry URL Enter the URL for this URL Filter URL Filter Listing This displays the information about the URL Filter rules Local Start IP Enter starting local IP address to block the URLs Local End IP Enter ending local IP address to block t...

Page 64: ...then click the SAVE to save the entry Other operations for the entries as shown in Figure 4 39 Select the URL Index to view or modify the entry Select the URL Index to locate the specific rule and then click the DELETE button to delete the entry 4 5 3 SNMP Choose Access Management SNMP you can see the SNMP screen The Simple Network Management Protocol SNMP is used for exchanging information betwee...

Page 65: ...e UPnP function Only when the function is activated can the UPnP take effect Auto Configure If you activate the function then the UPnP network devices can automatically configure network addressing announce their presence in the network to other UPnP devices and enable exchange of simple product and service descriptions 4 5 5 DDNS Choose Access Management DDNS you can configure the DDNS function i...

Page 66: ... address here Username Password Type the User Name and Password for your DDNS account Wildcard support Select the option to use Wildcard function 4 5 6 CWMP Choose Access Management CWMP you can configure the CWMP function in the screen shown in Figure 4 46 The router offers CWMP feature The function supports TR 069 protocol which collects information diagnoses the devices and configures the devic...

Page 67: ...ACS server Port Enter the port that connects to the ACS server User Name Password Enter the User Name and Password that provided the ACS server to login the router Periodic Inform Activate or deactivate the function If Activated the information will be informed to ACS server periodically Interval Enter the interval time here 4 6 Maintenance Choose Maintenance you can see the next submenus Figure 4...

Page 68: ...AVE to make the new password take effect 4 6 2 Time Zone Choose Maintenance Time Zone you can configure the system time in shown Figure 4 49 The system time is the time used by the device for scheduling services There are three methods to configure the time You can manually set the time or connect to a NTP Network Time Protocol server If a NTP server is set you will only need to set the time zone ...

Page 69: ...outer connects to the Internet the Router will get the system time automatically from the NTP Server You can also configure the NTP Server address manually and then the Router will get the time from the specific Server firstly 2 PC s Clock Select PC s Clock as the Synchronize time you don t need to set any items Figure 4 50 ...

Page 70: ...ding to the current time Figure 4 51 4 6 3 Firmware Choose Maintenance Firmware you can upgrade the firmware of the Router in the screen shown in Figure 4 52 Make sure the firmware or romfile you want to use is on the local hard drive of the computer Click Browse to find the local hard drive and locate the firmware or romfile to be used for upgrade ...

Page 71: ...router s firmware you may lose its current configurations so please back up the router s current settings before you upgrade its firmware 2 Do not turn off the router or press the Reset button while the firmware is being upgraded 3 The router will reboot after the upgrading has been finished To back up the Router s current settings Step 1 Click the ROMFILE SAVE button shown in Figure 4 52 click Sa...

Page 72: ... to locate the update file for the device or enter the exact path in New Romfile Location field Step 2 Click the UPGRADE button to complete 4 6 4 SysRestart Choose Maintenance SysRestart you can select to restart the device with current settings or restore to factory default settings in the screen shown in Figure 4 55 Figure 4 55 ...

Page 73: ...se Maintenance Diagnostics you can view the test results for the connectivity of the physical layer and protocol layer for both LAN and WAN sides in the screen shown in Figure 4 56 Figure 4 56 Note Select the PVC from Virtual Circuit tab to access the corresponding information ...

Page 74: ...y 3 4 5 cable 100Base TX UTP category 5 Max line length 6 5Km Data Rates Downstream Up to 24Mbps Upstream Up to 3 5Mbps With Annex M enabled WPS WPS button WiFi Wi Fi ON OFF button Reset button Factory default Safety Emission FCC CE Power 12V DC 0 5A System Requirement Internet Explorer 5 20 or later Netscape Navigator 6 0 or later Win 9x ME 2000 XP Vista Windows 7 Wireless Frequency Band 2 4 2 48...

Page 75: ... 8 PER 6M 88dBm 10 PER 1M 90dBm 8 PER Physical and Environment Working Temperature 0 40 Working Humidity 10 90 RH non condensing Storage Temperature 40 70 Storage Humidity 5 90 RH non condensing Appendix C Contact Information Note For any technical help on iBall Baton products please contact support iballbaton com www iBallBaton com ...

Reviews: