iBall Baton iB-WRA150N User Manual Download Page 69

iB-WRA150N

  150M Wireless-N ADSL2+ Router - User Guide
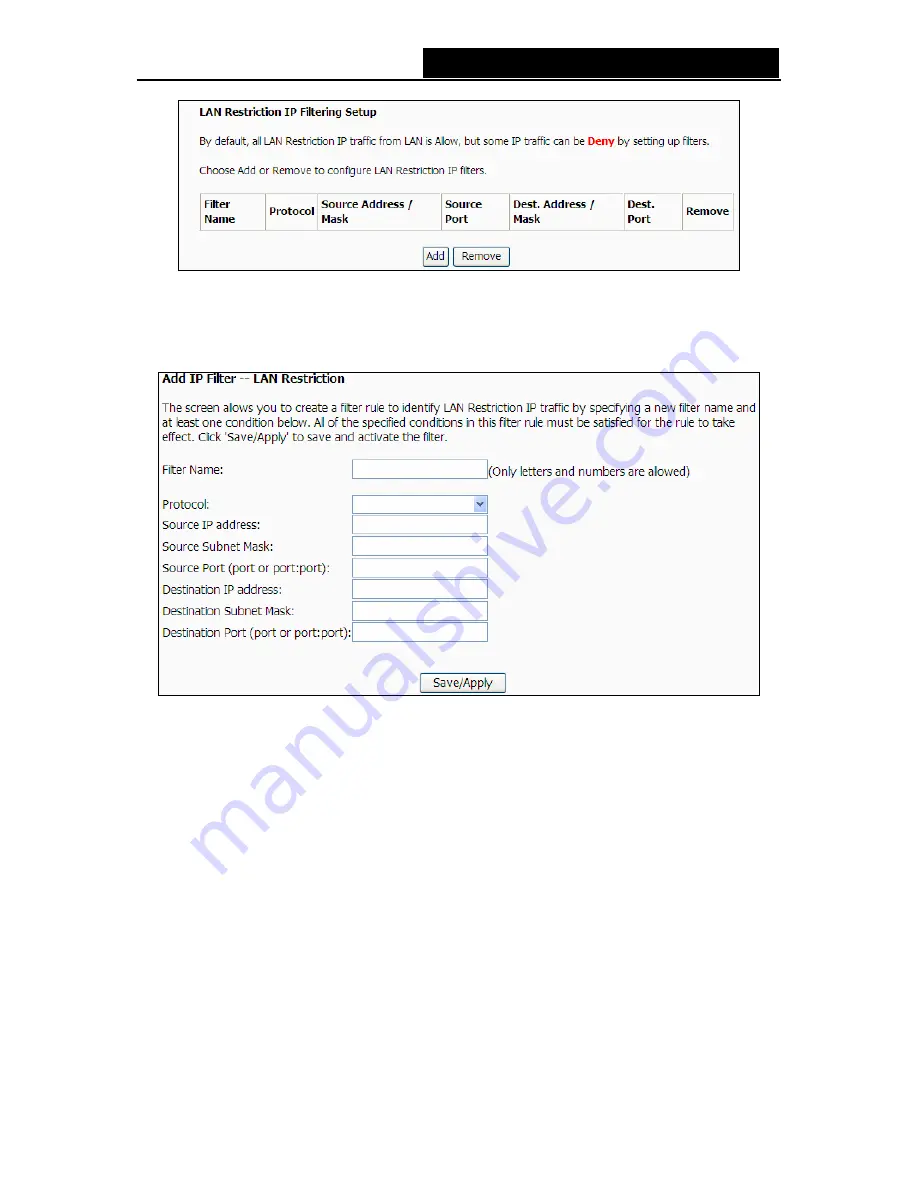


Figure 4-67 

Setup an LAN Restriction rule: 

1. Click 

the 

Add

 button in Figure 4-67, and you will see the next screen as shown in Figure 4-68. 


Figure 4-68 

2.  Enter the Filter name for the rule, it is exclusive and must be filled. 

3.  Select the protocol: TCP/UDP, TCP, UDP or ICMP in the drop-down list for the connection 

between the Source IP address and Destination IP address. 

4.  Enter a Source IP Address in dotted-decimal notation format and then type the Source 

Subnet Mask and Source Port (port or port: port) in the text boxes separately. 

5.  Enter a Destination IP Address in dotted-decimal notation format and then type the 

Destination Subnet Mask and Destination Port (port or port: port) in the text boxes separately. 

6.  Click 

Save/Apply

 to save this entry.


)


Note: 

When you add a LAN Restriction entry, you must configure at least one condition on the 
preceding screen except the Filter name. If you leave the Protocol blank, it means that the rule is 
effective to all protocols, if you leave the Source IP Address and/or Destination IP Address blank, 
it suggests that all Source IP Addresses and/or Destination IP Addresses are controlled by the 
rule, if you leave the Source Port and/or Destination Port blank, it suggests that all Source Ports 
and/or Destination Ports are controlled by the rule. 

64 

Summary of Contents for iB-WRA150N

Page 1: ...150M Wireless N ADSL2 Router Model No iB WRA150N User Manual Ver 1 0 0...

Page 2: ...nce will not occur in a particular installation If this equipment does cause harmful interference to radio or television reception which can be determined by turning the equipment off and on the user...

Page 3: ...xposure compliance requirements this grant is applicable to only Mobile Configurations The antennas used for this transmitter must be installed to provide a separation distance of at least 20 cm from...

Page 4: ...on 8 3 2 Quick Installation Guide 9 Chapter 4 Configuring the Router 14 4 1 Login 14 4 2 Status 14 4 3 Quick Setup 15 4 4 WPS 15 4 5 Network Settings 22 4 5 1 WAN 22 4 5 2 LAN 34 4 5 3 MAC Clone 36 4...

Page 5: ...e Restriction 69 4 9 Diagnostics 70 4 10 System Tools Maintenance 70 4 10 1 Settings 71 4 10 1 1 Backup 71 4 10 1 2 Restore 71 4 10 1 3 Factory Default 72 4 10 2 System Log 72 4 10 3 SNMP Agent 73 4 1...

Page 6: ...N ADSL2 Router including This User Guide Other Helpful Information Note Make sure that the package contains the above items If any of the listed items are damaged or missing please contact with your d...

Page 7: ...performance of this 802 11n wireless Router will give you the unexpected networking experience at speed faster than 802 11g It is also compatible with all IEEE 802 11g and IEEE 802 11b products Multi...

Page 8: ...t Connects Internet on demand and disconnects from the Internet when idle for PPPoE Built in NAT and DHCP server supporting static IP address distributing Supports Stateful Packet Inspection Supports...

Page 9: ...nternet Internet Off There is no successful PPP connection or the Router works on Bridge mode Off The Wireless function is disabled WLAN Flashing The Wireless function is enabled On There is a device...

Page 10: ...Default function on System Tools Maintenance Settings Factory Default page in the router s Web based Utility 2 Use the Factory Default RESET button With the Router powered on use a pin to press and h...

Page 11: ...ower plug and keep your hands dry 1 Locate an optimum location for the Router The best place is usually at the center of your wireless network 2 Adjust the direction of the antenna Normally upright is...

Page 12: ...iB WRA150N 150M Wireless N ADSL2 Router User Guide Figure 2 1 7...

Page 13: ...refer to Appendix B Configuring the PC 2 Configure the network parameters The IP address is 192 168 1 xxx xxx is any number from 2 to 254 Subnet Mask is 255 255 255 0 and Gateway is 192 168 1 1 The Ro...

Page 14: ...s is 192 168 1 1 your PC s IP address must be within the range of 192 168 1 2 192 168 1 254 3 2 Quick Installation Guide With a Web based utility it is easy to configure and manage the 150M Wireless N...

Page 15: ...eb browser has been set to a proxy Go to Tools menu Internet Options Connections LAN Settings in the screen that appears cancel the Using Proxy checkbox and click OK to finish it 2 After your successf...

Page 16: ...ess N ADSL2 Router User Guide Figure 3 6 4 The Connection Type page will display Here we select PPPoE WAN Link Type for example Figure 3 7 5 Enter the Username and Password given by your ISP and click...

Page 17: ...50M Wireless N ADSL2 Router User Guide Figure 3 8 6 The following page will display Keep the default settings and click Next to continue Figure 3 9 7 The Wireless Setup page will display Click Next to...

Page 18: ...hese settings Figure 3 11 9 Now your ADSL Modem Router has been configured and is rebooting Please do not power off the Router while it s rebooting After successfully rebooting the Router will return...

Page 19: ...e Status menu there are six submenus under the main menu Summary WAN Statistics Route ARP and DHCP This Device Info section mainly introduces the elementary information about the Router and its curren...

Page 20: ...up Please refer to Section 3 2 Quick Installation Guide 4 4 WPS This section will guide you add a new wireless device to an existing network quickly by WPS function a Choose menu WPS you will see the...

Page 21: ...ion PBC method or PIN method Note To build a successful connection by WPS you should also do the corresponding configuration of the new device for WPS function meanwhile For the configuration of the n...

Page 22: ...WPS button on the front panel of the Router Step 2 For the configuration of the wireless adapter please choose Push the button on my access point in the configuration utility of the WPS as below and c...

Page 23: ...ton in Figure 4 2 then the following screen will appear Figure 4 6 Add A New Device Step 2 Choose Press the button of the new device in two minutes and click Connect Step 3 For the configuration of th...

Page 24: ...wing two methods Enter a PIN into your AP device Method I Enter the PIN from your AP device Method II 4 2 1 Enter a PIN into your Router device Method I a Double click the icon on the desktop to open...

Page 25: ...he Router and click WPS link on the left of the main menu Write down the Current PIN code of the router b Double click the icon on the desktop to open the WPS Utility and then you can see the welcome...

Page 26: ...r Note The default PIN code of the Router can be found in its label or the WPS configuration screen as Figure 4 2 You will see the following screen when the new device successfully connected to the ne...

Page 27: ...4 7 Figure 4 7 4 5 1 WAN Choose Network Settings WAN and you will see the page of Wide Area Network WAN Setup as shown Figure 4 8 Figure 4 8 There are four PVC links in the WAN setup page Click the A...

Page 28: ...Figure 4 10 Figure 4 10 After choosing the proper protocol enter the correct parameters supported by your ISP Enable the configurations and then you will go to the Internet Note The type of network pr...

Page 29: ...ou change the default value unless required by your ISP The value should be between 512 and 1492 Enable Fullcone NAT Check this box to enable the Fullcone NAT function The default value is disabled Di...

Page 30: ...le PPP Debug Mode Check this box to enable the debug mode The default value is disabled Click Next button in Figure 4 11 and then you will see Figure 4 12 Check or uncheck the Enable WAN Service box a...

Page 31: ...P Password Enter your password for your PPPoE connection PPPoE Service Name Enter a name for the PPPoE connection for recognition Authentication Method Choose a method of authentication AUTO PAP CHAP...

Page 32: ...nd the NAT and Firewall will be disabled Use Static IP Address Check this box to use the static IP address to dial The default value is disabled Enable PPP Debug Mode Check this box to enable the debu...

Page 33: ...y This radio button is checked by default You can obtain the IP address automatically Use the following IP address and gateway Check this radio button to enter the information provided by your ISP to...

Page 34: ...l affect the whole system Configuring them with static values will disable the automatic assignment from DHCP or other WAN connection 3 If you configure static default gateway over this PVC in MER mod...

Page 35: ...P Figure 4 20 WAN IP Address Enter the IP Address provided by your ISP WAN Subnet Mask Enter the subnet mask provide by your ISP Use the following default gateway Check this radio button then you can...

Page 36: ...default gateway or the DNS will affect the whole system Configuring them with static values will disable the automatic assignment from other WAN connection Click Next in Figure 4 20 and then you will...

Page 37: ...N ADSL2 Router User Guide Figure 4 22 Bridging If you select the Bridging protocol you will see the Figure 4 23 Click the Next button Figure 4 23 Then you will see the Figure 4 24 Click Save to compl...

Page 38: ...e After completing any setup the new setup must be saved and the Router must be restarted for the configuration to go into effect Please click the Save Reboot button to restart as shown in Figure 4 25...

Page 39: ...1 1 Subnet Mask An address code that determines the size of the network Normally use 255 255 255 0 as the subnet mask Note 1 If you change the IP Address of LAN you must use the new IP Address to log...

Page 40: ...ic IP address Enter the amount of time in hours and the user will be leased this dynamic IP address After the time is up the user will be automatically assigned a new dynamic IP address The default va...

Page 41: ...ation screen and see the new entry as shown in Figure 4 27 6 Click Save Reboot button to save the settings and reboot the Router Note The function won t take effect until the router reboots 4 5 3 MAC...

Page 42: ...Note 1 Only the PC on your LAN can use the MAC Address Clone function 2 Your configuration won t take effect unless the ADSL Router is rebooted 3 MAC Clone can t be used with port mirror If they are...

Page 43: ...e default channel is set to Auto so the AP will choose the best channel automatically It is not necessary to change the wireless channel unless you notice interference problems with another nearby acc...

Page 44: ...d all of 802 11b 802 11g and 802 11n wireless stations can connect to the Router Channel width Select any channel width from the pull down list The default setting is automatic which can adjust the ch...

Page 45: ...the same as your AP s security type WEP Index This option should be chosen if the key type is WEP ASCII or WEP HEX It indicates the index of the WEP key Auth Type This option should be chosen if the...

Page 46: ...do not want to use wireless security select this check box but it s strongly recommended to choose one of the following modes to enable security WEP It is based on the IEEE 802 11 standard If you sel...

Page 47: ...28 bit You can enter 26 hexadecimal digits any combination of 0 9 a f A F zero key is not promoted or 13 ASCII characters 152 bit You can enter 32 hexadecimal digits any combination of 0 9 a f A F zer...

Page 48: ...tication Type you can select either Automatic or TKIP or AES as Encryption Note If you check the WPA PSK WPA2 PSK radio button and choose TKIP encryption you will find a notice in red as shown in Figu...

Page 49: ...button The Add or Modify Wireless MAC Address Filtering entry page will appear shown in Figure 4 36 Figure 4 36 Add or Modify Wireless MAC Address Filtering entry To add or modify a MAC Address Filter...

Page 50: ...0 07 8A and the wireless station B with MAC address 00 0A EB 00 23 11 are able to access the Router but all the other wireless stations cannot access the Router you can configure the Wireless MAC Addr...

Page 51: ...eshold This value specifies the maximum size for a packet before data is fragmented into multiple packets If you experience a high packet error rate you may slightly increase the Fragmentation Thresho...

Page 52: ...t by the station You cannot change any of the values on this page To update this page and to show the current connected wireless stations click on the Refresh button If the numbers of connected wirele...

Page 53: ...service port will be redirected to the computer specified by the server IP Any PC that was used for a virtual server must have a static or reserved IP Address because its IP Address may change when u...

Page 54: ...reen as shown in Figure 4 42 Figure 4 42 2 Select the service which you want to use from the drop down list If the list does not have the service you need type the name of the custom service in the te...

Page 55: ...the LAN side using the open ports A maximum 32 entries can be configured Figure 4 43 Port Triggering Table The table indicates the information about the Port Triggering entries Application Name This i...

Page 56: ...the External Port Start External Port End Internal Port Start Internal Port End and the Protocol will be added in the table automatically 4 7 1 3 DMZ Host Choose Advanced Setup NAT DMZ Host you can se...

Page 57: ...r priority such as voice data packets give higher priority than Web data packets This option will provide better service of selected network traffic over various technologies Figure 4 46 Select the En...

Page 58: ...you will see you settings as shown in Figure 4 47 Note 1 Lower integer values for precedence imply higher priority for this queue relative to others 2 The queue entry configured here will be used by...

Page 59: ...re the QoS on the next screen 4 7 3 Routing Choose Advanced Setup Routing menu you can see two submenus under the Routing menu as shown in Figure 4 50 Figure 4 50 4 7 3 1 Default Gateway Choose Routin...

Page 60: ...gure 4 52 A static route is a pre determined path that network information must travel to reach a specific host or network Figure 4 52 To add a new entry follow the steps below 1 Click the Add button...

Page 61: ...er and Dynamic DNS submenus Figure 4 54 4 7 4 1 DNS Server Choose Advanced Setup DNS DNS Server and you can see the DNS Server Configuration screen Deselect the checkbox before Auto DNS Server and the...

Page 62: ...wing your Router to be more easily accessed from various locations on the Internet Figure 4 56 To add a DDNS entry 1 Click the Add button pop up Figure 4 56 and then you will set the DDNS in the next...

Page 63: ...make some advanced settings click Advanced Settings button in Figure 4 58 to go to the DSL Advanced Settings page as shown in Figure 4 59 Figure 4 59 If you want to select the tone click the Tone Sel...

Page 64: ...se Advanced Setup Virtual Ports Port Mapping menu you can view and configure the parameters in the screen as shown in Figure 4 61 Port Mapping supports multiple ports to PVC and bridging groups Each g...

Page 65: ...the ports The group name must be unique The max length is 15 Click Save Apply button to make the changes effective immediately Note Group name only can be a number or letter 0 A Z or a z 4 7 7 IPSec C...

Page 66: ...use other VPN Routers to set VPN tunnels with iB WRA150NiB WRA150N supports up to 10 VPN tunnels simultaneously Click Add New Connection in Figure 4 63 and then you will enter the screen shown in Figu...

Page 67: ...Method Select Pre Shared Key recommended or Certificate X 509 Pre Shared Key Input the Pre Shared key for Authentication For example Input 12345678 Perfect Forward Secrecy PFS is an additional securi...

Page 68: ...r Router There are two submenus under the Security menu as shown in Figure 4 65 Figure 4 65 4 8 1 IP Filtering There are two submenus under IP Filtering Figure 4 66 The IP address filtering feature ma...

Page 69: ...es separately 5 Enter a Destination IP Address in dotted decimal notation format and then type the Destination Subnet Mask and Destination Port port or port port in the text boxes separately 6 Click S...

Page 70: ...firewall is enabled However some IP traffic can be ACCEPTED by setting up filters Figure 4 69 Setup a WAN Restriction rule 1 Click the Add button in Figure 4 69 and then you will see Figure 4 70 Figur...

Page 71: ...ing rules based on Domain to control the computers in the LAN to access the specified port Figure 4 71 Domain Filtering Global Policy The default setting is Allow Allow means that all MAC layer frames...

Page 72: ...tings Application Filtering menu you can select the desired application to filter Figure 4 74 Select the desired application and click Save Apply to make the setting effective 4 8 4 MAC Filtering Choo...

Page 73: ...e Change Policy button to go to the Change MAC Filtering Global Policy page as shown in Figure 4 76 Figure 4 76 To add a new entry follow the steps below 1 Click the Add button in Figure 4 75 to go to...

Page 74: ...gure 4 79 2 Create a User Name for your child for example child_1 3 If you want to restrict the Browser s surfing time check the Browser s MAC Address radio button If you want to restrict other user s...

Page 75: ...m will test your DSL connection Then you will see the test results for the connectivity to your local network and your DSL service provider similar to the following page Figure 4 80 4 10 System Tools...

Page 76: ...ings Backup menu and you can save the current configuration of the Router as a backup file in Figure 4 83 Click Backup Settings button to save your current configuration Figure 4 83 4 10 1 2 Restore C...

Page 77: ...ory Default button to begin restoring Figure 4 85 4 10 2 System Log Choose System Tools Maintenance System Log menu and you can view and configure the logs of the Router in Figure 4 86 Figure 4 86 Cli...

Page 78: ...he selected mode is Local or Both events will be recorded in the local memory 4 10 3 SNMP Agent Choose System Tools Maintenance SNMP Agent menu and you will go to the SNMP Simple Network Management Pr...

Page 79: ...he Password information from your ISP Note If you want to log on the ACS you must own the ACS User Name and ACS Password Connection Request User Name Type the Connection Request User Name set it yours...

Page 80: ...time with Internet time severs Figure 4 92 Automatically synchronize with Internet time servers Select the checkbox to make your router synchronize its time with Internet time severs First Second NTP...

Page 81: ...e Access Control Remote Management menu and can view and configure the IP address access control in the screen as shown in Figure 4 95 If enabled only PCs with IP addresses listed are allowed to acces...

Page 82: ...e Access Control page in the screen as shown in Figure 4 97 2 Enter the IP address e g 192 168 1 23 you want to add in the IP Address filed 3 Click Save Apply to save your configuration Figure 4 97 4...

Page 83: ...p the Router up to date Figure 4 99 Browse Click the button to locate the latest software for the device Firmware Upgrade After you have selected the latest software click the button To update the Rou...

Page 84: ...onfiguration settings of the Router 3 Do not turn off the Router or press the Reset button while the software is being updated 4 The Router will reboot after the Upgrading is finished 4 10 8 Save Rest...

Page 85: ...he detailed steps please refer to section 4 5 1 4 If your ADSL lease is in pay according time mode select Dial on Demand for Internet connection mode Note If you are a Cable user please configure the...

Page 86: ...apter s manual if necessary 1 Configure TCP IP component 1 On the Windows taskbar click the Start button and then click Control Panel 2 Click the Network and Internet Connections icon and then click o...

Page 87: ...ows 98 OS or before the PC and Router may need to be restarted Setting IP address manually 1 Select Use the following IP address radio button And the following items available 2 If the Router s LAN IP...

Page 88: ...iB WRA150N 150M Wireless N ADSL2 Router User Guide Figure 0 4 Now Click OK to keep your settings 83...

Page 89: ...cable maximum 100m EIA TIA 568 100 STP maximum 100m 1 2 3 4 LAN WLAN ADSL LED Power Internet WPS Safety Emissions FCC CE Wireless Frequency Band 2 4 2 4835GHz Radio Data Rate 11n up to 150Mbps Automat...

Page 90: ...dent IEEE 802 11 wireless LAN Ad hoc wireless computers operate on a peer to peer basis communicating directly with each other without the use of an access point Ad hoc mode is also referred to as an...

Page 91: ...and operating in the unlicensed radio spectrum at 2 4GHz and backward compatibility with IEEE 8021b devices and WEP encryption for security Infrastructure Network An infrastructure network is a group...

Page 92: ...on the same system or they may be on different systems with a network connecting them By using RPC programmers of distributed applications avoid the details of the interface with the network The tran...

Page 93: ...a large geographical area Web based Utility The web page that allows you to manage the Router WEP Wired Equivalent Privacy A data privacy mechanism based on a 64 bit or 128 bit or 152 bit shared key...

Reviews: