iBaby Monitor User Manual
15
Figure 12
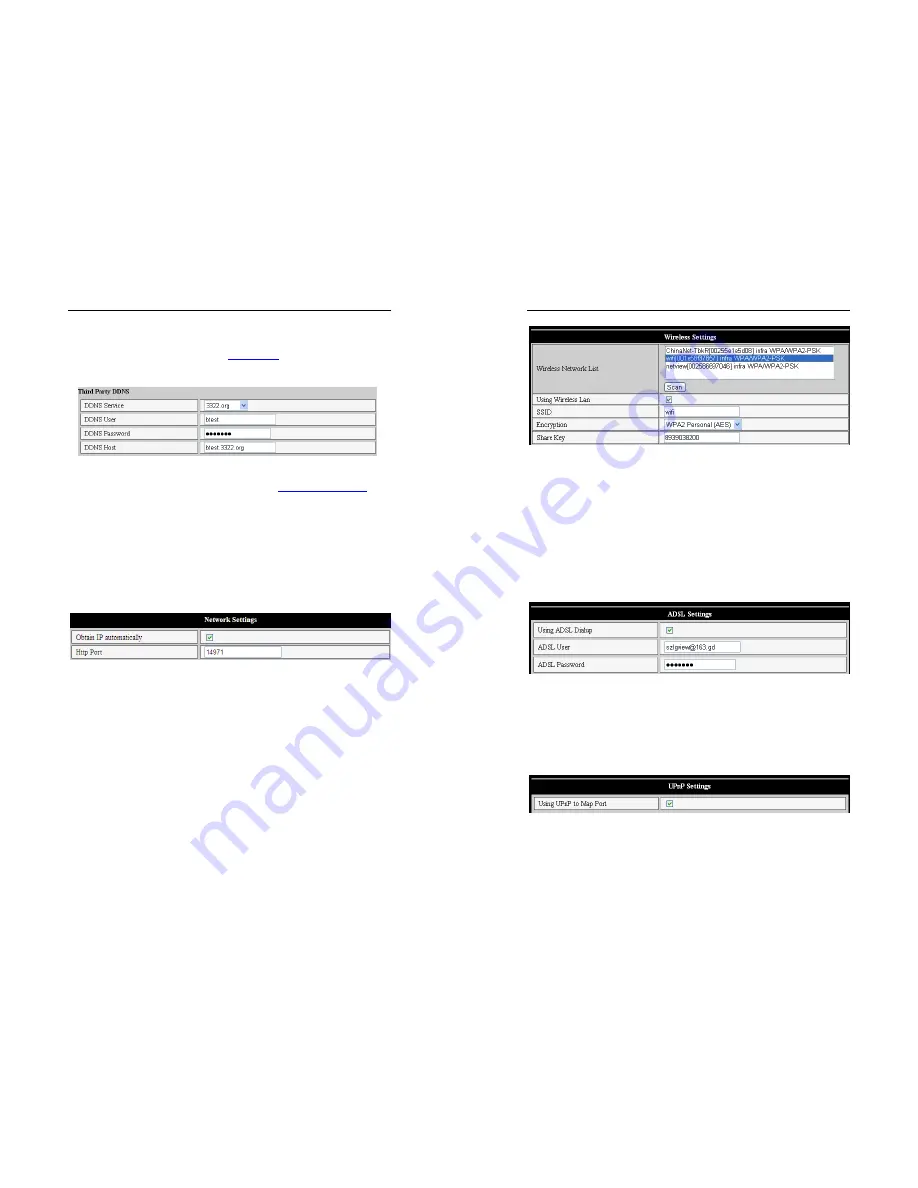
4.3.2 Third Party DDNS
User can also use third part DDNS, such as
www.3322.org
. User must apply a free
domain name from this website and fill the info into the below blanks (Figure 13) and
save the settings. Then the domain name can be used.
Figure 13
Note:
Using the third party domain name, if the http port is not 80, the port number should
be adding to the domain name with colon. Example:
http://btest.3322.org:81
.
While manufacturer DDNS is no need to add PORT.
5 Other Settings
5.1 Network Setting
5.1.1 Basic Network Setting
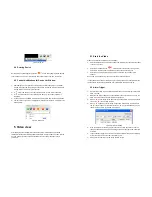
The user can also enter the Basic Network Settings to set the IP address except using
the search software. See below Figure 14.
Figure 14
5.1.2 WIFI Setting
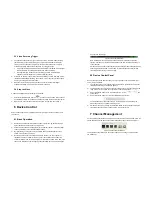
If the device is with WIFI, enter the Wireless LAN Setting, just as below Figure 15 shown,
click the “Scan” button, it will show you all the wireless networks detected in the Wireless
Network List column. Select one of them and tick “Using Wireless Lan”, then the relevant
data of the selected wireless network will be shown in the following blanks. Put in the
password and click “Set”, then the WIFI setting is finished.
iBaby Monitor User Manual
16
Figure 15
Note1: When the device is connected both WIFI and wired, it will firstly connect to the
wired network, if it can’t connect to it, then it will change to connect to the wifi. The
IP address and port is the same, either wireless or wired network.
Note2: Before you do the configuration of wireless as shown above; please make sure
the device is connected to the network via network cable. After settings succeed,
please reboot the device and wireless function takes effect.
5.1.3 ADSL Setting
User could enable the ADSL Dialup according to the below Figure 16 (The ADSL
provider will assign the user name and password to you when you apply for ADSL
service.) Connect the device directly to the ADSL modem and it is connected to the
Internet.
Figure 16
5.1.4 UPnP Setting
If you enable UPNP, once the IP camera is connected into the LAN, it will communicate
with the router in the LAN to do the port-forwarding automatically.
Below Figure 17
, tick “Using UPNP to Map Port” and the setting are completed. You
could check the UPNP succeeds or not in the interface of System Maintenance.
Figure 17
Before using UPNP function, please make sure the router’s UPNP function has been
triggered. Not all the routers support UPNP perfectly. Please test if the router works well


