background image


Manual 

ibaMS16xDO-2A


24 

Issue 1.3 


9.3 

Update 

An update can be installed in two different ways. 

  Web interface (only with ibaPADU-S-IT-2x16) 

  ibaPDA  

No matter which of the both ways you choose to install an update: the progress of the 

update is shown by the LEDs L5 … L8. Beginning with L5, the LEDs are flashing one 

after another, at first in orange and then in green and at a slower rate. When the update 

is finished, the device will be rebooted. 


9.3.1 

Update via Web interface 


Important note 

The Web interface is available only with the central unit ibaPADU-S-IT-2x16. 


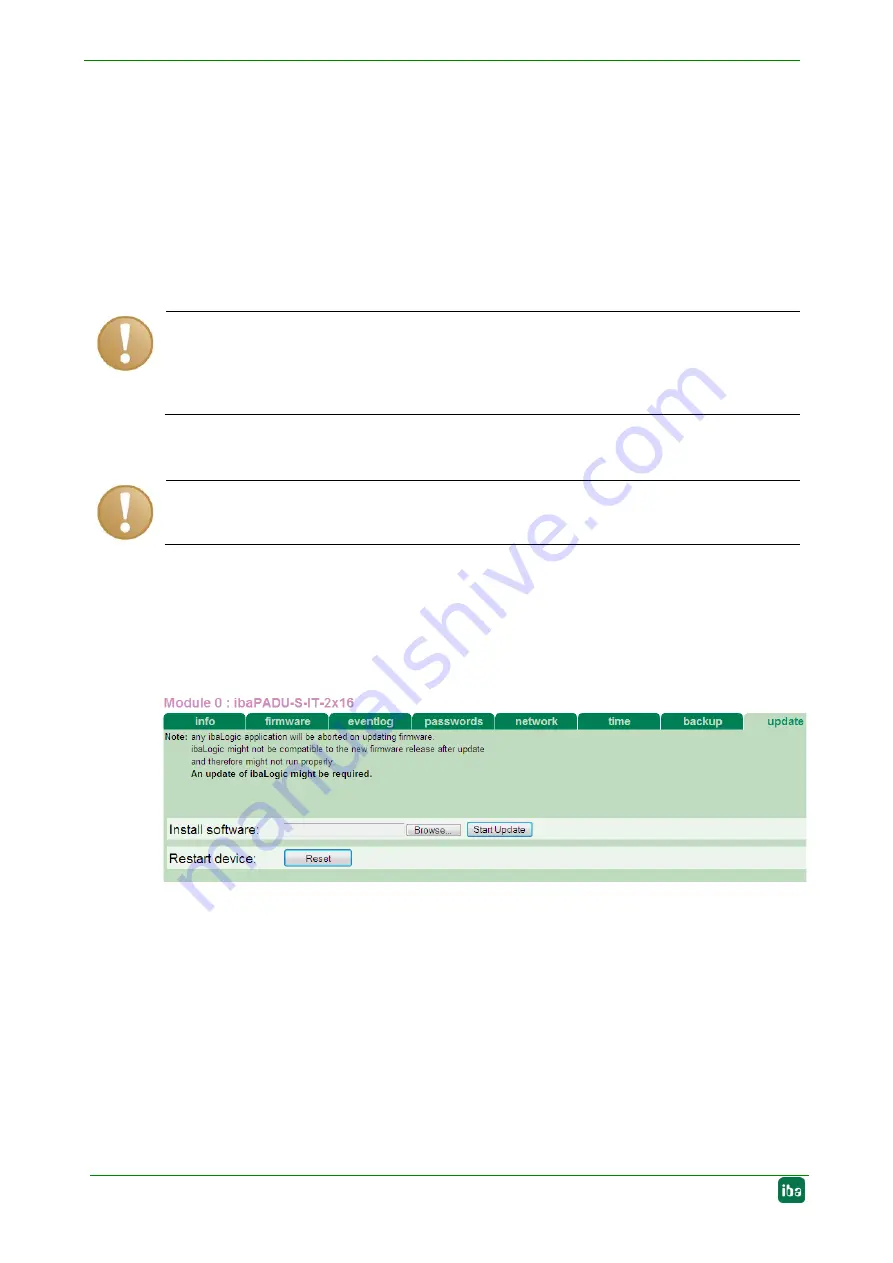
  Start the Website of the iba-modular system in your browser and select the central 

unit.  

  On the “update“ tab, click on the <Browse…> button and choose the  

<padusit2x16_ v[xx.yy.zzz].iba> update file.  

  By clicking on <Start Update>, you start the update.  


Figure 9: Update via the Webinterface 

9.3.2 

Update via ibaPDA 

  Open the ibaPDA I/O Manager and choose your iba-modular system in the tree 

structure. 

  On the “Diagnostics“ tab, click on the <Write firmware> button and choose the 

„padusit2x16_v[xx.yy.zzz].iba“ or „paduscm_v[xx.yy.zzz].iba“ update file.  

  You start the update by clicking on <OK>. 


Important note 

When updating the iba-modular system, a possible autostart of the ibaLogic PMAC is 

deactivated and the existing ibaLogic-V5 application deleted. Furthermore, an update 

of the ibaLogic-V5 software (ibaLogic Clients) might be necessary. 

Summary of Contents for ibaMS16xDO-2A

Page 1: ...ibaMS16xDO 2A Output module for digital signals Manual Issue 1 3 ...

Page 2: ...d registered trademark of the Microsoft Corporation Other product and company names mentioned in this manual can be labels or registered trademarks of the corre sponding owners Certification The product is certified according to the European standards and directives This product meets the general safety and health requirements Further international customary standards and directives have been obse...

Page 3: ... 3 Digital outputs 14 7 3 1 Connection diagram Pin assignment 14 7 3 2 Circuit design 15 7 3 3 Output channel as P switch 16 7 3 4 Output channel as N switch 16 7 3 5 Output channel with external diodes 17 7 4 Connectors 18 7 4 1 Grounding screw X29 18 8 Protective and monitoring functions 19 8 1 Physical protective functions of the hardware 19 8 1 1 Shorted load protection 19 8 1 2 Over temperatu...

Page 4: ...aPDA 24 9 4 Module Information Diagnostics 25 9 4 1 Diagnostics in ibaPDA 25 9 4 2 Web interface 25 10 iba applications 27 10 1 Configuration in ibaPDA 27 10 1 1 General settings 27 10 1 2 Output configuration 29 10 1 3 Reset channel errors 29 10 1 4 Diagnostics channels 31 10 2 Configuration in ibaLogic V5 32 11 Technical Data 35 11 1 Main Data 35 11 2 Digital outputs 36 11 3 Dimensions 37 12 Sup...

Page 5: ...iba Software Man uals The documentation of the iba modular system comprises the following manuals Central units The manuals of the central units e g ibaPADU S IT 2x16 or ibaPADU S CM con tain the following information Scope of delivery System requirements Description of the device Mounting Demounting Start up Configuration Technical data Accessories Modules The manuals for the single modules conta...

Page 6: ...ssible consequences and risks on the basis of his her specialist training knowledge and experience and knowledge of the standard regulations 1 2 Notations In this manual the following notations are used Action Notations Menu command Menu Logic diagram Call of menu command Step 1 Step 2 Step 3 Step x Example Select menu Logic diagram Add New logic diagram Keys Key name Example Alt F1 Press keys sim...

Page 7: ...cess and the system or machine to be controlled there is a risk of death or severe injury The non observance of this safety information may result in a potential risk of death or severe injury The non observance of this safety information may result in a potential risk of injury or material damage Note A note specifies special requirements or actions to be observed Important note Note if some spec...

Page 8: ...tages 0 V up to 55 V Switching currents up to 2 A Short switch proof Automatic disconnection at 2 3 A continuous current Rugged design easy mounting The device driver and the firmware are stored on the module When switching on and booting the central unit the module is identified automatically and the drivers are loaded Monitoring functions The device offers several self protection and monitoring ...

Page 9: ...utput channels with SELV Safety Extra Low Voltage Electric shock The device is only designed for electrical measuring voltages as shown in the Technical Data Do not use any damaged measuring cables You must not attach or detach measuring cables to the device that is under voltage Modules must NOT be attached or detached to from the rack under voltage Switch off the central unit or disconnect power...

Page 10: ...nt one or more modules on the right next to the central unit slots X2 to X5 can be freely selected 6 1 Mounting 1 Disconnect the central unit from the power supply 2 Remove the cover from the backplane bus to which the module is to be attached 3 Attach the module to the backplane bus and press it firmly against the backplane 4 Screw the module on the top and on the bottom on the backplane by means...

Page 11: ...ected connect the central unit to the power supply 3 Switch on the voltage supply of the central unit 6 3 Dismounting 1 Disconnect the central unit from the power supply 2 Remove all cables 3 Remove the fixing screws on the top and the bottom by means of which the module is fixed on the backplane unit 4 Pull the device straight from the backplane 5 Put a cover on the free backplane bus ...

Page 12: ...Device views 1 2 3 4 5 Fixing screws Operating status indicators L1 L4 Status LEDs L10 L25 for the digital outputs 00 15 Connector X5 for digital outputs 00 07 Connector X6 for digital outputs 08 15 Figure 1 Front view 6 Grounding screw X29 Figure 2 Bottom view ...

Page 13: ... not working switched off L2 yellow On Access to the backplane bus L3 white L4 red Off On Normal status no faults Disorder Fault Important note When LED L4 indicates a failure please contact the iba support 7 2 2 Status of digital outputs L10 L25 LED Status Description L10 L25 Off Channel is open Green Channel is closed Red Failure Channel is switched off automatically If an output is deactivated ...

Page 14: ...e 1 3 7 3 Digital outputs 7 3 1 Connection diagram Pin assignment 16 output signals 0 15 each bipolar and electrically isolated can be connected Each channel is connected by means of two wire connection Figure 3 Connection diagram ...

Page 15: ...15 L25 16 Digital output 07 16 Digital output 15 7 3 2 Circuit design Important note Please consider for all applications that the load switch can only work with the correct polarity If polarity is wrong the load switch is permanent conductive and all the self protective functions that can only be effective when the load switch is switched off be come ineffective Note Please do not connect 2 chann...

Page 16: ...xt by means of the controllable switch load switch in the output channel In the figure below you can see this typical circuit Figure 4 Output channel as P switch 7 3 4 Output channel as N switch The circuit can also be realized as N switch negative voltage Figure 5 Output channel as N switch Compared to the use as positive switch no particularities have to be observed in opera tion ...

Page 17: ...1 3 17 7 3 5 Output channel with external diodes For load circuits with P switch Figure 6 Output channel with external diodes and P switch For load circuits with N switch Figure 7 Output channel with external diodes and N switch ...

Page 18: ...nnection of cable shielding to the device should be ensured The shield con nector M6 screw found on the bottom of the device should be connected with any total shield that serves for all sensor cables Use a M6 cable lug for the connection Important note Connect shield on one cable side only to avoid ground loops Always ground the DIN rail on which the device is installed ...

Page 19: ...for a better dif ferentiation from the internal short switching of the load switch shorted switch 8 1 2 Over temperature protection Each channel switches off individually in case the load switch IC exceeds a certain max imum junction temperature TLS This can be caused by Continuous currents that are too high Periodical switch loads that are too high load voltages and or switching frequen cies Ambi...

Page 20: ...orary transient overvoltages of the channel compared to all other potentials are buffered up to 2 5 kV by isolation 8 1 7 Reverse current and polarity reversal protection If a load generates itself a positive voltage above Uext or is connected to a higher poten tial than is applied to the channel the load switch will be operated inverse current flow in reverse direction compared to normal operatio...

Page 21: ...disconnection in case of an error can be configured in ibaPDA 8 2 1 Shorted switch In case a current flows although the channel is not connected logically this error is indi cated Status signals Possible cause DO_Err_CurrentWhileOff_Ch 00 15 In this case you can suppose a hardware problem of the channel 8 2 2 Broken line As soon as a current is higher than 100 mA it is identified If the channel is...

Page 22: ...ches off internally The magnitude of the current depends on the number of impulses and the energy over time Protection type Description Continuous over current protection Channel inactive at out I min 2 0 typ 2 3 max 2 7A Impulse overcur rent protection Channel inactive at OC out t I z B OC out t I 3Ax80ms 5Ax33ms 10Ax15ms 20Ax7ms 35Ax4ms tolerance 20 OC t response time of the overcurrent protecti...

Page 23: ...sion of the central unit the central unit does an automatic up or downgrade of the module Thereafter the module is ready to be used Important note The overall release version contains all modules developed up to the date of release of this firmware and the corresponding software versions If a module cannot be de tected yet i e it is more recent than the firmware version of the CPU this module is i...

Page 24: ... iba modular system in your browser and select the central unit On the update tab click on the Browse button and choose the padusit2x16_ v xx yy zzz iba update file By clicking on Start Update you start the update Figure 9 Update via the Webinterface 9 3 2 Update via ibaPDA Open the ibaPDA I O Manager and choose your iba modular system in the tree structure On the Diagnostics tab click on the Writ...

Page 25: ...a modular system like hardware version firmware ver sion FPGA version and serial number is displayed in the Diagnostics tab Open the ibaPDA I O Manager and choose your iba modular system in the tree structure see also the figure above 9 4 2 Web interface On the module Website general information about the module is only displayed You cannot change the values ...

Page 26: ...al information and technical specifications of the I O module Figure 11 info tab 9 4 2 2 notes tab On the notes tab you can enter notes e g for notes on wiring or the recording of changes By clicking on save notes the notes are permanently stored on the device Figure 12 notes tab ...

Page 27: ...utomatic detection of the module Note The automatic detection requires a bidirectional FO connection from the ibaPDA com puter to the central unit Other documentation If you want to install the iba modular system at first refer to the manual of the central unit chapter Configuration with ibaPDA 10 1 1 General settings If the module is detected click on the module in the signal tree and the General...

Page 28: ...not modify the configuration of the modules and signals In this case the configuration is set by the embedded application The following entries can be displayed ibaPDA When ibaPDA is displayed an embedded application has not been started and the configuration can be set by ibaPDA Embedded application When embedded application is displayed the configuration of the modules and signals is set by the ...

Page 29: ... can specify a signal using the expression builder Signals can be linked mathematically or logically Channel off on broken line If this option is active the channel will be switched off in case of a broken line error Channel off on shorted switch If this option is active the channel will be switched off in case of a shorted switch error Active Enabling disabling the signal 10 1 3 Reset channel err...

Page 30: ...er a name for the signal and two additional comments click on the icon in the Name field Expression Using the expression builder you can specify an output signal in order to reset a hardware error Manual reset Button to manually reset the hardware error Active Enabling disabling the signal ...

Page 31: ... comments click on the icon in the Name field Channel 0 15 active Output signal is ready Channel 0 15 error state Group error of the channel Channel 0 15 overcurrent error Channel is in error status due to overcurrent Channel 0 15 over temperature error Channel is in error status due to over temperature Channel 0 15 broken line error Channel is in error status due to broken line Channel 0 15 short...

Page 32: ...arate ibaPADU S IT 2x16 manual This manual describes only the signals belonging to this module The signals can be configured in the I O Configurator of ibaLogic V5 Open the I O Con figurator in the Configuraton I O Configurator menu When you click on the Update Hardware button then ibaLogic detects the module ibaMS16xDO 2A offers the following signal groups 1 Outputs 2 Inputs The digital output ch...

Page 33: ...ibaMS16xDO 2A Manual Issue 1 3 33 All available status or failure information is listed under Inputs Figure 19 ibaMS16xDO 2A inputs ...

Page 34: ...rror Broken line Statusbit see chapter 8 2 DO_Err_CurrentWhileOff_Ch 00 15 Error signal single error Shorted switch Statusbit see chapter 8 2 StatusIn Status information about the plugged input module for output module without function 0 module not initialized 1 module is running 1 error e g module cannot be initialized StatusOut Status information about the plugged output module for input module ...

Page 35: ...l outputs Fault indication Broken line shorted circuit over temperature overcur rent Operating and environmental conditions Temperature ranges Operation Storage transport 32 F 122 F 0 C 50 C 13 F 158 F 25 C 70 C Installation position Vertical plugged on backplane bus Cooling Passive Humidity class acc to DIN 40040 F no condensation Protection class IP20 Certification Standards EMC IEC 61326 1 Safe...

Page 36: ...on 25 A peak Reverse voltage limitation appr 1 V Overvoltage limitation 60 V Overtemperature protection from 150 C 1 deviating switching frequency with ibaLogic up to 1 kHz and ibaPDA up to 20 Hz Supplier s Declaration of Conformity 47 CFR 2 1077 Compliance Information Unique Identifier 10 124250 ibaMS16xDO 2A Responsible Party U S Contact Information iba America LLC 370 Winkler Drive Suite C Alph...

Page 37: ...rent protec tion min 2 0 typ 2 3 max 2 7A Surge current protection Channel inactive at an impulse of appr 3 A x 80 ms 5 A x 33 ms 10 A x 15 ms 20 A x 7 ms Fire protection 4 A lead fuse 11 3 Dimensions Dimensions in mm Figure 20 Dimensions of the module ...

Page 38: ... product Contact Headquarters iba AG Koenigswarterstrasse 44 D 90762 Fuerth Germany Phone 49 911 97282 0 Fax 49 911 97282 33 E mail iba iba ag com Mailing address iba AG Postbox 1828 D 90708 Fuerth Germany Delivery address iba AG Gebhardtstrasse 10 DE 90762 Fuerth Germany Regional and Worldwide For contact data of your regional iba office or representative please refer to our web site www iba ag c...

Reviews: