Veo16p
QUICK START GUIDE
i3 INTERNATIONAL INC.
1.866.840.0004
www.i3international.com
U.S.A 4450 Witmer Industrial Estates Unit 4
Niagara Falls, NY 14305
Canada 780 Birchmount Road, Unit 16,
Scarborough, ON, M1K 5H4
i3-TRNG-DVR-
Veo16p-QSG
.indd
RECORDING SETTINGS
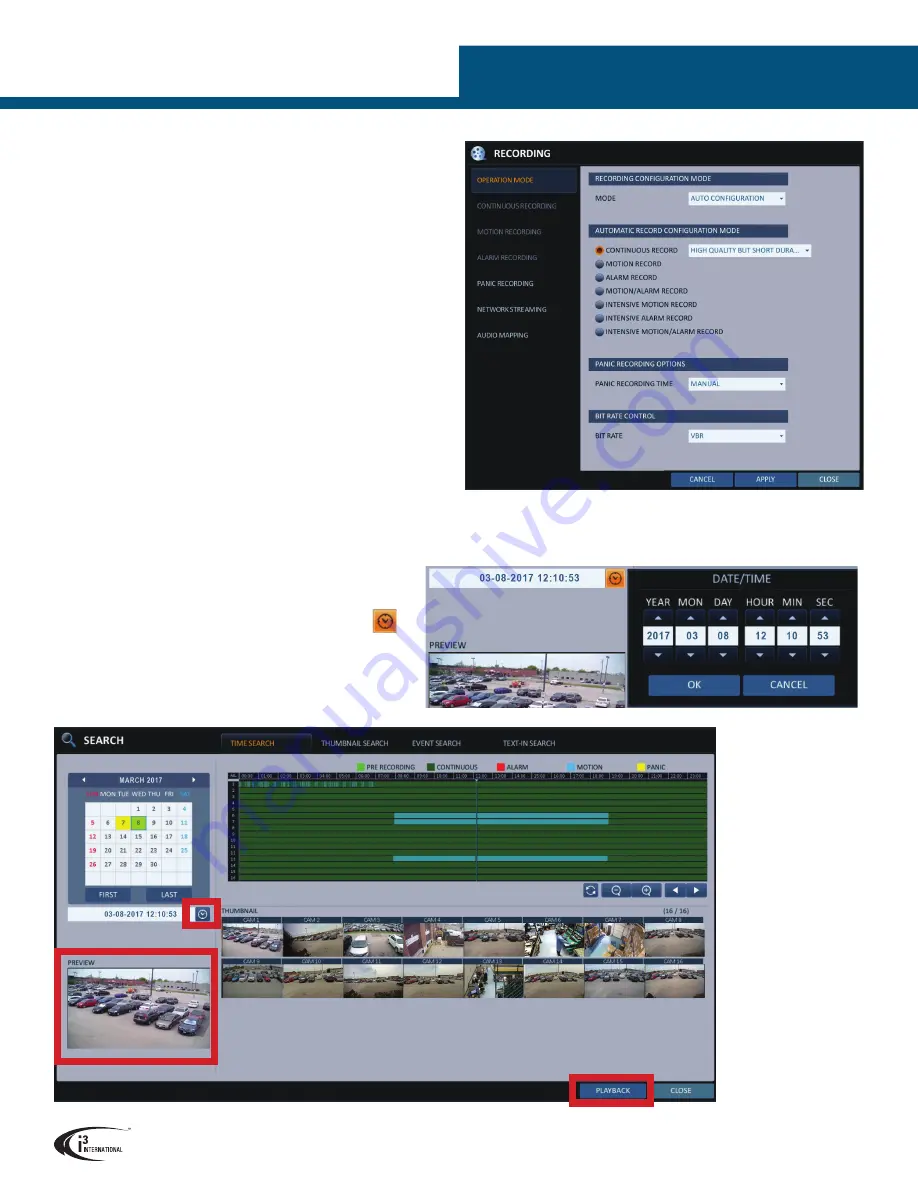
Auto Configuration allows selecting one type of video recording for all connected cameras.
To configure your HVR’s recording settings,
1.
In the Status Bar, go
MENU > RECORD SETUP
2.
For a recording schedule that will apply to all cameras, set
RECORDING CONFIGURATION MODE
to
AUTO CONFIGURATION
.
3.
Select recording type from the list:
• CONTINUOUS RECORD > HIGH QUALITY BUT SHORT DURATION.
All cameras will record continuously 24/7. This recording mode requires the most storage
space and will result in the shortest video retention of all available modes.
• MOTION RECORD
Record only when motion is detected. Motion detection must be configured under
SYSTEM SETUP > CAMERA > MOTION SENSOR
• ALARM RECORD
Record only when alarm event occurs. Alarm events must be configured and linked to
cameras in the
SYSTEM SETUP > EVENT
• MOTION/ALARM RECORD.
Combination of Motion and Alarm recordings. See above.
• INTENSIVE MOTION RECORD.
Record continuously at lower resolution/fps and at higher quality when motion is
detected.
• INTENSIVE ALARM RECORD.
Record continuously at lower resolution/fps and at higher quality when alarm event is
detected.
• INTENSIVE MOTION/ALARM RECORD.
Combination of the two recording types above.
4.
Click
APPLY
.
TIME SEARCH
Timeline colored video data
bars:
Lime Green: Pre-Recording.
(Must be first configured in
OPERATION MODE >
PRE-RECORDING TIME.)
Green: Continuous Recording
Red: Alarm Recording
Blue: Motion Recording
Yellow: Panic Recording
Search video one camera at-a-time. To search recorded video,
1.
In the status bar, go
MENU > SEARCH > TIME SEARCH
2.
In the calendar window, select the search date and time.
Note: You can also click on the clock icon to change Year, Month,
Day, Hour, Minute and Second of the playback start time.
3.
Timeline window will show colored bars that represent recorded video for
each camera.
4.
Click directly on the Timeline to adjust playback start time.
5.
Click one of the camera thumnails and click
PLAYBACK
. The video will play in
the
PREVIEW
window.


