background image

Rev. : 1.0 


P.18


11. KVM Session


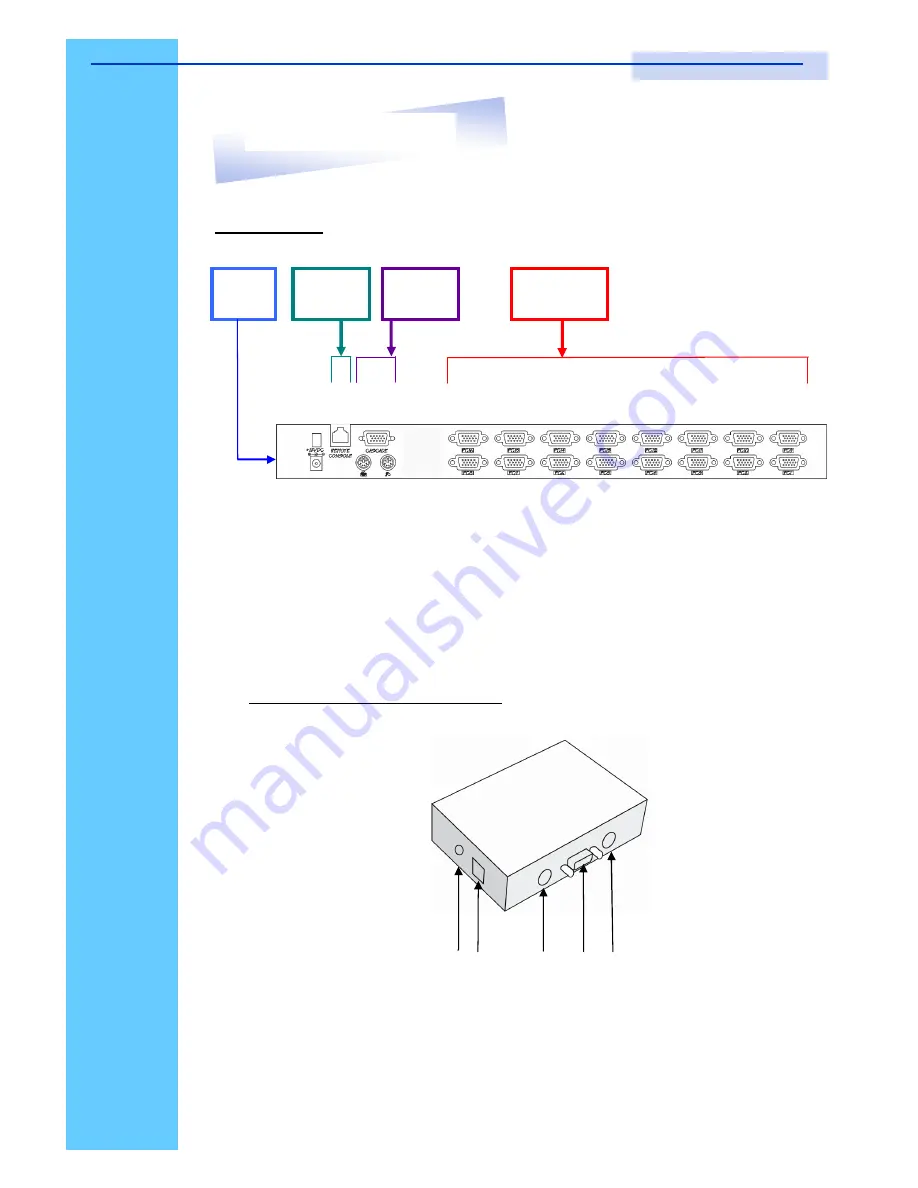
Rear View


Cascade 

Port 

Channel 

Port 

DC 

Power 

DC Power 

- connect to external 12V DC power adapter. 

Cascade Port 

- connect to additional KVM switch for channel           


   expansion.  

LAN Port  

- connect to receiver by UTP / STP cable. 

Channel Port


- connect to PC computer with CD-6 3-in-1 KVM cable. 


RKP115 / RKP117 / RKP119  


     User Manual


RKP1XX-1602 (Local Console) 

LAN  

Port


RKP1XX-1602 (Remote Console) 

• 

‚ 

ƒ  „ … 

• 

DC Power 


- connect to external 12V DC power adapter. 

‚ 

LAN Port 


- connect to local console by UTP / STP cable. 

ƒ 

Keyboard Port 

  - connect to PS/2 keyboard 

  VGA Port


- connect to VGA Monitor 


Mouse Port   

- connect to PS/2 mouse 

Summary of Contents for RKP115-1602

Page 1: ...User Manual RKP115 117 119 1602 1U 15 17 19 Rackmount LCD Keyboard Drawer with PS 2 2 Console KVM Switch...

Page 2: ...P 9 10 LCD Session LCD Membrane Diagram P 11 LCD OSD Control Main Menu P 11 Sub Menu P 12 13 Resolution Settings For Windows P 14 For SUN Servers P 15 11 KVM Session Front View P 17 Rear View P 18 In...

Page 3: ...t to rear 19 mounts Two keyboard selections supporting multiple languages Three models to choose from 15 17 or 19 LCD panel Slide rails have two fixed positions to prevent movement of the keyboard Sup...

Page 4: ...r moisture and vibration Convenience for connecting the LCD Keyboard Drawer to the related facilities should be well considers too Unpacking The LCD Keyboard Drawer comes with the standard parts shown...

Page 5: ...rt PS 2 KVM switch CV 1601 16 Port PS 2 KVM switch CV 101 CAT 5 PS 2 KVM extender CD 6 10 15 6ft 10ft 15ft 3 in 1 KVM cable CA 6 10 15 6ft 10ft 15ft PS 2 3 to 3 Cascade cable SUN 31 SUN iMAC USB to PS...

Page 6: ...plug the keyboard drawer with LCD Keyboard Drawer immediately and call a qualified service personnel under the following conditions 1 If the LCD Keyboard Drawer has been exposed to rain liquid or wate...

Page 7: ...luminium front panel 3 Class A active matrix TFT LCD panel 4 Rear metal case 5 LCD inverter 6 LCD membrane 7 Ball bearing telescopic slides with stopper 8 Adjustable mounting bracket 9 PS 2 KVM switch...

Page 8: ...Rev 1 0 P 7 RKP115 1602 1U 15 LCD Keyboard Drawer with PS 2 KVM Two Consoles 9 Dimension Diagram RKP115 RKP117 RKP119 User Manual...

Page 9: ...Rev 1 0 P 8 RKP117 1602 1U 17 LCD Keyboard Drawer with PS 2 KVM Two Consoles 9 Dimension Diagram RKP115 RKP117 RKP119 User Manual...

Page 10: ...Rev 1 0 P 9 RKP119 1602 1U 19 LCD Keyboard Drawer with PS 2 KVM Two Consoles 9 Dimension Diagram RKP115 RKP117 RKP119 User Manual...

Page 11: ...Rev 1 0 P 10 LCD Session RKP115 RKP117 RKP119 User Manual...

Page 12: ...e Bright Black level Contrast sub menu Auto Adjust To perform automatic optimisations of all functions An Adjusting message is displayed during the process Phase Clock To enter into the phase clock su...

Page 13: ...To adjust input video sampling clock s phase Use the Left Right button to adjust and button to Phase 2 Clock To adjust input video sampling clock Use the Left Right button to adjust and button to Cloc...

Page 14: ...cy of the current input signal 2 OSD Timer To modify the duration of the OSD time out 3 Color a 5500K Select Colour Temp at 5500K b 6500K Select Colour Temp at 6500K c 9500K Select Colour Temp at 9500...

Page 15: ...on Settings For Microsoft Windows Step 1 Press right click on the desktop Step 2 Choose Properties Step 3 Change the Screen Resolution Step 4 Change the Screen refresh rate 10 LCD Session RKP115 RKP11...

Page 16: ...mment user sbin m64config 2 To view current resolution Type user sbin m64config prconf 3 To change to 1024x768 70MHz Type user sbin m64config res 1024x768x70 now 4 The screen will be rubbish 5 Then ty...

Page 17: ...Rev 1 0 P 16 KVM Session RKP115 RKP117 RKP119 User Manual...

Page 18: ...on monitor red in LED Channel select button Press to select channel from 1 8 Shift button Press Hold follow with a channel button to select channel from 9 16 Online Channel Green LED state the PC has...

Page 19: ...connect to receiver by UTP STP cable Channel Port connect to PC computer with CD 6 3 in 1 KVM cable RKP115 RKP117 RKP119 User Manual RKP1XX 1602 Local Console LAN Port RKP1XX 1602 Remote Console DC Po...

Page 20: ...to the one of your server Mini Din 6 pin Male connector to the USB Port HDDB 15 pin Male connector to the VGA Port 2 Plug the power adapter included to the switch 3 Connect STP UTP cable to the switch...

Page 21: ...PS 2 KVM switch to reset the KVM switch CA 6 Cascade cable CA 6 Cascade cable Bank 1 Bank 2 Bank 8 Max Cascade level Max 8 level Max PC connection is 128 or with additional 122 PCs All PS 2 KVM switch...

Page 22: ...lect the channel 5 Enter the password default is 00000000 eight zeros 6 Otherwise the keyboard mouse will be locked 7 If you forget your password send back to Manufacturer HotKey Command Simple key se...

Page 23: ...Previous Bank 5 Switch to Specific Port Example a Bank 1 Port 4 b Bank 2 Port 16 Bank 1 8 No 0 or 1 No 0 9 Second digit of port Number 1 0 4 Space Bar Scroll Scroll Scroll Scroll Scroll Scroll Scroll...

Page 24: ...N D Note The default Beeper function is ON and beeper control is only for available for Scan Mode Note Not available for password reset PgDn B S Scroll Scroll R F Scroll Scroll Scroll Scroll Scroll S...

Page 25: ...E ON OFF ESC QUIT ENTER COMPLETE TAB NEXT INSERT EDIT SELECT PORT PgDn PgUp BANK SELECT 04 OSD Structure Diagram Bank Session PC Session KVM Settings Session Menu Information OSD Menu Operation Use Ta...

Page 26: ...word in KVM Setting Session Key in the existing password Enter the New Password Re Enter the New Password Changing Password complete The steps are shown as next picture 4 Console On OFF ON any user ca...

Page 27: ...he mouse is a true PS 2 mouse A combo mouse will work just as long as it is set for PS 2 mode with the correct adapter Please try a different mouse Avoiding moving the mouse or pressing the mouse butt...
Page 28: ...ttached to computer during boot up process Power adapter is not connected to receiver 10 Video signal is foggy or un cleared on the screen Please check VGA connector or the VGA resolution is too high...

Page 29: ...A PC Selection 1 Bank LED 1 Power LED 16 Online LED Green 1 Status LED Red 16 Selected LED Green On screen display control Scan intervals Keyboard and mouse emulation VGA resolution Max 1920 x 1440 16...

Page 30: ...64 kHz Vertical Sync 65 MHz 60 75 Hz 60 Hz Input Signal Power Management Power Input Video Input Weight 20ms H Position V Position Phase Scaling South Korea Description 5ms 15 TFT RKP115 1602 11 0kg 1...

Reviews: