background image

I/OMagic PC PVR 

User’s Guide 


- 11 - 


Your computer cover may be different than the computer cover 
shown above.  The screws may not be located at the back of your 

computer.  Some covers have screws on the side of the computer.  

Tower cases also have different location for the screws.  Refer to 

your computer’s manual if you need specific instructions on how to 

remove the cover. 


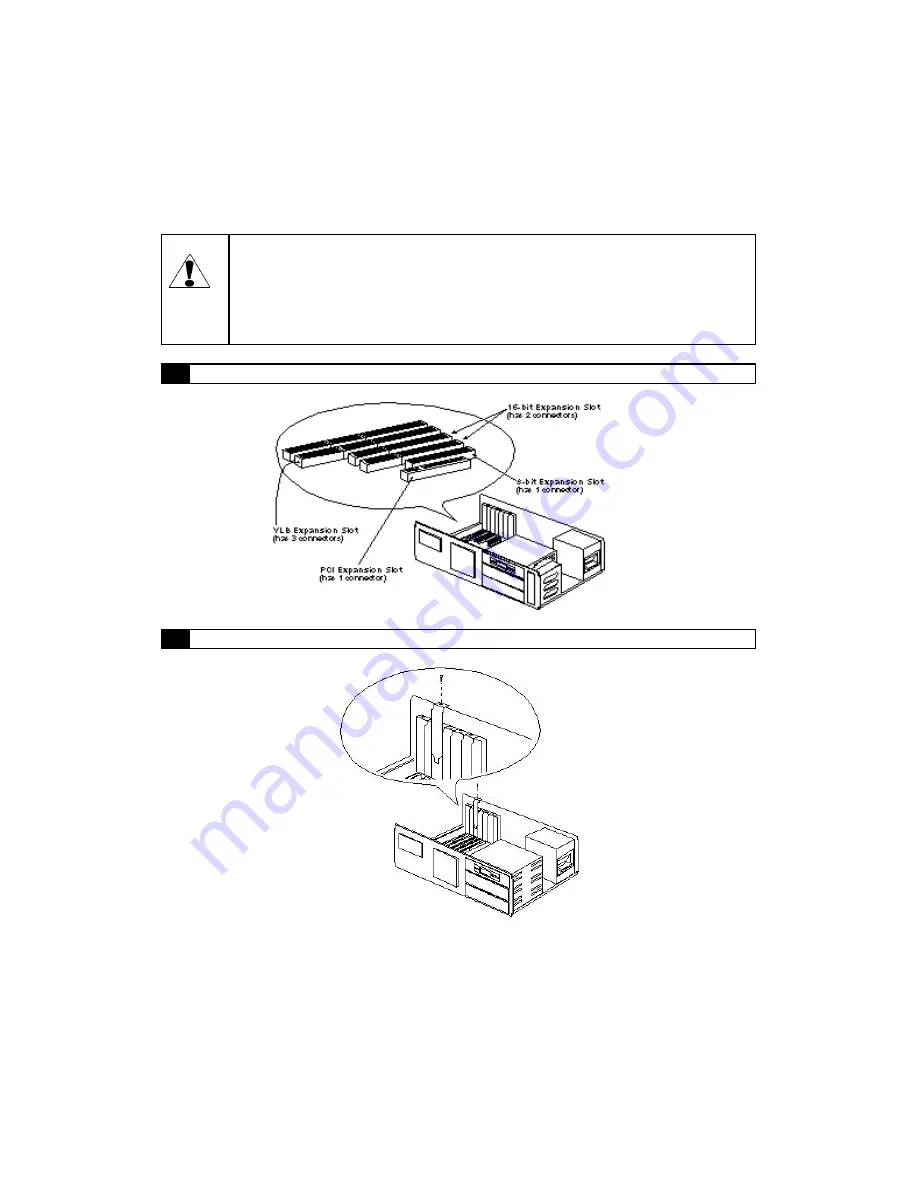
Locate an available 

PCI

 expansion slot 


Remove the cover plate from the access slot 


Each expansion slot has an access slot in the chassis covered by a 
removable plate.  Undo the screw that holds the plate and remove the 

plate. 

Summary of Contents for DVD+RW/+R External USB 2.0 DVD ReWritable Drive

Page 1: ...PC PVR Desktop TV Personal Video Recorder USER S GUIDE ...

Page 2: ...ough the most rigorous testing and quality assurance procedures in the industry With an emphasis on products that revolutionize the way people interact with the new technologies around us we continually introduce integrated solutions that enable users to take full advantage of their multimedia experience Our ever expanding product line covers the entire multimedia spectrum Look to us to as the lea...

Page 3: ...ment nor a recommendation I OMAGIC Corporation assumes no responsibility with regards to the performance of these products This document contains proprietary information which is protected by copyright see below The information contained in this document is subject to change without notice Trademarks Microsoft is a registered trademark of Microsoft Corporation Windows Windows 95 98 Me NT 2000 and ...

Page 4: ...emit radio frequency energy and if not installed or used in accordance with the instructions may cause interference to radio communications However television reception interference can be determined by turning the equipment off and on The user is encouraged to correct the interference by one or more of the following measures Reorient or relocate the receiving antenna Increase the separation betwe...

Page 5: ...4 WINDOWS ME 18 WINDOWS 2000 21 Power VCR II 25 POWER VCR II INSTALLATION 25 POWER VCR II FEATURES 30 POWER VCR II LAYOUT 31 MODES 33 RECORDING AND PLAYING VIDEO FILES 38 CHANGING SYSTEM SETTINGS 42 EDITING AND CONVERTING VIDEO FILES 48 SCHEDULING RECORDING TIMES 51 Troubleshooting 53 I OMAGIC PC PVR FAQ 53 POWER VCR II FAQ 55 Limited Warranty 58 Contacting I OMagic 59 Register Your I OMagic Produ...

Page 6: ...ic PC PVR is equipped with a TV tuner allowing you to receive any TV channel using a common TV antenna or via cable TV connection Watch TV on your computer using PCI busmastering technology when combined with a graphics card that enables digital TV overlay Your TV image is superimposed onto the image generated by your graphics card and displayed in a scalable window The included CyberLink PowerVCR...

Page 7: ...o share with friends and family Watch TV on PC monitor while surfing the Internet or working on a project Watch your favorite programs in a window or at full screen Watch broadcast or cable TV on your PC Create MPEG movies Create streaming video Record and play TV shows like a VCR Record your favorite TV moments Keep an eye on the local news or favorite sporting event while working Track financial...

Page 8: ...ards we have tested with this product S3 Savage2000 Savage4 Virge 3D Trio 64V Trio 32 64 and Vision ATI Rage128 Rage Pro Rage and Mach 64 NVidia GeForce TNT Ultra TNT 2 TNT Riva128 Riva 3DFx Voodoo3xxx Voodoo 2xxx Voodoo Banshee Tseng Labs now ATI ET6000 Matrox G400 G200 Millennium and Mystique Cirrus Logic 5446 3Dlabs Permedia Rendition Verite This includes most cards from ATI Matrox Diamond Stea...

Page 9: ... sound graphics card 30 MB of disk space for software installation 500 Mb of disk space for minimum instant replay buffer CD ROM drive for driver installation Power VCR Requirements Windows 98SE Me 2000 Pentium II 350 or above and at least 64MB RAM recommended for Real time MPEG 1 video recording Pentium II 650 or above and at least 64Mb RAM recommended for Real time MPEG 2 video recording Pentium...

Page 10: ... computer Electronic components are sensitive to static electricity To prevent damage discharge any static electricity from your body by touching any known grounded metal surface such as your computer s chassis before and during installation of hardware 2 Remove the computer cover Locate and remove any screws that hold the cover in place Gently remove the cover leaving the base of the unit in plac...

Page 11: ...side of the computer Tower cases also have different location for the screws Refer to your computer s manual if you need specific instructions on how to remove the cover 3 Locate an available PCI expansion slot 4 Remove the cover plate from the access slot Each expansion slot has an access slot in the chassis covered by a removable plate Undo the s crew that holds the plate and remove the plate ...

Page 12: ...from Carefully align the connector with the slot and push the card into the slot until it snaps into place You may need to use a gentle back and forth rocking motion when inserting the card into the slot Once you install the card secure it by replacing the screw you removed with the expansion slot cover plate Double check all connections make sure everything is plugged in correctly and firmly seat...

Page 13: ...bove If you need help replacing the computer cover refer to your computer s manual 9 Turn on your computer monitor and other peripherals Your computer should start up as it normally does If it doesn t power down your system first and check to make sure that all your expansion boards are firmly seated and that all cables both inside and on the back of the computer are properly connected If you are ...

Page 14: ...SE 1 Power on your System 2 During the load process the Add New Hardware Wizard should detect PCI Multimedia Video Device Click on the Next button 3 Insert the I OMagic PC PVR driver diskette into your floppy drive Select Search for a better driver and press Next ...

Page 15: ...User s Guide 15 4 Select the CD ROM drives option Make sure everything else is unchecked and then hit the Next button 5 After the install program finds the correct drivers Click on the Next button to begin installation ...

Page 16: ...he driver installation Please click Yes to keep the file 6 Once done installing drivers Press the Finish button to finish your installation and restart your computer Note Three other driver installation portions will continue after completing this step I OMagic WDM Audio Capture WDM TvTuner and WDM Crossbar ...

Page 17: ...s Guide 17 8 Check Device Manager to make sure everything is installed correctly From the top row of tabs Click on the sign next to Sound Video and Game Controllers and make sure there are I OMagic WDM devices listed below ...

Page 18: ...m 2 During the load process the Add New Hardware Wizard should detect PCI Multimedia Video Device Select the Specify the location option and click on the Next button 3 Select the Search the best driver option put a check on Removable Media Then press the Next button ...

Page 19: ... the install program finds I OMagic WDM Video Capture drivers Click on the Next button to begin installation Note For some systems MS Windows will show Version Conflict dialog during the driver installation Please click Yes to keep the file ...

Page 20: ...hree other driver installation portions will continue after completing this step I OMagic WDM Audio Capture WDM TvTuner and WDM Crossbar 8 Check Device Manager to make sure everything is installed correctly From the top row of tabs Click on the sign next to Sound Video and Game Controllers and make sure there are I OMagic WDM devices listed below ...

Page 21: ...ser s Guide 21 Windows 2000 1 Power on your System 2 During the load process the Found New Hardware Wizard open up Click on the Next button 3 Select the Search for a suitable driver option and then press the Next button ...

Page 22: ...R User s Guide 22 4 Place a check mark on CD ROM drives only and click the Next button 6 Windows will find the appropriate drivers for this Multimedia Video Controller Press the Next button to begin copying the files ...

Page 23: ...installation Please click Yes to keep the file 6 After it is done copying files Click on the Finish button to restart your computer and complete the driver installation process Note Three other driver installation portions will continue after completing this step I OMagic WDM Audio Capture WDM TvTuner and WDM Crossbar ...

Page 24: ... PC PVR User s Guide 24 8 Check Device Manager to make sure everything is installed correctly Click on the sign next to Sound Video and Game Controllers and make sure there are I OMagic WDM devices listed below ...

Page 25: ...re installing Power VCR II 1 After installing your WDM video drivers place your I OMagic software CD into your CD ROM drive and Power VCR II will automatically install Note To manually install Power VCR II open the CD ROM drive and select the Power VCR II directory Then run Setup exe from disk 1 directory 2 Select English and press Ok button ...

Page 26: ...I OMagic PC PVR User s Guide 26 3 Press Next when the InstallShield Wizard comes on 4 Click Yes and agree to the License Agreement ...

Page 27: ...ur Name Company and Power VCR II serial number The serial number can be found on the CD ROM itself or on the package sleeve 6 Select the directory you would like to install Power VCR II into by clicking the Browse button Click Next to continue ...

Page 28: ... working directory for saving and recording from your TV Your working directory should preferably be set to another hard drive that does not contain your system data Press Next to continue 8 Power VCR II will begin copying files to your computer ...

Page 29: ...mplete run the System Diagnostics program 10 You should enable DMA mode for your drives if your system supports it Please refer to your computer manufacturer s manual for further information 11 Restart your computer after Power VCR II installation is complete ...

Page 30: ...s you to watch the beginning of a recorded program while it is in progress Skipping through trivial commercials and watching at a faster speed to catch up to the live broadcast has never come so easy nor effortlessly Still Image Snapshot Catch and capture all your memorable video frames as still image files with a single click Channel Surfing With the channel surfing feature no more incessant flip...

Page 31: ...I OMagic PC PVR User s Guide 31 Power VCR II Layout Main Controls Icon Description Turns PowerVCR off Minimizes PowerVCR Accesses Online Help About PowerVCR ...

Page 32: ......

Page 33: ...pace available Modes 1 Live Digital Recorder In this mode you may watch live video content and record video content Configures PowerVCR s System Settings Captures still images during playback or from TV Enables the Time shifting playback feature Shows hides the TV tuner control Controls playback volume TV Tuner Control Goes to next channel Returns to previous channel Auto scans for available chann...

Page 34: ...ion on navigating in the Instant TV Replay mode Note There is no Stop function in the Replay mode 3 File Player In this mode you may play existing video files There are two types of files MPEG video files and playlist files Playlist video files contain the description of the video file s and if greater than one are played in its original playback sequence Opens files for playback Navigates during ...

Page 35: ...heduling Wizard that guides you through the scheduling process Deletes scheduled tasks 5 File Converter In this mode you may convert AVI files to MPEG files according to your specified recording profile or you may extract DAT files from video CDs to MPEG 1 files for further editing Opens files for converting Converts selected files Converts all files Deletes conversion tasks Shows PowerVCR ...

Page 36: ...lips into a new video file Opens files for editing trimming The start trimming position The end trimming position Step left trim Step right trim Edits trims selected files Edits all selected items merge Adds next segment of current tape as a new clip Goes up to previous task Goes down to next task Deletes task Shows PowerVCR ...

Page 37: ...p right trim Transcodes trims selected clip Transcodes all clips Adds next segment of current tape as a new clip Marks current tape position as the start trimming position Marks current tape position as the end trimming position Deletes task Shows PowerVCR 8 i Power In this mode you may access Internet resources directly from PowerVCR It provides the latest electronic TV program guide and links fo...

Page 38: ... break from all the channel flipping and mouse clicking endured when watching TV by providing a preview of sixteen channels at a time 1 Be sure that your TV Tuner card or capture card is installed correctly or your PowerVCR screen will be blank 2 Click on Surf Channels located in the video display area 3 Click on Auto Page to allow a continuous refresh of sixteen new channels 4 Click Next and Prev...

Page 39: ...button to display the Recording Timer menu Select one of the time durations and PowerVCR will automatically stop the recording once the set time duration has expired 5 Click Stop when you are finished 6 The playlist will appear for you to save it Info Because of the inherent limitations of the Windows operating system in handling files over 2 GB PowerVCR will automatically save and chunk your vide...

Page 40: ...Replay Mode Skip forward skip commercials or backward instant replay by clicking on the corresponding buttons in the control wheel Note The skipping forward or backward speed is set at seven seconds Click Pause to momentarily cease instant replay The fastest method for navigating here is to drag the slider Note that the live broadcast will always be at the slider s end so you may notice that the s...

Page 41: ...gain Playing Files The File Player plays all the playlists or video files you have stored in your hard drive Info Because of the inherent limitations of the Windows operating system in handling files over 2 GB PowerVCR will automatically save and chunk your video files into 600 MB files if the file s size is over this limit Thus when you select the appropriate playlist for playback all the chunked...

Page 42: ...s Please refer to Snapshots for more information on snapshots 1 When in Pause or Stop mode click the Step Left or Step Right functions for moving minimal frames at a time Note Step Left functions move one GOP Group of Pictures backward at a time while Step Right moves one frame forward at a time 2 To begin playback click Play Changing System Settings Settings are configured automatically before re...

Page 43: ... bandwidth and chrominance UV information at half bandwidth The YUV color model luminosity and color values are processed separately The YUV values are calculated by addition or subtraction of specifically formed RGB values RGB is the default setting with 16 bit the higher the bit the better the quality but with more memory consumed For video source choose the appropriate input such as SVHS S Vide...

Page 44: ...ltiple audio sources Click on the drop down menu to select other audio sources if necessary Video Adjust the visual aspect of your video content when viewing and recording Click on Default to return to the original settings Brightness Drag to the right to increase the intensity of light and left to decrease Contrast Drag to the right to increase the contrast of colors and left to decrease Hue Drag...

Page 45: ...rding Profile A recording profile is great for discerning video enthusiasts or hard drives with a limited amount of space Choose a profile that will suit your recording requirements If it s a file that warrants great video quality or only an experimental recording PowerVCR s recording profiles are guaranteed to suit any of your inclinations When you first start PowerVCR the default position will b...

Page 46: ...dicted pictures P frames are coded with reference to past pictures predict in a forward direction and significantly compressed B Frame Bi directional pictures B frames predictions are forward backward and bi directional which is relative to the other I frames and P frames Compression is at a high level Audio Compression The default Layer 2 contains more efficient codes for representing bit allocat...

Page 47: ...System Settings while in the Live Digital Recorder mode 2 Click the Profiles tab and then select an existing profile that closely matches with the new profile you want to create 3 Click New only after selecting an existing profile 4 Rename your profile in the Profile Name field 5 Click the Video tab 6 Select an encoding format 7 Select an Output Size for your video content by clicking the drop dow...

Page 48: ...Files Not only does PowerVCR possess astounding recording features and breathtaking recording quality it also allows you to edit all the files that you have recorded or boxes full of VHS tapes stashed away in your private collection PowerVCR cuts and trims out unwanted footage of any given file or combines and merges video clips or files to resemble a feature length movie If you have in your posse...

Page 49: ...only be added after the End Trim position of the original task 5 Click Trim Selected Item s to begin trimming 6 You will be asked to save and name your edited file first Name it and then click Save Step Left and Right Trim The purposes of the step left and right functions in the Video Trimmer mode are for accurate trimming and merging timed within fractions of a second Their function is similar to...

Page 50: ...e files select a file first and then click on the Move Up and Move Down arrows 4 Click Play to begin previewing when you have finished selecting files Note During editing and previewing clips you may experience time lags when playing videos If your video content utilizes constant bitrate these lags will be minimized Merging Multiple Video Clips If you have a collection of files or an infinite numb...

Page 51: ...imming Clips section earlier in this chapter 9 Click Convert Selected Item s after you have selected specific files or add more files by repeating the above steps 10 Click Convert All Items to convert all your files at once Scheduling Recording Times Scheduling with the Wizard For recording programs when you re away from your computer the Scheduling Wizard meets every one of your recording needs B...

Page 52: ...o exit the Recording Scheduler click the upper right hand corner Editing Scheduling Tasks 1 To edit scheduling tasks just double click on the specific task located in the Recording Scheduler panel and the Scheduling Wizard will automatically appear 2 To add more scheduling tasks repeat the steps in the last section 3 To delete tasks click on Delete or press DELETE on your keyboard after selecting ...

Page 53: ...omputer system locating the port where the speakers are plugged in This is the sound card and it should be marked as to what manufacturer and what model it is The capture window displays distorted video A Make sure you use the latest drivers for your graphics card We recommend that you do not use any generic driver that is built into Windows 98SE It is always better to use the drivers specifically...

Page 54: ...not have the UDMA driver loaded or your hard drives do not support UDMA or both Please contact either your computer manufacturer or the hard drive vendor 6 You ll get a message stating that you may want to contact your hard drive vendor to ensure that the setting is supported Click OK 7 You ll be prompted to reboot your system Click OK 8 Now try to capture F Upgrade RAM If you have less than 64MB ...

Page 55: ...PC PVR 4 If you don t have an available IRQ free one up 5 Go into your computer s BIOS and set the option for Plug and Play to OFF or disable or NO Save the BIOS settings and then restart the machine 6 Put the I OMagic PC PVR in a different PCI slot Shutdown your computer completely Unplug the power cord from the computer as a safety precaution Remove the I OMagic PC PVR and insert it into another...

Page 56: ...ideo setups in PowerVCR II Video Overlay and Video Preview What are the differences between these two modes for recording MPEG files A The Video Overlay mode means the superimposition of computer graphics over a live or recorded signal and storing the resulting video image on hard disk Therefore the result is that motion in video content is smoother Whether you will view video in this mode via Vid...

Page 57: ...y attention to the following items when merging video files 1 Merging video files recorded with different MPEG profiles is not allowed For example merging a MPEG 1 file with MPEG 2 files 2 Merging files with different video profiles is not recommended for example merging files recorded by two different profiles that possess different designations such as Constant Bitrate versus Constant Quality 3 ...

Page 58: ...way without the consent of I OMagic or if the failure is the result of misuse abuse or misapplication I OMagic has no obligation to repair or replace the failed product Except as expressly provided above the hardware and accompanying written materials including the Users Guide are provided as is without warranty of any kind including the implied warranties of merchantability and fitness for a part...

Page 59: ...ntact I OMagic s Technical Support staff at the following numbers Phone 714 953 0675 M F 8 00AM 5 00PM PST Internet http www iomagic com Go to the technical support section and fill out support form Register Your I OMagic Product Please take the time to send in your registration card The serial number of your DVD drive is located on the top of the drive itself The series of numbers under the bar c...

Page 60: ...DR PCTV100 02 Ver 01 ...

Reviews: