background image

The Instructions Manual 

14 


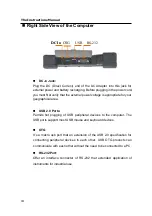
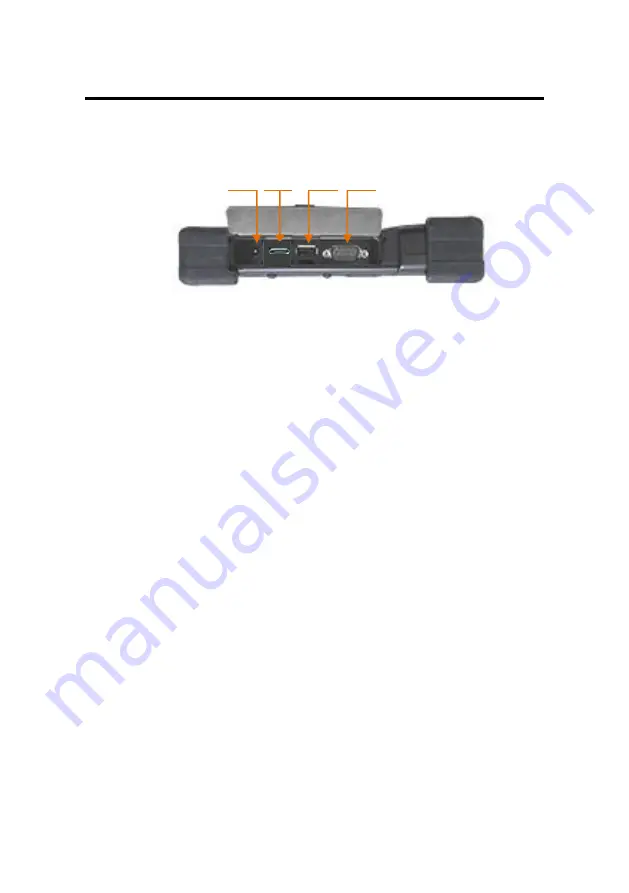
Right Side View of the Computer 


DC-in Jack: 

Plug  the  DC  (Direct  Current)  end  of  the  AC  Adapter  into  this  jack  for 

external power and battery recharging. Before plugging in the power cord, 

you must first verify that the external power voltage is appropriate for your 

geographical area.


USB 2.0 Ports: 

Permits  hot  plugging  of  USB  peripheral  devices  to  the  computer.  The 

USB ports support most USB mouse and keyboard devices.


OTG 

It

’s a macro usb port that an extension of the USB 2.0 specification for 

connecting  peripheral  devices  to  each  other.  USB  OTG  products  can 

communicate with each other without the need to be connected to a PC.   


RS-232 Port: 

Offer  an  interface  connecter  of  RS-232  that  extended  application  of 

instruments for industrial use. 


DC In 

USB 

RS-232 

DC In  OTG 

Summary of Contents for IMT-8 PLUS

Page 1: ...User s Manual IMT 8 PLUS 2016 Jun 20 mobile...

Page 2: ...s the right to revise or make changes to this publication without notice or obligation of the manufacturer to notify any person of such revision or changes Software Licenses The software included with...

Page 3: ...progress The ideal range for safe operation of the computer is from 100 240V AC 1 AC Power Cord 2 AC Adapter 3 DC Direct Current Cord Warning Using the AC adapter to power other devices can damage the...

Page 4: ...ie Ersatz nur durch denselben oder einem vom Hersteller empfohlenem hnlichen Typ Entsorgung gebrauchter Batterien nach Angaben des Herstellers 4 Swedish Explosionsfara vid felaktigt batteribyte Anv nd...

Page 5: ...B of Part 15 of the FCC rules Do not make any changes or modifications to the equipment unless otherwise specified in the manual If such changes or modifications should be made you could be required...

Page 6: ...View of the Computer 14 Left Side View of the Computer 15 Bottom View of the Computer 16 Rear View of the Computer 17 CHAPTER 3 19 PROTECTING AND MAINTAINING 19 Caring for Your Computer 20 Routine Car...

Page 7: ...and secure solution for managing all of your technology and mission critical data Scale the computer and streamline the costs of day to day business operations and multimedia demands Discover the com...

Page 8: ...Screen Control Panel Capacitive type LED back light Sunlight readable and Smart Panel Application enhancing user s ability to view data outdoors and under moving conditions Complete Connectivity from...

Page 9: ...ess protection rating can provide indoor and outdoor protections of no ingress of dust and water jets against enclosure without harmful effects Furthermore the computer is equipped with 4 corner buffe...

Page 10: ...diator heat register or in a built in cabinet unless adequate ventilation is provided 6 The computer should only be operated using the specified power indicated on the Warning Label located on the bat...

Page 11: ...ter does not operate normally when the operating instructions are followed Adjust only those controls that are specified in the Operating Instructions or improper adjustment may require calibration ag...

Page 12: ...C CH HA AP PT TE ER R 1 1 G Ge et tt ti in ng g S St ta ar rt te ed d Chapter Preview Unpacking and setting up the Product Packing list Power Supply...

Page 13: ...x and remove the contents preserving the integrity of the box as you may need it and all of the packing materials for future shipping 2 Inspect the contents for damage If you find any irregularities o...

Page 14: ...will begin recharging immediately In the future you should not have to access the battery pack unless you wish to replace it with a fresh one Note 1 The Battery LED lights green when charging and will...

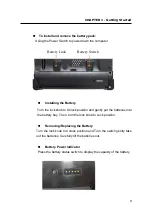
Page 15: ...ition and gently put the batteries into the battery bay Then turn the lock knob to Lock position Removing Replacing the Battery Turn the lock knob to Unlock position and Turn the switch gently take ou...

Page 16: ...o a grounded electrical outlet Use the AC adapter to power the computer or recharge the battery when it is low Caring for the AC Adapter Be sure to only use the AC adapter that comes provided with thi...

Page 17: ...ontains six illustrations highlighting each external component and its respective functions Chapter Preview Front view of the Computer Right side view of the Computer Left side view of the Computer To...

Page 18: ...yboard A soft keyboard can be located by tapping the keyboard icon in the bottom right on the desktop Data can also be entered via a USB keyboard plugged into the USB port on the right side of the com...

Page 19: ...g button for 2 Seconds Hot Key These 4 quick access buttons are used for navigating applications in the Android Status LEDs LED Indicator Relevant Component Description Orange Flashing Hard Drive Disk...

Page 20: ...hical area USB 2 0 Ports Permits hot plugging of USB peripheral devices to the computer The USB ports support most USB mouse and keyboard devices OTG It s a macro usb port that an extension of the USB...

Page 21: ...he Computer Network Jack RJ45 Interfaces with an Ethernet 10 100 1000 Mbps Base T network connection Micro SD Micro Secure Digital SD Card Slot Strap Hook The user can grasp the machine by using the h...

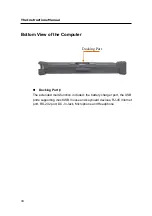
Page 22: ...ew of the Computer Docking Port The extended multi function included the battery charger port the USB ports supporting most USB mouse and keyboard devices RJ 45 Internet port RS 232 port DC In Jack Mi...

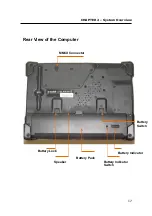
Page 23: ...CHAPTER 2 System Overview 17 Rear View of the Computer Battery Pack MMCX Connector Speaker Battery Indicator Battery Indicator Switch Battery Lock Battery Switch...

Page 24: ...ol can be adjusted via the OS or additional multimedia application software Sound will mute when headphones are detected Battery Pack A 3 cell 3400mAh removable Lithium Ion battery pack comes standard...

Page 25: ...C CH HA AP PT TE ER R 3 3 P Pr ro ot te ec ct ti in ng g M Ma ai in nt ta ai in ni in ng g Chapter Preview Caring for your Computer Configuring DRAM and SIM Card...

Page 26: ...and storing the computer in locations exposed to extreme temperature fluctuations likely condensation or direct sunlight Keep the device away from moisture such as exposure to liquids or precipitation...

Page 27: ...ter from the computer before unplugging it from the electrical outlet Caring for the Touch Screen Display Never spray liquids of any kind directly onto the display screen or allow excess liquid to dri...

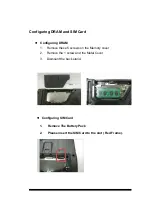
Page 28: ...d Configuring DRAM 1 Remove these 5 screws on the Memory cover 2 Remove the 1 screw and the Metal Cover 3 Dismount the back stand Configuring SIM Card 1 Remove The Battery Pack 2 Please insert the SIM...

Page 29: ...CHAPTER 4 Specifications Software 23 C CH HA AP PT TE ER R 4 4 S Sp pe ec ci if fi ic ca at ti io on ns s S So of ft tw wa ar re e Chapter Preview Specifications and Standard Features Software...

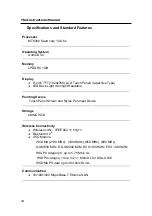
Page 30: ...eadable Pointing Device Touch Panel Screen and Stylus Pen Input Device Storage eMMC 8GB Wireless Connectivity Wireless LAN IEEE 802 11 b g n Bluetooth 4 0 3 5G Module WCDMA 2100 MHz 1900 MHz 850 MHz 8...

Page 31: ...d Power Supply External AC Adapter 175g AC Input 100 240V 50 60Hz 3 Pin Inlet DC Output 16V 4 0 A DIM 107 7mm x 45 9 mm x 30 mm includes Power Cord Included Accessories Hand strip power cord adapter a...

Page 32: ...ONE year limited warranty parts Docking USB 2 0 x 4 RJ 45 RS 232 DC IN Micro Phone Headphone VGA Port Environmental Specifications Operating temperature 10 to 40 C 14 to 104 F Storage temperature 20 t...

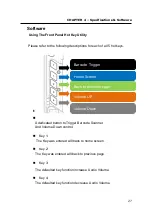
Page 33: ...T A dedicated button to Trigger Barcode Scanner And Volume Down control Key 1 The Key was entered will back to home screen Key 2 The Key was entered will back to previous page Key 3 The defaulted key...

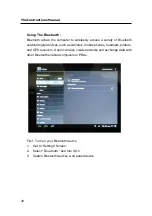
Page 34: ...bled digital devices such as cameras mobile phones headsets printers and GPS receivers Users can also create networks and exchange data with other Bluetooth enabled computers or PDAs First Turn on you...

Page 35: ...CHAPTER 4 Specifications Software 29 Using The wireless network 1 Get to the Setting screen 2 Select WIFI and Turn it On 3 Connecting the network API 4 Select Browser and Use network...

Page 36: ...nual 30 Using The 3 5G Mobile Network 1 Inserted the SIM Card 2 Select More and Mobile Network 3 Make Mobile network settings 4 Check the Icon of the 3 5G is appeared and perfected sign 5 Select Brows...

Page 37: ...CHAPTER 4 Specifications Software 31 Using the Ethernet 1 Turn the wifi off 2 Select Browser and Use network...

Page 38: ...The Instructions Manual 32 How to opening the GPS 1 Select the GPS ICON on the desktop...

Page 39: ...CHAPTER 4 Specifications Software 33 Using the OTG 1 Using USB cable connected the OTG port with the another computer or storage USB port 2 Sliding down the screen 3 Select Connected as a media device...

Page 40: ...The Instructions Manual 34 4 Turn on Media device MTP 5 Having a message showed on the another computer or storage...

Page 41: ...ver Connect the equipment into an outlet on a circuit different from that to which the receiver is connected Consult the dealer or an experienced radio TV technician for help SAR Information Statement...

Page 42: ...on Rates SAR can be found on the Cellular Telecommunications Industry Asso ciation CTIA web site at http www wow com com In the United States and Canada the SAR limit for mobile Tablet PCs used by the...

Page 43: ...f adapter 7 The device complies with RF specifications when the device used at 5mm form your body 8 AC adapter Model No ATS065S P160 Input AC 100 240V 50 60Hz 1 4A Output DC 16V 4 07A i Mobile Technol...

Reviews: