background image

5

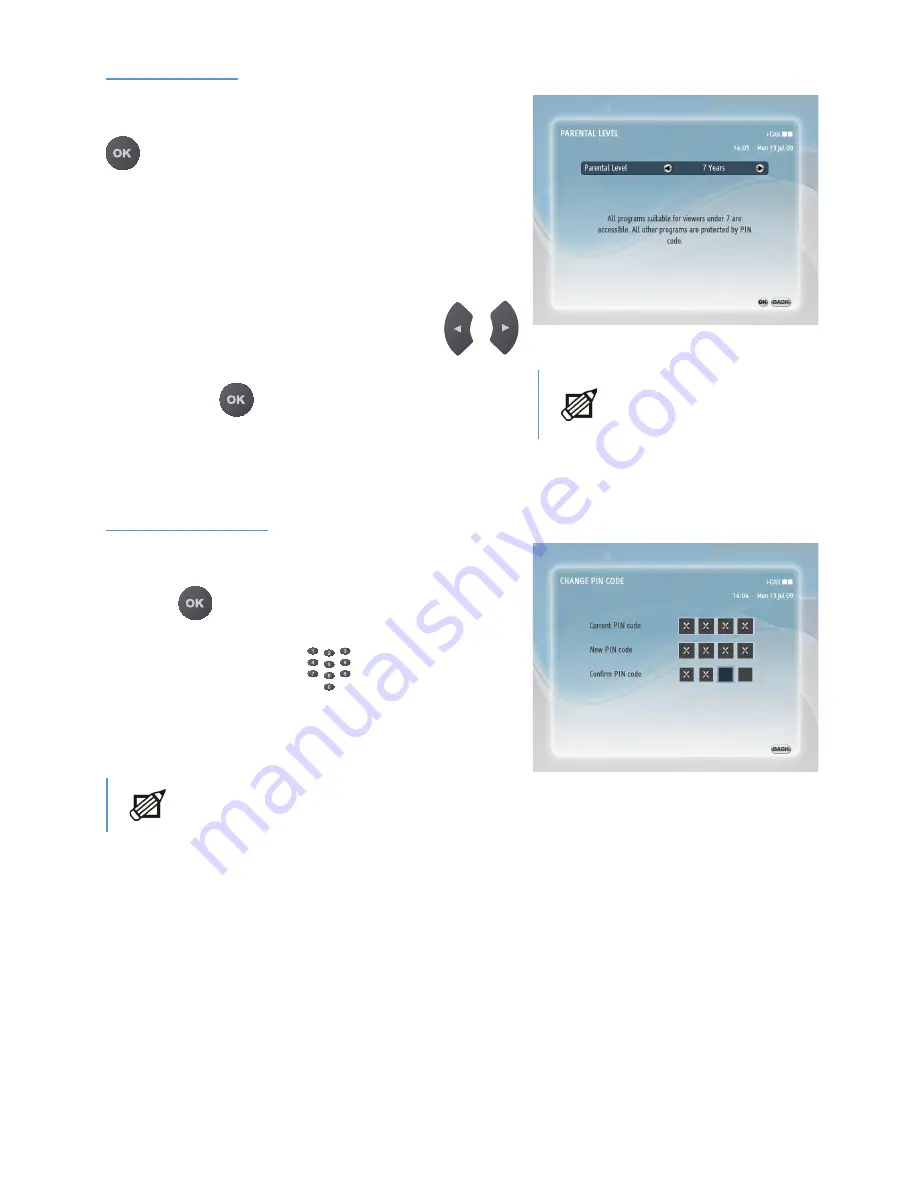
Parental Level

To open the 

Parental Level

 window, highlight the 

Paren-

tal Level

 item under the 

For Parents

 submenu and press 

.

This  screen  lets  you  define  the  age  level  according  to 

which programs will be blocked. It means that viewing of 

every program which rating exceeds the defined age level 

will require entering of the PIN code. For example, if you 

set 

Parental Level

 to 7 Years, all programs unsuitable for 

viewers  under  7  years  old  will  be  protected  by  the  PIN 

code.

In order to change 

Parental Level

, press the 

 / 


buttons until the age level you are interested in is displayed. 
Then, press the 

 button to confirm your setting.

Change PIN Code

To  open  the 

Change  PIN  Code

  window,  highlight  the 

Change PIN Code

 item under the 

For Parents

 submenu 

and press 

.

In the 

Change PIN Code

 screen you can change your PIN 

code. To do that, using the 

 keys, enter the current 

PIN code once, and a new PIN code twice.

If you want to lock whole 

channels, you can do this 

in the 

Channel Manager


submenu. 

Parental Level

As a new PIN code, it is advisable that you 

choose a number which you can easily 

remember. The default PIN code is 1234.

Change PIN Code

Summary of Contents for tivusat 1110SH

Page 1: ......

Page 2: ...fringement or fitness for a particular purpose with respect to the software the accompanying product manual s and written materials and any accompanying hardware The manufacturer reserves the right to revise or make improve ments to its product and related materials at any time and without obligation to notify any person of such revisions or improvements In no event shall the manufacturer be liabl...

Page 3: ...power input connec tor on the back panel of the decoder before you connect the power brick to the wall socket outlet Whenever you disconnect the decoder from the power supply always remove the power brick from the wall socket outlet before you remove the other end of the lead from the power input connector on the back panel of the decoder Never attempt to repair or reconstruct the decoder yourself...

Page 4: ...n Format 14 Using Your Decoder 15 Turning Your Decoder On Off 15 Basic Rule Point Select 15 Selecting Channels 15 Channel Banner 16 Browsing through Channels and Programs in the Channel Banner 16 Extended Information About Programs 18 Channel List 18 Options Menu 19 Audio Language 19 Subtitle Language 19 Teletext Language 19 Display Format 19 Video Resolution 19 Running Interactive Applications 20...

Page 5: ...rents 34 Receiver Lock 34 Parental Level 35 Change PIN Code 35 Your Preferences 36 Display Options 36 Language Options 37 Installation 38 Settings 38 TV Settings 38 System Settings 39 Energy Saving Settings 39 Modem Settings 40 Modem Diagnostics 40 Signal Meter 40 Channel Search 41 Factory Reset 42 Help 42 Electronic Program Guide 43 Before Requesting Service 44 Technical Specification 46 ...

Page 6: ...n used interchangeably About Your Decoder Set Top Box Your decoder will allow you to do the following prevent your children from viewing unsuitable programs display additional information about a selected program use interactive applications create lists of your favorite channels set a reminder and much more Please note that your decoder s software is being improved all the time and there fore fro...

Page 7: ...ambled TV channels Gently push the card into the slot Its chip should face downwards and the symbol of an arrow should face inwards Two Nagra Smart Cards e g Mediaset and Pangea cannot be used at the same time If you are using two Cards it does not matter to which slot you place a Card first If you are using just one Card it also does not matter which slot you use Decoder Remote Control Power Bric...

Page 8: ... 4 Connectivity Diagram Connecting the decoder to your Home Cinema System If you want to enjoy the surround sound broadcast connect the decoder and your Home Cinema system via an S PDIF cable and change the Dolby Digital option Main Menu Installation Settings System Settings to Yes 1 2 3 4 5 6 7 TV Hi Fi Antenna Power Socket Telephone Socket Home Cinema VCR DVD ...

Page 9: ...s of the IN jack Please note that when two receivers are connected to the antenna cable with the signal splitter only one device can be used at a time If you are not able to use your receiver despite having the second one turned off please try unplugging the power cable of the second receiver Please use ONLY the signal splitter supplied with this decoder Using other signal splitters may damage the...

Page 10: ... Card you can view free to air channels If you have more questions about the card functioning contact your service provider Looking After Your Smart Card The card is fragile so bear in mind the following precautions Do not bend or twist the card Do not expose the card to heat or direct sunlight After inserting the card leave it in the slot permanently Clean only with a soft dry cloth ...

Page 11: ...nnel lists and tune to a desired channel This button is inactive Displays the Electronic Program Guide Switches between the Channel Banner Channel Banner with Extended Information and viewing mode in a circular manner In the Channel Banner they browse through channels In different menus they shift highlight When up down shifting is possible there are icons displayed In the Channel Banner they swit...

Page 12: ...a few additional functions in some screens Displays and hides the Applications window Dispalays Teletext and is also used by some external applications Switches your decoder between the TV and Radio modes Displays the Options menu which allows to change the Video Resolution ...

Page 13: ... language selected in this window is also automatically assigned as the language of Primary Audio Primary Subtitles and Teletext Language Please note that you can also change the on screen language in the Language Options screen Main Menu Your Preferences Channel Numbering Method In the Select Channel Numbering Method screen you can choose the way channels are organized Press or to highlight the c...

Page 14: ... and change the TV Screen Format option to 16 9 TV Screen Format Change Channel Search After you have selected the numbering method and pressed the channel search will start automatically When this procedure is completed you will be informed about the total number of channels found Afterwards press the button to tune to the first TV channel If the channel searching procedure has not been completed...

Page 15: ...ow buttons on the remote control which moves the on screen highlight to different items Once you have pointed to an item highlighted an item on the screen select it by pressing the button on the remote control You can also press the button to go to the previous screen or to close all the windows screens and return to normal viewing Selecting Channels You can tune to the desired channel in a few wa...

Page 16: ...hannel the name of the channel is black When the decoder is in the browsing mode the name of the channel is blue and the icon appears in the Channel Banner When the Channel Banner displays the information about the current channel or is in the browsing mode pressing either or displays the information about the next program Pressing or once gain displays the information about the current program Ch...

Page 17: ... able to enjoy the surround sound you need suitable equipment and Dolby Digital in System Settings Main Menu Installation Settings set to Yes Recording Reminder has been set for a particular program Viewing Reminder has been set for a particular program The program is locked according to the parental settings defined in the For Parents submenu under the Main Menu External applications are availabl...

Page 18: ...hannels found are gathered in the All TV and All Radio lists You can however create additional six TV and six Radio lists where you can group channels you watch most often In order to access the lists of channels either All TV Radio or your favorite ones press the button on the remote control Use the button to switch between Radio and TV lists If you have defined your favorite lists you can access...

Page 19: ...ny changes Audio Language If available you can select any of the audio soundtracks being broadcast If any languages with the surround sound are available for the current program they are marked by the symbol Please note that to be able to enjoy the surround sound you need suitable equipment and Dolby Digital in System Settings Main Menu Installation Settings System Settings set to Yes Subtitle Lan...

Page 20: ...access the Applications window with a list of the available applications press the button on your remote control Select an application using the buttons and confirm your selection by pressing the button If your decoder is currently running an application it is impossible to display the Applications window by pressing To display the Applications window you have to first leave the running applicatio...

Page 21: ...e number buttons If you do not want to unlock the channel press to tune to the previous channel or press to tune to another channel Locked channels are marked by the icon while locked programs are marked by the icon in the Channel Banner When you enter the correct PIN code the locked channel remains unlocked as long as you are tuned to this channel If you tune to another channel the unlocked chann...

Page 22: ...ccording to the Point and Select rule Main Menu Window For Parents List Organization Channel Manager Viewer Planner Your Preferences Installation Help Remote Control TV Settings System Information CA Information Update Channel Lists System Settings Modem Settings Loader Information Receiver Upgrade Reinstall Channel Lists Parental Level Change PIN Code Settings Using Your Receiver Receiver Lock Di...

Page 23: ...tings Help Gives you access to the information concerning the basic functions of your decoder Viewer Planner When you select Viewer Planner from the Main Menu you get access to the list of Timers and Reminders which have already been set Timers are notifications set up in order to inform you about the coming time during which you want to view listen to or record the TV or Radio content There are t...

Page 24: ...ng List of them available to see in Viewer Planner Viewer Planner Icon visible in the list in Viewer Planner Yes Yes Icon visible in the Channel Banner No Yes Will a window with the notification appear 1 5 minutes before Yes Yes Can I modify and delete it in the Viewer Planner submenu Yes Yes When the notification window is displayed and I do not press to make the decoder tune to the appropriate c...

Page 25: ...r recording Daily means that the timer is defined for each day from Monday to Friday Weekly means that the Timer is set to occur once a week In the Set a Timer window by pressing you move the highlight to particular items and by pressing buttons you change the values of the highlighted items For the Channel Date and Start End Time modification you can also use the number buttons on your remote con...

Page 26: ...e button to display the Canceling a Reminder window Press the button on your remote control to confirm the cancellation Open the Viewer Planner submenu under the Main Menu Highlight the Reminder you want to cancel delete Press the button Press to confirm To modify Reminders go to Viewer Planner under the Main Menu If the Receiver Lock option Main Menu For Parents is set to Yes you will be asked to...

Page 27: ...sts when you are in the Channel Manager menu follow the procedure below Select Mode TV if you want to add channels to your favorite TV list s or Radio if you want to add channels to your favorite Radio list s Select the favorite list to which you want to add channels If the list already contains some channels set the Modify option to Add Channels and press to open the Add Channels window If the li...

Page 28: ... the list press the button to save the information Move Channels You can change the order of channels within the All TV Radio and your favorite channel lists To move channels within All TV or All Radio list follow the procedure below Set the Mode option to Radio if you want to move channels within the All Radio list or TV if you want to move channels within All TV list Set the Channel List option ...

Page 29: ... Channel Manager screen Please note that the selected channel the one you want to move is inserted in the chosen position and the channels are renumbered so that the numbering stays continuous Skip Channels In the Skip Channels submenu you can select the channels you want to skip when changing channels by means of buttons or when browsing in the Channel Banner You can however tune to the skipped c...

Page 30: ... list Using the buttons select the channel you want to hide and press the button The confirmation window will appear Press the button to confirm your choice The channel you have selected will disappear from the list After you have selected all the channels you want to hide press the button to save the information If you want to restore the hidden channels use the Restore Channels option under Chan...

Page 31: ...hich contains the channels you want to rename from the Channel List option Set the Modify option to Rename Channels Press the button to display the channels of the chosen list Using the or number buttons select the channel you want to rename and press the button to display the virtual keyboard Type in a new name of the channel Navigation of the virtual keyboard In the Channel Name Box the name of ...

Page 32: ...enter the PIN code every time you attempt to watch this channel In order to select channels you want to lock follow the procedure below Set the Mode option to Radio if you want to lock channels from a Radio list or to TV if you want to lock channels from a TV list Select the list which contains the channels you want to lock from the Channel List option Set the Modify option to Lock Channels Press ...

Page 33: ...n The added list will automatically appear in the List Organization window In order to change the order of channel lists Reorder follow the procedure below Using the buttons select the Reorder List command Highlight the list you want to move to another position and press The icon will appear next to the name of the selected list Using buttons move the list to the desired position Press to make the...

Page 34: ...e by default the Receiver Lock option is set to Yes In the For Parents menu you can activate or deactivate the blockade of the receiver set the age level according to which programs will be locked change your PIN code Receiver Lock To open the Receiver Lock window highlight the Receiver Lock item under the For Parents submenu and press The Receiver Lock screen contains only the Receiver Lock optio...

Page 35: ... PIN code In order to change Parental Level press the buttons until the age level you are interested in is displayed Then press the button to confirm your setting Change PIN Code To open the Change PIN Code window highlight the Change PIN Code item under the For Parents submenu and press In the Change PIN Code screen you can change your PIN code To do that using the keys enter the current PIN code...

Page 36: ...he settings press the button Channel Banner Duration defines how long the channel information remains displayed after tuning to another channel Volume Bar Yes When you press the buttons to adjust the volume the volume bar is displayed No When you press the buttons to adjust the volume the volume bar is not displayed Application AutoSTART Yes External applications available on a particular channel ...

Page 37: ... Preferences submenu and press Using the buttons highlight the option you want to change Use the buttons to change values of the highlighted option To confirm the settings press the button On screen Language specifies the language in which all the menus and screens are displayed Primary Audio specifies the first choice of language you would like to use for your audio sound tracks Secondary Audio s...

Page 38: ...m Diagnostics TV Settings The TV Settings screen contains the following options TV Screen Format The TV Screen Format option should be set to correspond with the format of your TV screen The default TV Screen format is 4 3 Display Format If your TV screen format is different than the format of the program currently broadcast you can choose the way the picture is transformed You can choose between ...

Page 39: ...Yes the sound will only be available on the S PDIF and HDMI outputs Auto Upgrade in Standby If this option is set to Yes and you switch your decoder into standby mode after about one hour the decoder checks whether a new software version is available If a new software version is detected the upgrade is carried out automatically If you set the Auto Upgrade in Standby option to No the upgrade proces...

Page 40: ...e the virtual keyboard see page 31 Modem Settings Energy Saving Mode By default the Energy Saving Mode is set Yes This means that whenever possible the decoder enters a low energy consumption mode when in standby Consequently it may need up to 90 seconds to turn back on from standby Actions that prevent the decoder from entering low energy consumption mode are for example recordings or new channel...

Page 41: ...ll the changes made in List Organiza tion and Channel Manager e g channel locks or favorite lists content are canceled Please note that if you choose the Reinstall Channels Lists option you will be ask to choose the way channels are to be numbered For more information see page 13 By means of the Manual Channel Search you can look for channels broadcast on different frequency range than the default...

Page 42: ...tored and the first time installation process described in the How to Set up Your Decoder chapter is started Help The Help menu provides you with some basic informa tion on actions of the remote control buttons as well as information concerning the overall functionality of the decoder If the upgrade of the decoder s software has been performed you can learn about the new features in the What is Ne...

Page 43: ...Electronic Program Guide press key on your remote control Use the buttons to navigate through the days of the week and the buttons to scroll through the program list for a particular day Using the red and green keys lets you scroll the whole page up or down Pressing the yellow key allows you to select the category subcategory of the programs to be displayed In the EPG you can also set Viewing or R...

Page 44: ...r remote control fails to operate your decoder Make sure your decoder is in the operate mode Make sure that you are pointing your remote control at the decoder s front panel Check the batteries in your remote control Make sure that the decoder is not exposed to direct sunlight There may be a temporary transmission error or your decoder has lost some of its software settings Switch off your decoder...

Page 45: ...Compliance DVB compliant Quality according to EU norms CE marking MTBF 50 000h Energy Consumption In Operate Mode 9 0 W In Active Standby Mode 4 5 W In Passive Standby Mode 0 7 W General Data Dimensions 23 5w x 17 5d x 4 2h cm One LED On Standby RCU key pressed Weight Decoder 560g Accessories 375g Packaging 410g Default PIN code 1234 This specification is subject to improvement and change without ...

Reviews: