background image

16

HHC315C

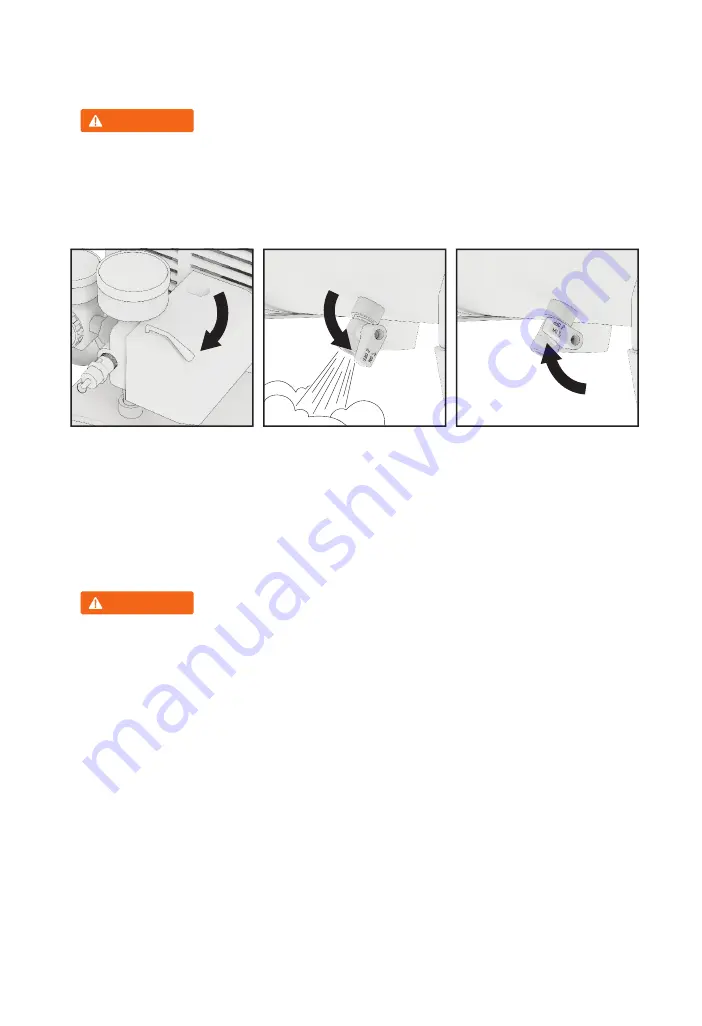
5.2 DRAINING THE AIR TANK

WARNING!

ALWAYS use ear and eye protection when draining the air tank, 
escaping air may contain moisture and debris.

Condensation will form inside the air tank. Make sure to completely drain condensed 
water from the tank after each use to prevent rust and thinning of air tank.

1. 

Turn power switch to OFF and unplug the power cord from receptacle.

2. 

Open the drain valve and drain all air and condensed water from the air tank. 
Tilt tank to remove all moisture. 

3. 

Once air tank is fully drained, close the drain valve.

5.3 CHECKING FOR AIR LEAKS

WARNING!

Minor leaks may cause the air compressor to overwork which can 
result in premature breakdown or lower performance.

1. 

Turn power switch to OFF and open drain valve to release all pressure from 
the air tank.

2. 

Apply a water and soap solution to all air line fittings and connections. 

3. 

Turn power switch to ON.

4. 

If soap bubbles appear or grow on these fittings when compressor reaches 
the pressure cut-out limit and the pump turns off, this indicates a leak at that 
location.

5. 

Turn power switch to OFF.

6. 

Tighten or replace leaking fittings and connections

CLOSE

OPEN

CLOSE

CLOSE

1

2

3

OFF

4

5

6

1

2

3

OFF

OPEN

Summary of Contents for HHC315C

Page 1: ...HHC315C User Manual...

Page 2: ...1 HYUNDAI 2022 Hyundai Power Equipment All Rights Reserved Licensed by Hyundai Corporation Holdings Korea HHC315C_UG_EN_2022 03 03 HHC315C...

Page 3: ...line for your warranty to be valid It only takes a minute do it now while you still have your purchase receipt Support for your product is available online including parts service center locations and...

Page 4: ...ncluding safety setup operation and maintenance that must be followed All information in this guide is based on information available at the time of print This guide or revised editions can be found o...

Page 5: ...10 3 Getting Started 11 3 1 Initial Inspection 11 3 2 Assembly 11 4 Operation 13 4 1 Starting Your Air Compressor 13 4 2 Stopping your Air Compressor 14 5 Maintenance 15 5 1 Maintenance Schedule 15 5...

Page 6: ...and ear protection Long durations of use may contribute to hearing loss ALWAYS wear certified breathing masks to reduce the risk of inhaling harmful particles and vapours Sprayed materials such as pa...

Page 7: ...ate abnormally Then disconnect power and air hose and investigate the problem Secure loose clothing hair and jewellery that may be caught in the moving parts of the air compressor 1 2 AC SAFETY WARNIN...

Page 8: ...tank is designed to withstand specific operating pressures NEVER adjust or substitute parts to alter the factory set operating pressures NEVER remove or modify safety guards or covers NEVER operate th...

Page 9: ...s section will show you how to identify key parts of your air compressor Going over the terminology below will make sure we re on the same page 2 1 COMPONENT IDENTIFICATION Air Tank Drain Valve Oil Si...

Page 10: ...knob counterclockwise Can only decrease the amount of pressure being delivered from the air tank can not increase pressure Air Intake Filter Prevents dust and debris from entering and damaging the ai...

Page 11: ...OFF the air compressor Quick Connect Air Outlet Allows easy attachment and removal of the air hose Safety Relief Valve This valve allows excess tank pressure to escape It should open when tank pressur...

Page 12: ...mpressor from top to bottom before first use If any parts are found to be damaged contact customer support for help we ve got you covered See the Warranty chapter for more info 3 2 ASSEMBLY 3 2 1 INST...

Page 13: ...l Capacity 80 mL DO NOT overfill SAE 10W 30 or SAE Synthetic 5W 30 is recommended for general use Use of synthetic oil does not affect maintenance schedule Oil Sight Gauge Oil Fill Cap SAE 30 Oil Oil...

Page 14: ...se 1 Place air compressor on a level surface 2 Make sure the drain valve is closed 3 Check the oil sight gauge and ensure oil level is aligned with the red dot 4 Attach an air hose and the desired air...

Page 15: ...nsure the air hose also supports this air pressure 8 The air compressor is ready for use 4 2 STOPPING YOUR AIR COMPRESSOR DANGER ALWAYS use ear and eye protection when draining the air tank escaping a...

Page 16: ...and extend the service life of the air compressor Maintain the air compressor according to the maintenance schedule below 5 1 MAINTENANCE SCHEDULE NOTE Service more frequently when used in dusty cond...

Page 17: ...moisture 3 Once air tank is fully drained close the drain valve 5 3 CHECKING FOR AIR LEAKS WARNING Minor leaks may cause the air compressor to overwork which can result in premature breakdown or lowe...

Page 18: ...ve Replace the valve immediately if it leaks air continuously 1 Turn power switch to OFF and unplug the power cord from receptacle 2 Open drain valve to release all pressure 3 Grasp the wire ring on t...

Page 19: ...reas with excessive dust 1 Turn power switch to OFF 2 Unplug the power cord from receptacle Secure cord around air compressor 3 Turn regulator knob counter clockwise until the outlet pressure gauge re...

Page 20: ...t Pressure reading on the outlet pressure gauge drops when a tool is used It is normal for the gauge to show a minimal pressure loss during initial use of a tool First try to adjust the outlet pressur...

Page 21: ...lubricated Rated Speed 3300rpm Cylinder Material Cast Iron Number of Stages 1 Bore 42 mm Stroke 38 mm TANK Tank Capacity 3 Gal 11 4 L Tank Style Horizontal Tank Drain Type Ball Valve Operating Pressur...

Page 22: ...alled by an authorized service center are warranted for a period of 90 days from date of purchase Labour must be performed by an authorized service center unless given Midland s prior written approval...

Page 23: ...California The California Air Resources Board and Midland Power Inc are pleased to explain the emission control system warranty on your Midland Power Inc engine In California new spark ignited small o...

Page 24: ...perature sensor Engine control module Fuel regulator Intake manifold Evaporative Fuel Tank Fuel Cap Fuel Hoses Vapor Hoses Carbon Canister Canister Mounting Brackets Fuel Strainer Fuel cock Fuel Pump...

Page 25: ...HHC315C Customer Service Online www benchmark midlandpowerinc com E mail support midlandpowerinc com Toll Free 1 877 528 3772 Enjoy Be sure to check www hyundaipower ca for updates regarding your prod...

Page 26: ...ntact Midland Power Inc 376 Magnetic Drive Toronto ON Canada M3J 2C4 1 877 528 3772 support hyundaipower ca www hyundaipower ca Imported Distributed by Midland Power Inc Canada Licensed by Hyundai Cor...

Reviews: