background image

Instruction manual

3

Utilization of the product


If you want to dispose this product, 

do not mix it with general household 
waste. There is a separate collection 
system for used electronic products 
in accordance with legislation that 
requires proper treatment, recovery 
and recycling.

Please contact your local authorities 

for the correct method of disposal. 
By doing so, you will ensure that 
your disposed product undergoes the 
necessary treatment, recovery and 
recycling and thus prevent potential 
negative effects on the environment 
and human health.

Important safeguards


•  The instruction manual contains 

important operating and maintenance 
instructions. For your safety, it is 
necessary to refer the manual. Keep 
the manual for use in future.

•  Do not hit or drop the unit.
•  Do not expose the unit to 

vibration, direct sunlight, too high or 
low temperature or humidity.

•  Do not disassemble the unit 

yourself. Refer servicing to qualified 
service personnel.

•  When the battery is exhausted, 

it should be removed from the set to 

prevent leakage.

Power supply


Power source

This unit is operated by a 3.7V BL-

5C, 1000 mA/h rechargeable lithium 
ion battery (included) or via USB cable.

Battery installation

To install the battery:
1.) Remove the battery 

compartment door.

2.) Follow the polarity to install the 

accompanied lithium ion battery

3.) Replace the battery compartment 

door.

WARNING:
•  Be sure that the battery is installed 

correctly. 

•  Only batteries of the same or 

equivalent type as recommend are to 
be used.

•  If the unit is not to be used for an 

extended period of time, remove the 
battery to prevent damage or injury 
from possible battery leakage.

•  Do not dispose of the battery in 

fire, the battery may explode or leak.

WARNING: The rechargable lithium 

ion battery is a consumable and its 
malfunction is not a warranty case.

General operations

Earphone socket

For private listening please insert 

Summary of Contents for H-PS1201

Page 1: ...ПОРТАТИВНАЯ АУДИОСИСТЕМА PORTABLE AUDIO SYSTEM Руководство по эксплуатации Instruction manual H PS1201 ...

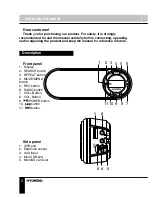
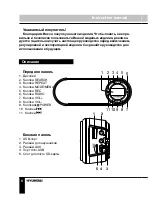
Page 2: ... and or adjusting the product and keep the manual for reference in future Description Front panel 1 Display 2 SEARCH button 3 REPEAT button 4 MODE MENU button 5 REC button 6 RADIO button 7 VOL Button 8 VOL Button 9 POWER button 10 button 11 button Side panel 1 USB port 2 Earphone socket 3 AUX input 4 Mini USB port 5 MicroSD card slot 1 2 3 4 5 6 7 8 9 10 11 1 2 3 4 5 ...

Page 3: ...w temperature or humidity Do not disassemble the unit yourself Refer servicing to qualified service personnel When the battery is exhausted it should be removed from the set to prevent leakage Power supply Power source This unit is operated by a 3 7V BL 5C 1000 mA h rechargeable lithium ion battery included or via USB cable Battery installation To install the battery 1 Remove the battery compartme...

Page 4: ...the unit is connected to the computer laptop via mini USB cable Record Press button and choose the recording mode Press M button to enter recording mode Press button to pause when recording press again to continue recording Press and hold M button for 3 seconds to stop and save the record to your Micro SD card The device will automatically create a VOICE folder on the Micro SD card You can celect ...

Page 5: ...ect the Repeat Mode and repeat the operation again till an icon A B will appear on the display When the A icon starts flashing press button to set the beginning time Then B will start flashing Press button again to set the end time The system will repeat the section you selected 5 times then return to normal play USB SD operation Connecting USB SD Insert a USB device into the USB port or insert a ...

Page 6: ... the USB port Such damages are not warrantee cases Warning usage of external USB drives containing BIN files in the root directory may cause malfunction of the unit or damage to the software Alarm operation Alarm mode Press MODE MENU button and choose SYSTEM SETTINGS In TOOL submenu choose ALARM and switch it to ON Set the alarm time in the same manner as the clock Choose CYCLE option to set the i...

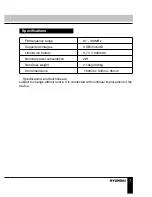
Page 7: ...USB microSD Lithium ion battery 3 7V 1000mAh Nominal power consumption 2W Net Gross weight 0 14kg 0 36kg Unit dimensions 150mm x 53mm x 35mm Specifications and functions are subject to change without notice It is connected with continual improvement of the device 7 ...

Page 8: ...ред включением регулировкой и эксплуатацией изделия Сохраняйте руководство для использования в будущем Описание Передняя панель 1 Дисплей 2 Кнопка SEARCH 3 Кнопка REPEAT 4 Кнопка MODE MENU 5 Кнопка REC 6 Кнопка RADIO 7 Кнопка VOL 8 Кнопка VOL 9 Кнопка POWER 10 Кнопка 11 Кнопка Боковая панель 1 USB порт 2 Разъём для наушников 3 Разъём AUX 4 Порт mini USB 5 Слот для micro SD карты 1 2 3 4 5 6 7 8 9 ...

Page 9: ...уководством и сохраните его для последующего использования Не наносите ударов по устрой ству не роняйте его Не подвергайте устройство вибрации воздействию прямых солнечных лучей высоких или низких температур и влажности Не включайте радиоприемник в ванных комнатах около кухонных плит ото пительного оборудования Не разбирайте корпус устрой ства самостоятельно Доверяйте ремонт устройства только квал...

Page 10: ...ов данного устройства звук не будет передаваться через встро енный динамик устройства Часы В режиме часов нажмите кнопку MODE MENU С помощью кнопок и выберите пункт НАСТРОЙКИ и нажмите на кнопку MODE MENU Затем выберите пункт ВРЕМЯ и снова нажмите кнопку MODE MENU С помощью кнопок и настройте дату и время нажимая кнопку MODE MENU для подтверждения Входной разъем AUX Для подключения линейного аудио...

Page 11: ...кт БУДИЛЬНИК FM В перрвом пункте выставьте значение БУДИЛЬНИК ВКЛ Выберите пункт ВРЕМЯ и установите когда должно будет включиться радио Функции воспроизведения Вы можете переключаться между композициями с помощью кнопок и Нажмите на кнопку MODE MENU во время воспроизведения и выберите в меню пункт ЭКВАЛАЙЗЕР Вы можете выбрать одну из следующих настроек натуральный рок поп классика мягкий джаз усил...

Page 12: ...льных стандартов USB и карт памяти при производ стве этих носителей Данным устройством поддерживается файловая система FAT32 Согласно стандарту USB 1 1 2 0 использование USB устройства с током потребления более 500 мА не рекомендуется без использования дополнительного источника питания Подключение без дополнительного питания USB носителей потре бляющих ток который превышает данное значение а также...

Page 13: ... необходимости протрите корпус влажной тканью при этом убедитесь что устройство отключе но от сети Предохраняйте устрой ство от попадания внутрь жидкости Расположение устройства не должно препятствовать его нормальной вентиляции Комплект поставки Портативная аудиосистема 1 шт Кабель mini USB 1 шт Литий ионный аккумулятор 1 шт Аудиокабель 3 5 3 5мм 1 шт Руководство по эксплуатации 1 шт Гарантийный ...

Page 14: ...ятор 3 7В 1000мА ч Номинальная потребляемая мощ ность 2Вт Вес нетто брутто 0 14кг 0 36кг Размеры устройства 150мм x 53мм x 35мм H PS1201_IM_01 Технические характеристики и функции могут быть изменены заводом изготовителем без предварительного уведомления в связи с постоянным усовершенствованием данного устройства 14 ...

Page 15: ......

Reviews: