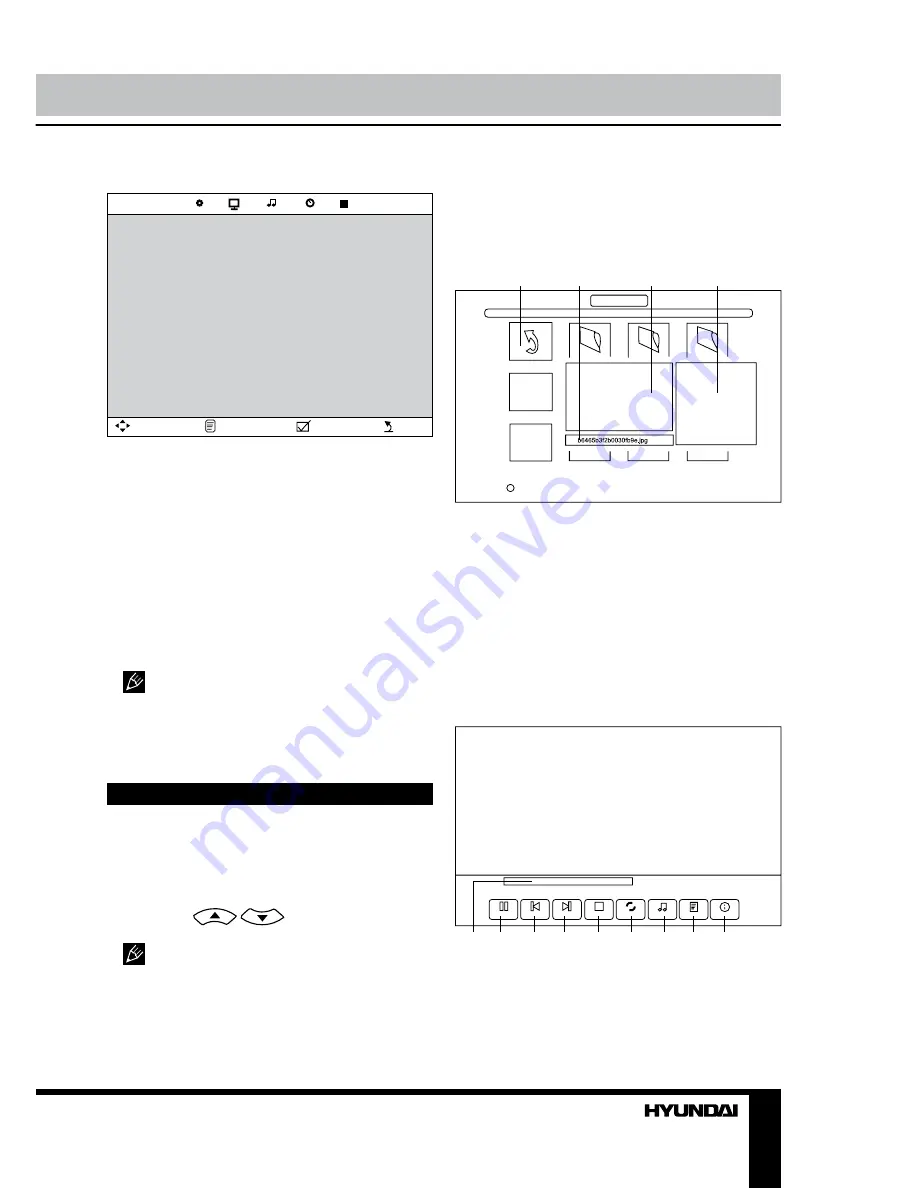
background image

11

Operation

Photo playback

As you select photo in the file type menu, 

following screen will be displayed, in which you 
can press cursor buttons to select an object 
and press OK button to confirm your selection:

PHOTO

Delete

1

2

3

4

1. Return to previous menu.
2. Current file name.
3. File preview window.
4. Current file information.
You can also press Red button on the RC to 

delete the current file.

When you select a file and press OK button, 

following menu will be shown, in which you can 
press cursor buttons to select an object and 
press OK button to perform the function:

1

2

3

4

5

6

7

8

9

1. File name
2. Pause. Play/pause the photo show.
3. Previous. Go to previous photo.
4. Next. Go to next photo.

Option setting

OPTION

OSD language
Aspect ratio
Blue screen
Key lock
Reset
Software update (USB)

Move

Menu

OK

exit

•  

OSD language

: select the OSD language.

•  

Aspect ratio

: select 4:3/16:9/Zoom1/

Zoom2.

•  

Blue screen

: set on/off blue screen active 

when there’s no signal.

•  

Key lock

: set on to make all buttons on 

the panel invalid. 

•  

Reset

: Press OK button to reset all 

settings. 

•  

Software update

: press OK button to 

enter the software update menu. 

  In this manual, the OSD Menu maybe 

changed and different from your real TV’s screen 
without further notice. This manual is just a 
sample to help you how to operate menu setting.

USB operation

Turn on USB mode

Insert a USB device into the USB port of the 

unit. Press repeatedly INPUT button to select 
Media source. The screen will show file type 
menu; press 

/

 buttons to select a file 

type you want, then press OK button to confirm.

  USB capacity supported: up to 250 Gb. 

For correct and satisfactory operation, licensed 
USB devices of famous brands should be 
used with this unit. Avoid using USB devices of 
unknown brands.

Summary of Contents for H-LED3202

Page 1: ...LED TV Instruction manual H LED3202...

Page 2: ...ting Picture setting Sound setting Time setting Option setting USB operation Turn on USB mode Photo playback Music playback Video playback Text playback General information Troubleshooting Causes of i...

Page 3: ...en the unit is unused for long periods of time When unplugging the plug always hold the wide slot do not touch the metal part and do not destroy refit twist pull or roast the power cord Please contact...

Page 4: ...ove left and right of the TV Please place all the signal cords behind of rear panel Do not overexert or touch the panel when you convey the product Do not transfer the LCD TV up or down display direct...

Page 5: ...his jack to PC main unit with related audio cable in PC mode and adjust the volume to Connection what you want If the video source has a HDMI output jack you can connect the signal to the monitor by t...

Page 6: ...R button 9 Power indicator Back panel 1 HDMI1 HDMI2 HDMI3 inputs 2 SCART connector 3 VGA input 4 USB port 5 Coaxial digital audio output 6 Headphone output 7 TVRF antenna socket 8 Mini AV input 9 Mini...

Page 7: ...utton 32 REVEAL button 33 Blue button 34 Yellow button Changing the battery 1 Remove the battery compartment cover on the back of the RC 2 Insert two AAA batteries into the battery compartment making...

Page 8: ...ferent signal sources AV signal sources Press INPUT button then press cursor buttons or CH CH buttons on the panel to cycle through the available source list as follows TV AV1 AV2 SCART Mini YPbPR HDM...

Page 9: ...ment of the current frequency AFC set automatic frequency control on off Search press buttons to perform manual search Programme edit press OK button to enter Programme edit menu Menu Fav Rename Delet...

Page 10: ...SOUND Sound mode Treble Bass Balance Auto volume SPDIF mode Move Menu OK exit Sound Mode Standard Music Movie Sports User Treble available if User sound mode is selected Bass available if User sound m...

Page 11: ...et Software update USB Move Menu OK exit OSD language select the OSD language Aspect ratio select 4 3 16 9 Zoom1 Zoom2 Blue screen set on off blue screen active when there s no signal Key lock set on...

Page 12: ...ou can also press REPEAT button on the RC for this operation 9 Mute Turn of on the sound 10 Elapsed total track time 11 Playlist not shown Show the playlist on the screen and select files for playback...

Page 13: ...RC for this operation 16 Zoom in out not shown You can also press ZOOM button on the RC for this operation 17 Aspect ratio not shown 18 Move view not shown Move the photo in zoom in mode You can press...

Page 14: ...d No audio signal or the signal cord is im properly not connected Connect the audio signal cord properly Set the sound system properly The RC does not work Batteries are improperly installed or exhaus...

Page 15: ...gressive scan Digital comb filter Quantity of channels 199 Teletext 1000 pages Power supply 100 240 V 50 60 Hz Power consumption 120 W Unit dimensions 780 x 200 x 550 mm Net Gross weight 9 2 kg 11 8 k...

Page 16: ...16 USB USB 16 17 17 17 19 19 19 19 20 20 20 20 21 21 22 22 22 22 23 23 24 24 25 25 25 25 25 26 27 28 29 29 29 30 31...

Page 17: ...17...

Page 18: ...18 20 50 LCD 10 18 2...

Page 19: ...19 75 300 75 DVD VDCR CAMCORDER PC L R RCA SCART SCART VGA YPbPr YPbPr HDMI HDMI 75...

Page 20: ...20 1 HDMI1 HDMI2 HDMI3 2 SCART 3 VGA 4 USB 5 6 7 8 9 YPbPR 10 11 12 13 1 INPUT 2 MENU 3 CH 4 CH 5 VOL 6 VOL 7 8 POWER 9 1 2 3 4 5 6 7 8 9 10 11 12 13 SCART 1 2 3 4 5 6 8 7 9...

Page 21: ...STEP HOLD 14 SLOW TV TEXT 15 INDEX 16 SUBPAGE 17 18 19 INPUT 20 21 DISPLAY 22 SLEEP 23 CH CH 24 MENU 25 26 GOTO 27 FAV A B 28 FAV ROOT 29 SUBTITLE 30 NICAM A2 31 SIZE 32 REVEAL 33 34 1 2 AAA 1 5V 3 8...

Page 22: ...ER POWER VOL VOL SLEEP TV CH CH 0 9 1 199 0 9 PICTURE 4 SOUND 5 MUTE DISPLAY ZOOM ASPECT INPUT CH CH TV AV1 AV2 YPbPr SCART HDMI1 HDMI2 HDMI3 PC Media TV TEXT TEXT HOLD INDEX SIZE REVEAL SUBPAGE 0001...

Page 23: ...23 MENU OK MENU EXIT OK OK MENU EXIT OK PAL AUTO I BG DK OK OK 1 C 04 2 S 44 3 S 05 4 C 05 5 S 09 6 S 10 7 C 06...

Page 24: ...24 CH CH FAV FAV FAV OK NTSC SPDIF OK SPDIF...

Page 25: ...25 OK 10 20 30 60 90 120 180 240 3 4 5 USB OK 4 3 16 9 1 2 OK USB USB USB USB USB INPUT Media K USB 250 USB OK...

Page 26: ...26 1 2 3 4 1 2 3 4 OK OK 1 2 3 4 5 6 7 8 9 1 2 3 4 5 6 REPEAT 7 8 CANCEL 9 10 ZOOM 11 OK 1 2 3 4 5 6 7 8 9 10 1 2 3 4 5 6 7...

Page 27: ...27 8 REPEAT 9 10 11 CANCEL 12 13 GOTO OK 1 2 3 4 5 6 7 8 9 10 1 2 3 4 5 6 7 8 REPEAT 9 OK A B 10 11 12 13 SLOW 14 STEP 15 GOTO 16 ZOOM 17...

Page 28: ...28 18 USB ROOT SUBTITLE OK 1 2 3 4 5 6 7 8 9 1 2 3 4 5 6 7 8 9...

Page 29: ...29 VGA...

Page 30: ...30 1 1 2 1 3 YPbPr 1 4 1 5 1 6 M4 x 14 5 7 1 8 1 5 2 9 1 10 1 11 1...

Page 31: ...31 32 81 250 2 3000 1 6 5 1366 x 768 16 9 PAL SECAM DK I BG USB 250 NICAM 2 8 RCA HDMI 3 VGA SCART YPbPr 199 1000 100 240 50 60 120 780 x 200 x 550 9 2 11 8...

Reviews: