Hyundai H-LCD2216 Instruction Manual Download Page 5

5

Installation and connection

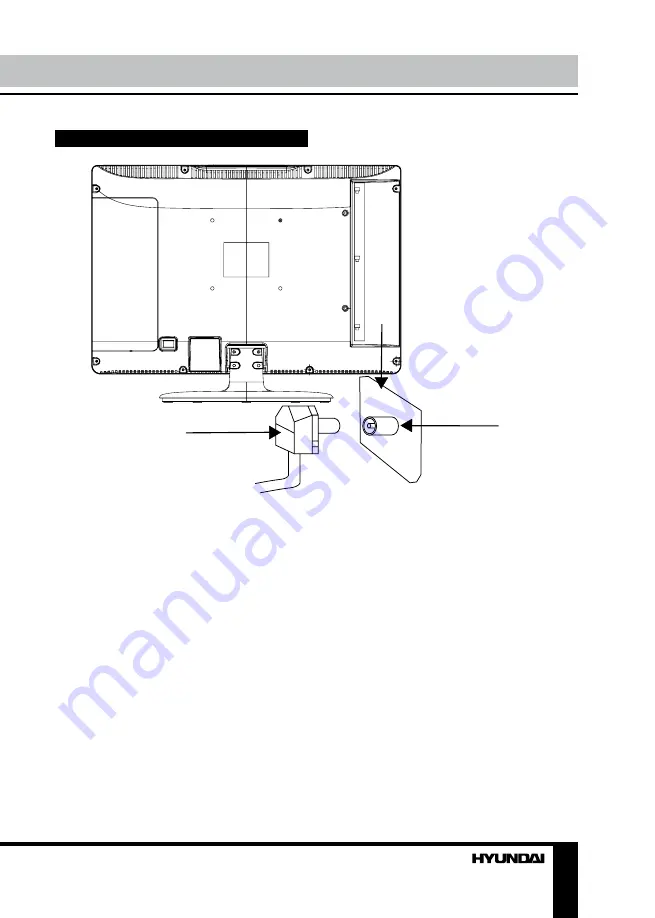
Outdoor Antenna Connection

Use 75

Ω

 coaxial cable plug or 300-75

Ω


impedance converter to plug in antenna input 
terminal on the rear of the cabinet.

Other connections

•  Connect the audio sources (Including 

DVD, VCDR, CAMCORDER and PC) to the 
proper AUDIO input jacks ‘L’ and ‘R’.

•  Connect the video source to the VIDEO 

jack by RCA cable.

•  If the video source has a SCART output 

jack, you can connect the signal to the monitor 
by the SCART cable.

•  Connect the video source to the S-VIDEO 

input jack of the monitor by the S-video cable 
(provided that the video source has S-video 
output jack).

•  When using the LCD as a computer 

screen, connect the PC to the VGA jack from 

Connection

the monitor by the relevant cable.

•  This unit has PC audio in jack. Connect 

this jack to PC main unit with related audio 
cable in PC mode and adjust the volume to 
what you want.

•  If the video source has a HDMI output 

jack, you can connect the signal to the monitor 
by the HDMI cable.

•  Connect your headphones or earphones 

(not included) to the headphone socket of 
this unit. When earphones are connected, the 
sound output through the built-in speakers of 
this unit is mute.

75 Ohm co-axis cable

TVRF antenna jack

Antenna cable connector

Summary of Contents for H-LCD2216

Page 1: ...LCD LCD TV Instruction manual H LCD2216...

Page 2: ...creen OSD operation Picture setting Sound setting Setting Function setting Channel setting PC setup Picture setup General information Troubleshooting Causes of interference Accessories Specifications...

Page 3: ...st pull or roast the power cord Please contact the service center immediately if you found that the core is showed in the air or has been broken Please replace the AC outlet if the metal bolt cannot b...

Page 4: ...product lifetime Keep a space at list 10 cm at above left and right of the TV Please place all the signal cords behind of rear panel Do not overexert or touch the panel when you convey the product Do...

Page 5: ...k of the monitor by the S video cable provided that the video source has S video output jack When using the LCD as a computer screen connect the PC to the VGA jack from Connection the monitor by the r...

Page 6: ...4 CH button 5 CH button 6 VOL button 7 VOL button 8 HDMI input 9 VGA input 10 SCART connector 11 S Video input 12 Composite video input 13 Audio right input 14 Audio left input 15 PC audio input 16 H...

Page 7: ...on Changing the battery 1 Remove the battery compartment cover on the back of the RC 2 Insert the batteries into the battery compartment making sure that the correct polarity is observed 3 Install the...

Page 8: ...for different signal sources This function is only available if the channel has NICAM signal Press AUDIO I II button on the RC repeatedly to select mono NICAM mono stereo Main dual SUB dual depending...

Page 9: ...E REDUCTION Picture Mode Personal Standard Movie Vivid Contrast Brightness Color Tint adjust the tone of color when your system is in NTSC Sharpness Color Temperature Normal Warm Cool Noise reduction...

Page 10: ...T EXIT SYSTEM LOCK CHILD LOCK KEY LOCK CHANGE CODE System lock to lock all functions when the password is entered Child Lock to lock all CHANNEL menu functions Key Lock to lock all TV buttons Change C...

Page 11: ...hannel Favorite Highlight the needed channel Press CYAN button to add the current channel to your favorite list CHANNEL MOVE SELECT EXIT PROGRAM COLOR SYS SOUND SYS MANUAL SEARCH AFT FINE SKIP Program...

Page 12: ...e phase manually Auto adjust automatical setting of the parameters Picture setup in VGA mode PICTURE MOVE SELECT EXIT PICTURE MODE CONTRAST BRIGHTNESS COLOR TEMP Picture Mode Personal Standard Movie V...

Page 13: ...nected Connect the audio signal cord properly Set the sound system properly The RC does not work Batteries are improperly installed or exhausted Make sure the positive and the negative polarities are...

Page 14: ...system PAL SECAM Sound system B G DK I Nicam stereo 2 x 3 W S video in Stereo audio in Composite video in SCART PC audio input VGA HDMI Headphone out Russian and English OSD Progressive scan Digital c...

Page 15: ...15 VGA 15 16 16 16 18 18 18 18 19 19 19 19 20 20 21 21 21 22 22 22 22 23 23 24 25 25 26 26 26 27 28...

Page 16: ...16...

Page 17: ...17 20 50 LCD 10 18 2...

Page 18: ...18 75 DVD VCDR CAMCORDER L R PAL NTSC SECAM RCA SCART DVD S Video S Video DVD S Video VGA VGA VGA HDMI HDMI HDMI 75...

Page 19: ...19 1 POWER 2 SOURCE 3 MENU 4 CH 5 CH 6 VOL 7 VOL 8 HDMI 9 VGA 10 SCART 11 S Video 12 13 14 15 16 17 8 9 10 11 12 13 14 15 16 17 1 2 3 4 5 6 7...

Page 20: ...11 CANCEL 12 TTX MIX 13 REVEAL 14 INDEX 15 16 17 MUTE 18 19 S MODE 20 MENU 21 PROGRAM PROGRAM 22 ASPECT 23 AUDIO I II 24 SIZE 25 HOLD FAV 26 SUBPAGE 27 SUBTITLE 28 29 1 2 3 AAA 1 5V 8 30 1 2 3 1 2 3 4...

Page 21: ...SLEEP 0 120 SLEEP TV PROGRAM PROGRAM CH CH 0 9 1 99 0 9 P MODE 4 S MODE 4 MUTE INFO ASPECT 4 3 14 9 NICAM AUDIO I II NICAM Main dual SUB dual NICAM SOURCE TV HDMI SCART AV S VIDEO VGA OK TV 0 9 TTX MI...

Page 22: ...22 INDEX REVEAL SUBPAGE VGA VGA MENU OK MENU EXIT NTSC AVL...

Page 23: ...23 AVL HDMI 0000 0000 OK...

Page 24: ...24 OK TV t 01 02 03 04 05 06 07 08 09 10 11 12 13 14 15 16 17 18 19 20 21 22 23 24 25 26 27 28 29 30 GREEN GREEN 5 RED RED...

Page 25: ...25 YELLOW YELLOW CYAN VGA VGA...

Page 26: ...26...

Page 27: ...27 1 1 2 1 3 1 4 1 5 2 5 1 6 1 7 1...

Page 28: ...21 6 55 250 2 1000 1 5 1920 x 1080 16 9 PAL SECAM B G DK I Nicam stereo 2 3 S video SCART VGA HDMI 99 110 240 50 60 30 524 x 200 x 388 4 3 6 4 VGA 640 x 480 60 800 x 600 60 1024 x 768 60 1920 x 1080...

Page 29: ......

Reviews: