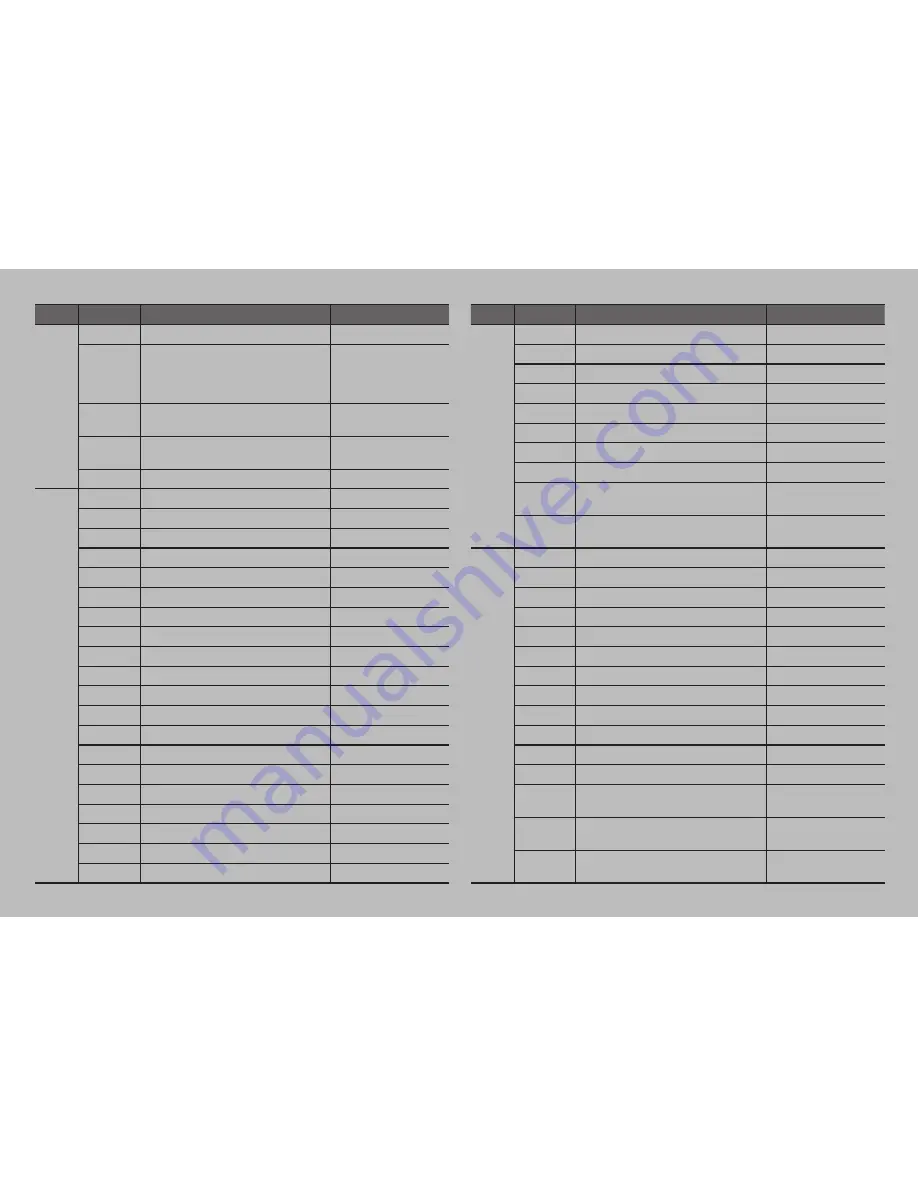
background image

Item

Command

Description

hexa

Factory

fr

factory reset

0x66 0x72

fo

factory option view

“lp:?, am:?, av:?, si:?, pwm:?, mot:?.”

-  last power, aging, av enable, source, 

pwm, motion

0x66 0x6F

mn

model nember

ex) model no 1:DID D400 SEC HD.

0x6D 0x6E

fv

firmware version

ex) fw:DID IN HD EU V4.84 110217.

0x66 0x76

dp

dpms on / dpms off

0x64 0x70

Factory 

Color 

Control

cr

Enable Color Control Mode

0x63 0x72

q

quit (from ir & cr mode)

0x71

sbu

sub-brightness 1 step up

0x73 0x62 0x75

sbd

sub-brightness 1 step down

0x73 0x62 0x64

rou

red offset 1 step up

0x72 0x6F 0x75

rod

red offset 1 step down

0x72 0x6F 0x64

gou

green offset 1 step up

0x67 0x6F 0x75

god

green offset 1 step down

0x67 0x6F 0x64

bou

blue offset 1 step up

0x62 0x6F 0x75

bod

blue offset 1 step down

0x62 0x6F 0x64

scu

sub-contrast 1 step up

0x73 0x63 0x75

scd

sub-contrast 1 step down

0x73 0x63 0x64

rgu

red gain 1 step up

0x72 0x67 0x75

rgd

red gain 1 step down

0x72 0x67 0x64

ggu

green gain 1 step up

0x67 0x67 0x75

ggd

green gain 1 step down

0x67 0x67 0x64

bgu

blue gain 1 step up

0x62 0x67 0x75

bgd

blue gain 1 step down

0x62 0x67 0x64

blu

backlight value 1 step up

0x62 0x6C 0x75

bld

backlight value 1 step down

0x62 0x6C 0x64

Item

Command

Description

hexa

Picture 

Mode

pmc

picture mode custom

0x70 0x6D 0x63

pmh

picture mode high

0x70 0x6D 0x68

pmm

picture mode middle

0x70 0x6D 0x68

pml

picture mode low

0x70 0x6D 0x6C

pbu

picture mode custom brightness 1 step upstep up

0x70 0x62 0x75

pbd

picture mode custom brightness 1 step upstep down

0x70 0x62 0x64

pcu

picture mode custom contrast 1 step up

0x70 0x63 0x75

pcd

picture mode custom contrast 1 step down

0x70 0x63 0x64

pcb

picture mode custom brightness

Brightness 70 (01~100) : ex) pcd70

0x50 0x63 0x62 value

0x50 0x63 0x62 0x37 0x30

pcc

blue offset 1 step down

Contrast 55 (01~100) : ex) pcc55

0x70 0x63 0x63 value

0x70 0x63 0x63 0x35 0x35

Picture 

Color

tru

picture color tone red up

0x73 0x63 0x75

trd

picture color tone red down

0x73 0x63 0x64

tgu

picture color tone green up

0x72 0x67 0x75

tgd

rpicture color tone green down

0x72 0x67 0x64

tbu

picture color tone blue up

0x67 0x67 0x75

tbd

picture color tone blue down

0x67 0x67 0x64

ptcm

picture color tone custom

0x70 0x74 0x63 0x6D

ptc2

picture color tone cool2

0x70 0x74 0x63 0x32

ptc1

picture color tone cool1

0x70 0x74 0x63 0x31

ptnl

picture color tone normal

0x70 0x74 0x6E 0x6C

ptw2

picture color tone warm2

0x70 0x74 0x77 0x32

ptw1

picture color tone warm1

0x70 0x74 0x77 0x31

rgb-r

color tone red  ex) rgb-r55

0x72 0x67 0x62 0x2D 0x72 value

0x72 0x67 0x62 0x2D 0x72 0x35 0x35

rgb-g

color tone green  ex) rgb-g56

0x72 0x67 0x62 0x2D 0x67 value

0x72 0x67 0x62 0x2D 0x67 0x35 0x36

rgb-b

color tone blue  ex) rgb-b45

0x72 0x67 0x62 0x2D 0x62 value

0x72 0x67 0x62 0x2D 0x62 0x34 0x35

Summary of Contents for D46CFA

Page 1: ...User s Guide MODELS D46KFA D46CFA D558FA D552FA...

Page 2: ...l not occur in a particular installation If this equipment does cause harmful interference to radio or television reception which can be determined by turning the equipment off and on the user is enco...

Page 3: ...rewith confirmed to comply with the requirements set put in the Council Directive on the Approximation of the Lows of the Member States relating to Electromagnetic Compatibility Directive 89 336 EEC L...

Page 4: ...5 Check the product list 6 Proper location for product installation 7 Installing a Bracket 8 Title and function of each part 10 Adjusting OSD and explanation of its function 15 Diagnosis 34 Specifica...

Page 5: ...place wet objects on or around the product or the power cord Do not cover or insert anything over or into the ventilation openings Do not place in a location where damage can be caused by oil smoke h...

Page 6: ...rheat thus causing premature malfunction or fire Please do not attempt to clean the inside of the product yourself please contact the local service agent Do not use alcohol or strong chemical solvent...

Page 7: ...creen and or touch screen itself The apparatus shall not be exposed to dripping or splashing and that no objects filled with liquids such as vases shall be placed on the apparatus Shall be connected t...

Page 8: ...aying white or moving frame about 10 hours But permanent afterimage cannot be disappeared according to the property of LCD This method is used to remove temporary afterimage that may occur after displ...

Page 9: ...ote control Power Cord HDMI cable HDMI to DVI Cable Option CD Manual Sheet D SUB Cable RS232C Cable Option please check the following components provided with the product after you open the box and co...

Page 10: ...ast 10cm away from the wall and ground 3 Keep the product out of direct ray of light and locate screen not to be reflected by the sunlight 4 Make sure the mounting rack firmly tightened before install...

Page 11: ...8 DIGITAL SIGNAGE Installing a Bracket A type The contents may vary depending on models...

Page 12: ...9 English DIGITAL SIGNAGE Installing a Bracket B type The contents may vary depending on models...

Page 13: ...button to select other connected device 3 Menu button to display menu or exit from the menu 4 Select button 5 To move down in OSD menu 6 To move up in OSD menu 7 To move left and control the volume d...

Page 14: ...OUT 4 PC D SUB IN 5 PC D SUB OUT 6 PC AUDIO IN 7 8 UPGRADE Port this port is used for upgrade service and not for general users 9 RS 232C IN 0 RS 232C OUT COMPONENT OUT Y Pb Pr CVBS OUT COMPONENT AUD...

Page 15: ...To move down in OSD menu 6 ENTER Select in OSD menu 7 Display the OSD menu 8 Close the OSD menu 9 Display the menu of signal source and choose it 0 Temporary sound switch off TIP If it doesn t need t...

Page 16: ...cy KHz Vertical frequency Hz 1 480p 640 x 480p 60 2 576p 720 x 576p 50 3 720p 1280 x 720p 50 60 4 1080i 1920 x 1080i 50 60 5 640 x 480 31 47 59 94 6 800 x 600 37 88 60 32 7 1024 x 768 48 36 60 8 1360...

Page 17: ...ing for analog RGB NO Resolution Horizontal frequency KHz Vertical frequency Hz 1 640 x 480 31 47 59 94 2 800 x 600 37 88 60 32 3 1024 x 768 48 36 60 00 4 1360 x 768 47 71 60 00 5 1280 x 1024 63 98 60...

Page 18: ...ng to the input mode Picture Picture Mode Custom Custom High Colour Tone Middle Size Low PC U Select Enter Menu 1 Press Menu button Menu items appear on the screen 2 Press button to select Picture Ico...

Page 19: ...ress buttons to move to Custom and press or buttons to select Custom 4 Select required option by pressing the or button then Press button to adjust 5 Press EXIT button to escape OSD MENU or press MENU...

Page 20: ...5 Press buttons then the menu changes in the following order Custom Cool2 Cool1 Normal Warm1 Warm2 6 Press EXIT button to escape OSD menu or press MENU button to return to the previous menu Custom Whe...

Page 21: ...Select Enter Menu 1 Press Menu button Menu items appear on the screen 2 Press button to select Picture Icon Picture Mode is highlighted 3 Press buttons to move to Size 4 Press or buttons and press th...

Page 22: ...t 6 Press EXIT button to escape OSD MENU or press MENU button to return to the previous menu Auto Adjust Horizontal vertical positions are automatically adjusted Phase To eliminate the shake of the pi...

Page 23: ...he Audio Mode 1 Press Menu button Menu items appear on the screen 2 Press buttons to move to Sound Icon 3 Press button to select Sound Icon Mode is highlighted 4 Press or buttons to select to Sound mo...

Page 24: ...Balance or Equalizer Balance or Equalizer menu appears 6 Select required option by pressing the buttons then Press buttons to adjust 7 Press EXIT button to escape OSD MENU or press MENU button to ret...

Page 25: ...Stereo Choose Mono for channels that are broadcasting in Mono or if you are having difficultly receiving a Stereo signal 1 Press Menu button Menu items appear on the screen 2 Press button to select S...

Page 26: ...nd Icon Mode is highlighted 3 Press buttons to move to HDMI Sound 4 Press or buttons to select to HDMI Sound 5 Press buttons to select to DVI 6 Press exit button to escape OSD MENU or press MENU butto...

Page 27: ...s menu 1 Press Menu button Menu items appear on the screen 2 Press button to select Setup Icon Reset is highlighted 3 Press buttons to move to Time 4 Press or buttons to select Time Time menu appears...

Page 28: ...eed to set the Source 11 Press buttons to move to Source 12 Press or buttons to select to Source 13 Press buttons to set to Source 1 Press Menu button Menu items appear on the screen 2 Press button to...

Page 29: ...om of the Monitor 1 Press Menu button Menu items appear on the screen 2 Press button to move to Setup Icon 3 Press button to select Setup Icon Reset is highlighted 4 Press buttons to move to Key Lock...

Page 30: ...Press button to select Setup Icon Reset is highlighted 4 Press buttons to move to DCR 5 Press or buttons to select to DCR 6 Press or buttons to set to On Off 7 Press EXIT button to escape OSD MENU or...

Page 31: ...s to select to Pixelshift 6 Press or buttons to set to On Off 7 Press EXIT button to escape OSD MENU or press MENU button to return to the previous menu Setup Reset Time Language OSD Tone Key Lock DCR...

Page 32: ...ti Function U Move Enter Menu 1 Press Menu button Menu items appear on the screen 2 Press button to move to Multi Icon 3 Press button to select Mutli Icon 4 Press buttons to move to Mutli Function 5 P...

Page 33: ...nication port on PC But do not need to set up or change when they are not controlled by PC Master You are recommended to use the Master on state only one of products that you are using Set up Value Ca...

Page 34: ...DVI OUT DVI IN DVI OUT DVI IN DVI OUT DVI IN DVI OUT DVI OUT HDMI IN HDMI IN HDMI IN DVI OUT When multi connecting in out cascade format loss of display quality can happen We recommend using a cable d...

Page 35: ...gnal loss when the displays are chained by HDMI cable 1 Press Menu button Menu items appear on the screen 2 Press button to move to Multi Icon 3 Press button to select Mutli Icon 4 Press buttons to mo...

Page 36: ...2 Press button to move to Multi Icon 3 Press button to select Multi Icon then Temp Control is highlighted 4 Press or buttons to select to Temp Control The current temperature is displayed 5 Press EXIT...

Page 37: ...perating frequencies of the product Unsupported please change you video signal when the screen is scrambled please check the cable connection and the signal generator and contact customer center Autom...

Page 38: ...es in the sensor and the polarity of battery inserted If the batteries are drained replace them with new batteries PC D SUB doesn t work Set up the resolution referring to frequency table of input ter...

Page 39: ...ut PIR option HDMI DVI D HDMI Connector D Sub PC Audio L R RS232C Component Component Audio L R Composite Composite Audio L R Output DVI D D Sub RS232C Speaker L R Component Composite Power AC 100 240...

Page 40: ...6 SOURCE 0xAC ENTER 0x8C UP 0x8D DOWN 0x8E LEFT 0x8F RIGHT 0x90 DATA LAYOUT LEAD CODE 9ms 4 5ms 0 56ms 1 125ms Tf Tf Tf 108ms 455KHz 0 56ms 2 25ms CUSTOM CODE LOW CUSTOM CODE HIGH DATA CODE DATA CODE...

Page 41: ...OMMAND END askii did 01 pn hexa 0x64 0x69 0x64 0x3A 0x30 0x31 0x2D 0x70 0x6E 0x2E decimal 100 105 100 58 48 49 45 112 110 46 Example 2 To FAN on Set ID No 2 Item HEADER SET ID COMMAND END askii did 02...

Page 42: ...ode high 0x70 0x6D 0x68 pmm picture mode middle 0x70 0x6D 0x68 pml picture mode low 0x70 0x6D 0x6C pbu picture mode custom brightness 1 step upstep up 0x70 0x62 0x75 pbd picturemodecustombrightness1st...

Page 43: ...0x66 0x66 fn fan control on 0x66 0x6E fa fan control auto 0x66 0x61 la light sensor auto 0x6C 0x61 lh light sensor high 0x6C 0x68 lm light sensor middle 0x6C 0x6D ll light sensor low 0x6C 0x6C tp temp...

Reviews: