background image

www.hyundaipowerproducts.co.uk

24

Operation

It is always a good idea to fire the heater outdoors for the first time. This will allow any oils used in 
the manufacturing process to be burned off in a safe environment. This initial burn should last at 
least 10 minutes.

    CAUTION! 

NEVER FILL FUEL TANK INDOORS. ALWAYS FILL FUEL TANK OUTDOORS. BE 

SURE THAT THE HEATER IS ON LEVEL GROUND WHEN FUELLING, AND NEVER OVERFILL 
FUEL TANK.

!

    WARNING! 

NEVER REFUEL THIS HEATER WHILE IT IS HOT OR OPERATING, FIRE OR 

EXPLOSION COULD RESULT.

!

Risk of indoor air pollution. Use heater only in well ventilated areas.

Always provide a fresh air opening in the heated space of at least three square feet (2800sq.cm) 
for each 29kW/hr of heater output. Provide a larger opening if more heater will require.
- a two-car garage door raised 15.24cm (6 inches)
- a single-car garage door raised 15.24cm (9 inches)
- TWO, a 76cm (30 inches) windows raised 38.1cm (15 inches)

Fuelling The Heater

Ventilation

Summary of Contents for HY70DKH

Page 1: ...www hyundaipowerproducts co uk 1 DIESEL KEROSENE FORCED AIR HEATER HY70DKH Instruction Manual WARNING Read and understand the instruction manual carefully before use ...

Page 2: ...reference and pass it on if the machine is loaned or sold to another user This manual has been produced by Hyundai Power Products and should be kept with the product Please read and understand these instructions before you use your product Failure to do this may result in personal injury or damage to the product The safety precautions and warnings are to ensure your safety and protect you from har...

Page 3: ...peration 23 Fueling The Heater 24 Ventilation 24 Starting Procedure 25 Stopping Procedure 26 Restarting Procedure 26 Maintenance Care 27 38 Checking Your Machine 27 Storage 27 Long Term Storage 28 Maintenance 29 Fuel Fuel Tank 29 Air Filter 29 Fan Blades 30 Nozzles 31 Spark Plug 32 Photocell 33 Fuel Filter 34 Pump Pressure Adjustment 35 Fuse Replacement 36 37 Troubleshooting 38 Technical Data 38 4...
Page 4: ...ts and other people not using the unit away from the work area Be alert and shut off the unit if anyone enters work area Keep children under the watchful care of a responsible adult Stay alert watch what you are doing and use common sense when operating the machine Never operate the machine when unwell or tired or if you have taken alcohol medicine drugs or any substances which may slow your refle...

Page 5: ...leaks Keep the machine in safe working condition Do not use the machine if the switch does not turn off the machine when running Any machine that can t be controlled with the switch is dangerous and must be replaced Regularly check to see that keys and adjusting wrenches are removed from the machine area before starting it A wrench or a key that is left attached to a rotating part of the machine m...

Page 6: ...square foot 2800sq cm opening of outside air for every 29kW hr or heater rating Minimum clearance from combustibles Top 125cm Side 125cm Front 125cm During Use Walk never run with the machine Be very careful when pulling the machine toward you You must look behind you to make sure there are no obstacles before and during operations in reverse gear if applicable Do not allow the machine to pull you...

Page 7: ...in front or at rear of heater NEVER move or handle heater while still hot NEVER transport heater with fuel in its tank If equipped with a thermostat the heater may start at any time ALWAYS locate heater on a stable and level surface ALWAYS keep children and animals away from the heater Bulk fuel storage should be a minimum of 762cm from heaters torches portable generators or other sources of ignit...

Page 8: ...ical appliances upon owners Power cables and plugs should always be regularly inspected for safety If in doubt about electrical safety you must consult a qualified electrician WARNING Risk of electric shock Use only the electrical power voltage and frequency specified on the model plate of the heater Use only a local correct plug grounded outlet and extension cord ALWAYS install the heater so that...

Page 9: ...g else To avoid carbon monoxide poisoning DO NOT use Petrol Diesel powered equipment inside any of the following Home garage tent camper van mobile home caravan or boat DO NOT use in an enclosed area or moving vehicle This is not exhaustive and if you are in any doubt contact your dealer If you think you have or someone around you has been affected by carbon monoxide poisoning Get them fresh air i...

Page 10: ...el in the correct and clearly marked container ALWAYS wear correct suitable and fit for purpose Personal Protective Equipment PPE suggested items are but not limited to safety gloves and overalls To avoid sparking or arcing keep grounded conductive objects such as tools away from exposed live electrical parts and connections These events could ignite fumes or vapors Do not operate the machine with...

Page 11: ...p the engine and allow it to cool before filling the fuel tank Never remove the cap of the fuel tank or add fuel while the engine is running or when the engine is hot Loosen the fuel tank cap slowly to relieve any pressure in the tank ALWAYS keep the handles dry clean and free of oil and fuel After fueling ensure to tighten the cap securely Never use the lock function when filling with fuel Fuelin...

Page 12: ... dilute sulphuric acid Nickel cadmium potassium hydroxide alkali electrolyte Use fresh running water to wash off excess electrolyte continue this until medical assistance arrives Make sure that you do not wash the electrolyte to another part of your body or face If electrolyte comes in to contact with Eyes the electrolyte needs to be immediately washed away with large amounts of water Make sure th...

Page 13: ...chines will cause the user to feel the effects of from vibrations These vibrations can lead to white finger Raynaud s phenomenon or carpal tunnel syndrome This condition reduces the ability of the hand to feel and regulate temperature causing numbness and heat sensations and may cause nerve damage and circulatory tissue death Not all factors that lead to white finger disease are known but cold wea...

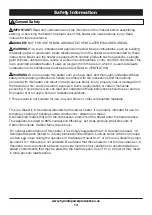
Page 14: ...tions and instructions provided with this heater can result in death serious bodily injury property loss or damage from the hazards of fire soot production explosion burns asphyxiation or carbon monoxide poisoning Only persons who can read and understand these instructions should use or service this heater Not for use in home or recreational vehicles This is a Diesel 1 K Kerosene directed fire for...

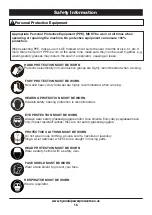
Page 15: ...NG MUST BE WORN Do not wear loose clothing gloves scarfs neckties or jewellery rings wrist watches which can be caught in moving parts HEAD PROTECTION MUST BE WORN Wear a safety helmet with a safety visor FACE SHIELD MUST BE WORN Wear a face shield to protect your face RESPIRATOR MUST BE WORN Wear a respirator Appropriate Personal Protective Equipment PPE MUST be worn at all times when operating o...

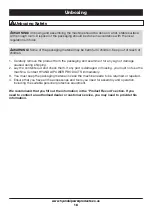
Page 16: ...ed or repaired 4 Ensure that you have all the accessories and tools you need for assembly and operation including the suitable personal protective equipment WARNING Unboxing and assembling the machine should be done on a flat stable surface with enough room Disposal of the packaging should be done in accordance with the local regulations in force WARNING Some of the packaging material may be harmf...

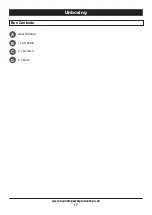
Page 17: ...www hyundaipowerproducts co uk 17 www hyundaipowerproducts co uk 17 Unboxing Box Contents User Manual Top Handle 2 x Screws 2 x Nuts A B C D ...

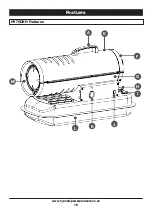
Page 18: ...www hyundaipowerproducts co uk 18 www hyundaipowerproducts co uk 18 Features HY70DKH Features A E F G H I J K L M ...

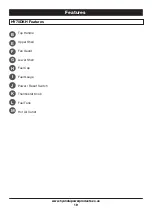
Page 19: ...oducts co uk 19 www hyundaipowerproducts co uk 19 Features Top Handle Upper Shell Fan Guard Lower Shell Fuel Cap Fuel Gauge Power Reset Switch Thermostat Knob Fuel Tank Hot Air Outlet HY70DKH Features B E F G H I J K L M ...

Page 20: ...e Product Record section If you need to contact an authorised dealer or customer service you may need to provide this information NOTE Images may vary depending on model NOTE The machine may be supplied with some parts already assembled Prior to assembly check all items have been received The mulching plug may already be installed for transport ...

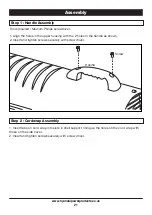
Page 21: ...Align the holes in the upper housing with the 2 holes in the handle as shown 2 Insert and tighten screws securely with screw driver 1 Insert tabs on cord wrap into slots in shell support lining up the holes on the cord wrap with those on the side cover 2 Insert and tighten screws securely with screw driver Handle Screw Step 2 Cordwrap Assembly ...

Page 22: ...OT use any fuel that is not approved above NOTE Diesel 1 K kerosene should only be stored in a blue container that is clearly marked Diesel 1 K kerosene Never store diesel 1 K kerosene in a red container Red is associated with gasoline NEVER store diesel 1 K kerosene in the living space Diesel 1 K kerosene should be stored in a well ventilated area outside the living area NEVER use fuel such as ga...

Page 23: ...ich forces air around and into the combustion chamber where it is super heated and forced out the front of the chamber Temperature Limit Control This heater is equipped with a temperature limit control designed to turn the heater off should the internal temperature rise to an unsafe level if this device activates and turns your heater off it may require service Once the temperature falls below the...

Page 24: ...OUND WHEN FUELLING AND NEVER OVERFILL FUEL TANK WARNING NEVER REFUEL THIS HEATER WHILE IT IS HOT OR OPERATING FIRE OR EXPLOSION COULD RESULT Risk of indoor air pollution Use heater only in well ventilated areas Always provide a fresh air opening in the heated space of at least three square feet 2800sq cm for each 29kW hr of heater output Provide a larger opening if more heater will require a two c...

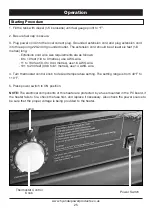
Page 25: ...are as follows 6 to 10 feet 1 8 to 3 metres use AWG wire 11 to 100 feet 3 4 to 30 4 metres use 16 AWG wire 101 to 200 feet 30 8 to 61 metres use 14 AWG wire 4 Turn thermostat control knob to desired temperature setting The setting range is from 40 F to 110 F 5 Press power switch to ON position NOTE The electrical components of this heater are protected by a fuse mounted in the PC board if the heat...

Page 26: ...topping Procedure 1 Turn the power switch to OFF position and unplug the power cord Restarting Procedure 1 Wait 10 seconds after shutting off the heater 2 Turn the power switch to ON position 3 Be sure to follow all starting procedure precautions ...

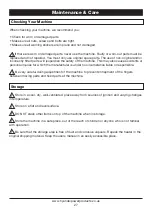
Page 27: ...ingers between moving parts and fixed parts of the machine When checking your machine we recommend you Check for worn or damaged parts Make sure all nuts screws and bolts are tight Make sure all warning stickers are in place and not damaged Storage Store in a cool dry well ventilated place away from sources of ignition and varying changes in temperature Store on a flat and level surface DO NOT sta...

Page 28: ...2 Using a small amount of diesel 1 K kerosene rinse and swirl the diesel 1 K kerosene inside of the fuel tank empty the tank fully 3 To replace push the drain head fully into the drain hole and secure by pushing the seal cap fully into the head hole IMPORTANT Never store leftover Diesel 1 K kerosene over the summer Using old fuel can damage your heater ...

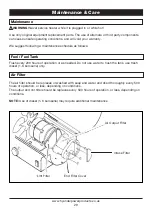
Page 29: ...while hot Fuel Fuel Tank Flush every 200 hours of operation or as needed Do not use water to flush the tank use fresh diesel 1 K kerosene only Air Filter The air filter should be replaces or washed with soap and water and dried thoroughly every 500 hours of operation or less depending on conditions The output and lint filter should be replaces every 500 hours of operation or less depending on cond...

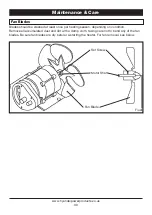
Page 30: ...eaned at least once per heating season depending on condition Remove all accumulated dust and dirt with a damp cloth taking care not to bend any of the fan blades Be sure fan blades are dry before re starting the heater For fan removal see below Set Screw Motor Shaft Fan Blade Flush ...

Page 31: ...y be necessary to soak nozzle in clean diesel 1 K kerosene to help loosen any particles NOTE Use of diesel 1 K kerosene may require an additional maintenance Using this heater without proper maintenance or with contaminated or old fuel may lead to improper combustion and possible soot production BE SURE FUEL USED IS APPROVED Burner Head Burner Head Screw Spark Plug Ignitor Wire Fuel Line Hose Air ...

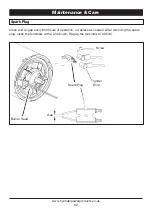
Page 32: ...intenance Care Spark Plug Clean and re gap every 600 hours of operation or replace as needed After removing the spark plug clean the terminals with a wire brush Re gap the terminals to 0 35cm Screw Igniter Wire Gap Burner Head Spark Plug ...

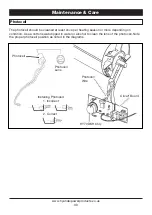
Page 33: ...once per heating season or more depending on condition Use a cotton swab dipped in water or alcohol to clean the lens of the photocell Note the proper photocell position as noted in the diagrams Photocell Photocell Lens Photocell Wire Circuit Board HY70DKH Only Installing Photocell 1 Incorrect 2 Correct ...

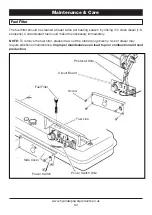
Page 34: ...el 1 K kerosene Contaminated fuel could make this necessary immediately NOTE To remove the fuel filter please draw out the rubber plug directly Use of diesel may require additional maintenance Improper maintenance can lead to poor combustion and soot production Power Switch Power Switch Wire Side Cover Fuel Line Screw Fuel Filter Circuit Board Photocell Wire ...

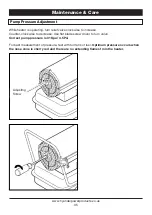
Page 35: ...ve clockwise to increase Counter clockwise to decrease Use flat blade screw driver to turn valve Correct pump pressure is 31Kpa 4 5Psi For best measurement of pressure test with full tank of fuel Optimum pressure occurs when the nose cone is cherry red and there are no extending flames from the heater Adjusting Screw ...

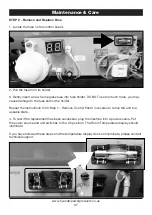
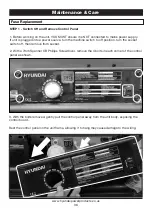
Page 36: ... into a power source turn the machine switch to off position turn the socket switch off then remove from socket 2 With a 7mm Spanner OR Phillips Screwdriver remove the 4 bolts in each corner of the control panel as shown 3 With the bolts removed gently pull the control panel away from the unit body exposing the control board Rest the control panel on the unit frame allowing it to hang may cause da...

Page 37: ...e damage to the fuse and or the holder Repeat the instructions from Step 1 Remove Control Panel in reverse to retrun the unit to a useable state 4 To test if the replacement has been successful plug the machine into a power source Put the power source and unit switches to the On position The Room Temperature display should illuminate If you have followed these steps and the temperature display doe...

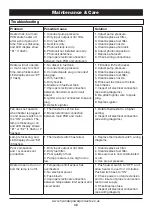
Page 38: ... nozzle 6 Rinse out fuel tank with clean fresh diesel 7 Inspect all electrical connection see wiring diagrams 8 Re attach igniter wire to spark plug 9 Replace igniter Fan does not operate when heater is plugged in and power switch is in the ON position The lamp is flickering or on and LED display shows E1 or E2 1 flash or 2 flashes 1 Thermostat is set too low 2 Broken electrical connection between...

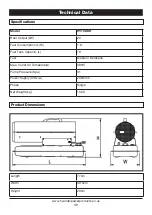
Page 39: ...HY70DKH Heat Output kW 20 Fuel Consumption L Hr 1 9 Fuel Tank Capacity L 19 Fuel Diesel or Kerosene Max Outlet Air Temperature 393 C Pump Pressure Kpa 31 Power Supply V Hz A 230 50 5 Phase Single Net Weight kg 15 23 Product Dimensions Length 77cm Width 39 5cm Height 29cm ...

Page 40: ...ce Heater SKU Code HY70DKH Date of Issue 14 05 2021 Regulations and Directives of Compliance 2014 35 EU Low Voltage Directive 2009 125 EC Energy Related Products ERP 2014 30 EU Electromagnetic Compatibility Directive 2011 65 EU RoHS 2 0 Directive EN 13842 2004 Oil fired forced convection air heaters Stationary and transportable for space heating Statement of Declaration We the importer and authori...

Page 41: ...atible with the environment We are a Member of the VALPAK National Compliance Scheme and our registration number is RM08660 For further information about disposal please contact your Local Authority You can also get more advice and guidance about recycling at the following website http www recycle more co uk Should you pass this product on to another user either sold or loaned you MUST pass on thi...

Page 42: ...tance We reserve the right to make any modifications without prior notice whenever necessary Our latest manuals are also placed online All our manuals can be downloaded at www hyundaipowerproducts co uk If you are returning your product please contact the dealer for their returns policy We work very hard to give all of our customers the best possible service If you have any problems before leaving...

Page 43: ...d serial number can be found on the grey specification sticker on your machine Product Information Product Record Our friendly aftersales team will be more than happy to help you Phone Call our team on 01646 687880 open Monday Friday 8 30am 5pm Email aftersales hyundaipowerproducts co uk Online Live Chat Go to www hyundaipowerproducts co uk Live chat is open Monday Friday from 8 30am 5pm Post Genp...

Page 44: ...Way London Road Pembroke Dock UNITED KINGDOM SA72 4RW T 44 0 1646 687 880 F 44 0 1646 686 198 E info hyundaipowerproducts co uk www hyundaipowerproducts co uk Imported Distributed by Genpower Ltd for The United Kingdom Ireland Licensed by Hyundai Corporation Korea ...

Reviews: