�
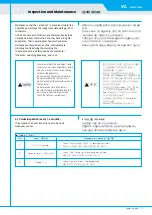
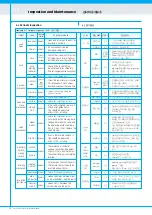
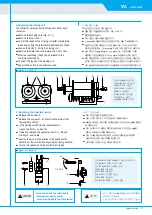
Fig. 4-4 / 그림 4-4
�
Fig. 4-3 / 그림 4-3
2) Replacing the closing coil
The contactor employs a pair of magnet coil for each
contactor.
■
Remove the moving core (Fig. 3-1
② )
■
Remove the rear cover
■
Cut off the leads of the closing coil after marking the
leads and noting the relationship between each lead.
■
Loosen the bolts
⑤
, fixing the closing coil.
■
Remove the defected coils toward the front cover.
■
After reassembling, check the operation of the
contactor electrically.
■
Connect the leads of the closing coil
■
Reverse the action in the previous step.
2) 투입 코일의 교체
투입 코일은 2개/1조로 되어 있습니다.
■
제품 전면 구동판를 풀어냅니다. (Fig. 3-1의 ② )
■
후면판을 풀어냅니다.
■
투입 코일의 연결 wire를 절단합니다.
■
L-wrench를 사용하여 투입 코일을 지지하는 볼트 ⑤ 를 풀어냅니다.
■
손상된 코일 ② 를 교체합니다. 이때 솔레노이드 코어 ④ 와 지지대 ①
사이에 원형고무판 ⑧
및 rear plate ③ 를 꼭 끼워 조립하시기 바랍니다.
■
코일 코어 ④ 와 gap plate ⑥ , sus plate ⑦ 는 기존 부품을 그대로
사용하며, 가장 앞부분에 반드시 sus plate가 체결되어 있어야 합니다.
■
배선 작업을 합니다. 이때 110 V에서는 병렬 연결, 220 V에서는 직렬연결
을 하며 한쪽 코일의 붉은색 선은 다른 코일의 노란색 선과 연결되어야 합니다.
■
위의 순서를 역순으로 재조립 후 시험작동을 하여 이상 유무를 확인합니다.
진공접촉기 취급설명서
>>
21
VC
|
HCA Series
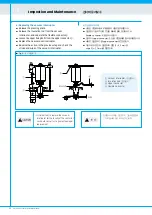
3) 보조 스위치 교체
■
보조 접점 구동판
⑥
을 풀어냅니다.
■
보조 스위치 지지대
①
의 고정 볼트
⑦
를 풀어냅니다.
■
제어용 스위치
③
를 교체할 경우에는 볼트
④
와 연결 cable을 풀어낸
후 교체합니다.
■
보조 스위치
②
가 불량일 경우에는 볼트 M4 ⑤ 와 연결 cable을
풀어낸 후 불량 스위치를 교체합니다.
■
위의 순서를 역순으로 재조립 후, 수동 투입핸들
⑧
을 이용하여
수동으로 시험하여 이상 유무를 확인합니다.
■
전기적으로 시험하여 이상 유무를 확인합니다.
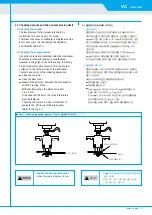
3) Replacing the Auxiliary Switch
■
Release the pusher
⑥
.
■
Release the support
①
and remove the wires from
the auxiliary switch.
■
If the closing switch needs replacement
③
,
loosen the bolt
④
and wires.
■
If need to replace the auxiliary switch
②
, release
the bolt
⑤
and cable.
■
Reverse the action in the previous step and check the
operation of the switch manually using the closing handle
⑧ .
■
Check the operation of the Switch electrically.
�
Note and check the relationship
between each wire and its
associated Auxiliary Switch terminal.
�
보조 스위치의 cable 재연결시 위치가 변경되지
않도록 주의 하십시오.
a, b 접점의 변경으로 시스템에 사고가 발생할 수 있습니다.
①
Coil support /
지지대
②
Closing Coil /
투입코일
③
Rear Plate
/ 보강관
④
Coil Core
/ 코일코어
⑤
Bolt
/ 고정 볼트
⑥
Gap plate
/ 갭조정판
⑦
Stainless
/ 조정판
⑧
Rubber Plate
/ 고무판
⑦
⑥
④
②
⑧
③
⑤
①
②
②
④
①
Auxiliary Switch Support /
보조 스위치 지지대
②
Auxiliary Switch /
보조 스위치
③
Closing Switch
/ 제어용 스위치
④
M4 Bolt
/ M4 볼트
⑤
M4 Bolt
/ M4 볼트
⑥
Pusher
/ 보조접점 구동판
⑦
M5 Bolt
/ M5 볼트
⑧
Closing Handle
/ 수동투입 핸들
⑧
⑥
⑦
CLOSING
③
⑤
②
①
④


