background image

PARTS LIST

230V CE Installation Manual

3-4

Summary of Contents for Powermax 900

Page 1: ...230 Volt CE Conversion Installation Manual 803210 Rev 0 ...

Page 2: ...ights Reserved HYPERTHERM and POWERMAX are trademarks of Hypertherm Inc and may be registered in the United States and or other countries Revision 0 September 1998 HYPERTHERM Inc P O Box 5010 Hanover New Hampshire 03755 5010 Tel 603 643 3441 Fax 603 643 5352 http www hypertherm com email info hypertherm com ...

Page 3: ...anization ETSO Technologiepark Hanau Rodenbacher Chaussee 6 D 63457 Hanau Wolfgang Germany Tel 49 6181 58 2100 Fax 49 6181 58 2134 Hypertherm Singapore Pte Ltd No 19 Kaki Bukit Road 2 K B Warehouse Complex Singapore 417847 Republic of Singapore Tel 65 841 2489 Fax 65 841 2490 Hypertherm U K 9 Berkeley Court Manor Park Runcorn Cheshire England WA7 1TQ Tel 44 1928 579 074 Fax 44 1928 579 604 Hyperth...

Page 4: ...1 1 230V CE Installation Manual SPECIFICATIONS Section 1 SPECIFICATIONS In this section Introduction 1 2 Specifications 1 2 230 Volt CE Powermax900 Power Supply 1 2 ...

Page 5: ...r Supply Rated Open Circuit Voltage OCV U0 300VDC Rated Output Current I2 20 50 amps Rated Output Voltage U2 120VDC Duty Cycle X 40 C 50 I2 55A U2 120V See data tag on power supply for more information on duty cycle Ambient temperature duty cycle Power supplies will operate between 14 and 104 F 10 and 40 C Power supplies operated in an ambient temperature above 86 F 30 C may show some decrease in ...

Page 6: ...tion 2 4 Attaching Power Supply Bracket to Powermax900 CE Chassis 2 6 Attaching 230V Transformer Case Assembly to Powermax900 CE Chassis 2 9 Hooking up the Three Phase Transformer Secondary Power Cord from 230V Transformer Case Assembly to Powermax900 CE Power Unit 2 10 Choosing Plug Power Cord and Line Disconnect Box Fuse 2 11 Power Cord Plug 2 11 Power Cord 230V 2 11 Line Voltage Disconnect Box ...

Page 7: ... out and tag out switch before proceeding INSTALLATION The installation of the 230V kit to the 400V CE Powermax900 involves 5 basic steps 1 Installation of wheels and casters to the transformer case 2 Attaching the power supply bracket to the Powermax900 chassis 3 Attaching the 230V case assembly to the Powermax900 bracket and chassis 4 Hooking up the three phase transformer secondary power cord f...

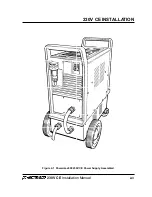
Page 8: ...230V CE INSTALLATION 230V CE Installation Manual 2 3 Figure 2 1 Powermax900 230V CE Power Supply Assembled ...

Page 9: ...unted wheel 5 Slide the axle through both holes in the rear of the transformer case assembly 6 Slide the second 008973 shoulder washer over the end of the axle with the smaller diameter end of the washer facing the transformer case 7 Slide the second 027057 wheel onto the axle 8 Snap the second 027249 retaining ring on the end of the axle to secure the second wheel Caster Installation 1 Attach the...

Page 10: ... Figure 2 3 Wheels and Casters Installed on 230V Transformer Case Figure 2 2 Wheel and Caster Installation 027249 Retaining ring 008973 Shoulder washer 027299 Caster 075470 10 32 screws 8 004672 Axle 075174 10 32 star washers 8 027057 Wheel 027057 Wheel ...

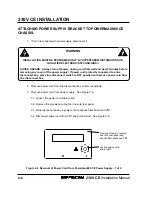
Page 11: ...e disconnect box place line disconnect switch to OFF position and remove power cord from line disconnect box Figure 2 4 Removal of Power Cord from Powermax900 CE Power Supply 1 of 2 Remove screws to remove line cord rear panel and expose filter board and TB1 2 Remove power cord from line disconnect box or from receptacle 3 Remove power cord from power supply See Figure 2 4 3 1 Loosen the power cor...

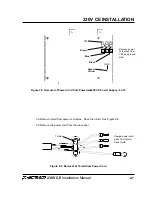
Page 12: ...low Black Blue Brown TB1 Figure 2 5 Removal of Power Cord from Powermax900 CE Power Supply 2 of 2 GND 3 5 Remove toroid from power cord wires Save the toroid See Figure 2 6 3 5 Remove the power cord from the rear panel Figure 2 6 Removal of Toroid from Power Cord Unwind power cord wires from toroid Save toroid Toroid ...

Page 13: ...ts on inside 12 075174 Star washers 12 075470 Screws 12 4 Remove the power supply cover 5 Carefully tilt the Powermax over onto its front handle as shown in Figure 2 7 6 Place the 001568 power supply bracket against the bottom of the power supply as shown in Figure 2 7 and fasten with the 075470 10 32 screws 075174 star washers and 075160 kepnuts in 12 locations ...

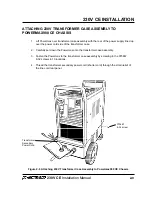
Page 14: ...the transformer case 2 Carefully set down the Powermax onto the transformer case assembly 3 Fasten the Powermax to the transformer case assembly by screwing in the 075467 8 32 screws in 10 locations 4 Thread the transformer secondary power cord shorter cord through the strain relief of the line cord rear panel Figure 2 6 Attaching 230V Transformer Case Assembly to Powermax900 CE Chassis 075467 8 3...

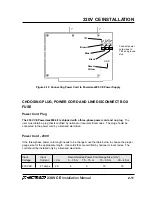
Page 15: ...UPPLY ENCLOSURE TO INCOMING GROUND WIRE BEFORE CONNECTING TO POWER Figure 2 9 Power Cord Preparation 2 Connect the power cord wires and the ground wire as shown in Figure 2 10 Be certain that all wires are fastened securely Pull on wires after fastening to verify that they will not come loose 3 Connect the rear panel to the Powermax900 power supply and secure with screws 4 Tighten the strain relie...

Page 16: ...ug The user must obtain a plug that is certified by national or local electrical codes The plug should be connected to the power cord by a licensed electrician Power Cord 230V If the three phase power cord length needs to be changed use the table below to choose the proper gauge size for the appropriate length Use cords that are certified by national or local codes The cord should be installed onl...

Page 17: ...pply This disconnect box allows the operator to turn the power supply off quickly in an emergency situation The switch should be located on a wall near the power supply and should be easily accessible to the operator The interrupt level of the switch must be equal to or exceed the continuous rating of the fuses Use slow blow fuses according to the power requirements listed below Input Input Curren...

Page 18: ...PARTS LIST 3 1 230V CE Installation Manual Section 3 PARTS LIST In this section Powermax900 230 Volt CE Conversion Kit 128313 3 2 ...

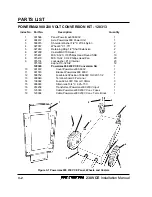
Page 19: ...10 8 075470 M S 10 32 X 3 4 Phillips Head Pan 20 9 075174 Lockwasher 10 Internal 20 075160 Kepnut 10 32 S Z 12 129365 Powermax900 230V CE Conversion SA 1 10 001672 Cover Powermax900 600V 1 11 001570 Bracket Powermax800 600V 2 12 008752 Fuseblock 3Position 30A600V 13 32X1 1 2 1 13 008949 Terminal board 3 Terminal 1 14 108092 Fuse 32A 400V 10mm X 38mm 3 15 008963 Strain relief 3 4 X 625 750 2 16 014...

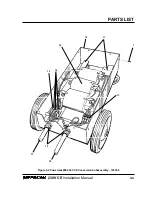
Page 20: ...PARTS LIST 3 3 230V CE Installation Manual 7 10 11 12 13 14 15 16 Figure 3 2 Powermax900 230V CE Conversion Subassembly 129369 17 18 ...

Page 21: ...PARTS LIST 230V CE Installation Manual 3 4 ...

Reviews: