


MX-4000W 5. Operator Function
5- 110
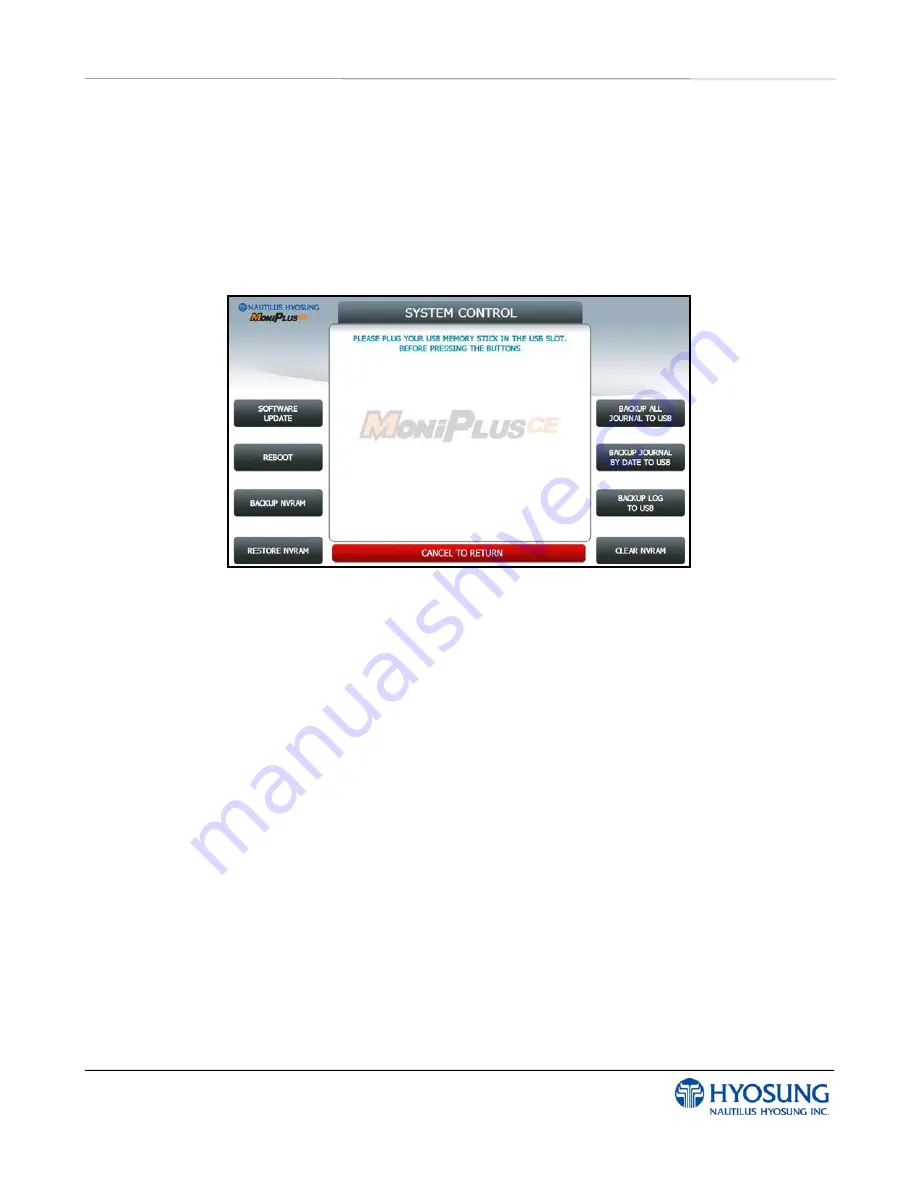
5.8.8 SYSTEM CONTROL
This
SYSTEM CONTROL
menu contains
SOFTWARE UPDATE, REBOOT, BACKUP ALL
JOURNAL TO USB, BACKUP JOURNAL BY DATE TO USB, BACKUP LOG TO USB, BACKUP
NVRAM, RESTORE NVRAM
and
CLEAR NVRAM.
Please press each button on this menu to go to next screen or to operate the related function..
And if you want to go back to the previous screen, press the
CANCEL
key.
You can back up a various kinds of journal data and log data you want in this menu. Please make sure
that USB drive is connected into USB slot before pressing the button. When
BACKUP ALL
JOURNALS TO USB, BACKUP JOURNAL BY DATE TO USB
or
BACKUP LOG TO USB
button is
selected, this data will be sent into USB flash drive. When
SOFTWARE UPDATE
is entered, it will
change to the screen of
SOFTWARE UPDATE
. This is because Software Update functionality is
supported at
SYSTEM CONTROL
menu. When
SYSTEM CONTROL
is submitted the files in USB
flash drive will be copied to the ATM.
Terminal configuration data is saved at NVRAM, so
BACKUP NVRAM
and
RESTORE NVRAM
button
is to use the backup and restore terminal configurations.
NOTE:
1) How to update the software, please refer to the Appendix.
2) BACKUP NVRAM and RESTORE NVRAM Button is only displayed when security door is opened.
Summary of Contents for MX-4000W
Page 1: ...MX 4000W Operator Manual Copyright 2011 Nautilus Hyosung Inc All right reserved...
Page 5: ...MX 4000W 1 Introduction 1 1 Chapter 1 Introduction...
Page 10: ...MX 4000W 2 Precautions for Safety 1 2 Chapter 2 Precautions for Safety English...
Page 14: ...MX 4000W 2 Pr cautions pour la s curit 1 2 Chapitre 2 Pr cautions pour la s curit French...
Page 18: ...MX 4000W 3 Hardware Specifications 3 1 Chapter 3 Hardware Specifications...
Page 25: ...MX 4000W 4 Operating Instructions 4 1 Chapter 4 Operating Instructions...
Page 39: ...MX 4000W 5 Operator Function 5 1 Chapter 5 Operator Function...
Page 122: ...MX 4000W 5 Operator Function 5 84 Touch Type...
Page 207: ...MX 4000W 6 Installation 6 1 Chapter 6 Installation...
Page 209: ...MX 4000W 6 Installation 6 3 ATM Dimension Plan View ATM Dimension Side View...
Page 214: ...MX 4000W 6 Installation 6 8 Attaching the mounting frame bracket separated from the ATM...
Page 217: ...MX 4000W 6 Installation 6 11 Hanging the ATM on the mounting frame bracket...
Page 220: ...MX 4000W 6 Installation 6 14 The external appearance after the completion of installation...
Page 221: ...MX 4000W 7 Appendix 7 1 Chapter 7 Appendix...
Page 247: ...MX 4000W 7 Appendix 7 27 2 Select SYSTEM SETUP menu 3 Select SYSTEM CONTROL menu...
Page 333: ...MX 4000W 7 Appendix 7 113 2 Press OPTIONAL FUNCTION 2 button 3 Press SCREEN SERVICES button...


