background image


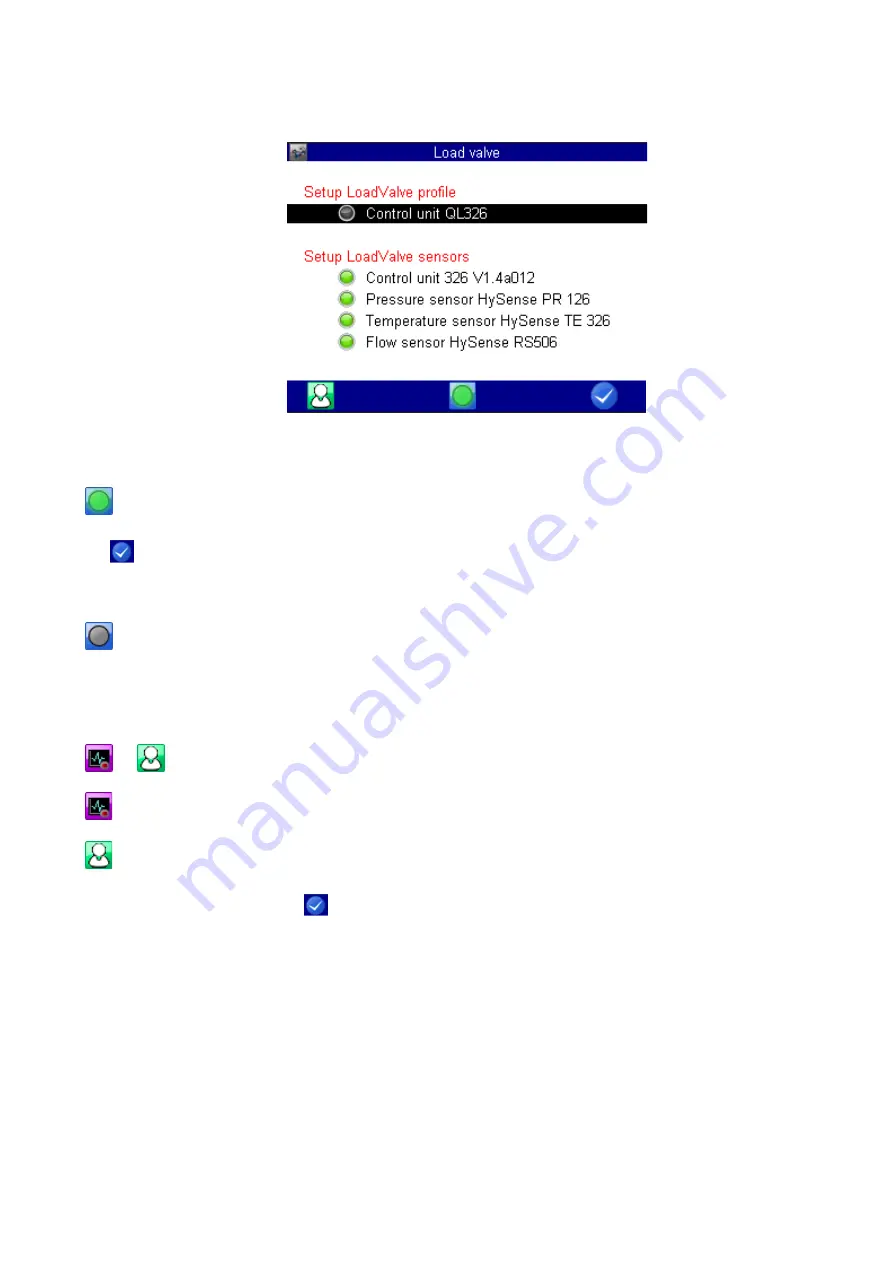
Activation QL326 

When all relevant traffic lights of the sensor system are "GREEN", the load distance can be activated. 


ONLINE / OFFLINE - Mode 

 Switches the load valve to the ONLINE mode. The button colour of the control unit changes to 

green

. A 

correction of the parameters is no longer possible. 
F5         takes you directly to the menu of the measured value display. All active sensors are added to the dis-

play indication. A manual correction is possible later. In the measured value display, you have an additional soft-

key bar for sequence control of the load valve. 

 Switches the load valve to the OFFLINE mode. The button colour of the control unit changes to

 GREY

. The 

correction of parameters is possible again. 

Storing measured values 

 or  

  The function key F1 switches between both states. 

 When starting a test cycle, the storage is automatically activated. 

   When starting a test cycle, the storage is not automatically activated. You must set up a storage yourself. 

When leaving this menu with F5       , the required storage time is calculated from the current parameter settings 

and all active sensors of the load valve are added to the display.  
The display can be adjusted manually via the channel settings. 


Summary of Contents for HySense QL 326

Page 1: ...HySense QL 326 Load valve Manual Version 1 0 ENG ENG ...

Page 2: ...measurement results 19 5 Operation with MS5070 20 Activating the CAN BUS 20 Starting the application Load valve 20 Setting Load profile 21 Programming the operating mode MANUAL 22 Programming the operating mode Ramp 22 Programming the sine wave operating mode 23 Setting QL326 Sensors 24 Scan CAN bus 24 Detection of multiple sensors on the CAN bus 25 Activation QL326 26 ONLINE OFFLINE Mode 26 Stori...

Page 3: ...Setting a sinusoidal load 39 Starting and stopping the control box 41 Status of the heartbeat 41 7 Accessories 41 8 Cleaning and maintenance 42 Cleaning 42 Calibration and maintenance 42 Repair 42 ...

Page 4: ... or in temperatures below freezing Do not immerse the unit in water or other liquids Never allow liquids to get inside the unit Never open the device Do not use the unit after it has been dropped or the housing is damaged Avoid strong magnetic fields Keep the device away from electric motors or other devices that generate electromagnetic fields Strong magnetic fields can cause malfunction and affe...

Page 5: ...ce of safety and warning instructions We accept no liability for damage caused by the use of accessories and or wearing parts that were not supplied or certified by Hydrotechnik GmbH The products of Hydrotechnik GmbH are designed for a long service life They correspond to the state of science and technology and were individually tested in all functions before delivery The electrical and mechanical...

Page 6: ...omer The operator of this device must ensure that only persons who know the rules of work safety and accident prevention were instructed in the operation of this measuring instrument have read and understood this manual completely be able to use and operate this device Persons who operate this measuring instrument are obliged to observe all rules of work safety and accident prevention to read this...

Page 7: ...4 CAN Pressure Sensor Pressure measurement 5 CAN inductive trans ducer Volume flow measurement 6 CAN temperature sen sor Temperature measurement 7 Minimess test point Venting and measuring point for pilot pressure 8 Venting screw Venting screw of the proportional valve under screw cap 9 Power supply Power supply for control box CAN sensors and proportional valve amplifier 10 CAN port Connection fo...

Page 8: ...nt load can be simulated exactly and reproducibly The components volume flow sensor turbine and proportional valve as well as measuring points for pressure and temperature are combined in one unit The mechanical connection inlet outlet is designed as a female thread ISO 150 228 G 1 For safe operation of the load line we recommend the installation of an external pressure protection This must be ins...

Page 9: ...ection class IP 40 EN 60529 IEC 529 Supply voltage Ub 12 24 VDC Power consumption max 1 A Overvoltage protection 36 VDC Response time 50 ms Electrical data of the control box Input signal CAN 2 0A Control signal to proportional valve 0 10V 1 Connection Input Output M12x1 5 pin socket and plug Connection Supply voltage M16x0 75 3 pin connector Supply voltage Ub 12 24 VDC Power consumption max 1 A M...

Page 10: ...d 4 CAN H CAN high 5 CAN L CAN low CAN connector M12 x 1 with screw lock A coding 5 pin connector IEC DIN EN 61076 2 101 M12 A 5p m 1 CAN SHLD CAN shield 2 CAN Ub CAN supply 3 CAN GND CAN ground 4 CAN H CAN high 5 CAN L CAN low Supply connector M16 x 0 75 3 pin connector M16 3p m 1 PWR Power supply control box 24VDC 2 NC unassociated 3 PWR Power supply control box Ground GND ...

Page 11: ...een installed in a measuring point it must be vented during the first two minutes of operation 1 Remove the protective cap pos 8 page 3 on the proportional valve to gain access to the venting screw underneath 2 Connect a Minimess measuring hose to the Minimess test point pos 7 page 3 Caution Oil air mixture of the system immediately escape at the hose end 3 Let the oil air mixture contained in the...

Page 12: ...nd press 6 Exit the settings with F5 OK Starting the application Load valve Select the Special Applications menu and open the menu with Select the Load valve menu 1 Press to open the menu 2 Use to highlight Special Applications and press 3 Use to highlight Load valve and press 4 Via F3 CONFIG the connected sensors are recognized Select YES to add the sensors to the display 5 Confirm with the menu ...

Page 13: ... measuring instrument the short designation QL 326 is displayed QL326 is INACTIVE then you can configure the parameters of the load valve the load valve cannot be operated in this state QL326 is CONNECTED the load valve can be operated in this state a configuration is not possible Heartbeat The measuring instrument communicates with the load valve when ACTIVE is displayed The code before ACTIVE in...

Page 14: ...ws a sinusoidal curve see programming operating mode sine Inactive The load valve is switched off Manual The proportional valve of the load valve is operated manually via the function keys Mode Press and select between the following options CYCLICAL Ramp sine is repeatedly run down The number of repetitions is defined as Nbr of cycles SINGLE VAL Ramp sine is run exactly once Nbr of cycles If the l...

Page 15: ...o end value C in time duration C Range D Level D with value D and the dwell time duration D Range Starting value Final value Duration A 10 100 10 100 0 01 10s B 10 100 10 100 0 01 99 99s C 10 100 10 100 0 99 99s D 10 100 10 100 0 99 99s After range D has expired the proportional valve is set to 0V or 0 In cyclic mode the system jumps to the start value A after range D A maximum of 9999 cycles can ...

Page 16: ... as a percentage of the maximum output voltage F Frequency of the oscillation is given as a multiple of 10 mHz Range Value range A 10 100 O 10 100 A O max 100 F 0 01Hz 2Hz A minimum offset of 10 is specified in this operating mode The amplitude of the sine is added to the offset The value of 100 is not exceeded nor is the value falling below 0 Make sure that the sum of amplitude and offset is less...

Page 17: ...ight the desired channel 2 Press and change the channel number 3 Confirm the entry with Save and exit the setting with F5 Exit programming Press F5 to exit the programming of the load valve and to save your entries If the channels of the load valve are not shown in the measurement display the measuring instrument offers to add the channels to the display YES The measured values of the load valve a...

Page 18: ...se to highlight Special Applications and press 3 Use to highlight QL 326 device and press Connected is displayed next to the QL 326 entry 4 Press repeatedly until the measurement display appears The function bar at the bottom of the measurement display has a double assignment this can be recognized by two arrows on the right hand side of the screen Press to switch between the assignments In the op...

Page 19: ...tion of the proportional valve increase the flow restriction only in operating mode manual STOP Freezes the measurement display When you have finished your measuring you can deactivate the load valve again Saving measurement results To save measured data use the submenu Memory in the MultiSystem 5060 Plus 1 Select the used CAN channels for storage 2 Define additional channels for storage if necess...

Page 20: ...highlight Interface and press tACTIVE 7 Use to highlight Power Supply and use and to switch to OFF 8 Use to highlight Bus termination and press and switch to YES 9 Use to highlight Baudrate and press and switch to 125kBit s 10 The Start CANopen entry is not relevant for the operation of the load valve 11 Exit folder using F5 Starting the application Load valve Select the menus Extras Special appli...

Page 21: ...tivated first Control unit pressure sensor and volume flow sensor are not known yet button colour red The temperature sensor is inactive button colour grey Sensors whose settings are already known but cannot be found on the CAN bus have the button color yellow Note Set parameters are saved when you exit the current window with F5 Setting Load profile The profile of the test sequence can be set her...

Page 22: ...the MANUAL mode the position of the proportional valve is set by pressing the function keys during opera tion of the load valve Save and exit the setting with F5 Programming the operating mode Ramp In this operating mode a ramp devided in four stages can be defined The values shown in above dialog results in this ramp ...

Page 23: ...0 100 10 100 0 1 300s C 10 100 10 100 0 100s D 10 100 10 100 0 20s At the end of phase D the proportional valve is set to 0V or 0 In cyclic mode the system jumps to the start value A after range D A maximum of 9999 cycles can be run Highlight the setting values of the curve press and enter the desired value and confirm with Save and exit the setting with F5 Programming the sine wave operating mode...

Page 24: ...than 100 A negative amplitude cannot be displayed Highlight the setting values of the curve press and enter the desired value and confirm with Save and exit the setting with F5 Setting QL326 Sensors When using the load valve for the first time the connected sensors are still unknown The temperature sensor is always set INACTIVE If a temperature sensor is used it is useful to activate it before sca...

Page 25: ...r In this case it may be necessary to change the channel and node ID of the sensor found The control unit is permanently pre programmed Only the channel number can be exchanged For pressure temperature and volume flow sensor the measuring channel can be changed and the Node ID of the sensor can be selected To change the channel number and Node ID proceed as follows 1 Mark the desired sensor and pr...

Page 26: ...additional soft key bar for sequence control of the load valve Switches the load valve to the OFFLINE mode The button colour of the control unit changes to GREY The correction of parameters is possible again Storing measured values or The function key F1 switches between both states When starting a test cycle the storage is automatically activated When starting a test cycle the storage is not auto...

Page 27: ...nge the display format to call up the last measurement and to return to the load valve In the ONLINE mode of the load valve another softkey bar is available which can be reached with the cursor keys Note It is not possible to add your own favourites to the softkey bar for the load valve Switches the display mode List Tiles Graphics MINMAX The test cycle get started Recalling the last measurement R...

Page 28: ...e set with F3 and F4 Any number of measuring channels can be added to the measured value display Switches the display mode List Tiles Graphics MINMAX The test cycle is terminated Reduce the control voltage Increasing the control voltage Note The control voltage can be set between 0V 10V This display corresponds to the load value 0 100 changes the step size per step ...

Page 29: ...MINMAX Start the test The test cycle is activated and processed automatically In the case of cyclic repetition the current executed cycle is displayed in the header Return to the Load Distance menu After starting the test cycle the measurement display is supplemented by the test progress bar and the numbers of cycles completed The test cycle is terminated prematurely ...

Page 30: ...overview all chan nels can be formatted accordingly The graphic representation of measuring channels over time as well as the representation of measuring chan nels over a defined measuring channel are possible Enlargement of the section Inserting measuring spots Change of the measuring channel display of the Y axis ...

Page 31: ...t be changed TPDO1 0x1A0 Valve voltage TPDO2 0x2A0 Status information Heartbeat 0x720 every 1000ms DLC 8 Heartbeat The current operating mode is transmitted in byte 0 0x02 Configuration parameter not loaded 0x03 Calibration data for DAC not set 0x04 Standby OFFLINE 0x05 Connected ONLINE Parameter are activated waiting for START 0x06 Activated LoadValve is running 0x07 ConfigMode active 0x80 Timeou...

Page 32: ...4 00 0x00Final value C in 10mV steps 100 gives 1 0V as start value Constant Bin 10mV stepsConstant D in 10mV stepsRx 40 04 00 xxx 0x05 uint8_tuint16_t uint16_tuint16_t Ramp values Z2 e g Tx 05 00 90 01 00 00 00 00 0x00Duration A in 10ms steps 200 gives 2 0 seconds Duration B in 10ms stepsDuration C in 10ms stepsRx 40 05 00 xxx 0x06 uint8_t uint8_t uint8_tuint8_tuint8_tuint16_t Operating mode e g T...

Page 33: ...int8_t uint32_t SingleStep e g Tx 79 03 01 00 00 00 00 00 0x03Valve value in 10mV steps0x000x00Rx 40 79 03 01 00 00 00 00 0x99 0x01 Parameter CONFIG ONRx 40 99 01 00 00 00 00 0x02 Parameter CONFIG OFFRx 40 99 02 00 00 00 00 0x03 Parameter CALIBRATION ONRx 40 99 03 00 00 00 00 0x04 Parameter CALIBRATION OFFRx 40 99 04 00 00 00 00 0xAA 0x01 Reset control box Query of the control box The control box ...

Page 34: ...0x01HeartbeatState 0x05 must now be sent Start test sequence Command NOTE The control box now works with a timeout which is counted up internally This timeout must be reset at least every 1000ms via CAN command 0x2050 1 otherwise the control box switches itself off and ends the test cycle Tx 0x40 50 20 01 00 00 00 00 Rx 0x43 50 20 01 05 00 00 HeartbeatState must now be sent 0x06 Operating mode Ram...

Page 35: ...77h 00 00 00 00 00 00 00 Calibrate zero value of channel 1 ID DLC B0 B1 B2 B3 B4 B5 B6 B7 0x620 8 77h 01h 01 00 00 00 00 00 The D A output is set to 0 V To get the actual digital value for the zero point the message must be repeated until the DVM at the terminal output moves out of the zero point With the following message the AD value is decremented again so that the exact zero point can be deter...

Page 36: ...final value can be determined ID DLC B0 B1 B2 B3 B4 B5 B6 B7 0x620 8 77h 02h 00 00 00 00 00 00 Once the final value has been set confirm this with the message ID DLC B0 B1 B2 B3 B4 B5 B6 B7 0x620 8 77h 02h 03 00 00 00 00 00 The end value of channel 1 is now stored in the device Calibrate zero and full scale value of channel 2 Perform the same procedure for channel 2 as for channel 1 Replace 0x78 i...

Page 37: ...ion D Range Starting value Final value Duration A 10 100 10 100 0 1 100s B 10 100 10 100 0 1 300s C 10 100 10 100 0 100s D 10 100 10 100 0 20s Switch to configuration mode ID DLC B0 B1 B2 B3 B4 B5 B6 B7 0x620 8 99h 01h 00 00 00 00 00 00 Select operating mode ID DLC B0 B1 B2 B3 B4 B5 B6 B7 0x620 8 01h XXh 00 00 00 00 00 00 For byte B1 enter one of the following numbers instead of XX 0x00individual ...

Page 38: ...SB Duration CLSB Duration CMSB End value ramp C values Duration times B and D ID DLC B0 B1 B2 B3 B4 B5 B6 B7 0x620 8 0x04 End CLSB End CMSB Value BLSB Value BMSB Value DLSB Value DMSB Duration time D ID DLC B0 B1 B2 B3 B4 B5 B6 B7 0x620 8 0x05 Duration DLSB Duration DMSB 00 00 00 00 Save configuration ID DLC B0 B1 B2 B3 B4 B5 B6 B7 0x620 8 80h 00h 00 00 00 00 00 00 The parameters are saved and rem...

Page 39: ...ple of 10 mHz Area Value range A 1 10V O 1 10V A O 10V F 0 01Hz 2Hz in 10nHz steps A minimum offset of 10 1V is specified in this operating mode The amplitude of the sine is added to the off set The value of 100 10V is not exceeded nor is the value falling below 0 0V Make sure that the sum of amplitude and offset is less than 100 10V A negative amplitude cannot be displayed Switch to configuration...

Page 40: ... Bytes B4 and B5 zzzzh Frequency in multiples of 10 mHz LSB first Bytes B6 and B7 vvvvh Offset in multiples of 10 mV LSB first Save configuration ID DLC B0 B1 B2 B3 B4 B5 B6 B7 0x620 8 80h 00h 00 00 00 00 00 00 The parameters are saved and remain until the next configuration End configuration ID DLC B0 B1 B2 B3 B4 B5 B6 B7 0x620 8 99h 02h 00 00 00 00 00 00 ...

Page 41: ...XX 0x04 Device is stopped XX 0x05 Device is started XX 0x7F Control box in configuration mode XX 0x77 Control box in calibration mode YY Firmware version in ASCII format Please use only spare parts and accessories from Hydrotechnik Product Order no CAN cable 5m for connection to the MultiSystem 5060 Plus and MultiSystem 5070 8824 R7 05 00 CAN cable 2 5m for connection to existing CAN bus e g 8824 ...

Page 42: ...ed regularly We recommend calibration every two years if the instrument is used frequently Please send the instrument freight prepaid and securely packed to our customer service centre see address below Repair In case of repair please contact our customer service Please have the following information ready before con tacting us If you are sending in the unit this information should also be include...

Reviews: