


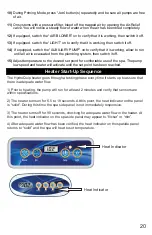


Align the other studded clamp and attach to
the other slide bracket. Now determine the
proper alignment for the heater and tighten the
nuts and clamps
Position 2
Position 1
The adjustable clamp on the right will be in
position 1. Remove the clamp and relocate
it to position 2.
Step 4
Step 5
Step 6
Step 7
Heater Installation
Step 1
Step 2
Step 3
Remove the control system from the carton
and verify contents for completeness. If the
application is a bottom mount install then you
are ready to go directly to step 7.
If you need to utilize the slide brackets simply
remove the (2) 3/8” outer nuts securing the
heater to the foot brackets and remove from
under the box.
The mounting studs are attached to adjustable
clamps on the heater. Loosen the clamps to adjust
the stud locations to align with the slide brackets
on one end. Do not tighten the nuts yet.
Ground/Bond the heater directly to the control box
using the
included
#8 solid bonding wire.
Connect the power control cords from the heater
to the matching receptacles on the control box.
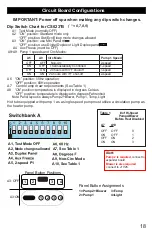
The "U" Series Fixed Heater and "US" Series Slide Heater systems will arrive from the
factory with the heater mounted in the bottom location as pictured in Step 1. The "US"
Series Slide Heater can be installed and used in this configuration or you can move the
Slide Heater to the back of the control as shown below to align easily with your particular
plumbing arrangement.
9


