background image

4 | LOGO! Changing the PLC and display

HYDAC FILTER SYSTEMS GMBH

14 / 20

BA FAM5 replace adjust the control and display 4639760 en-us web

6.

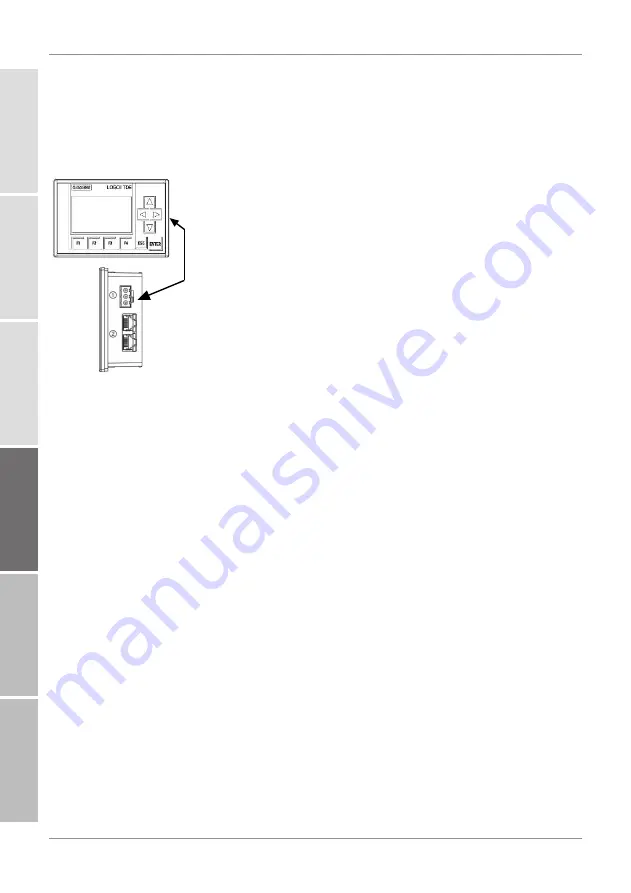
Loosen the screws (2) and remove the mounting brack-
ets (1).

7.

Remove the display and the seal ring (3).

8.

Insert the new display with seal ring (3) and tighten the
screws (2) of the mounting bracket to 0.2 Nm.

9.

Plug the power supply (1) and the network cable (2) into
the display.

O

The replacement of the PLC and the display is now
complete.

1

2

3

4

5

6

Summary of Contents for FAM 5

Page 1: ... LOGO Replace adjust the control and display Operating Instruction English translation of original instructions Document No 4639760 Follow these instructions for proper and safe use Keep for future reference ...

Page 2: ... 509 9046 E mail filtersystems hydac com Homepage www hydac com Court of Registration Saarbrücken HRB 17216 Executive directors Mathias Dieter Dipl Kfm Wolfgang Haering Documentation Representative The contact data of the Documentation Representative is Günter Harge c o HYDAC International GmbH Industriegebiet 66280 Sulzbach Saar Germany Telephone 49 6897 509 1511 Fax 49 6897 509 1394 E mail guent...

Page 3: ...rocedural instructions 6 1 2 4 Representation of intermediate results results 7 1 2 5 Supplementary symbols 8 1 2 6 Representation of warning general safety information 8 1 2 7 Signal words and their meaning in the general safety information 9 1 3 Exclusion of liability warranty 10 1 4 Notes on copyright 10 2 Product Performance description 11 2 1 Checking the scope of delivery 11 3 Copying the pr...

Page 4: ...nd visualizations in this manual are meant for general illustration purposes Therefore representations and functional options can deviate from the delivered product We reserve the right to modifications to the contents of this manual without prior notice 1 1 Target group of the manual This manual was created for the following target group Target group Tasks Owner Keep this manual and the applicabl...

Page 5: ...me of the product Product name Operating and Maintenance Instructions Document no 12345678 English translation of original instructions Valid from from s no 1 5 2 4 3 Fig 1 Overview labeling of the title page 1 Short name of the product product name 2 Type of document 3 Language 4 Document no Index 5 Supplementary instructions regarding the validity of the manual optional Please note that you can ...

Page 6: ...irements ü he product is assembled and connected ü The product is switched off 1 Switch the product on 1 2 3 Representation of procedural instructions In the case of procedural instructions there are the two follow ing representations Procedural instructions with a fixed sequence Procedural instructions whose sequence must be complied with without fail are listed with sequential numbering 1 2 3 et...

Page 7: ...arry out work steps with intermediate results and end results Intermediate results are the consequence of activities they are marked with an indented arrow End results represent the end of an activity and are repre sented with a flag An example for a procedural instruction with intermediate re sult and final result 1 Switch the product on ð The display lights up 2 Press the button O The product is...

Page 8: ... chapter at the end of the manual Tip for handling the product Required tool 1 2 6 Representation of warning general safety information All the warning general safety information in this manual are highlighted with pictograms and signal words The pictogram and the signal word give you information of the risk level of the danger Warning General Safety Information which is placed ahead of each activ...

Page 9: ...al word indicates a hazardous situation with a medium level of risk which if not avoided can result lethal or serious injury CAUTION CAUTION The signal word indicates a hazardous situation with a low level of risk which if not avoided can result in mi nor or moderate injury NOTICE NOTICE The signal word indicates a hazardous situation with a high level of risk which if not avoided will result in d...

Page 10: ...x cluded in respect of the information in these instructions In particular we shall not be liable for lost profit or other financial loss This exclusion of liability does not apply in cases of intent and gross negligence Moreover it does not apply to defects which have been deceitfully concealed or whose absence has been guaranteed nor in cases of culpable harm to life physical in jury and damage ...

Page 11: ...d for the complete replace ment of defective or faulty controls in the FAM 2 1 Checking the scope of delivery Before assembly check the scope of delivery for complete ness The following items are supplied Item Qty Description 1 Siemens Logo PLC assembly A1 1 Siemens Logo TDE operating unit A3 1 USB memory stick with Program Micro SD memory card 1 Operating instructions this document 1 2 3 4 5 6 ...

Page 12: ...ram with your language from the USB memory stick to the supplied micro SD card To do this copy the desired language version LOGO_U_P bin from the USB memory stick to the micro SD card You can immediately insert the micro SD card contained in the scope of delivery into the PLC Other micro SD cards must be formatted on a Pc before being used for the first time The PLC only supports micro SD cards th...

Page 13: ... and disconnect the main switch Se cure the unit against being switched on again ü Check that the switch cabinet is not live 1 Release and remove all cables to the PLC 2 Remove the PLC from the profile rail 3 Place the new PLC on the profile rail 4 Clamp all the cables to the PLC 5 Remove the power supply plug connector 1 and the network cable plug connector 2 from the display 1 Mounting bracket S...

Page 14: ...Loosen the screws 2 and remove the mounting brack ets 1 7 Remove the display and the seal ring 3 8 Insert the new display with seal ring 3 and tighten the screws 2 of the mounting bracket to 0 2 Nm 9 Plug the power supply 1 and the network cable 2 into the display O The replacement of the PLC and the display is now complete 1 2 3 4 5 6 ...

Page 15: ...the card socket and pull it partially out of the card slot with a lever movement 2 Pull the card holder into the position shown in the figure Do not pull the SD card socket completely out of the SD card slot 3 Insert the micro SD card into the card socket Make sure the micro SD memory card is oriented cor rectly in the card socket see photo 4 Insert the micro SD card until you hear it click into p...

Page 16: ...5 Inserting the SD card HYDAC FILTER SYSTEMS GMBH 16 20 BA FAM5 replace adjust the control and display 4639760 en us web O The insertion of the micro SD memory card is complete 1 2 3 4 5 6 ...

Page 17: ...S1000 detected AquaSensor AS1000 detected FAM 5 x x x xx x x S A AC ACS x CS1000 detected ContaminationSensor CS 1000 de tected FAM 5 x x x xx x x S AC ACS x Heater detected Heater detected FAM 5 x x x xx x H S x x Tab 2 Optional sensor system equipment The individual components can have the following statuses Status Description OFF Inactive not detected ON Active detected Opening the configuratio...

Page 18: ... now automatically copies the program from the micro SD memory card to the PLC ð When the copying process is complete the configura tion menu is displayed 2 Press on ESC until the cursor appears 3 Use the arrow keys to select the desired position 4 Confirm position with ENTER 5 Exit the selection by pressing ESC O The setting of the configuration is now complete 1 2 3 4 5 6 ...

Page 19: ...39760 en us web 19 20 Index C Configuration Setting 17 configuration menu Leaving the 17 Opening the 17 D Documentation Representative 2 E Exclusion of Liability 10 H HYDAC General Terms and Conditions 10 Terms of delivery 10 I Imprint 2 M Manufacturer 2 P Publisher 2 W Warranty 10 ...

Page 20: ...www hydac com ...

Reviews: