background image


G. STATION PROGRAMMING 

30

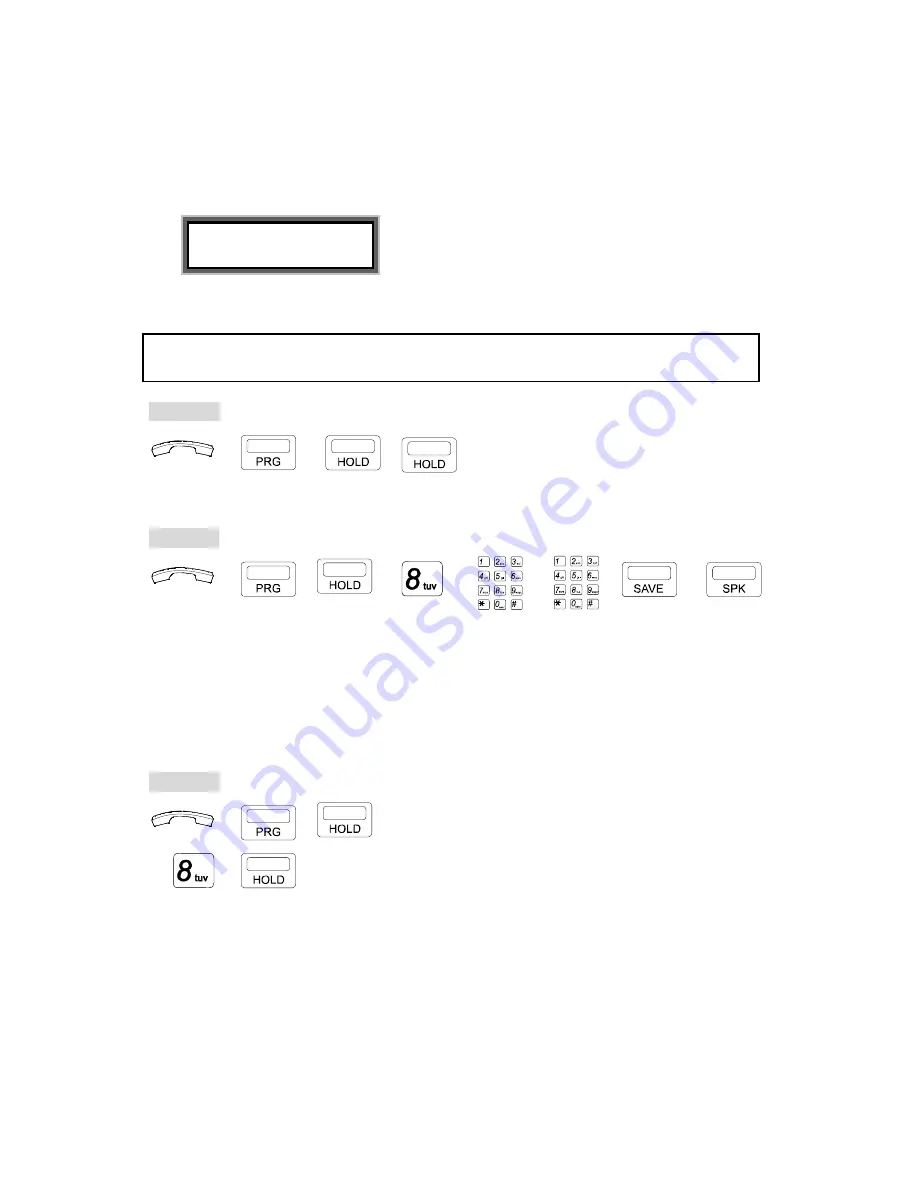
. Insert the Alarm-Time HH:MM (24-hour) format. 
. Insert the duration (00-98 minutes).  
  For instance, 01 means 1 minute's duration. 


EXAMPLE:


User Alarm    07 
   

15:30 01 


 The music plays at 15:30, for one minute. 


. Press 

[SAVE]

 key.  


. Press 

[SPK] 

key to exit. 


NOTE:

   If the time is not correctly set in HH:MM format, the LCD will show "Access Denied," and a 

 Busy tone will be heard.


  To cancel: 


→    

  →     

  , 


. Handset on hook / 

[SPK]

 key off. 

   . 

Press 

[PRG]


. Press 

[HOLD]

 twice. 


2. For Attendant Console :


  To define:  


  HH:MM     Duration  


→    


→  

 →               →


. Handset on hook / 

[SPK]

 key off.    

. Press 

[PRG]

 key.   

. Press 

[HOLD]

 then 

[8]

 key. 


. Insert the Alarm-Time. 
. Insert the duration (00-98 minutes).  


. Press 

[SAVE]

 key.  

. Press 

[SPK] 

key to exit. 

  To cancel: 


→    


. Handset on hook / 

[SPK]

 key off. 


. Press 

[PRG]

 then 

[HOLD]

 key. 


Press 

[8]

 then 

[HOLD]

 key. 


Summary of Contents for DK1-WMU

Page 1: ...www hybrex com DK Series Handsets Hybrid IP Communication System Digital Key Telephone User Guide V3 6 ...

Page 2: ... merchantability or fitness of it s products for a particular purpose Auto Telecom Company Ltd disclaims any and all liability from errors omissions or erroneous interpretations made from the contents of this document 2015 Auto Telecom Company Ltd This document or any parts thereof are not to be reproduced or transmitted in any form or by any means electronic or mechanical including photocopying r...

Page 3: ... with a three wire grounding type plug this plug will only fit into a grounding type power outlet This is a safety feature If you are unable to insert the plug into the outlet contact your electrician to replace your obsolete outlet Do not defeat the safety purpose of the grounding type plug 10 Do not allow anything to rest on the power cord Do not locate this product where the cord will be damage...

Page 4: ... to the system main equipment CAUTION This handset may retain small unmagnetised ferromagnetic common items staples pins if held very close above such items WARNING This is a Class A product In a domestic environment this product may cause interference in which case the user may be required to take adequate preventative measures ...

Page 5: ......

Page 6: ... 4x16 LCD Handsfree Blue Tooth Headset Interface DK3 21 Keyphone 10 Dual Color DSS 2x16 LCD Handsfree Headset interface DK3 31 Keyphone 10 Dual Color DSS 2x16 LCD DK3 33 Keyphone 10 Dual Color DSS DK6 21 Keyphone 2x16 LCD display Speaker phone Handsfree Headset Jack Visible Ringing Indication LED 36 dual color programmable keys 8 function keys DK6 21BT Keyphone 2x16 LCD display Speaker phone Hands...

Page 7: ...DK6 21 DK6 31 DK6 33 DK7 21 DK9 25 DK9 15 DK9 DSS ...

Page 8: ...Digital Key Telephone Layout DK6 21 DK7 21 ...

Page 9: ...n set the 1 st station when G2 STU2 is connected 6 Reserved for Future Use 7 Expansion Port for DK9 DSS 8 Connect to G2 STU2 Note 1 4 conductor wiring with two digit ports is required for the DK9 25 if DK9 DSS phone connected 2 2 conductor wiring used between DK9 25 and DK9 DSS phone 1 Function Keys 2 Dual Color DSS Keys 3 Microphone 4 Function Keys 5 Numeric Dial Key Pad 6 Speaker ...

Page 10: ... set the 1st station when G2 STU2 is connected 6 Reserved for Future Use 7 Expansion Port for DK9 DSS 8 Connect to G2 STU2 Note 1 4 conductor wiring with two digit ports is required for the DK9 15 if DK9 DSS phone is connected 2 2 conductor wiring used between DK9 25 and DK9 DSS phone 1 Function Keys 2 Dual Color DSS Keys 3 Microphone 4 Function Keys 5 Numeric Dial Key Pad 6 Speaker ...

Page 11: ...Installation DK9 25 Connect Digital Key Telephone DK9 25 to G2 STU2 or G1E STU Card as the following ...

Page 12: ...25 and DK9 DSS Connect Digital Key Telephone DK9 25 to G2 STU2 or G1E STU Card as the following Diagram And then connect the DK9 DSS through the DSS expansion port of DK9 25 Fix the connection kit by screws ...

Page 13: ...DK9 15 Connect Digital Key Telephone DK9 15 to G2 STU2 or G1E STU Card as the following ...

Page 14: ...15 and DK9 DSS Connect Digital Key Telephone DK9 15 to G2 STU2 or G1E STU Card as the following Diagram And then connect the DK9 DSS through the DSS expansion port of DK9 15 Fix the connection kit by screws ...

Page 15: ... Handset Handset off hook Hang up Handset on hook In conversation make a call Press Dial Key 0 9 Press key Press key Dial numbers Press the CO key Press the busy CO key Press the flashing or blinking CO key Press DSS key ...

Page 16: ...d Fast Flashing Green System Hold Fast Flashing Red Exclusive Hold Slow Flashing Green SPK key Idle Steady Off I Use Steadily On Red Save Redial Fast Blinking Red System Program Fast Flashing Red Call Forward Fast Flashing Red Signalling Tone Dial Tone Ring Back tone Busy Tone Override Tone Ring Intercom Trunk Hold Recall ...

Page 17: ...k Queuing 7 B 03 Last Number Redial 8 B 04 Automatic Redial 8 B 05 Barge In Monitor Extension 9 B 06 Barge In CO 9 C RECEIVING CALLS 10 C 01 Answer 10 C 02 Automatic Answer Intercom 10 C 03 Call Pickup 10 C 04 Doorphone Optional 11 D DURING CONVERSATION 12 D 01 Call On Hold 12 D 02 Call On Exclusive Hold 12 D 03 Conference 13 D 04 Call Transfer 15 D 05 Answer Call Waiting 15 D 06 Call Splitting 16...

Page 18: ...5 Lock Up Unlock Extension By Security Code 29 G 06 Define Time Reminding Service 29 G 07 Define Morning Call Service 31 G 08 Date Time Setting For Console only 31 G 09 Switching of Day Night Service Mode For Console only 32 G 10 Alarm Assignment For Console only 33 G 11 Absent Message 34 G 12 Function Key Assignment Macro Key 35 G 13 User Programming Help For G1E system only 35 G 14 Station Progr...

Page 19: ...rt after Alert Tone is heard speak to the called party through Speaker and your voice will be heard from the called extension 4 When the called extension is busy Busy Tone heard pressing another DSS key can call another extension A 02 Automatic Line Access Trunk Group Access The feature allows each Extension to automatically select an idle CO Line If CO lines are divided into trunk groups Extensio...

Page 20: ... connected to a new CO line without hanging up A 04 Flash Open Loop Timed Flash Flash Key provides a temporary loop disconnection from a used CO line This allows a user to end a conversation and regain dial tone on the same trunk Flash duration is pre programmed and can meet the special needs of Central Office or PABX Lines if they offer them eg Call waiting Broker s call Press TRF FL key to Netwo...

Page 21: ...e name and depress Vol or Vol to find the desired name forward or backward Key Pad Depress 1 time Depress 2 times Depress 3 times Depress 4 Times Depress 5 Times 1 1 Space 2 A B C 2 3 D E F 3 4 G H I 4 _ 5 J K L 5 6 M N O 6 7 P Q R S 7 8 T U V 8 9 W X Y Z 9 0 ä Ü ñ ö 0 Vol Find the next name Vol Fine the previous name Lift Handset press SPK key to make the connection If the system finds a match th...

Page 22: ...er G 04 is selected the Extension automatically selects an idle CO line and a previously stored phone number will be dialed Handset off hook on hook Press SPD key Press a programmable DSS key DK6 Series One Touch Dialing Keys DK2 Series One Touch Dialing Keys DK3 Series One Touch Dialing Keys ...

Page 23: ...A MAKING CALLS 5 DK9 25 One Touch Dialing Keys DK9 15 One Touch Dialing Keys G1E GDS has 10 sets for One Touch Dialing on DSS 1 10 ...

Page 24: ... on can not be activated by the Doorphone A 09 Dial Access To Operator This is for an Extension user to reach the Attendant by dialing a programmed one digit code Lift Handset or press SPK key Dial 9 or 0 programmable NOTE When digit 9 is programmed for Automatic Line Access digit 0 is for Dial Access To Attendant When digit 0 is programmed for Automatic Line Access digit 9 is for Dial Access To A...

Page 25: ...ess SPK key the called Extension will ring NOTE 1 When you use the Call Waiting feature the MSG LED Lamp Red will flash slowly on the Called party 2 If an Intercom Recall is not answered after a programmed duration of about 90 seconds the recall will automatically be canceled B 02 Trunk Queuing Trunk Queuing is for an Extension to queue wait in line for a busy trunk When the busy trunk becomes fre...

Page 26: ...cally redialed at intervals of at least 10 seconds The value for the interval can be programmed from 10 to 90 seconds Automatic Save Number Redial Busy Tone heard when making an outside call Press SAVE key Auto Save will display in LCD Press new Telephone number If you skip this step the last dialed number will be stored Hang up Press SAVE key again for Redial Automatic Last Number Redial Busy Ton...

Page 27: ...ll signal the barged Extension A 3 party conference is made To Monitor Dial to monitor If programmed To Cancel Hang up press SPK key if Handsfree B 06 Barge In CO This feature is for an Extension to join another Extension in conversation with a CO line The calling Extension needs to be set up by programming before using this feature To Barge in Lift Handset or press SPK key Press the busy CO key D...

Page 28: ...e Handsfree mode The feature can only be applied to Extensions with a Microphone To assign to cancel Press MIC AT to assign and to cancel LED Indicating When Extension is in Automatic Answer Mode LED is steady on When Extension is back to normal mode the LED is off C 03 Call Pickup The feature is for an Extension to answer for another ringing Extension grouped by programming or not grouped Direct ...

Page 29: ...04 Doorphone Optional The feature is for an Extension to answer a Doorphone call To answer a Doorphone call Doorphone Ring is heard through Extension Speaker Lift Handset or press SPK key An Extension has to be programmed beforehand for receiving Doorphone calls Please refer to the System Programming manual To unlock the door by Extension Answer the Doorphone ring by Lifting Handset or pressing SP...

Page 30: ... fails to retrieve after a programmed duration 30 to 270 seconds See System Programming 2 The Hold Recall will ring the holding Extension If the call is still not retrieved the Hold Recall will continue to ring both the holding Extension and the Attendant Console The Recall Won t stop until it is answered 3 If there are several calls held at the same time unless the first Hold Recall is answered t...

Page 31: ...he DND CN conference key and hang up Remaining members are granted up to 4 minutes of time for their unsupervised conference A warning tone is provided 10 seconds before the termination of the conference period Members can press any key 0 9 Note1 to extend the time an additional time period NOTE 1 The unsupervised conference period is programmable from 1 minute to 4 in one minute increments 2 When...

Page 32: ...r one of the three parties has hung up the other two parties can still converse with each other To Remove A Party From A Conference Call During the conference press the CO line of the party you would like to disconnect You will be connected to this line and removed from the conference Other parties will continue in the conference Disconnect the other party by hanging up To return to the original c...

Page 33: ...en the busy Extension is free If the transferred call is not answered after a programmed duration the call will ring back the sending Extension 3 To transfer the call again or to another party press the blinking CO key to retrieve the call and repeat the Call Transfer procedure D 05 Answer Call Waiting As described in B 01 Call Waiting you are absent or your Extension is busy when another Extensio...

Page 34: ...In conversation with A Press SPD then key for retrieving B party and holding A In conversation with B party D 07 Mute Operation When you do not want your voice to be heard by the party in conversation with you use this feature To place in Mute Press MIC AT key Indicating LED Lamp goes steady when off hook goes off when on hook To resume the conversation Press MIC AT key again Indicating LED Lamp g...

Page 35: ...rom Handsfree to Using Handset Lift Handset From Using Handset to Handsfree Press SPK key Handset back on hook D 09 Volume Control During a conversation you may Increase or Decrease volume by this function Two volume levels can be chosen for handset During Conversation Adjustment Press VOL key for voice up Press VOL key for voice down ...

Page 36: ...the single line phone cannot receive the paging E 02 All Paging Internal The feature is for paging all zones The paging can be received from Keyphones only Lift Handset Press 1 E 03 Zone Paging External In GX system Paging can be broadcast over external paging equipment to one of the eight maximum depending on the system External Zones Lift Handset Press 3 Paging Code 1 8 Dial a one digit External...

Page 37: ...ows an Extension to announce to all Internal and External Paging Zones Lift Handset Press 0 E 06 Answer Paging Meet Me Page Paging through Speakers or external paging equipment can be answered through any Extension before the paging party hangs up Lift Handset Press ...

Page 38: ...phone instead of using the Handset Press SPK key NOTE It s only available for telephone models with Handsfree function F 03 Background Music Background Music BGM is available through the Keyphone Speakers The music is temporarily off when the telephone is in use Background Music can share the music source for Music On Hold To listen Press key NOTE 1 Incoming calls Lifting the Handset or Paging wil...

Page 39: ...he system is not fitted with a Voice Mail unit then dial 8901 Only a Console can dial 8901 8902 The G2 1648 access code is 89 The GDS600 access code is 8901 to 8916 depending on the number of VMU cards installed Normal access is 8901 Message Recording on the Service Voice must be performed at the Console telephone set Recording Method Password Handset off hook Dial the Voice Channel number 89 8901...

Page 40: ...orward number for inbuilt Voice mail is 86 To forward CODE Ext No Press PRG key Dial 1 for Any Call 2 for Busy 3 for Busy No Answer GDS 3 1 for Busy No Answer G1E 2 for No Answer Dial 86 for Voice mail To cancel Ext No Press PRG key Dial 1 Dial your own Extension number F 06 Message Waiting Programming Maybe Required If the Extension you re calling does not answer this feature allows you to light ...

Page 41: ...key on your extension called CLI Status This key when pressed can display the number date and time of the last 10 incoming calls to your extension You can view all of these numbers by pressing the VOL UP or VOL DOWN keys You may by pressing the Redial key then call that number back CLI Status Press CLI STATUS key 0294150100 02 15 10 20 MISS Press VOL key for next record Press VOL key for previous ...

Page 42: ...No Answer G1E 2 for No Answer Dial the ext or hunt group number you want your calls forwarded to When activated your forward key will flash 2 When Busy or No Answer If your Extension fails to answer after programmed time 10 to 100 seconds or is busy all incoming calls to your Extension are automatically forwarded to any other Extension you have programmed 3 To forward an external number Program th...

Page 43: ...g calls and Forced Account Cord used by the station For details of setting an FAC please refer to the System Programming manual of each system SPK key off Handset on hook Press PRG key then Dial 4 Dial the Forced Account Code F A C Dial telephone number NOTE 1 If the dialed FAC is correct your Extension automatically selects an idle CO line for you If not you will hear Busy Tone 2 Once you end the...

Page 44: ... Volume Up Press VOL key for Volume Down To Set or Cancel the Ring Volume Up Gradually method is To Save Press PRG 6 4 Confirmation Tone and the LCD will show Save To Cancel Press PRG 6 4 Confirmation Tone and the LCD will show Cancel To Set the Ring Frequency 8 ring frequencies can be selected The method is PRG 6 5 then key in your choice 1 8 To Set the Microphone level 8 Mic levels can be select...

Page 45: ...a specific and unique frequency when someone from your home calls your office then enter a unique frequency Valid settings are 1 through 8 If you do not want to use this feature simply press save at the Set Ring Frequency prompt 2 For Operator or numeric 0 to 9 Press PRG key then Dial 8 8 Press a programmed DSS key 1 10 or Dial the Speed Access Code 0 9 Dial desired outside telephone number Max 30...

Page 46: ...t To define a specific CO line Name for Speed Dialing After or before dialing stored telephone number User can assign a CO line for the stored numbers Press MIC AT key then dial the CO line number 01 12 for G1E or 00 for Automatic CO Selection Or key in Name for this System Speed Dial To exit Press SPK key Other signal for stored number when storing data Key Meaning LCD display Pause P Flash F Pul...

Page 47: ...acters digits NOTE To change the Security Code unlock the Extension and then lock it by a new Security Code Access to a locked telephone S CODE Handset on hook SPK key off Press PRG key then Press key Enter your Security Code If the code is right system will provide a free CO Line automatically Dial the telephone number G 06 Define Time Reminding Service The System is equipped with an internal clo...

Page 48: ...the time is not correctly set in HH MM format the LCD will show Access Denied and a Busy tone will be heard To cancel Handset on hook SPK key off Press PRG Press HOLD twice 2 For Attendant Console To define HH MM Duration Handset on hook SPK key off Press PRG key Press HOLD then 8 key Insert the Alarm Time Insert the duration 00 98 minutes Press SAVE key Press SPK key to exit To cancel Handset on ...

Page 49: ...t alarm plays at 07 00 A M for Morning Call NOTE Once the morning call is answered the Morning Call Service feature is automatically canceled The time will need to be reprogrammed when next you want to use this service G 08 Date Time Setting For Console only The user can set Date and Time without entering into System Programming DATE TIME Handset on hook SPK key off Press PRG key Press HOLD then 7...

Page 50: ...ized people from accessing programming functions the Attendant Extension can be locked by a Security Code See G 05 Lock Unlock Extensions By Security Code For programming of the Day Time duration please refer to Day Time Duration Setup of System Programming manual Setting for Manual User or Auto System Select Handset on hook SPK key off Press PRG TRF FL then key LED Indication SPK key LED Lamp fla...

Page 51: ...ther extensions To define Ext No Handset on hook SPK key off Press PRG then REDIAL key Dial the Alarm Assigned Ext number Insert the Alarm Time Alarm time Press SAVE key Press SPK key to exit To cancel Ext No Handset on hook SPK key off Press PRG then REDIAL key Dial the Alarm Assigned Ext number Press HOLD key ...

Page 52: ...Handset on hook SPK key off Press PRG MSG key Dial one of the Absent Messages Insert data after Message for G1E only If needed Press SAVE then SPK to exit Examples Message 0 Vacation 12 24 Message 4 Call 9578244 Message 1 Will back 15 30 Message 5 DND 12 30 13 30 Message 2 Lunch 12 00 Message 6 Call EXT 16 Message 3 Meeting 10 10 Message 7 Off Duty 17 30 NOTE 1 Each Absent Message can have a maxim...

Page 53: ... function the DSS key must be assigned to CO or Extension G 13 User Programming Help For G1E system only This Program assists users to perform station programming by LCD help information if the user has no operation manual available Programming Handset on hook SPK key off Press PRG key then Dial 0 The LCD of the telephone will display help information Each Help Information example will be held for...

Page 54: ...set off hook on hook Press SAVE key NOTE 1 Once SAVE key is pressed your Extension will automatically select an idle CO line for you 2 You may also press a CO key to select an idle CO line before pressing SAVE key G 15 Account Code This feature allows an Extension user to enter an Accounting Code into System s Station Message Detail Recording SMDR which records all incoming and outgoing calls Sett...

Page 55: ...tatus DND CN off indicates the status back to normal G 17 Baby Listen For G1E system only By assigning beforehand another station can directly call this station without ringing and monitor from Handset or Microphone to enable Handset off hook or Press SPK key Dial 7 7 0 to disable Put handset on hook or Press SPK key G 18 Automatic Line Access by Lifting Handset For G1E system only By assigning be...

Page 56: ... is locked then S M D R records will be stored in the System s Memory and will not be sent out until the S M D R output is unlocked to lock unlock Press SPK key Dial 7 7 2 NOTE The G1E System s RAM can store max 25 records G 20 Headset ON OFF To switch between handset and headset mode by press SPK 7 7 5 Extension which must have Headset feature Press SPK key Dial 7 7 5 ...

Page 57: ...orning Call Service 31 Define Time Reminding Service 29 Dial Access To Attendant 6 Dial By Name 3 Do Not Disturb 37 Doorphone Optional 11 F Flash Open Loop Timed Flash 2 Function Key Assignment Macro Key 35 H Handsfree 20 I Individual Line Access 2 Inter Office Call Intercom 1 L Last Number Redial 8 Lock Unlock S M D R output For Console only 39 Lock Up Unlock Extension By Security Code 29 M Mute ...

Page 58: ...P N 5502 4900 0003 All data and specifications are subject to change without notice ...

Reviews: