background image

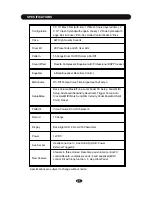
SPECIFICATIONS

25

Specifications 

are 

subject to change without notice

Configuration

3 X 10" Mesh Tom(with rim), 10" Mesh Snare (layered rims), 2 
X 12" Crash Cymbal(with edge & choke), 14" Ride Cymbal(with 
edge, Bell & choke), 8" Hi-Hat, Hi-Hat Control Pedal, 8" Kick

Voice

Drum Kit

Pattern 

55

 Songs,Drum On/Off,Accomp On/Off

Sound


Effect

Reverb,Compressor,Equalizer


with


Professional


DSP


Processor

Equalizer

4-Band


Equalizer,Real-time


Control

Metronome

O

n/Off,Tempo,Voice,Time


Signature,TapTempo

SetupMenu

Back


Volume,MasterTune,Local,Fader


FX


Setup,


FaderM


IDI


Setup,Advanced

(

Sensitivity,Headroom,Trigger


Curve,Auto


Crosstalk,MIDI


Note


Send,Rim


Velocity,Pedal,SnareRimSplit


Point),R


eset

PadEdit

V

oice,Volume,Pan,Pitch,Reverb

Record

15 Songs

Display

Back-light


LCD,


2


Row


X16


Characters

Power

12V DC

Aux. Socket

Headphone,Line


In,


Line


Out(L/R),USB,


Power,


External


TriggerX2

New


Feature

faders


in


three


modes

:


Real-time


pad


volume


control,FX


control(Reverb,


compressor


and


4


-band


equalizer),MIDI


control.


Kit


with


loop


function.


5


step


Hihat


Pedal.

697 High Quality Sounds

20

 Preset Kits and 20 User Kits

Summary of Contents for XD-450C

Page 1: ...USER S MANUAL DIGITAL DRUM XD 750 ...

Page 2: ...gned to provide reasonable protection against harmful interference in a resi dential installation This equipment generates uses and can radiate radio frequency energy and if not installed and used in accordance with the instructions may cause harmful interference to radio communications However there is no guarantee that interference will not occur in a particular installation If this equipment do...

Page 3: ...d be serviced by qualified service personnel when the power supply cord or the plug has been damaged liquid has been spattered into the unit or it has been exposed to rain the instrument does not appear to operate normally or exhibits a marked change in performance the instrument has been dropped or the cabinet has been damaged Do not attempt to open the unit or make any change in the circuits or ...

Page 4: ... Settings SETUP Back Volume Tune Local FX Set MIDI Set Advanced Settings Sesitivity Headroom Sense Time Trigger Curve Cross Talk Note Send Rim Velocity Pedal Velocity Calibration Reset DRUM KIT EDIT Voice Type Voice Volume Reverb Pitch Pan APPENDIX Kit List Pattern List Voice List SPECIFICATIONS 1 6 6 9 10 11 12 12 12 12 13 13 13 14 14 14 14 14 15 15 15 15 15 15 16 16 16 16 16 16 17 17 17 17 17 17...

Page 5: ... The diagram shows complete drum kit after installation Power adaptor and connection cables are not shown in the diagram SOUNDMODULE HI HAT CRASH1 CRASH2 TOM1 TOM2 SNARE RIDE KICK PEDAL HI HAT CONTROL PEDAL KICK TOM3 ...

Page 6: ...2 INSTALLATION This is the view of all separated parts Match each part to its number and set up the drums accord ing to the diagram on next page are spare parts RACK INSTALLATION 1 ...

Page 7: ...ihat and Crash stands to their clamps Fasten their wing nuts 3 Insert Ride stand to its clamp Fasten its wing nut 4 Insert the L shape hex rod to snare clamp 5 Insert other hex rods to tom clamps 6 Adjust all parts to a comfortable position when playing seated Make sure all parts are fasten tight and then install drum pads according to next page ...

Page 8: ...4 INSTALLATION RACK INSTALLATION 3 This diagram shows the completely installed drum rack Please check the rack with part numbers before you start pad installation ...

Page 9: ...ct the trigger connector cable plug to the bottom of the sound module and then connect all cable heads according to their name tags 2 3 1 Remove the wing nut washer and felt pad from the top of the rod 3 Adjust the pad position then re tighten the wing nut Cymbal Installation COMPONENTS INSTALLATION 2 Put the cymbal pad into the rod then place back parts removed in the step 1 Fasten the wing nut b...

Page 10: ...s quickly Rotate it clockwise to increase 8 MIXER 9 ALTER Use ALTER button to switch 3 fader modes In VOL mode S1 S6 are used to control volume of kick snare toms ride crashes hi hats and also their rim or edge volume In FX mode S1 controls kit reverb level Reverb type can be selected in FX SET menu S2 controls kit compression ratio Threshold can be set in FX SET menu S3 S6 control the gain of a 4...

Page 11: ...ress SETUP button to adjust system settings including BACK VOLUME MASTER TUNE LOCAL FX SET MIDI SET ADVANCE and RESET See chapter SETUP 14 MODE Change playing modes for demo patterns Play One Play a single pattern once Repeat One Loop a single pattern Play All Play all patterns once Repeat All Loop all patterns 15 METRO Press this button to set metronome on off volume tempo time signature and voic...

Page 12: ...ed it four times You can also change the tempo using scroll wheel 7 or button 16 after you have pressed TEMPO button 20 Pauses playback of the current demo pattern press it again to cancel playing current pattern 21 Plays the current demo pattern 22 Record a drum sequence You can use STOP button 20 to pause recording Press STOP button 20 again to finish recording and save the sequence to a user so...

Page 13: ... player mobile phone or computer Play and practice with your favorite music 27 EXT1 Extended trigger socket 1 connect to Crash2 by default 28 EXT2 Extended trigger socket 2 connect to Tom4 by default 29 USB Connect standard B type USB cable to this socket for updating firmware gaming recording midi and using plug ins for more sound on computer TIPS Connect USB2 0 A male to B male cable to this soc...

Page 14: ...harder to make higher volume and strike the pad softer to make lower volume Playing Tom Drum Strike the central position head of the pad to make head sound strike the rim of the pad to make rim sound Playing Kick Drum Press the Kick drum pedal to make kick drum sound Playing Hi Hat 1 Strike the Hi Hat pad without pressing the Hi Hat control pedal to make open Hi Hat sound 2 Strike the Hi Hat pad w...

Page 15: ...ote All the system settings in SETUP is global parameter they will affect all the kits and can be saved even when rebooted If the adjustment result is not good do a crosstalk reset according to next pages Make sure the drum kit is stable and all the parts are well locked Connect all the cables to the drum module according to their tags Connect the multi trigger connector to its socket at the botto...

Page 16: ...ened voice names R stands for Rim shot X for Cross stick E for Edge B for Bell C for Close O for Open Half for Half Open P for Pedal Chick Sp for Pedal Foot Splash Use PAGE DOWN UP to enter VOLUME menu to adjust the volume level for a single trigger Press EXIT to quit the current menu and select a place to save it using button You can either save it to a preset kit or a user kit if you don t want ...

Page 17: ... wheel or button to locate the place for saving and press enter to confirm If you are in PATTERN mode you can record along with demo song TO USE THE MIXER Press the ALTER button to switch between 3 modes for faders In VOL mode all the faders control the volume of different pads In FX mode S1 controls reverb level S2 controls com pression ratio and S3 S6 change to a 4 Bank equalizer In MIDI mode 6 ...

Page 18: ...the EXIT to give up All items can be setup are BACK VOLUME Controls the volume of demo patterns and loops MASTER TUNE Controls the overall pitch It is A4 440Hz by default LOCAL Decides whether the module read the sound files or not If switched to OFF the sound module will function as a midi drum which produce no sound but send midi messages TIPS If you want to connect the sound module to computer ...

Page 19: ... this value by certain amount may avoid being trig gered multiple times by vibration in very short time Trigger Sets the velocity curve for pads including Linear EXP1 2 LOG1 2 and Spline On horizontal is the velocity you strike and on vertical is the volume after processed by the trigger curve TOM1 ADV Sensitivity 77 SETUP ADVANCE ENTER V o l ume V o l ume V o l ume V o l ume Linear Exp Log Spline...

Page 20: ... rim softer than this value it will trigger cross stick sound Above that value it will trigger rim shot sound Note Some unique settings such and Rim Velocity Spilt Point Pedal Vel Calib and etc they will ap pear only if the matching part is struck Or you can find them using DRUM button Tip Use DRUM button can switch between trig gers quickly in SETUP menu RESET Restore to factory settings It is st...

Page 21: ... current trigger The higher the volume the louder it will be REVERB Adjust the reverb level of current trigger Over all reverb can be adjusted by S2 in FX mode this value decides how much the current trigger will be affected by fader S2 PITCH Adjust the pitch of current trigger measured in semi tones PAN Adjust the panning of current trigger Minus value stands for left and 0 stands for middle posi...

Page 22: ...r names DRUM KIT EDIT 18 HIHAT Open HIHAT Close HIHAT HalfOpen CRASH1 CRASH2 TOM1 TOM2 Rim SNARE Rim SNARE X Stick RIDE Bow PEDAL Chick PEDAL Splash KICK TOM3 CRASH1 Edge CRASH2 Edge RIDE Bell RIDE Edge TOM1 Rim TOM2 TOM3 Rim SNARE Head ...

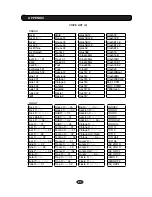
Page 23: ...etal 12 Mario 19 Utopia 6 Rock 13 Impulse 20 BlueBay 7 80s 14 Loop 1 WalkWithTree 20 SoftAmour 39 Bartender 2 Soul 21 MelodicDeath 40 Celebration 3 Latin 22 SambaDance 41 Discover 4 Moskau 23 RockBlues 42 Shade 5 Heart 24 Fly 43 Echo 6 Fable 25 Bossa 44 LiteGroove 7 theStorm 26 Tango 45 River 8 Beowulf 27 Dancing 46 Jazz 9 Forever 28 CryintheRain 47 Love 10 Acid 29 NightTrain 48 Blues 11 Arcane 30...

Page 24: ...le Six TR66RIM Techno 02 Latin Hot Soli909RIM SNARE Rock RnB 04 Latin Rimshot 02 POPV SS Rock Rimshot RnB R 01 Session ROCKV2 Rock X RnB R 02 Session Rimshot ROCKV2 RS Jazz 01 RnB X Stick 01 Session X ROCKV2 SS Jazz 01 Rimshot RnB X Stick 02 Vintage ROCKV3 Jazz X Stick Techno 01 Vintage Rimshot ROCKV3 RS Jazz 02 Techno 02 Vintage X Stick ROCKV3 SS Jazz 02 Rimshot TechnoC 01 Jungle ROCKBRI Indie 01...

Page 25: ...m16SoliNat Rock3 Techno3 Jungle4 10SoliJP1 Rock3 Rimshot Techno4 Jungle4 Rimshot 12SoliJP1 Rock4 Trance1 01 Fiesta1 14SoliJP1 Rock4 Rimshot Trance2 01 Fiesta1 Rimshot 16SoliJP1 Jazz1 Trance3 01 Fiesta2 Rim10SoliJP1 Jazz1 Rimshot Trance4 01 Fiesta2 Rimshot Rim12SoliJP1 Jazz2 Trance1 02 Fiesta3 Rim14SoliJP1 Jazz2 Rimshot Trance2 02 Fiesta3 Rimshot Rim16SoliJP1 Jazz3 Trance3 02 Fiesta4 yt808ana1 Jazz...

Page 26: ...4 Conga5 Brush1 Rim14XNMas NOV_808TOM1 Conga6 Brush2 Rim16XNMas NOV_808TOM2 Timbale1 Brush3 10BigReverb NOV_808TOM3 Timbale2 Brush4 12BigReverb NOV_808TOM4 8Bit1 Latin1 14BigReverb SDS7_4TO1 8Bit2 Latin2 16BigReverb SDS7_4TO2 8Bit3 Latin3 Rim10BigRev SDS7_4TO3 8Bit4 Latin4 Rim12BigRev SDS7_4TO4 House1 01 Session1 Rim14BigRev 909_TOM1 House2 01 Session2 Rim16BigRev 909_TOM2 House3 01 Session3 10Met...

Page 27: ...hick 02 Trance Closed 02 Jungle Half Open 808_HH C1 Metal Open Trap Open 01 Jungle Pedal Splash 808_HH C2 Metal Closed Trap Closed 01 Fiesta Open 808HH P Metal Pedal Chick Trap Open 02 Fiesta Closed 909HHOP2 Funk Open 01 Trap Closed 02 Fiesta Pedal Chick 909_HHCL CRASH Rock1 8Bit2 SplashA12 Crash18 Rock1 Edge House 01 SplashA12E Crash18 E Rock2 House 02 SplashB12 CrashB16 E Rock2 Edge House 03 Spl...

Page 28: ... Closed BalHH C Y808HH O House Open 02 Brush Pedal Chick BalHH P Y808HH C House Closed 02 Brush Half Open BalHH Half PERCUSSION Cowbell TranceFX02 Agogo01 808 shaker FunkPercussion01 TranceFX03 Agogo02 SakataAgogo FunkPercussion02 TranceFX04 ShakerShort Elec9Clap 8BitFX01 TranceFX05 ShakerLong 626_TAM 8BitFX02 TrapFX01 NoClp 707_TAMB 8BitFX03 TrapFX02 SDS7_CLP ABcowbell HouseFX01 ElectricShaker So...

Page 29: ...ff Tempo Voice Time Signature TapTempo SetupMenu Back Volume MasterTune Local Fader FX Setup FaderM IDI Setup Advanced Sensitivity Headroom Trigger Curve Auto Crosstalk MIDI Note Send Rim Velocity Pedal SnareRimSplit Point R eset PadEdit Voice Volume Pan Pitch Reverb Record 15 Songs Display Back light LCD 2 Row X16 Characters Power 12V DC Aux Socket Headphone LineIn Line Out L R USB Power External...

Reviews: