background image

32

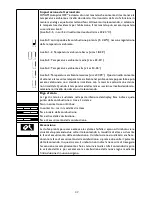
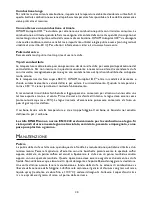
Impostazione del termostato

HWAM Autopilot IHS

TM

 è dotato di un termostato che consente di mantenere la 

temperatura ambiente al livello desiderato. Il termostato della stufa funziona in 
maniera analoga a quello dei termosifoni. Attraverso il telecomando, si seleziona 
la temperatura desiderata per l’abitazione. Il termostato può essere impostato 
su sei diversi livelli:
(Livello 0-5, in cui 3 è il livello intermedio di circa 22-24 °C).

Livello 0: corrisponde alla combustione più lenta (3-4 kW), nessuna regolazione 
della temperatura ambiente.

Livello 1-2: Temperatura ambiente bassa (circa 18-22°)

Livello 3: Temperatura ambiente media (circa 22-24°)

Livello 4: Temperatura ambiente alta (circa 24-26°)

Livello 5: Temperatura ambiente massima (circa 27-29°). Questo livello consente 
di ottenere la massima temperatura ambiente nel più breve tempo possibile e può 
essere selezionato se si desidera riscaldare con la massima velocità una stanza 
non riscaldata. Quando la temperatura della stanza si avvicina al livello desiderato, 
selezionare il livello desiderato sul telecomando.

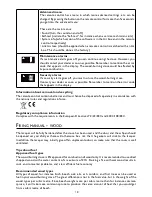
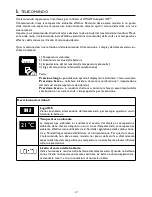
Riga di stato

La riga di stato è visualizzata nella parte inferiore del display. Essa indica a quale 
punto della combustione si trova il sistema.
Non in contatto con l’Airbox.
In contatto – ma in modalità di attesa.
Fase iniziale della combustione.
Fase attiva della combustione.
Fase di esaurimento della combustione.

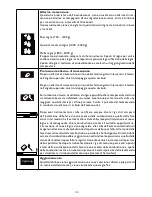
Accensione

La stufa è pronta per essere accesa e le valvole a farfalla si aprono. Il simbolo viene 
visualizzato premendo due volte il telecomando in modalità di attesa o durante 
la fase di esaurimento della combustione. Il simbolo viene visualizzato anche se, 
durante la fase di esaurimento della combustione, si preme due volte il pulsante 
del telecomando. In questo caso il simbolo non indica la necessità di rieseguire 
l’accensione ma semplicemente che è stato inviato alla stufa il comando di aprire 
le valvole dell’aria per accelerare la combustione della nuova legna mediante 
l’introduzione di nuovo ossigeno.

Summary of Contents for 3130

Page 1: ...User s Manual Instruzoni per l uso GB IT 21 11 2014 97 9658 www hwam com 578 006 3120 3130 3220 ...

Page 2: ......

Page 3: ... 21 Maintenance 22 Operational problems 24 Declaration of Performance 24 Type plate 41 43 Indice Italiano Disegni 4 8 HWAM Autopilot IHSTM 25 Istruzioni per l installazione 26 Il telecommando 31 Uso iniziale della stufa 34 Ragguagli generali 37 Manutenzione 38 Disturbi del funzionamento 40 Dichiarazione di prestazione 40 Targa dati 41 43 ...

Page 4: ...4 B C A 3 1 1 4 45 4 3 2 1 11 15 14 12 13 9 11 10 17 1 6 5 8 2 3 15 4 16 4 3 14 12 13 ...

Page 5: ...5 D 6 2 1 3 4 5 ...

Page 6: ...6 E 13 2 8 4 12 11 6 7 14 1 3 10 9 6 7 8 4 10 11 5 5 1 3 14 6 7 8 4 10 9 11 3 15 5 16 16 17 ...

Page 7: ...7 F ...

Page 8: ...8 G ...

Page 9: ...tion Your new wood burning stove and the HWAM Autopilot IHSTM will ensure the cleanest possible com bustion as well as a good fuel economy regardless of external conditions such as the type of firewood used the chimney the user s experience and other external circumstances The HWAM Autopilot IHSTM consists of the following components Air box the Air box contains a printed circuit board software as...

Page 10: ...as a flammable wall in which case we ask you to contact your local chimney sweep or glass producer to hear at what distance the stove should be kept from glass Load bearing capacity of floor Before installing the stove you must ensure that the load bearing capacity of the floor can withstand the weight of the stove and the chimney The weight of the chimney should be calculated according to its dim...

Page 11: ...vered smoke outlet nor the cleanout door and pipe connections Please note that bent and or horizontal smoke pipes will reduce the effect of the chimney draft Vertical cross section of smoke flue Drawing B and C B Top smoke outlet C Rear smoke outlet Steel chimney 9 Flue gas elbow 10 Fits into smoke flue socket Brick built jamb of flue 11 Built in pipe sleeve 12 Fits smoke flue Wall rosette 13 Cove...

Page 12: ...ws 12 Use a soft faced hammer for instance to break off the top of the heat shield 11 and the wire fastener 12 13 Fasten the heat shield 7 and wire fastener 6 to the stove again 14 Reposition the lambda sensor coupling 5 in the wire fastener 6 15 Fix the two wires by closing the metallic tabs 4 again 16 Install the front 17 on the heat storage compartment again 17 Break off the laser cuttings 13 o...

Page 13: ...nd rear plates on the left side of the wood burning stove when seen from the front There is a mark on the Air box where the plug should be let in See the photo of the power supply on the Air box Air box without power supply Air box with power supply 2 Insert three AA batteries in the remote control When the IHS logo disappears from the display the remote control is ready to use 3 The remote contro...

Page 14: ...xt Pass if everything is OK or Failed if there is a problem The remote control will also respond with the text Failed if you prior to self test with the remote control have prepared the wood burning stove for lighting up a fire made the match box appear on the display If the electric power is cut and switched on again the programme will return to standby and the self test can be carried out If the...

Page 15: ...t IHSTM The remote control measures the actual room temperature It must hence be placed in a location in the room where it is not affected by unnaturally high temperatures such as the wood burning stove s radiation heat or direct sunlight On the remote control you enter the desired heat level as you would on a radiator thermostat Via radio waves the remote control sends information to the stove s ...

Page 16: ...can be adjusted to six different levels The thermostat function can be adjusted to six different levels Level 0 5 where level 3 is a medium temperature of approx 22 24 C Level 0 regulates to the slowest combustion 3 4 kW no room temperature control Level 1 2 regulates to low room temperature approx 18 22 C Level 3 regulates to middle room temperature approx 22 24 C Level 4 regulates to high room t...

Page 17: ...stoking has been carried out this symbol will flash on and off in the upper left corner If the symbol has been displayed for a long time the temperature in the flue gasses can be so low that you have to light up again in order to give the stove more air this is done by pressing the remote control twice causing the lighting up symbol to appear in the display Always be aware that the status line cha...

Page 18: ...parately in accordance with the national rules and regulations in force Regulatory compliance information Complies with the requirements in the European Directives 72 23 EEC and 2004 108 EEC Firing manual wood The lacquer will be fully hardened after the stove has been used and the door and the ashpan should be opened very carefully as there will otherwise be a risk that the gaskets will stick to ...

Page 19: ...ling Press the remote control twice to activate the symbol of lighting up Light up the fire lighters and close the stove door Adjust the temperature selection mechanism on the remote control to level one Let the fire burn out and do not restoke even if there is a restoking alarm When the fire has died out completely the door must be opened and stay open while the stove cools down to room temperatu...

Page 20: ...y friendly combustion and adapt to the desired room temperature The thermostat function is designed as a radiator valve The user enters a desired heat level which suits the room in which the stove is installed When the thermostat is set at a heat level the control function will adapt to this temperature If the room temperature is lower than the desired heat level the control function increases the...

Page 21: ...ever patent fuel can be used to fuel the fire and should be placed on the embers produced by the burned wood Be aware that using fuels other than wood will cause soot to form on the glass pane Operating the heat compartment damper HWAM 3130 There is a damper at the back of the stove between the top plate and the heat compartment that opens and closes the flow of convection air in the heat compartm...

Page 22: ...ating When the temperature is reduced to 450o Celsius the normal functions apply again It is recommended that you use birch or beech wood that has been chopped and stored for at least one year in an open shed exposed to sun and wind The wood must be dry max 20 water contents before it is stored indoors It is recommended that kindling wood is stored indoors for a couple of days prior to use Briquet...

Page 23: ...hook 6 beneath the top plate Ashes The ash pan is best emptied by pulling a waste bag over the pan tipping it and then carefully pulling it out of the bag Ashes are disposed of via the domestic waste collection Please note that there may be embers in the ashes for up to 24 hours after the fire has gone out Insulation The efficient but porous insulation of the combustion chamber may in time become ...

Page 24: ...ace or refit Never open the door when there are still flames on the wood Uncontrollable combustion Faulty seal in door or ash pan Fit new seal Safety Alarms In case the safety alarms go off you must not use the stove Contact your dealer as soon as possible At interruptions that you cannot yourself rectify you should contact the dealer Declaration of Performance The DoP can be downloaded from our w...

Page 25: ...in termini di ecologia e di risparmio energetico La nuova stufa con HWAM Autopilot IHSTM garantisce pertanto una combustione pulita ed economica indipendentemente da fattori esterni come il tipo di legna le condizioni della canna fumaria l esperienza dell utilizzatore e altre circostanze HWAM Autopilot IHSTM consiste di Airbox L Airbox è costituito da un circuito stampato software e da 3 motori ch...

Page 26: ...l peso della stufa Modello Peso Altezza Larghezza Profondità HWAM 3120c 3120m 107 kg 104 kg 100 5 cm 47 9 cm 41 4 cm HWAM 3130c 3130m 114 kg 111 kg 126 0 cm 47 9 cm 41 4 cm Accumulatore di calore 32 kg HWAM 3220c 3220m 91 88 kg 109 9 cm 47 5 cm 41 3 cm Distanza da materiale infiammabile La stufa HWAM deve essere sempre messa su un pavimento ignifugo Se la si pone su pavimenti in legno o simili que...

Page 27: ...llo di copertura Posizionare il pannello di copertura sopra l apertura sulla sommità della camera di combustione da cui è stato appena rimosso l anello di uscita fumi e ser rare con le 3 viti 13 Rimuovere gli inserti tagliati con il laser 13 sulle fiancate 14 Applicare le fiancate sui perni 14 e sollevarle sulle viti 3 che saranno poi serrate 15 Applicare il top di ghisa 1 sulla stufa 16 Posare il...

Page 28: ...ermi 5 10 Fissare di nuovo i 2 cavi tra i fermi 3 11 Posizionare la piastrina di copertura 8 sopra l apertura sulla sommità della camera di combustione da cui è stato appena rimosso l anello di uscita fumi e serrare con le 3 viti 12 Posizionare il pannello posteriore 1 sui perni posti lungo il lato posteriore della base della stufa quindi premere il pannello verso la stufa Sollevare il pannello po...

Page 29: ...tico della centralina elettronica di controllo deve essere eseguito prima della prima accensione della stufa operazione eseguita in fabbrica È possibile eseguire la procedura autodiagnostica solo quando la stufa è fredda e in modalità di attesa nessuna indicazione nella riga di stato Verificare che il display non sia attivo in altre parole non deve essere illuminato Se il pulsante viene tenuto pre...

Page 30: ...pediscono un buon tiraggio è importantissimo riscaldare più rapidamente possibile la canna fumaria A tal fine è necessario accendere velocemente il fuoco Tagliare la legna in pezzi più piccoli del solito utilizzare più blocchi di accensione ecc In seguito a un periodo di inutilizzo prolungato è importante verificare che il tubo della canna fumaria non sia ostruito È possibile collegare più disposi...

Page 31: ...ve nella fase iniziale o durante la combustione impostazione del termostato temperatura desiderato Pressione breve in modalità di attesa o durante la fase di esaurimento della combustione avviare la stufa cioè prepararla per l accensione Descrizione dei simboli Logo IHS Viene visualizzato all accensione del telecomando per esempio quando si sosti tuiscono le batterie Temperatura ambiente La temper...

Page 32: ...n la massima velocità una stanza non riscaldata Quando la temperatura della stanza si avvicina al livello desiderato selezionare il livello desiderato sul telecomando Riga di stato La riga di stato è visualizzata nella parte inferiore del display Essa indica a quale punto della combustione si trova il sistema Non in contatto con l Airbox In contatto ma in modalità di attesa Fase iniziale della com...

Page 33: ...aggiore quantità d aria a tal fine premere 2 volte il pulsante del telecomando in modo da visualizzare il simbolo dell accensione Dopo aver rialimentato la stufa verificare sempre che la riga di stato passi dall indicazione della fase di esaurimento della combustione a quella della fase attiva In tal modo si ha la certezza che la stufa abbia recepito l immissione di nuova legna e di conseguenza ch...

Page 34: ...conformemente alla legislazione e alle normative nazionali vigenti Informazioni sulla conformità normativa Conforme ai requisiti delle direttive europee 72 23 CEE e 2004 108 CEE Uso iniziale della stufa Alla prima accensione la vernice si indurisce L anta e il cassetto raccoglicenere devono essere aperti con estrema attenzione per evitare che le guarnizioni si attacchino alla vernice In questa fas...

Page 35: ...co ai blocchi di accensione e chiudere lo sportello Impostare il selettore della temperatura sul telecomando sul livello 1 Lasciare che il fuoco si esaurisca ed evitare di riaccendere anche quando entrerà in funzione l allarme di riaccensione Quando le fiamme si saranno spente completamente aprire lo sportello e lasciarlo aperto per consentire alla stufa di raffreddarsi a temperatura ambiente 2 Se...

Page 36: ... di garantire una combustione ecocompatibile e di adattarsi alla temperatura ambiente desiderata Il termostato funziona come la valvola di un termosi fone Essa viene impostata dall utilizzatore su un livello di calore adeguato alla stanza in cui è installata la stufa Quando il termostato è impostato su un livello di calore la centralina di comando si adegua il più possibile a tale temperatura Se l...

Page 37: ...ico È tuttavia possibile utiliz zare formelle da introdurre sui tizzoni a una certa distanza dalla legna Ricordare di ruotare la manopola di regolazione nuovamente verso sinistra Fare atten zione che il riscaldamento con altri tipi di combustibili comporta un vetro piu sporco Attivazione dell accumulo termico HWAM 3130 Nella parte alta della stufa tra il ripiano superiore e il vano riscaldato si t...

Page 38: ... torna a 450 C viene ripristinato il normale funzionamento Si raccomanda l uso di blocchi di betulla o faggio spaccati e conservati per almeno un anno sotto una tettoia esposta al sole e al vento Prima di essere trasferita all interno la legna deve essere secca contenuto d acqua max 20 La legna riservata all accensione può essere conservata al chiuso un paio di giorni prima dell uso Il carbone bru...

Page 39: ...ndola di nuovo al di sotto dei supporti 3 ed estrarla Liberare entrambe le metà del deflettore fumi 4 dal supporto 5 dietro al tubo del fumo e sgan ciarla dal gancio 6 sotto al ripiano superiore Cenere Il cassetto della cenere si può vuotare facilmente La cenere è un ottimo concime per l orto Fare attenzione La cenere puo contenere ancora brace viva anche 24 ore dopo lo spegni mento della stufa Is...

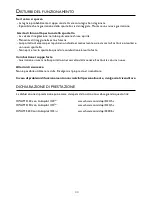
Page 40: ...ovo sportello Non aprire mai lo sportello quando la combustione è molto forte Combustione troppo forte Guarnizione usurata nello sportello o nel cassetto della cenere Sostituirla con una nuova Allarmi di sicurezza Non è possibile utilizzare la stufa Rivolgersi al più presto al rivenditore In caso di problemi di funzionamento non risolvibili personalmente rivolgersi al rivenditore dichiarazione di ...

Page 41: ...41 ...

Page 42: ...42 ...

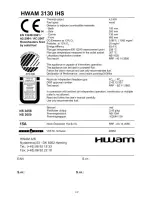
Page 43: ...43 ...

Page 44: ...www hwam com ...

Reviews: