Huvema VBS-2012H-CE Operator'S Manual Download Page 27


- 26 - 

AIR PUMP COMPONENT 

VARIATOR COMPONENT 


4060 

2  

AIR PUMP SEAT 

7000 

1  

MOTOR SPRING HOUSING 

4170 

1  

AIR NOZZLE 

7010 

1  

SPRING 

4180 

1  

AIR NOZZLE CLIPPER 

7020 

1  

VAEIATOR DISK, UPPER OUTER 

4450 

1  

AIR COMPRESSOR 

7030 

1  

VAEIATOR DISK, UPPER INNER 

BA51 

-  

V-BELT, 2011+4450 

7040 

1  

VARIATOR HOUSING TUBE 


7050 

1  

VARIATOR SHAFT 


7060 

1  

VARIATOR HOUSING 

MAIN BODY & MISCELLANCEOUS 

7070 

1  

PULLEY 


7080 

1  

WORM GEAR 

5000 

1  

MAIN BODY 

7090 

1  

WORM GEAR HOUSING 

5100 

1  

REAR DOOR, LARGER 

7100 

1  

GEAR SHAFT 

5101 

1  

REAR DOOR, SMALLER 

7110 

1  

WORM 

5120 

1  

LOWER DOOR 

7120 

1  

WHIRLING ARM 

5140 

1  

UPPER DOOR 

7200 

1  

SPRING HOUSING 

8111 

1  

CONTROL PLATE 

7200 

1  

SPRING HOUSING 

8372 

1  

VARIATOR INSTRUCTION 

7210 

1  

SPRING 

8422 

1  

GEAR BOX INSTRUCTION 

7220 

1  

VARIATOR DISK, LOWER OUTER 

8712 

1  

INDICATOR PLATE 

7230A 

1  

VARIATOR DISK, LOWER INNER 

8743 

1  

TILT INSTRUCTION 

7260 

1  

SHAFT HOUSING 

9300 

2  

UPPER DOOR HINGE 

7290 

1  

SPEED CHANGING WHEEL SEAT 

9310 

6  

HINGE 

7300 

1  

PULLEY 

9500 

6  

SPRING PLATE 

7310 

1  

SPEED READOUT DETECTOR 

9590 

2  

HANDLE ARM 

7330 

1  

DIGITAL TACHOMETER 

9600 

1  

CHIP STOPPER 

9030 

1  

HANDWHEEL 

9700 

1  

INDICATE MIDDLE 

BA42 

-  

V-BELT, 7071+7300 (60HZ) 

9780 

1  

BRUSHER BRACKET 

BA43 

-  

V-BELT, 7071+7300 (50HZ) 

9790 

1  

CHIP BRUSHER 

BA44 

-  

V-BELT, 2011+7070 

9880 

1  

CHIP COLLECTOR 

BV875 

1  

V-BELT 

9900 

1  

MAGNIFYING GLASS 

G6007 

2  

BALL BEARING 

9999 

1  

EYE BOLT 

G6204 

1  

BALL BEARING 


G6205 

2  

BALL BEARING 


CONTROL SWITCH COMPONENT 


6600 

2  

PUSH BUTTON, ON 


6602 

2  

PUSH BUTTON, OFF,   


6610 

1  

EMERGENCY SWITCH 


6621 

2  

LIMIT SWITCH 


6650 

1  

KEY SWITCH 


6700 

1  

MAIN POWER SWITCH 


6710 

2  

MAGNETIC SWITCH 


6720 

1  

OVERLOAD STARTER 


6741 

1  

PILOT LAMP, GREEN 


6745 

1  

VOLTAGE REDUCER 


6752 

8  

FUSE SEAT 


6770 

2  

WIRE HOUSING 


6771 

1  

GROUND SEAT 


6798 

1  

ELECTRIC BOX 


6799 

1  

WIRING PLATE 


CHM-0(DF)1

Summary of Contents for VBS-2012H-CE

Page 1: ...OPERATOR S MANUAL VBS 2012H CE METALWORKING BANDSAW ...

Page 2: ...en trying our best to supply you all the information about these Please be sure to look through all the contents in this manual so that you may obtain the maximum efficiency and the longest machine running but in the minimum expense The specifications contained herein were in effect at the time book was approved for printing The supplier whose policy is one of continuous improvement reserves the r...

Page 3: ...the power source 10 Use the right tool Don t force a tools or attachment to do a job which it was not designed for 11 DO NOT make cuts requiring more power than is available on the machine 12 Replace warning labels if they become obscured or removed 13 Make certain the motor switch is in the OFF position before connecting the machine to power 14 Give your work undivided attention Looking around ca...

Page 4: ... Somewhere is uneven C Somewhere the materials and finished goods be come in and go out frequently D Somewhere is not easy to work or repair machine POWER SUPPLY 1 Put off the main power switch before connecting cables 2 Check motor voltage against supply 3 Make sure the power supply is connected to comply with the local safety regulations 4 Electric terminal is sited on the right down of the Elec...

Page 5: ... 600 700 mm Table Tilt R 45 ゚ L 10 ゚ Main Drive Motor 400V 3PHASE 50HZ 2 2 KW Grinder Motor 400V 3PHASE 50HZ 0 04 KW Blade Length 4035 mm Blade Welder Cap 4 2 KVA 6 19 mm Band Wheel Diameter 515 mm Table Height 1016 mm Dimension 1090 Length 810 Width 2030 Height mm Mach Weight 590 kgs ...

Page 6: ...b 2 Shear 10 Work Lamp 3 Weld Board 11 Blade Guide Supports 4 Grinding Wheel Motor 12 Work Table 5 Variable Speed Hand Wheel 13 Table Support Housing 6 Hang Ring 14 Low High Range Shift Lever 7 Upper Wheel 15 Lower Wheel 8 Post Elevating Hand Wheel ...

Page 7: ...front Depress and hold to anneal blade release to stop Blade Clamp Pressure Knob Located on blade welder panel found on column front Sets pressure for different width blades Blade Clamps Located on blade welder panel found on column front DOWN position allows insertion of blade into clamp Up position locks blade Blade Tension Hand Wheel Located on underside of upper frame Turn clockwise to tension...

Page 8: ...he machine from the power source and open both blade wheel doors Shift the high low gearbox lever into the neutral position Turn the upper blade wheel by hand while observing blade position on the upper blade wheel if adjustment is necessary 1 Turn blade tracking knob clockwise to track blade toward front of blade wheel 2 Turn counter clockwise to track blade toward rear of blade wheel Blade shoul...

Page 9: ...he power off and the machine disconnected from the power source Failure to comply may result in serious injury Please notice if it is necessary to open the Blade Guide first before you adjust the Guide Post to upper GUIDE HOUSINGADJUSTMENT 1 Loose the inner hexagonal screws located at the rear side with an L shaped spanner 2 Adjust the Guide Housing forward or backward according to the blade width...

Page 10: ...the front end as it is used If the Blade Guide is hard to be adjusted turn the left Blade Guide over to the right side as illustrated in the right figure and turn the right side Blade Guide over to the left side as well The Blade Guide can thus be used on both sides The Blade Guide Shaft will be worn as it is used and its friction with the saw blade may cause a worn line in its surface It this is ...

Page 11: ... or high speed steel 4 Carbide Tipped Blade which are best used for cutting unusual materials such as uranium titanium and beryllium These metals are difficult to cut with other types of blades TOOTH SHAPES The regular or standard tooth is preferred for all ferrous metals and general purpose cutting The skip tooth blade has widely spaced teeth to provide the added chip clearance needed for cutting...

Page 12: ...nd Buttress are usually preferred GAGE SELECTION Use standard gage except when increased work thickness decreases accuracy and width cannot be increased to compensate Example for heavy gage application 1 When radius cutting in thick materials 2 When maximum width usable on machine provides insufficient beam strength PITCH SELECTION Select best pitch from Sawing Recommendations Tables or Job Select...

Page 13: ...feed in thick work for example results in a barrel shaped cut BLADE SELECTION 1 Blade characteristics to meet job requirements Tooth form three standard types Width from 1 16 to 2 inches Pitch from 2 to 32 Gage standard as well as extra heavy Set for parting or slotting 2 Recommended blade from work planning system 3 Proper break in method if use a new blade 4 Operating conditions for lowest cost ...

Page 14: ... blade sharpness A Use a smaller pitch blade B Increase blade speed slightly C Decrease feeding rate D Use a better blade Following are suggestions for preventing saw blade from being twisted A Put the blade correctly in the center of the upper guides and lower guides B Decrease feeding rate C Use a larger pitch blade D Set the guides post as close to the work as possible To prevent from any vibra...

Page 15: ...sium bronze 125 75 40 25 20 14 8 6 3 3 Leaded commercial bronze 915 610 450 305 150 14 8 6 3 3 Commercial bronze 150 105 60 30 20 14 8 6 3 3 Free cutting brass 1220 915 610 450 300 14 8 6 3 3 Forging brass 610 460 335 245 150 14 8 6 3 3 High leaded brass 1065 825 565 410 260 14 8 6 3 3 Leaded brass 610 460 275 215 150 14 8 6 3 3 Low loaded brass 455 305 150 60 20 14 8 3 3 3 Leaded copper 765 550 3...

Page 16: ...n fine pitched bands one or more teeth on each side of the cut must be removed by grinding so that the cross section of the weld area of the blade is uniform 2 After finishing internal cutting Cut 5mm left and right of the cross section of the welded area Because the annealed area of the blade is cut the using of the blade could be longer Follow these cutting and grinding instructions and the teet...

Page 17: ...osition 2 Butt blade ends together and locate joint in the center between the two electrodes 3 Set pressure knob to blade width 4 Press welder button in all the way Do not release until the blade joint is red hot 5 The switch is automatic Wait 3 or 4 seconds until blade returns to original color Set pressure knob to blade width Due to the different materials and thickness of blade please pay espec...

Page 18: ...l the weld becomes a deep blue color Continue to heat by jogging the anneal button until the width of the blue color is one half the length of the band exposed between the jaws Do not overheat or the temper of the band will be damaged CAUTION Do not heat beyond the blue stage if the band begins to show any red color it is too hot Cool quickly by releasing the anneal button c For IMPERIAL BI METAL ...

Page 19: ... the weld is brittle because it has not been annealed Grind Carefully do not hit the teeth or grind deeper than the thickness of the blade or burn or overheat the weld area Be sure to remove flash from the back edge of the blade Any flash or stub teeth that project beyond the normal set or height of the other teeth must be ground off CLEAN UP WELDER JAWS AFTER WELDING It is important that the weld...

Page 20: ...lly The spacing of the teeth should be uniform and the weld should be located in the center of the gullet Major jaw misalignment is easily noted at this time from the weld appearance See the Trouble Shooting Chapter if the weld is imperfect CAUTION This welder is designed for intermittent use Repeated welding within a short period of time may cause the welder to overheat ...

Page 21: ...position not set correctly b Upset Force Control not set correctly 2 Improper clamping procedures 3 Defective cut off switch may not break the circuit at end of welding operation 4 Cut off Switch not adjusted correctly 5 Points of Cut off Switch welded together 6 Slide Rod sticking because of rust or dirt Clean and oil the Rod 7 Slide Rod movement obstructed because the Stop Screw too tight on the...

Page 22: ...nnection of the Conductor is poor A Change an Anneal Switch B Change a fuse The Grinder is not running when put the Grinder Switch on A The Grinder Motor is burnt out B The Grinder Switch is out of order A Change a Grinder Motor or rewire it B Change a switch The blade can not be tightly clamped with the Jaw Clampers A The Jaw Clampers are out of order B The Lower Jaw Inserts are out of order C Th...

Page 23: ... off A Blade tension is too lose B Blade is not installed correctly A Increase blade tension B Adjust the wheel alignment The blade is bunt very soon A The blade speed is too fast B The selection of blade is improper C Feeding too fatly or too heavily A Slow down the blade speed B Use a proper blade for the work C Decrease feeding rate The blade is warped A The blade is blunt B The guide post is n...

Page 24: ... handle Grease every 6 months 0600 0740 7120 7290 Gear and thread Grease every 3 months 7080 7110 Variable pulley Grease every 100 hours 9995 VBS 1408 1610 only Table slide shaft Mechanism oil every day 1250 E type only clean up every day Compact Mechanism oil every one months 3100 3110 Blade Tension Screw Grease every one months 3110 3120 Welder Jaw clean up every day Rubber Tire clean up every d...

Page 25: ... 24 ...

Page 26: ...T 7071 1 PULLEY 2000 1 MAIN DRIVE MOTOR 9220 1 LEVER KNOB 2011 1 MOTOR PULLEY BA42 2 V BELT 7071 7300 60HZ BA44 2 V BELT 2011 7070 BA43 2 V BELT 7071 7300 50HZ BA51 1 V BELT 2011 4450 G6008 1 BALL BEARING G6206 1 BALL BEARING G6303 1 BALL BEARING G6304 1 BALL BEARING WHEEL COMPONENT L4030 1 OIL SEAL L5230 1 OIL SEAL 3010 1 LOWER WHEEL L5840 1 OIL SEAL 3020 2 RUBBER TIRE 3030 1 TAPER SLEEVE 3040 1 ...

Page 27: ...ICATOR PLATE 7230A 1 VARIATOR DISK LOWER INNER 8743 1 TILT INSTRUCTION 7260 1 SHAFT HOUSING 9300 2 UPPER DOOR HINGE 7290 1 SPEED CHANGING WHEEL SEAT 9310 6 HINGE 7300 1 PULLEY 9500 6 SPRING PLATE 7310 1 SPEED READOUT DETECTOR 9590 2 HANDLE ARM 7330 1 DIGITAL TACHOMETER 9600 1 CHIP STOPPER 9030 1 HANDWHEEL 9700 1 INDICATE MIDDLE BA42 V BELT 7071 7300 60HZ 9780 1 BRUSHER BRACKET BA43 V BELT 7071 730...

Page 28: ......

Page 29: ... CHAIN JOINT RIGHT 6100 1 CLAMP SUPPORT RIGHT 1990 1 HANDLE BAR 6101 1 CLAMP SUPPORT LEFT 9210 1 KNOB 6110 1 CLAMP PLATE RIGHT 6111 1 CLAMP PLATE LEFT 6120 2 CAM 6130 1 MOVING JAW 6150 1 WELD BUTTON 6170 1 PRESSURE ADJUST KNOB 6180 1 SHAFT 6200 1 CAM 6210 1 WELD TENSION ARM 6211 1 BUSHING 6220 1 SPRING SHORTER 6230 1 SPRING LONGER 6240 1 TRANSFORMER 6241 1 MOUNTING BRACKET 4 2KVA ONLY 6255 1 PILOT...

Page 30: ... 29 ...

Page 31: ... 30 ...

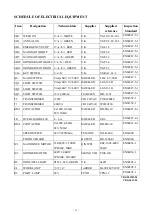
Page 32: ...ELLER LS S11 2B EN60947 5 1 SQ2 LIMIT SWITCH Uimp 4KV Ui 400V MOELLER LS S11 2B EN60947 5 1 SQ3 LIMIT SWITCH 15A 480VAC TMOUJEN MJ2 1307 EN60947 5 1 T2 TRANSFORMER 150W CHI CHYAU T150380024 EN61558 1 T1 TRANSFORMER 4 2KVA CHI CHYAU W2220380 EN61558 1 KM1 CONTACTOR Ue380V Ith20A 24V 50HZ MOELLER DILEM 10 EN60947 4 1 FR OVERLOAD RELAY 4 6A MOELLER ZE 6 EN60947 4 1 KM2 CONTACTOR Ue380V Ith20A 24V 50H...

Page 33: ... SOCOMEC 10AgG EN60269 1 FU6 FUSE 10 X 38 120KA 500V SOCOMEC 1AgG EN60269 1 FU7 FUSE 10 X 38 120KA 500V SOCOMEC 1AgG EN60269 1 FU8 FUSE 10 X 38 120KA 500V SOCOMEC 4AgG EN60269 1 CABLE 2 00m x 4C TAIWAN SHIN KAWN TSS 93 3A EN60227 2 00m x 3C TAIWAN SHIN KAWN TSS 93 5A EN60227 0 75m x 8C TAIWAN SHIN KAWN TTS 80 EN60227 0 75m x 3C TAIWAN SHIN KAWN TTS 89 EN60227 WIRE 1 25m x 1C TAIWAN SHIN KAWN 1 25m...

Reviews: