background image

10 

– INTRODUCTION

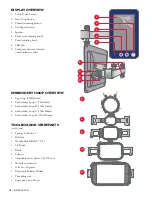
DISPLAY OVERVIEW

1.  Color Touch Screen
2.  Start/Stop button 
3.  Thread trimming button
4.  100-degree button
5. Speaker
6.  Panel arm adjusting knobs
7.  Panel adjusting knob
8.  USB port
9.  Computer network interface  

(insert internet cable)


EMBROIDERY HOOP OVERVIEW

1.  Cap hoop (260X60mm)
2.  Embroidery hoop A (70x50mm)
3.  Embroidery hoop B (110x110mm)
4.  Embroidery hoop C (190x140mm)
5.  Embroidery hoop D (310x210mm)

TOOLBOX AND SPAREPARTS

(not pictured)

•  Sponge Cushion x5
• Bobbins
•  Needle Pack-DBxK5 75/11
•  USB stick
• Brush
• Scissors
•  Adjustable screw driver 4 by 107 mm
•  Double end wrench
•  Oil can – 40 grams
•  Electronic Bobbin Winder
•  Threading tool
•  Spare parts box-D type

1

2

3

5

6

7

9

8

4

1

2

3

5

4

Summary of Contents for Viking Platinum MN 1000

Page 1: ...User s Guide KEEPING THE WORLD SEWING ...

Page 2: ...d plug or embroidery machine in water or other liquids Turn off and unplug the embroidery machine from the electrical outlet when NOT in use and be fore cleaning To unplug the embroidery machine grab the power plug and pull it outwards from the electrical outlet Do NOT pull the power cord Make sure the embroidery machine is turned off before inserting and or removing parts It is recommended to reg...

Page 3: ...ies on top or beneath the embroidery machine when NOT in use Do NOT use any materials that are not recommended for the embroidery machine such as paper cardboard plastic foam and other such materials or their likes Use extreme caution MUST be used when moving the embroidery machine to prevent any inju ries It is recommended that the embroidery machine NOT be moved while it is being used or plugged...

Page 4: ...RNA VIKING dealer If the LED lamp is damaged or broken it must be replaced by the manufacturer or it s service agent or a similarly qualified person in order to avoid a hazard SAVE THESE INSTRUCTIONS THIS EMBROIDERY MACHINE IS FOR INDOOR HOUSEHOLD USE ONLY SERVICING OF DOUBLE INSULATED PRODUCTS In a double insulated product two systems of insulation are provided instead of grounding No ground mean...

Page 5: ...p support 21 Attaching the hoop 22 Removing the hoop 22 Hooping the fabric 23 Cap hoop 24 Cap driver installation 24 Cap station installation 24 Hooping the cap 25 Attaching the cap hoop to the cap driver 25 Removing the cap hoop from the cap driver 25 Removing the cap driver from the embroidery arm 25 Tension 26 Factors that affect thread tension 26 Check thread tension 26 Adjusting the thread te...

Page 6: ...d break t break 47 Needle break 47 Main axis not at 100 degrees 48 If you are still receiving the error message 48 THREADS STABILIZERS NEEDLES 49 Thread fiber choices 49 Rayon thread 49 Polyester thread 49 Metallic thread 49 Cotton thread 49 Thread consumption 49 Bobbin fiber choices 50 Cotton 50 Nylon 50 Continuous filament polyester 50 Spun polyester 50 Magna glide 50 Backing stabilizer 51 Cut a...

Page 7: ...hine is not in direct sunlight Set the embroidery machine two inches 2 away from the wall Lift the embroidery machine with at least two people Lift the embroidery machine from he bottom ONLY Make sure there are no objects underneath the embroidery machine Make sure there are no objects within the moving range of the embroidery machine Set the embroidery machine on a leveled balanced and durable su...

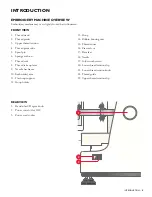
Page 8: ...8 INTRODUCTION 1 13 2 3 4 5 6 7 8 9 10 11 12 14 15 16 17 19 20 21 22 23 18 ...

Page 9: ...n 7 Thread rack 8 Thread take up lever 9 Needle bar frame 10 Embroidery arm 11 Flat hoop support 12 Hoop holder 13 Hoop 14 Bobbin housing unit 15 Thread cutter 16 Presser foot 17 Base feet 18 Needle 19 Color touch screen 20 Lower thread tension clip 21 Lower thread tension knob 22 Thread guide 23 Upper thread tension clip REARVIEW 1 Hand wheel Degree knob 2 Power switch On Off 3 Power cord socket ...

Page 10: ...ble EMBROIDERY HOOP OVERVIEW 1 Cap hoop 260X60mm 2 Embroidery hoop A 70x50mm 3 Embroidery hoop B 110x110mm 4 Embroidery hoop C 190x140mm 5 Embroidery hoop D 310x210mm TOOLBOX AND SPAREPARTS not pictured Sponge Cushion x5 Bobbins Needle Pack DBxK5 75 11 USB stick Brush Scissors Adjustable screw driver 4 by 107 mm Double end wrench Oil can 40 grams Electronic Bobbin Winder Threading tool Spare parts...

Page 11: ...e from the bottom and place it on top of the stand Use caution 8 Remove the protection film ADJUST AND SECUREYOUR EMBROIDERY MACHINE To avoid accidents or injuries lift the embroidery machine between two 2 people Keep the embroidery machine two inches 50 mm away from the wall Do not block the embroidery machine s ventilation Set up the embroidery machine on top of a leveled balanced and durable su...

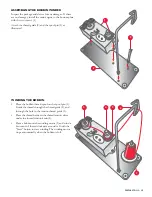
Page 12: ... 1 Loosen the lower screws A on the thread stand columns Lift off the thread stand 2 Remove the lower lock nuts B on the thread stand columns Place the thread rack onto the thread stand columns Replace and tighten the lower lock nuts B to the thread stand columns If needed also tighten the upper lock nuts C 3 Put the assembled thread stand back onto the machine Tighten the lower screws A on the th...

Page 13: ...f the embroidery machine 3 Connect power supply cord to an electrical outlet A surge protector is highly recommended Move the main power switch on to I The needle bar rack will automatically move to the position of needle bar 5 and the Color Touch Screen will turn on TURNING OFF To prevent injury make sure embroidery machine is turned off when not in use In the case of a power outage while the emb...

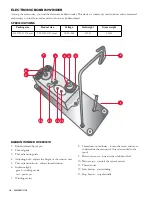
Page 14: ...bbin thread Spool pin 2 Thread guide 3 Thread tension guide 4 Adjusting bolt adjusts the height of the tension unit 5 Thread tension knob adjusts thread tension 6 Indicator light green working mode red power on 7 Winding motor 8 Thread amount adjuster loosen the screw and move to determine the amount of thread wounded to the spool 9 Detection sensor detects when bobbin is full 10 Main motor contro...

Page 15: ...DINGTHE BOBBIN Place the bobbin thread spool on the spool pin 1 Guide the thread through the thread guide 2 and through the hole in the tension thread guide 3 Place the thread between the thread tension discs under the thread tension knob 4 Place a bobbin on the winding motor 5 and wind a few turns of thread clockwise around it Touch the Start button to start winding The winding motor stops automa...

Page 16: ...Open the needle plate and clean the trimming set area weekly Wind self wound bobbins or buy pre wound commercial bobbins in disposable cartridges For a high speed commercial embroidery machine a smooth and consistent release of thread is required for proper function Commercial pre wound bobbins are economical and they run smoothly It is better to run a polyester bobbin than a cotton bobbin because...

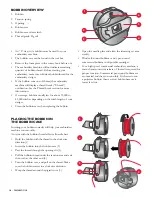
Page 17: ...t the bobbin case into the rotary hook by aligning bobbin case with the rotary hook groove 1 Push in the bobbin case slightly and make sure the bobbin case clicks into place Close the bobbin housing unit REMOVINGTHE BOBBIN 1 Open the bobbin housing unit 2 Identify the thread hook If thread hook is not forward then pull it forward Note Do not pull thread hook beyond its capacity It only moves to a ...

Page 18: ...y cause thread or needle breakage The threading paths are numbered from 1 10 they can be threaded in any order but must follow it s own threading path The example below illustrates threading path 10 Note A pair of tweezers might be a good help when threading the machine 1 5 2 7 9 10 11 8 17 4 6 3 12 13 15 14 16 4 7 8 14 17 1 3 9 10 12 13 ...

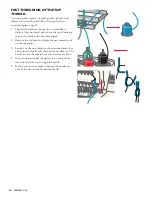
Page 19: ...ot THREADINGTHETOP OFTHE MACHINE Guide the thread from right to left under the upper thread tension clip 8 On the machine cover there are arrows guiding you through the correct threading path Thread around the thread guide as indicated by the arrows Turn the thread 1 5 turns around the lower thread tension knob 9 Thread around the thread guide as indicated by the arrows Guide the thread from left ...

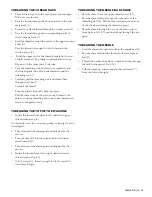
Page 20: ...king sure the thread is still in the thread path 2 Remove the old spool and place the new thread spool on the spool pin 3 Securely tie the new thread to the previous thread Use a knot that will pull easily through the needle s eye The best knots are the square knot and the weaver s knot 4 Grab the thread under the presser foot and pull the new thread all the way through the needle 5 If the knot do...

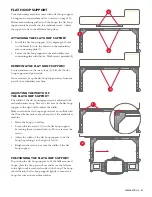
Page 21: ...chine ADJUSTINGTHE WIDTH OF THE FLAT HOOP SUPPORT The width of the flat hoop support can be adjusted to fit each embroidery hoop Move the left arm of the flat hoop support to the right left to adjust the width Make sure that the flat hoop support does not collide with the 10 needle bar rack or any other part of the embroidery machine Select the hoop you will use Loosen the two screws 1 on the flat...

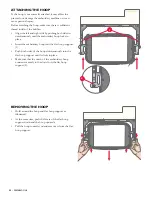
Page 22: ... foot damage the embroidery machine or it can cause personal injury Before attaching the hoop make sure there is sufficient thread inside of the bobbin Align the left and right side by pushing both sides in simultaneously until the embroidery hoop locks in place Insert the embroidery hoop into the flat hoop support 1 Push both sides of the hoop simultaneously into the flat hoop support until it cl...

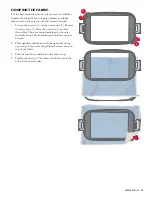
Page 23: ...r hoop 2 Remove the inner hoop 3 Place the outer hoop on a firm flat surface There are center markings on the outer and inner hoops Those markings should line up once hooped 2 Place stabilizer and fabric with the right sides facing up on top of the outer hoop Place the inner hoop on top of the fabric 3 Push the inner hoop firmly into the outer hoop 4 Tighten the screw s The fabric should be taut i...

Page 24: ... 6 Match the set of holes on the cap driver with the metal dowels on the embroidery arm 3 7 Insert and tighten a screw in the other two holes 4 9 Make sure the cap driver is tightly secured CAP STATION INSTALLATION 1 Select a location to clamp your cap station onto 2 Twist the knob counterclockwise to separate the knob from the cap station device 3 Make sure enough room is available to fit the wid...

Page 25: ...GTHE CAP HOOPTO THE CAP DRIVER 1 Rotate the cap hoop 90 degrees to either the left or right 2 Push the hoop onto the embroidery arm until the cap hoop connects to the cap driver 3 Rotate the cap hoop back into an upward position with the bill of the cap facing upwards 4 Align the center metal tab on the cap driver with the metal opening of the cap hoop 5 Grab the cap driver from the back 6 Slide a...

Page 26: ...the top tension is too loose 2 If a large amount of the bobbin thread is visible the top tension is too tight 3 Under normal use the user should temporarily stop the embroidery machine and check thread tension after the first 100 stitches of each color Because of different types or thicknesses of cloth or backing being used embroidery results may be different from what is expected make samples bef...

Page 27: ... that many professional embroiderers use to determine when to change needles is the three strikes rule When there have been 3 consecutive thread breaks on a needle it should be changed Turn off the embroidery machine Remove the needle excess If broken needle pieces are not on the garment look in the bobbin area Loosen the needle screw 1 Release the needle Insert a new needle Make sure the front gr...

Page 28: ...ss the Start Stop button 2 Allow the embroidery machine to complete the first color thread The current thread will automatically trim The needle bar case will move to the position of the second color thread and resume embroidery Note Allow the embroidery machine to continue its process until the last color thread has completed The embroidery machine will automatically stop The Start Stop button wi...

Page 29: ...e movement embroidery machine speed control etc 4 Embroidery parameter display zone Displays embroidery machine parameters such as design name number of stitches and embroidery frame type 5 Embroidery machine networking process Displays embroidery machine software version date time and embroidery machine s IP address There are five different views that can be displayed on the touch screen 1 Home p...

Page 30: ...e 16 Embroidery parameter setting 17 Enter exit ready status 18 Comprehensive setting 19 Display software version date time and IP address 20 Display networking status 21 LED lamp on off switch 22 Design display 23 Display the size of current embroidery hoop 24 Reduce embroidery speed 25 Increase embroidery speed 26 Hoop offset 27 Return to starting point 28 Control frame movement in Y direction 2...

Page 31: ...itch to internal storage 3 Previous page 4 Next page 5 Delete a design 6 Save design in embroidery machine memory COLOR SEQUENCE PAGE OVERVIEW 7 Set offset point 8 Low speed embroidery 9 Switching needle bar 10 Color change mode 11 Previous page 12 Next page 2 3 4 5 6 7 8 9 10 1 12 11 ...

Page 32: ...Number of Y direction array 21 Y direction array space 22 Status of current embroidery frame COMPREHENSIVE SETTING PAGE OVERVIEW 23 User restriction setting 24 IP setting 25 On board lettering library 26 Software information 27 Origin operation 28 Relieve user restriction 29 Display color setting 30 Power on automatic resetting 31 Language setting 32 Embroidery machine testing 14 15 16 17 13 19 20...

Page 33: ...ht side of the display 1 2 Make sure that the embroidery status is set to unlocked 1 3 Press the file icon 2 A new screen will be displayed 4 Press the memory stick icon 3 A list of available files located on the inserted memory stick will appear You can turn the pages by pressing the forward and backward arrows 4 5 Locate your desired design and select it An image of the design will appear on the...

Page 34: ...Once the embroidery machine completes reading you will be taken back to the home screen SELECTING AN EMBROIDERY HOOP 1 Press the design set icon 2 A new screen will display 2 Press the embroidery hoop selection icon 3 Locate the image of the desired embroidery hoop See table below for images of each embroidery hoop 4 Press the OK button A message indicating Reading will appear on the screen Once t...

Page 35: ... manual M M process Color changes take place according to the color sequence selections made for the design A A is for fully automatic mode this is the default selection 4 In automatic mode there will be no stops between color changes A M is for semi automatic mode 5 Here the embroidery machine will stop upon completion of each color stop Press the Start Stop button to resume M M is for manual mod...

Page 36: ... is within the embroidery hoop range the preview line will be in black Embroidery design tracing should take place before beginning a new design to make sure the selected design and the frame embroidery hoop are in coordination HOWTOTRACEYOUR DESIGN 1 Press the trace design icon 10 A menu with different tracing options opens Press the corner check icon 11 The embroidery hoop automatically moves wi...

Page 37: ...tch floating mode icon twice will display the F H icon 2 Pressing the stitch floating mode icon three times will display the ADD icon 3 2 To rewind or fast forward a design either in F L or F H mode press and hold the plus or minus icon until you reached your desired placement To fast forward a design in manual mode press the to enter the exact location by stitch amount 4 To rewind a design in man...

Page 38: ...ve been made 5 Press the OK button You will be taken back to the home screen SETTING LOW SPEED ON A SPECIFIC NEEDLE This function is used to select a low speed option on a specific needle or needles that require a lower speed due to thread type or intricacy of design area 1 Press the color sequence icon 10 The color sequence page will display 2 Select the needle or color to be reduced in speed 3 S...

Page 39: ...trace design icon 2 The following message will prompt Enter embroidery status 2 Press OK to confirm A menu with different tracing options opens Press the corner check icon 3 The embroidery machine will now begin to trace the set design Follow the tracing needle to make sure that it stays within the embroidery hoop range DELETING A DESIGN This function is used to delete a design from the memory of ...

Page 40: ...ont 6 Press OK The newly added letters or words will display on the screen At this time you may edit the design further 7 Press OK 8 Press the import to screen icon 3 9 Press the escape button three times You will be back at the home page 10 Click the file icon 4 The font design will be displayed on the design list 11 Select the design 12 Add colors 5 13 Press the trace design icon 6 The following...

Page 41: ... Press the increments icon 2 2 Press the plus or minus button 3 If the increments button is displaying one 1 arrow then the speed can be reduced or increased by 10 stitches per minute If the increments button is displaying two 2 arrows then the speed can be reduced or increased by 50 stitches per minute HOWTO BRINGTHE HOOP OUT This function is used to bring the hoop from underneath the needles so ...

Page 42: ...ect your design 8 Press the machine icon alongside the blue arrow to import the design into the embroidery machine s memory 2 9 Now select the machine icon on the top row 3 10 The last imported design will be the last one in the list Select the desired design 11 Press OK 12 Click on the design set button 4 13 Select the embroidery hoop selection icon on the bottom right 5 14 Select the preset embr...

Page 43: ...ing is set to unlocked See the Embroidery status section EMBROIDER 7 Click on the file icon 1 8 Select your design 9 Press the machine icon alongside the blue arrow to import the design into the machine s memory 2 10 Now select the machine icon on the top row 3 11 The last imported design will be the last one in the list Select the desired design 12 Press OK 13 Click on the design set button 4 14 ...

Page 44: ...le switch display icon on your panel to needle 1 then to needle 10 Needle switch display icon LEVER ARMS Apply a few drops of lubrication oil to the lever arms 4 every week of continuous use Do not drop on all ten arms at the same occasion The oil will spread MAINTENANCE AND CARE This is the most important maintenance that needs to be completed Repeat the following process every time before using ...

Page 45: ...at the process on each side of the machine s head manually using the manual needle switch display icon 2 on your panel to needle 1 then to needle 10 BOBBIN CASE MAINTENANCE Clean the accumulated lint from underneath the tension plate with the corner of a business card or remove it with the bobbin thread itself like dental floss Note Resist the temptation to blow the lint off the case this deposits...

Page 46: ...s Make sure the embroidery hoop is hooped properly Loosely framed fabric will bounce up and down during sewing See the Hoop Fabric section Excessive backing will apply greater friction to the thread and needle and cause thread or needle breaks EMBROIDERY DESIGN Too high density of thread in the design can cause needle deflection which leads to thread shredding and breaks Too many stitches in a sma...

Page 47: ...Identify the thread break by locating the T break icon on the panel 2 Click on the T break icon to display the stitch float mode icon 3 Back up your design to the desired stitch 4 Press the float mode key three 3 times until the stitch icon appears 5 Thread the needle 6 Press the Start button NEEDLE BREAK Replace damaged or bent needles Make sure to thread the needle from the front to the back and...

Page 48: ...the 100 degree button 1 IFYOU ARE STILL RECEIVINGTHE ERROR MESSAGE 1 Clear the message from the screen 2 Turn off the embroidery machine 3 Rotate the degree knob 2 at the back of the embroidery machine to 100 degrees 4 Press the 100 degree button 1 NOTE If you are still experiencing issues please contact your local dealer where you made your initial purchase 1 2 ...

Page 49: ...ors such as light heat and cold Black and white tend to break more frequently due to the bleaching and dying processes POLYESTERTHREAD Excellent sewing ability Good choice for embroiderers May be too strong for certain lightweight delicate goods Strong resistance to thread breaks which can aid in production efficiency Can accept neon dyestuffs Excellent resistance to abrasion and bleaching Good ch...

Page 50: ...n on bobbin cases CONTINUOUS FILAMENT POLYESTER One long filament comprises the thread These run much cleaner in the bobbin case and are much stronger There are three 3 different sides of bobbins 1 Paper sided the most common 2 Sideless all thread with no sides 3 Plastic sided the plastic slides better and runs smoother in the bobbin case Most popular thread amongst U S embroiderers Consistent str...

Page 51: ...shes CUT AWAY Weights range from 1 oz light to 3 75 oz heavy Used for permanent support remains permanently affixed to the fabric excess is cut away with scissors Provides the most stability Heat set fusible Offers the sharpest embroidery on highly detailed designs that include small lettering Used on loosely woven and unconstructed caps Best used on knits since it prevents the design from stretch...

Page 52: ...too small or too big for the thread and fabric can result in thread breaks or even skipped stitches There are three 3 things to consider when choosing the right needle for the job Finish Size Point Requires the use of backing on the back of the fabric to support your fabric To remove the plastic film tear away the topping or use water FOAM Adds dimension to lettering on caps for a 3D effect Availa...

Page 53: ...en you might sew extremely detailed designs like a detailed patch or small lettering Size 80 12 Good needle for heavier materials Used to sew heavy canvases vinyl lighter leathers ball caps visors etc Size 90 14 Good needle for metallic thread It has a larger eye Used to sew canvases and belts since it is a very stiff needle NEEDLE FINISHES Most sewing and embroidery needles have a chromium platin...

Page 54: ...eavy cut away or tear away wash away We recommend using a 75 11 or 70 10 light ballpoint or 80 12 needles for small details Golf shirt Use a light to heavy cut away Heavy knits require a medium to heavy cut away medium knits require a light cut away We recommend using a 75 11 light ballpoint needle Headwear Use a medium to heavy tear away We recommend using a 75 11 or 80 12 sharp needle Leather an...

Page 55: ...back your old appliance for disposal free of charge If electrical appliances are disposed of in landfills or dumps hazardous substances can leak into the groundwater and get into the food chain damaging your health and well being We reserve the right to change the machine equipment and the assortment of accessories without prior notice or make modifications to the performance or design Such modifi...

Page 56: ...www husqvarnaviking com 4710557 26B English 2018 Singer Sourcing Limited LLC All rights reserved Printed on environmentally friendly paper ...

Reviews: