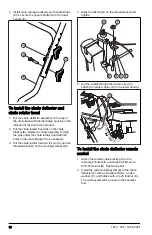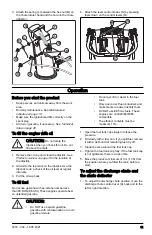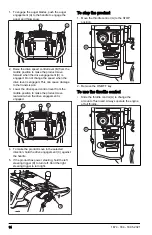
3. Attach the spring (L) between the hex nut (M) on
the chute rotator head and the hole on the chute
deflector.
F
L
M
B
A
D
K
C
E
G
4. Attach the lever control knobs (N) by pressing
them down on the control levers (O).
O
N
Operation
Before you start the product
• Keep persons and animals away from the work
area.
schedule on page 16
.
• Make sure the ignition lead fits correctly on the
spark plug.
• Add oil or gasoline, if necessary. See
.
To fill the engine with oil
CAUTION:
Do not rotate the
dipstick when you check the oil. Do not
fill above the mark.
1. Remove the oil cap and clean the dipstick. See
Product overview on page 3
for the location of
the dipstick.
2. Add oil to the top mark on the dipstick. Use the
dipstick to do a check of the oil level at regular
intervals.
3. Put the oil cap back.
To fill fuel
Do not use gasoline with an octane number less
than 90 RON (86 AKI.) These engines operate best
on unleaded gasoline.
CAUTION:
• Do NOT use expired gasoline,
gasoline with contamination or an oil/
gasoline mixture.
• Do not get dirt or water in the fuel
tank.
• Only use correct fuel containers and
make marks to easier identify them.
• Do NOT use E85 mix fuels. These
engines are not E20/E30/E85
compatible.
• The ethanol contents must be
maximum 10%.
1. Open the fuel tank cap slowly to release the
pressure.
2. Fill slowly with a fuel can. If you spill fuel, remove
it with a cloth and let remaining fuel dry off.
3. Clean the area around the fuel tank cap.
4. Tighten the fuel tank cap fully. If the fuel tank cap
is not tightened, there is a risk of fire.
5. Move the product a minimum of 3 m (10 ft) from
the position where you filled the tank, before a
start.
To adjust the discharge chute and
the chute deflector
1. To adjust the discharge chute position, move the
discharge chute control lever (A) back and to the
left or right direction.
1674 - 004 - 18.05.2021
11
Summary of Contents for ST 324
Page 82: ...82 1674 004 18 05 2021 ...
Page 83: ...1674 004 18 05 2021 83 ...

