background image

MAINTENANCE

36 – English

Pull out the cord approx. 30 cm and hook it into the 
notch in the rim of the pulley. Release the recoil spring 
by letting the pulley rotate slowly backwards.

Undo the screw in the centre of the pulley and remove 
the pulley. Insert and fasten a new starter cord to the 
pulley. Wind approx. 3 turns of the starter cord onto 
the pulley. Connect the pulley to the recoil spring so 
that the end of the spring engages in the pulley. Fit the 
screw in the centre of the pulley. Insert the starter cord 
through the hole in the starter housing and the starter 
handle. Make a secure knot in the end of the starter 
cord.

Tensioning the recoil spring

Hook the starter cord in the notch in the pulley and 
turn the starter pulley about 2 turns clockwise.

Note! Check that the pulley can be turned at least a 
further 1/2 turn when the starter cord is pulled all the 
way out.

Changing a broken recoil spring

Lift up the starter pulley. See instructions under the 
heading Changing a broken or worn starter cord. 
Remember that the recoil spring is coiled under 
tension in the starter housing.

Remove the cassette with the recoil spring from the 
starter.

Lubricate the recoil spring with light oil. Fit the 
cassette with recoil spring in the starter. Fit the starter 
pulley and tension the recoil spring.

Fitting the starter

To fit the starter, first pull out the starter cord and place 
the starter in position against the crankcase. Then 
slowly release the starter cord so that the pulley 
engages with the pawls.

Fit and tighten the screws that hold the starter.

Air filter

The air filter must be regularly cleaned to remove dust 
and dirt in order to avoid:

Carburettor malfunctions

Starting problems

Loss of engine power

Unnecessary wear to engine parts.

Excessive fuel consumption.
Summary of Contents for 357XP 359

Page 1: ...E E E En n n ng g g gl l l li i i is s s sh h h h 357XP 359 Operator s manual Please read the operator s manual carefully and make sure you understand the instructions before using the machine ...

Page 2: ...ata and on label If your machine bears this symbol it is equipped with a catalytic converter Other symbols decals on the machine refer to special certification requirements for certain markets Symbols in the operator s manual Switch off the engine by moving the stop switch to the STOP position before carrying out any checks or maintenance Always wear approved protective gloves Regular cleaning is ...

Page 3: ...ing and stopping 19 WORKING TECHNIQUES Before use 21 General working instructions 21 How to avoid kickback 28 MAINTENANCE General 30 Carburettor adjustment 30 Carburettor with movement limiters 30 Carburettor without movement limiters 31 Checking maintaining and servicing chain saw safety equipment 33 Muffler 35 Starter 35 Air filter 36 Spark plug 37 Lubricating the bar tip sprocket 37 Needle bear...

Page 4: ...dustry Husqvarna s aim is also to be in the front edge according to ergonomics usability security and environmental protection That is the reason why we have developed many different features to provide our products within these areas We are convinced that you will appreciate with great satisfaction the quality and performance of our product for a very long time to come The purchase of one of our ...

Page 5: ...el tank 12 Muffler 13 Bar tip sprocket 14 Chain 15 Bar 16 Spike bumper 17 Chain catcher 18 Clutch cover 19 Rear handle with right hand guard 20 Throttle control 21 Throttle lockout 22 Decompression valve Model 359 Automatic decompression valve Model 357XP 23 Combination spanner 24 Chain tensioning screw 25 Operator s manual 26 Transport guard 27 Oil pump adjustment screw 28 Switch for heated handl...

Page 6: ...lements in the event of a damaged muffler WARNING Long term inhalation of the engine s exhaust fumes chain oil mist and dust from sawdust can represent a health risk WARNING The ignition system of this machine produces an electromagnetic field during operation This field may under some circumstances interfere with pacemakers To reduce the risk of serious or fatal injury we recommend persons with p...

Page 7: ...carried out professionally If you need further information please contact your nearest service workshop Chain brake and front hand guard Your chain saw is equipped with a chain brake that is designed to stop the chain if you get a kickback The chain brake reduces the risk of accidents but only you can prevent them Take care when using your saw and make sure the kickback zone of the bar never touch...

Page 8: ... are minor and do not always activate the chain brake If this happens you should hold the chain saw firmly and not let go The way the chain brake is activated either manually or automatically by the inertia release mechanism depends on the force of the kickback and the position of the chain saw in relation to the object that the kickback zone of the bar strikes If you get a violent kickback while ...

Page 9: ...the chain brake must be in working order to provide the intended protection Second it must be activated during the kickback as described above to stop the saw chain Third the chain brake may be activated but if the bar is too close to you the brake might not have enough time to slow down and stop the chain before the chain saw hits you Only you and proper working technique can eliminate kickback a...

Page 10: ...th properly sharpened Follow our instructions and use the recommended file gauge A damaged or badly sharpened chain increases the risk of accidents Maintain the correct depth gauge setting Follow our instructions and use the recommended depth gauge clearance Too large a clearance increases the risk of kickback WARNING Overexposure to vibration can lead to circulatory damage or nerve damage in peop...

Page 11: ... chain with a bar and chain combinations recommended by Husqvarna See instructions under the heading Technical Data for a list of replacement bar and chain combinations we recommend Bar Length inches cm Number of teeth on bar tip sprocket T Chain pitch inches The spacing between the drive links of the chain must match the spacing of the teeth on the bar tip sprocket and drive sprocket Number of dr...

Page 12: ...n correctly without the right equipment We recommend that you use our file gauge This will help you obtain the maximum kickback reduction and cutting performance from your chain See instructions under the heading Technical data for information about sharpening your chain Sharpening cutting teeth To sharpen cutting teeth you will need a round file and a file gauge See instructions under the heading...

Page 13: ...e setting is correct when you no longer feel resistance as you draw the file along the depth gauge tool Tensioning the chain The more you use a chain the longer it becomes It is therefore important to adjust the chain regularly to take up the slack Check the chain tension every time you refuel NOTE A new chain has a running in period during which you should check the tension more frequently Tensio...

Page 14: ...an the oil and that you also use the recommended cutting equipment a bar that is too long will use more chain oil Checking chain lubrication Check the chain lubrication each time you refuel See instructions under the heading Lubricating the bar tip sprocket Aim the tip of the bar at a light coloured surface about 20 cm 8 inches away After 1 minute running at 3 4 throttle you should see a distinct ...

Page 15: ...ed Bar Check regularly Whether there are burrs on the edges of the bar Remove these with a file if necessary Whether the groove in the bar has become badly worn Replace the bar if necessary Whether the tip of the bar is uneven or badly worn If a hollow forms on the underside of the bar tip this is due to running with a slack chain To prolong the life of the bar you should turn it over daily WARNIN...

Page 16: ...rocket and that the chain is correctly located in the groove in the bar Tighten the bar nuts finger tight Tension the chain by turning the chain tensioning screw clockwise using the combination spanner The chain should be tensioned until it does not sag from the underside of the bar See instructions under the heading Tensioning the chain The chain is correctly tensioned when it does not sag from t...

Page 17: ...troke oil For best results and performance use HUSQVARNA two stroke engine oil which is specially formulated for our air cooled two stroke engines Never use two stroke oil intended for water cooled engines sometimes referred to as outboard oil rated TCW Never use oil intended for four stroke engines A poor oil quality and or too high oil fuel ratio may jeopardise function and decrease the life tim...

Page 18: ...er designed for that purpose For longer periods of storage or for transport of the chain saw the fuel and chain oil tanks should be emptied Ask where you can dispose of waste fuel and chain oil at your local petrol station Ensure the machine is cleaned and that a complete service is carried out before long term storage The bar guard must always be fitted to the cutting attachment when the machine ...

Page 19: ...e setting is obtained by moving the choke control to the choke position and then pushing it in again Starting Grip the front handle with your left hand Hold the chain saw on the ground by placing your right foot through the rear handle Pull the starter handle with your right hand and pull out the starter cord slowly until you feel a resistance as the starter pawls engage then pull firmly and rapid...

Page 20: ... and chain attached to the chain saw the clutch can come loose and cause serious injury The chain brake should be activated when starting Se instructions under the heading Start and stop Do not drop start This method is very dangerous because you may lose control of the saw Never start the machine indoors Exhaust fumes can be dangerous if inhaled Observe your surroundings and make sure that there ...

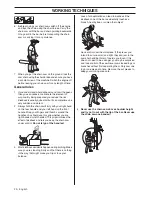
Page 21: ... avoid cutting bushes i e cutting many small branches at the same time Small branches can be grabbed by the chain and thrown back at you causing serious injury 4 Make sure you can move and stand safely Check the area around you for possible obstacles roots rocks branches ditches etc in case you have to move suddenly Take great care when working on sloping ground 5 Take great care when cutting a tr...

Page 22: ... your fingers and thumbs around the handles You should use this grip whether you are right handed or left handed This grip minimises the effect of kickback and lets you keep the chain saw under control Do not let go of the handles 3 Most kickback accidents happen during limbing Make sure you are standing firmly and that there is nothing in the way that might make you trip or lose your balance Lack...

Page 23: ...ain When you replace the bar and chain use only combinations that are recommended by us See instructions under the headings Cutting equipment and Technical data Basic cutting technique General Always use full throttle when cutting Reduce the speed to idle after every cut running the engine for too long at full throttle without any load i e without any resistance from the chain during cutting can l...

Page 24: ...ing a kickback as well as increasing the risk of losing your balance while working The log is lying on the ground There is little risk of the chain jamming or the object splitting However there is a risk that the chain will touch the ground when you finish the cut Cut all the way through the log from above Avoid letting the chain touch the ground as you finish the cut Maintain full throttle but be...

Page 25: ...for signs of damage and rot in the stem this makes it more probably that the tree will break and start to fall before you expect it to You may find you are forced to let the tree fall in its natural direction because it is impossible or dangerous to try to make it fall in the direction you first intended Another very important factor which does not affect the felling direction but does affect your...

Page 26: ...top cut The directional cuts should run 1 4 of the diameter through the trunk and the angle between the top cut and bottom cut should be 45 The line where the two cuts meet is called the directional cut line This line should be perfectly horizontal and at right angles 90 to the chosen felling direction Felling cut The felling cut is made from the opposite side of the tree and it must be perfectly ...

Page 27: ...g bar We recommend that you use a bar that is longer than the diameter of the tree so that you can make the felling cut and directional cuts with single cutting strokes See instructions under the heading Technical data section to find out which lengths of bar are recommended for your saw There are methods for felling trees with a diameter larger than the bar length However these methods involve a ...

Page 28: ...es deep Continue to cut deeper until tree limb bends and tension is released Cut tree limb from outside the bend after tension has been released How to avoid kickback What is kickback The word kickback is used to describe the sudden reaction that causes the chain saw and bar to jump off an object when the upper quadrant of the tip of the bar known as the kickback zone touches an object Kickback al...

Page 29: ... you and the chain saw as you move along the trunk Cutting the trunk into logs See instructions under the heading Basic cutting technique WARNING A majority of kickback accidents occur during limbing Do not use the kickback zone of the guide bar Be extremely cautious and avoid contacting the log other limbs or objects with the nose of the guide bar Be extremely cautious of limbs under tension They...

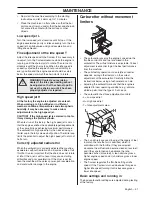
Page 30: ...troke oil The carburettor has three adjustment controls L Low speed jet H High speed jet T Idle adjustment screw The L and H jets are used to adjust the supply of fuel to match the rate that air is admitted which is controlled with the throttle If they are screwed clockwise the air fuel ratio becomes leaner less fuel and if they are turned anti clockwise the ratio becomes richer more fuel A lean m...

Page 31: ...ine accelerates without hesitation and 4 cycles a little at full throttle It is also important that the chain does not rotate at idle If the L jet is set too lean it may cause starting difficulties and poor acceleration If the H jet is set too lean the machine will have less power poor acceleration and could suffer damage to the engine Carburettor without movement limiters The carburettor governs ...

Page 32: ... while the engine is running until the chain starts to rotate Then turn anti clockwise until the chain stops When the idle speed is correctly adjusted the engine should run smoothly in every position and the engine speed should be safely below the speed at which the chain starts to rotate High speed jet H The high speed jet H influences the power and engine speed of the machine If the high speed j...

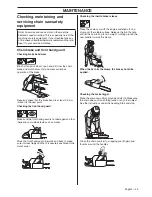
Page 33: ... Checking the inertia brake release Place the chain saw with the engine switched off on a stump or other stable surface Release the front handle and let the saw fall by its own weight rotating around the rear handle towards the stump When the bar hits the stump the brake should be applied Checking the brake trigger Place the chain saw on firm ground and start it Make sure the chain does not touch ...

Page 34: ... return springs work properly Start the chain saw and apply full throttle Release the throttle control and check that the chain stops and remains stationary If the chain rotates when the throttle control is in the idle position you should check the carburettor idle adjustment Chain catcher Check that the chain catcher is not damaged and is firmly attached to the body of the chain saw Right hand gu...

Page 35: ...er is designed to reduce the noise level and to direct the exhaust gases away from the operator The exhaust gases are hot and can contain sparks which may cause fire if directed against dry and combustible material A muffler equipped with a catalytic converter significantly reduces the amount of hydrocarbons HC nitrogen oxides NO and aldehydes in the exhaust fumes Carbon monoxide CO which is poiso...

Page 36: ...an be turned at least a further 1 2 turn when the starter cord is pulled all the way out Changing a broken recoil spring Lift up the starter pulley See instructions under the heading Changing a broken or worn starter cord Remember that the recoil spring is coiled under tension in the starter housing Remove the cassette with the recoil spring from the starter Lubricate the recoil spring with light ...

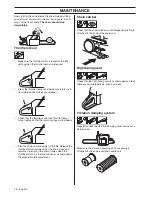
Page 37: ...ctrodes which may result in operating problems and starting difficulties If the machine is low on power difficult to start or runs poorly at idle speed always check the spark plug first before taking any further action If the spark plug is dirty clean it and check that the electrode gap is 0 5 mm The spark plug should be replaced after about a month in operation or earlier if necessary Note Always...

Page 38: ...ooling system on a chain saw with catalytic converter must be cleaned daily This is particularly important on chain saws with catalytic converters because the higher exhaust temperature requires efficient cooling of the engine and the catalytic converter unit Air Injection centrifugal cleaning Centrifugal cleaning means the following All air to the carburettor passes through the starter Dirt and d...

Page 39: ...dles 357 XPG 359 G On models with the designation XPG G the front as well as the rear handle are equipped with electric heating coils These are supplied with electricity from a built in generator on the chain saw When the switch is pushed downwards the heat is switched on When the switch is pushed upwards the heat is switched off Electrical carburettor heating 357 XPG 359 G On models with the desi...

Page 40: ... Check the lubrication hole in the bar to be sure it is not clogged Clean the bar groove If the bar has a sprocket tip this should be lubricated Lubricate the clutch drum bearing Clean the outside of the carburettor Check that the bar and chain are getting sufficient oil File off any burrs from the edges of the bar Check the fuel filter and the fuel hose Replace if necessary Check the saw chain wi...

Page 41: ...re 0 68 0 68 Oil pump capacity at 9 000 rpm ml min 6 17 6 17 Oil tank capacity litre 0 38 0 38 Type of oil pump Automatic Automatic Weight Chain saw without bar or chain empty tanks kg 5 5 357 XP 357 XP E tech 5 6 357 XPG 357 XPG E tech 5 5 359 359 E tech 5 6 359 G 359 G E tech Noise emissions see note 1 Sound power level measured dB A 113 357 XP G 111 357 XP E tech G E tech 113 359 G 111 359 E te...

Page 42: ...ording to ANSI B175 1 Saw chain filing and file gauges Bar Chain Length inch Pitch inch Gauge mm Max nose radius Type Length drive links no 13 0 325 1 5 10T Husqvarna H25 56 15 0 325 1 5 10T 64 16 0 325 1 5 10T 66 18 0 325 1 5 10T 72 20 0 325 1 5 12T 78 13 0 325 1 5 10T Husqvarna H30 56 15 0 325 1 5 10T 64 16 0 325 1 5 10T 66 18 0 325 1 5 10T 72 20 0 325 1 5 10T 78 15 3 8 1 5 11T Husqvarna H42 56 ...

Page 43: ...he chapter Technical data The following standards have been applied EN 292 2 CISPR 12 1997 EN 608 Notified body 0404 SMP Svensk Maskinprovning AB Fyrisborgsgatan 3 SE 754 50 Uppsala Sweden has carried out EC type examination in accordance with the machinery directive s 98 37 EC article 8 point 2c The certificates for EC type examination in accordance with annex VI have the numbers 404 99 679 357XP...

Page 44: ...1150901 26 z Rz 6 z Rz 6 2008 04 29 ...

Reviews: