background image


English


 – 


7


GENERAL SAFETY PRECA


UTIONS


Mac


hine


′′′′


s safety equipment


This section descr


ibes the machine


s safety equipment, its 

purpose, and how checks and maintenance should be carried 
out to ensure that it operates correctly. See the ”What is 
what?” section to locate where this equipment is positioned 
on your machine.

The life span of the machine can be reduced and the risk of 
accidents can increase if machine maintenance is not carried 
out correctly and if service and/or repairs are not carried out 
professionally. If you need further information please contact 
your nearest service workshop.


Thr


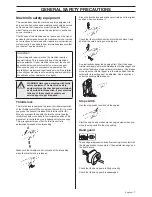
ottle lock


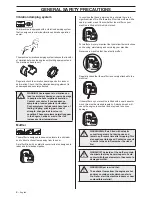
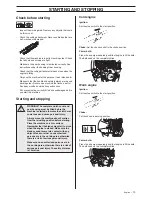
The throttle loc


k is designed to prevent accidental operation 

of the throttle control. When you press the lock (A) (i.e. when 
you grasp the handle) it releases the throttle control (B). 
When you release the handle the throttle control and the 
throttle lock both move back to their original positions. This 
movement is controlled by two independent return springs. 
This arrangement means that the throttle control is 
automatically locked at the idle setting.

Make sure the throttle control is locked at the idle setting 
when the throttle lock is released.

Press the throttle lock and make sure it returns to its original 
position when you release it.

Check that the throttle control and throttle lock move freely 
and that the return springs work properly.

See instructions under the heading Start. Start the hedge 
trimmer and apply full throttle. Release the throttle trigger and 
check that the blades stop and remain stationary. If the blades 
move when the throttle trigger is in the idle position then the 
carburettor idle setting must be adjusted. See instructions 
under the heading Maintenance.


Stop s


witch


Use the stop s


witch to switch off the engine.

Start the engine and make sure the engine stops when you 
move the stop switch to the stop setting.


Hand guar


d


The hand guard pre


vents hands from coming into contact with 

the moving blades, for example, if the operator loses grip on 
the front handle.

Check that the hand guard is 

fi

tted correctly.

Check that the hand guard is undamaged.

IMPORTANT!

All servicing and repair work on the machine requires 
special training. This is especially true of the machine


safety equipment. If your machine fails any of the checks 
described below you must contact your service agent. 
When you buy any of our products we guarantee the 
availability of professional repairs and service. If the retailer 
who sells your machine is not a servicing dealer, ask him for 
the address of your nearest service agent.

!


W


ARNING! Never use a machine with faulty 

safety equipment. The machine’s safety 
equipment must be checked and maintained 
as described in this section. If your machine 
fails any of these checks contact your 
service agent to get it repaired.

Summary of Contents for 324HDA55X series

Page 1: ...E E E En n n ng g g gl l l li i i is s s sh h h h 324HDA55X series Operator s manual Please read the operator s manual carefully and make sure you understand the instructions before using the machine ...

Page 2: ...ough branches and other objects especially if they are wet Always keep a distance of at least 10 m between the machine and high voltage power lines and or any objects that are touching them If have to work within this safe distance you should always contact the relevant power company to make sure the power is switched off before you start work This machine can be dangerous The operator of the mach...

Page 3: ...ing 13 Starting and stopping 13 WORKING TECHNIQUES General working instructions 15 MAINTENANCE Carburettor 17 Muffler 17 Cooling system 18 Spark plug 18 Air filter 18 Gear housing 19 Cleaning and lubrication 19 Maintenance schedule 20 TECHNICAL DATA Technical data 21 EC declaration of conformity Applies to Europe only 22 WARNING Under no circumstances may the design of the machine be modified with...

Page 4: ...ndustry Husqvarna s aim is also to be in the front edge according to ergonomics usability security and environmental protection That is the reason why we have developed many different features to provide our products within these areas We are convinced that you will appreciate with great satisfaction the quality and performance of our product for a very long time to come The purchase of one of our...

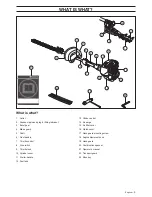
Page 5: ...vel gear 4 Blade guard 5 Shaft 6 Front handle 7 Throttle control 8 Stop switch 9 Throttle lock 10 Cylinder cover 11 Starter handle 12 Fuel tank 13 Choke control 14 Air purge 15 Air filter cover 16 Clutch cover 17 Hand guard mounting screw 18 Angle adjustment knob 19 Hand guard 20 Combination spanner 21 Operator s manual 22 Transport guard 23 Allen key ...

Page 6: ...rotective equipment Never use the machine in extreme weather conditions such as severe cold very hot and or humid climates Never use a machine that is faulty Carry out the checks maintenance and service instructions described in this manual Some maintenance and service measures must be carried out by trained and qualified specialists See instructions under the heading Maintenance All covers and gu...

Page 7: ...rottle lock move freely and that the return springs work properly See instructions under the heading Start Start the hedge trimmer and apply full throttle Release the throttle trigger and check that the blades stop and remain stationary If the blades move when the throttle trigger is in the idle position then the carburettor idle setting must be adjusted See instructions under the heading Maintena...

Page 8: ...hine that has a faulty muffler Regularly check that the muffler is securely attached to the machine If the muffler on your machine is fitted with a spark arrestor mesh this must be cleaned regularly A blocked mesh will cause the engine to overheat and may lead to serious damage WARNING Overexposure to vibration can lead to circulatory damage or nerve damage in people who have impaired circulation ...

Page 9: ...screw heads to slide sideways When the blades are correctly adjusted the play between the blades should be 0 2 0 4 mm measured at the screws The edges of the blades are too hard to be filed Dull blades should be sharpened using a grinder Replace the blades if they are bent or damaged Blade guard The blade guard A is intended to protect against any part of the body coming into contact with the blad...

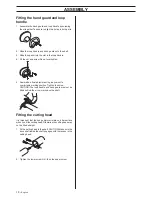
Page 10: ...inal adjustment to give yourself a comfortable working position Tighten the screw CAUTION The loop handle and hand guard must not be fitted behind the arrow marked on the shaft Fitting the cutting head It is important that the hedge trimmer is laid on a flat surface when you fit the cutting head Otherwise the cutting head may not be fitted straight 1 Fit the cutting head to the shaft CAUTION Make ...

Page 11: ...igh engine temperature and increased bearing load which can result in serious engine damage When working at continuous high revs a higher octane rating is recommended If the machine is not used for some time the fuel tank should be emptied and cleaned Engine oil Check the oil level before starting the machine A too low oil level can cause serious damage to the engine When the machine is new the en...

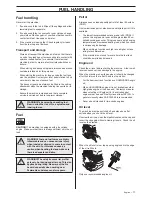
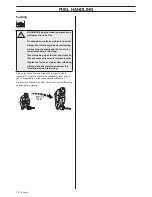
Page 12: ...sition before starting WARNING Taking the following precautions will lessen the risk of fire Do not smoke or place hot objects near fuel Always shut off the engine before refuelling Always stop the engine and let it cool for a few minutes before refuelling When refuelling open the fuel cap slowly so that any excess pressure is released gently Tighten the fuel cap carefully after refuelling Always ...

Page 13: ...the choke control in the choke position Primer bulb Press the air purge repeatedly until fuel begins to fill the bulb The bulb need not be completely filled Warm engine Ignition Set the stop switch to the start position Choke Put the choke in working position Primer bulb Press the air purge repeatedly until fuel begins to fill the bulb The bulb need not be completely filled WARNING The complete cl...

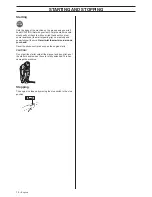
Page 14: ...feel some resistance the starter pawls grip now quickly and powerfully pull the cord Never twist the starter cord around your hand Reset the choke control as soon as the engine starts CAUTION Do not pull the starter cord all the way out and do not let go of the starter handle when the cord is fully extended This can damage the machine Stopping The engine is stopped by moving the stop switch to the...

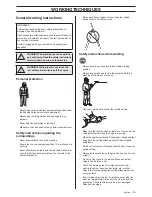
Page 15: ...e engine is running When the engine is switched off keep your hands and feet away from the cutting attachment until it has stopped completely Watch out for stumps of branches that can be thrown out during cutting Always lay the machine on the ground when you are not using it Do not cut too close to the ground Stones and other objects can be thrown out Check the working area for foreign objects suc...

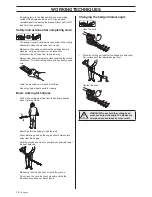
Page 16: ...ly cause cuts Store the machine out of reach of children Use only original spare parts for repairs Basic working techniques Work with a swinging action from the bottom upwards when trimming sides Adjust the throttle setting to suit the load When trimming a hedge the engine should always face away from the hedge Hold the machine as close to your body as possible to get the best balance Make sure th...

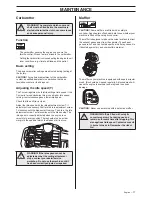
Page 17: ...here should also be a clear margin to the speed at which the blades start to move Muffler CAUTION Some mufflers are fitted with a catalytic converter See chapter on Technical data to see whether your machine is fitted with a catalytic converter The muffler is designed to reduce the noise level and to direct the exhaust gases away from the operator The exhaust gases are hot and can contain sparks w...

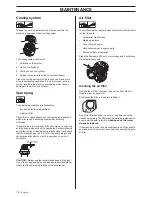
Page 18: ... it and check that the electrode gap is 0 6 0 7 mm The spark plug should be replaced after about a month in operation or earlier if necessary CAUTION Always use the recommended spark plug type Use of the wrong spark plug can damage the piston cylinder Check that the spark plug is fitted with a suppressor Air filter The air filter must be regularly cleaned to remove dust and dirt in order to avoid ...

Page 19: ...ase nipple and a plug for filling lubricant on the gear housing Use a grease gun to fill with grease This should be done after every 60 working hours Use Husqvarna s special grease no 503 98 96 01 CAUTION The gear housing must not be filled completely with grease The grease expands as the machine heats up during operation If the gear housing was completely filled with grease it could damage the se...

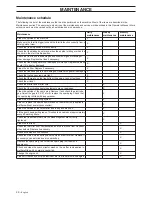
Page 20: ... fuel leaks from the engine tank or fuel lines X Check the oil level X Check the starter and starter cord X Check that the vibration damping elements are not damaged X Clean the outside of the spark plug Remove it and check the electrode gap Adjust the gap to 0 6 0 7 mm or replace the spark plug Check that the spark plug is fitted with a suppressor X Clean the machines cooling system X Clean or re...

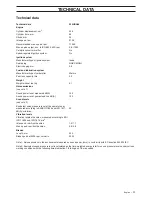
Page 21: ...tic converter muffler No Speed regulated ignition system No Ignition system Manufacturer type of ignition system Ikeda Spark plug NGK CMR5H Electrode gap mm 0 6 Fuel and lubrication system Manufacturer type of carburettor Walbro Fuel tank capacity litre 0 5 Weight Weight without fuel kg 6 1 Noise emissions see note 1 Sound power level measured dB A 102 Sound power level guaranteed LWA dB A 103 Sou...

Page 22: ...in the COUNCIL S DIRECTIVES of June 22 1998 relating to machinery 98 37 EC annex IIA of May 3 1989 relating to electromagnetic compatibility 89 336 EEC and applicable supplements of May 8 2000 relating to the noise emissions in the environment 2000 14 EC For information relating to noise emissions see the chapter Technical data The following standards have been applied EN292 2 CISPR 12 2001 EN774 ...

Page 23: ......

Page 24: ... z R J 6 2005 05 19 z R J 6 1150034 26 ...

Reviews: