background image

English – 

21

SAFETY INSTRUCTIONS

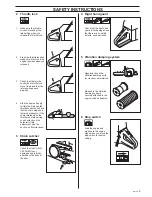
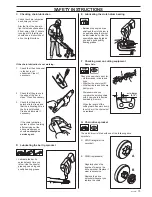
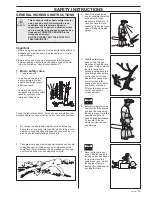
2 The log is supported at one

end. There is a high risk
that it will split.

A Start by cutting from

below (about 1/3 of the
way through).

B Finish by cutting from

above so that the two
cuts meet.

3 The log is supported at both

ends. There is a high risk
that the chain will jam.

A Start by cutting from

above (about 1/3 of the
way through).

B Finish by cutting from

below so that the two
cuts meet.

Limbing

When limbing thick branches
you should use the same
approach as for cutting.
Cut difficult branches piece by
piece.

1

2

3

!

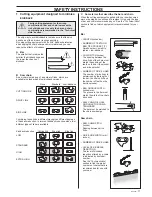
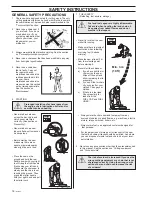
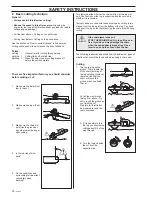
3 Tree felling technique

It takes a lot of experience to fell a tree.
Inexperienced users of chain saws should not
fell trees. NEVER ATTEMPT A TASK YOU ARE
UNSURE OF.

A

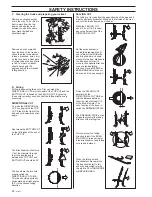
Safe distance

The safe distance between a tree that is to be felled and
anyone else working nearby is at least 21/2 tree lengths.
Make sure that no-one else is in this “risk zone” before or during
felling.

B

Felling direction

The aim is to fell the tree in the best possible position for
subsequent limbing and cross-cutting. You want it to fall on
ground where you can move about safely.

The main point to avoid is
letting the tree fall onto
another tree. It can be both
difficult and dangerous to
remove a tree in such a
position (see point 4 in this
section).
Once you have decided which
way you want the tree to fall
you must judge which way the
tree would fall naturally.

Several factors affect this:

Lean of the tree

Bend

Wind direction

Arrangement of branches

Weight of snow

You may find you are forced to let the tree fall in its natural
direction because it is impossible or dangerous to try to make it
fall in the direction you first intended.

Another very important factor, which does not affect the felling
direction but does affect your safety, is to make sure the tree
has no damaged or dead branches that might break off and hit
you during felling.

!

During critical felling operations, hearing
protectors should be lifted immediately when
sawing is completed so that sounds and
warning signals can be heard.

Summary of Contents for 242XP

Page 1: ...Operator s manual 42 242XP 246 101 89 26 26 Please read these instructions carefully and make sure you understand them before using the saw ...

Page 2: ... understand them before using the saw Always wear Approved protective helmet Approved hearing protection Protective glasses or visor Switch off the engine by moving the stop switch to the STOP position before carrying out any checks or maintenance Always wear approved protective gloves Regular cleaning is required Visual check Protective glasses or a visor must be worn KEY TO SYMBOLS Symbols in th...

Page 3: ... the instructions carefully Check cutting equipment is correctly fitted and adjusted See page 25 Refuel and start the saw Check the carburettor settings See pages 26 29 Do not use the saw until sufficient chain oil has reached the chain see page 14 IMPORTANT If the carburettor mixture is too lean it greatly increases the risk of engine failure Poor maintenance of the air filter will cause carbon b...

Page 4: ...PROTECTIVE EQUIPMENT MOST CHAIN SAW ACCIDENTS HAPPEN WHEN THE CHAIN TOUCHES THE OPERA TOR You must wear approved protective equipment whenever you use a chain saw Personal protective equipment cannot eliminate the risk of injury but it will reduce the degree of injury if an accident does happen Ask your chain saw dealer for help in choosing the right equipment PROTECTIVE HELMET HEARING PROTECTION ...

Page 5: ...ed mechanism that tightens the Brake Band C around the engine drive system D Clutch Drum SAFETY INSTRUCTIONS 2 The front hand guard is not designed solely to activate the chain brake Another important safety feature is that it prevents the chain from hitting your left hand if you lose your grip on the front handle 3 You can also use the chain brake as a temporary brake when you change position or ...

Page 6: ... but there are certain factors to remember see point 6 above 2 Throttle lock The throttle lock is designed to prevent accidental opera tion of the throttle control When you press the lock A i e when you grasp the handle it releases the throttle trigger B When you release the handle the throttle trigger and the throttle lock both move back to their original positions This movement is controlled by ...

Page 7: ...perience symptoms of overexposure to vibration These symptoms include numbness loss of feeling tingling pricking pain loss of strength changes in skin colour or condition These symptoms normally appear in the fingers hands or wrists SAFETY INSTRUCTIONS The exhaust fumes from the engine are hot and may contain sparks which can start a fire Never start the saw indoors or near combustible material Th...

Page 8: ...ront hand guard 1 Checking brake band wear Brush off any sawdust resin and dirt from the chain brake and clutch drum Dirt and wear can impair operation of the brake Regularly check that the brake band is at least 0 6 mm thick at its thinnest point SAFETY INSTRUCTIONS 4 Checking the brake trigger Start the chain saw and place it on firm ground Make sure the chain does not touch the ground or any ot...

Page 9: ...1 Make sure the throttle control is locked at the idle setting when you release the throttle lock 2 Press the throttle lock and make sure it returns to its original position when you release it 3 Check that the throttle control and throttle lock move freely and that the return springs work properly 4 Start the saw and apply full throttle Release the throttle control and check that the chain stops ...

Page 10: ...he risk of kickback Reduce the risk of the chain breaking or jumping Obtain maximum cutting performance Extend the life of cutting equipment The 5 basic rules 1 Only use cutting equipment recommended by us See the Technical data section 2 Keep the chain cutting teeth properly sharpened Follow our instructions and use the recommended file gauge A damaged or badly sharpened chain increases the risk ...

Page 11: ...EL OF KICKBACK REDUCTION The level of kickback reduction offered by a chain is indicated by its model number See the Technical data section to find the model numbers of chains that are recommended for use with your saw 1 Cutting equipment designed to minimise kickback Faulty cutting equipment or the wrong combination of bar and chain increases the risk of kickback Use only the bar and chain combin...

Page 12: ...data section for information about sharpening your saw chain It is very difficult to sharpen a chain correctly without the right equipment We recommend you use a file gauge This will help you obtain the maximum kickback reduction and cutting performance from your chain The following faults will increase the risk of kickback considerably FILE ANGLE TOO LARGE CUTTING ANGLE TOO SMALL FILE DIAMETER TO...

Page 13: ...sharpened We recommend that you adjust the raker clearance every third time you sharpen the chain NOTE This recommendation assumes that the length of the cutting teeth is not reduced excessively To adjust the raker clearance you will need a FLAT FILE and a RAKER GAUGE Place the gauge over the raker lip Place the file over the part of the lip that protrudes through the gauge and file off the excess...

Page 14: ...ess of whether it is warm summer or cold winter weather As a chainsaw manufacturer we have developed an optimal chain oil which with its vegetable oil base is also biodegradable We recommend the use of our own oil for both maximum chain life and to minimise environmental damage If our own chain oil is not available standard chain oil is recommended In areas where oil specifically for lubrication o...

Page 15: ... each time you refuel Use the special grease gun and a good quality bearing grease SAFETY INSTRUCTIONS E Lubricating the clutch drum bearing Between the engine drive shaft and the clutch drum is a needle bearing that must be lubricated daily Use the specially designed grease gun and a good quality bearing grease F Checking wear on cutting equipment Saw chain Check the saw chain daily for Visible c...

Page 16: ...ee section on General working instructions CHECK THAT ALL SAFETY FUNCTIONS ARE WORKING see section on General working instructions and General safety precautions SAFETY INSTRUCTIONS HOW TOAVOID KICKBACK Kickback can happen very suddenly and violently kicking the saw bar and chain back at the user If this happens when the chain is moving it can cause very serious even fatal injuries It is vital you...

Page 17: ...the wrong cutting equipment or a chain that is not sharpened correctly The wrong combination of bar and chain can increase the risk of kickback General rules 1 If you understand what kickback is and how it happens then you can reduce or eliminate the element of surprise By being prepared you reduce the risk Kickback is usually quite mild but it can sometimes be very sudden and violent 2 Always hol...

Page 18: ...f you spill fuel or chain oil on yourself or your clothes Change your clothes c If there is a fuel leak Check regularly for leaks from the FUEL CAP and FUEL LINES Always store the chain saw and fuel away from any sources of sparks or naked flames e g machines electric motors relays switches boilers etc Always store fuel in an approved container designed for that purpose For longer periods of stora...

Page 19: ... rain strong wind intense cold etc Working in cold weather is tiring and often brings added risks such as icy ground unpredictable felling direction etc 3 Take great care when removing small branches and avoid cutting bushes i e cutting many small branches at the same time Small branches can be grabbed by the chain and thrown back at you causing serious injury 4 Check the area around you for possi...

Page 20: ...nish the cut Maintain full throttle but be prepared in case the chain snatches A If it is possible to turn the log you should stop cutting about 2 3 of the way through B Turn the log and finish the cut from the opposite side 2 Basic cutting technique General Always use full throttle when cutting Reduce the speed to idle after every cut running the engine for too long at full throttle without any l...

Page 21: ...elling B Felling direction The aim is to fell the tree in the best possible position for subsequent limbing and cross cutting You want it to fall on ground where you can move about safely The main point to avoid is letting the tree fall onto another tree It can be both difficult and dangerous to remove a tree in such a position see point 4 in this section Once you have decided which way you want t...

Page 22: ...cuts meet is called the DIRECTIONAL CUT LINE This line should be perfectly horizontal and at right angles 90 to the chosen felling direction FELLING CUT The felling cut is made from the opposite side of the tree and it must be perfectly horizontal Stand on the left side of the tree and cut with the bottom edge of the bar Make the FELLING CUT about 3 5 cm 1 5 2 inches above the flat section of the ...

Page 23: ... on the trunk Keep the tree between you and the saw as you move along the trunk F Cutting the trunk into logs See chapter General working instructions point 2 Basic cutting technique 4 Freeing a tree that has fallen badly high accident risk A Freeing a Trapped tree The safest method is to use a winch A Tractor mounted B Portable B Cutting trees and branches that are in tension Preparations a Work ...

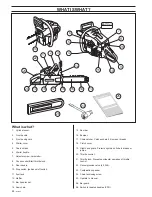
Page 24: ... tip sprocket 14 Saw chain 15 Saw bar 16 Bumper 17 Chain catcher Catches chain if it jumps or breaks 18 Clutch cover 19 Right hand guard Protects right hand if chain breaks or jumps 20 Throttle control 21 Throttle lock Prevents accidental operation of throttle control 22 Decompression valve 42 246 23 Combination spanner 24 Chain tensioning screw 25 Operator s manual 26 Bar guard 28 Switch for heat...

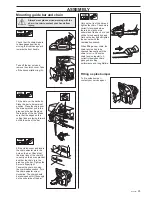
Page 25: ...guard towards the front handle Take off the bar nuts and remove the clutch cover Take off the transportation ring A Fit the bar over the bar bolts Place the bar in its rearmost position Place the chain over the drive sprocket and in the groove on the bar Begin on the top side of the bar Make sure that the edges on the cutting links are facing forward on the top side of the bar ASSEMBLY A Fit the c...

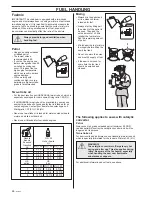
Page 26: ...so called outboard oil Never use oil intended for four stroke engines 5 10 15 20 2 1 50 0 10 0 20 0 30 0 40 3 1 33 0 15 0 30 0 45 0 60 4 1 25 0 20 0 40 0 60 0 80 Gasolin Benzin Essence Gasolina Lit Oil Öl Huile Aceite Lit 1 2 1 2 5 2 1 50 2 1 2 6 1 2 12 7 8 3 1 33 3 3 4 9 3 4 19 1 4 4 1 25 5 1 8 12 7 8 25 3 4 US gallon US fl oz FUEL HANDLING Mixing Always mix the petrol and oil in a clean containe...

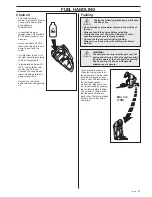
Page 27: ...he chain It is important to use oil of the right viscosity according to the air temperature In temperatures below 0o C 32o F some oils become too viscous This can overload the oil pump and result in damage to the oil pump components Contact your servicing dealer when choosing chain oil WARNING The catalytic converter muffler gets very hot during and after use This also applies during idling Be awa...

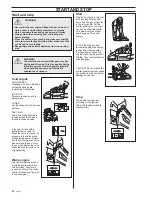
Page 28: ...ke is moved to choke position If the saw is fitted with a decompression valve A Press the valve to reduce the pressure in the cylinder and make starting easier Always use the decompression valve when starting the saw Once the saw has started the valve will automatically return to its original setting Warm engine Use the same procedure as for starting cold engine but without choke Fast idle is reci...

Page 29: ...e will result in a leaner mixture when the filter is finally cleaned This can give rise to serious engine damage Carefully turn the L and H jets clockwise to the bottom Now turn the jets one turn anti clockwise The carburettor is now set to H 1 and L 1 Now start the saw according to the starting instructions and run it warm for 10 minutes NOTE If the chain rotates the T screw should be turned anti...

Page 30: ...l when changing the recoil spring or the starter cord Always wear safety goggles for eye protection Tensioning the recoil spring Lift the starter cord up in the notch on the starter pulley and turn the starter pulley 2 turns clockwise NOTE Check that the starter pulley can be turned at least half a turn when the starter cord is entirely pulled out Changing the broken recoil spring Lift the starter...

Page 31: ...ug The spark plug condition is influenced by An incorrect carburettor setting Wrong fuel mixture too much oil in the gasoline A dirty air filter These factors cause deposits on the spark plug electrodes which may result in malfunction and starting difficulties If the engine is low on power difficult to start or runs poorly at idling speed always check the spark plug first If the spark plug is dirt...

Page 32: ...er unit 1 2 5 4 3 Heated handles On the model XPG both the front handle and the rear handle are equipped with electrical heating coils These are supplied with electricity from a built in generator in the electrical system The switch for the heating coils is placed to the right of the rear handle When the switch is pushed to the right the heat is switched on When it is pushed to the left the heat i...

Page 33: ... throttle trigger for smooth operation If any binding occurs or if engine fails to return to idle the saw should be taken to your dealer before it is used again Also be sure that the trigger cannot be pulled until the throttle trigger lockout is depressed 2 Clean the chain brake and check its function according to the instructions Make sure that the chain catcher is undamaged Otherwise replace it ...

Page 34: ...pion RCJ 7Y 0 020 0 5 Walbro HDA98 1 1 0 52 3 7 0 57 0 27 Automatic XP 10 3 4 7 XPCAT 11 0 5 0 TECHNICAL DATA 242XP 99 5 XP 106 5 XPCAT 107 3 6 5 4 13 33 11 18 28 45 11 18 28 46 19 1 0 325 8 25 0 050 1 3 0 058 1 5 7 Bar and chain combinations The following combinations are CE approved Bar Chain Length Pitch Max inches inches tip radius 11 0 325 10T Husqvarna H25 13 0 325 10T Husqvarna H25 15 0 325...

Page 35: ...g conditions with the following time distribution 1 3 idle 1 3 max load 1 3 max speed Note 2 Equivalent vibration level is according to ISO 7505 calculated as the time weighted energy total for vibration levels under various working conditions with the following time distribution 1 3 idle 1 3 max load 1 3 max speed Noise levels Equivalent see note 1 noise pressure level at operator s ear measured ...

Page 36: ... 2 6g ...
Reviews: