


CARE
25
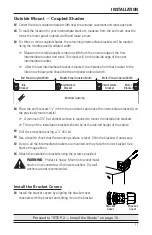
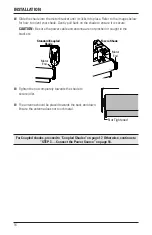
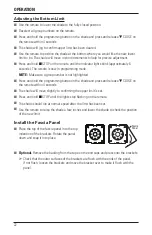
Removing the Shade
CAUTION:
Before removing the shade, the shade should be fully raised.
■
Pocket Shades Only.
Remove the bottom cover. Lift up the edge of
the bottom cover. Disengage it from the ledge of the pocket.
■
Fascia Shades Only.
Remove the
front/bottom cover of the fascia by
pulling down on the bottom of the
cover, near the installation brackets,
to release it from the tabs on the
installation brackets.
➤
Rotate the cover up and remove it.
■
Standard Bracket Shades with Bracket Covers.
Remove the cover on the motor-side.
NOTE:
Standard Bracket shades are shown in the
illustration, but the process is the same for all shades
types except Cassette shades shown below.
■
Disconnect power and make sure cables are not caught
before attempting to removing shade.
■
Loosen the nut on the idle spring end by rotating it away
from the shade.
■
You will use a screwdriver to push the latch. First, push
the shade away from the screwdriver until the latch
moves (depending on your mounting type you may need
to push up or in), and then press the latch.
■
Slide the shade out of the motor bracket.
■
Pull the shade from the idle bracket.
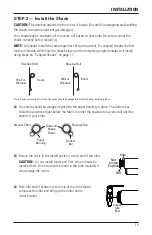
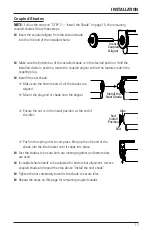
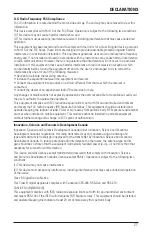
Cassette Shades
■
Disconnect power and make sure cables are not caught before
attempting to removing shade.
■
Insert the tip of a flat blade screwdriver into the screwdriver slot
provided on the bracket.
■
Press down to release the cassette.
■
Roll the cassette forward and then down to remove.
IMPORTANT:
Do not remove the roller shade from
the cassette.
Pull Down
to Release
Fascia
Panel
Push
Up on
Shade
Inside Mount
Outside Mount
Push
Latch with
Screwdriver
Push
In on
Shade
Latch
Insert a
screwdriver
to release
the cassette.
Summary of Contents for Designer Roller
Page 31: ......


