INSTALLATION
4
Inside Mount — No Valance
■
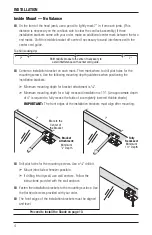
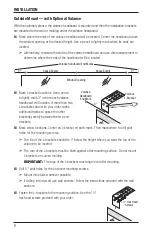
On the front of the head jamb, use a pencil to lightly mark 7" in from each jamb. (This
distance is necessary on the cordlock side to clear the cordlock assembly.) If three
installation brackets came with your order, make an additional center mark between the two
end marks. Shift this middle bracket off-center if necessary to avoid interference with the
center cord guide.
■
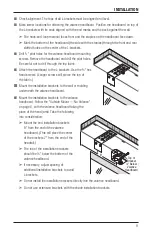
Center an installation bracket on each mark. Then mark where to drill pilot holes for the
mounting screws. Use the following mounting depth guidelines when positioning the
installation brackets:
➤
Minimum mounting depth for bracket attachment is
7
/
8
".
➤
Minimum mounting depth for a fully recessed installation is 1½". (An approximate depth
of 4" is required to fully recess the folds of a completely lowered Hobble shade.)
Important:
The front edges of the installation brackets must align after mounting.
■
Drill pilot holes for the mounting screws. Use a
1
/
8
" drill bit.
➤
Mount into studs whenever possible.
➤
If drilling into drywall, use wall anchors. Follow the
instructions provided with the wall anchors.
■
Fasten the installation brackets to the mounting surface. Use
the flat head screws provided with your order.
■
The front edges of the installation brackets must be aligned
and level.
Proceed to Install the Shade on page 10.
Top Sill (Looking Up)
7"
7"
Shift middle bracket off-center if necessary to
avoid interference with center cord guide.
7"
7"
Fully
Recessed:
Minimum
1½" Depth
Bracket
Attachment:
Minimum
7
/
8
" Depth
Mark to the
Center of
the Bracket

