background image

4

Hunter Fan Company 

42015-01 • 02/15/05

5

42015-01 • 02/15/05 

Hunter Fan Company

1 • Getting Ready

To install a ceiling fan, be sure you can do the following:

• Locate the ceiling joist or other suitable support in ceiling.
• Drill holes for and install wood screws.
• Identify and connect electrical wires.
• Lift 40 pounds.

If you need help installing the fan, your Hunter fan dealer can direct 
you to a licensed installer or electrician.

Gathering the Tools

You will need the following tools for installing the fan:

• Electric drill with 9/64” bit
• Standard screwdriver
• Phillips-head screwdriver
• Wrench or pliers

Check Your Fan Parts

Carefully unpack your fan to avoid damage to the fan parts. Check 
for any shipping damage to the motor or fan blades. If one of the fan 
blades was damaged in shipment, return all the blades for replacement.

If any parts are missing or damaged, contact your Hunter dealer or call 
Hunter Parts Department at 888-830-1326.

Preparing the Fan Site

Before you begin installing the fan, follow all the instructions in 
the pullout sheet called “Preparing the Fan Site.”  Proper ceiling fan 
location and attachment to the building structure are essential for 
safety, reliable operation, maximum effi  ciency, and energy savings.

Installing Multiple Fans?

If you are installing more than 
one fan, keep the fan blades in 
sets, as they were shipped.

Summary of Contents for 42015-01

Page 1: ...42015 01 02 15 05...

Page 2: ...ck the circuit breakers in the off position securely fasten a prominent warning device such as a tag to the service panel All wiring must be in accordance with national and local electrical codes and...

Page 3: ...ssories Consider using Hunter s optional accessories including a wall mounted or remote speed control To install and use the accessories follow the instructions included with each product For quiet an...

Page 4: ...r pliers CheckYourFanParts Carefully unpack your fan to avoid damage to the fan parts Check for any shipping damage to the motor or fan blades If one of the fan blades was damaged in shipment return a...

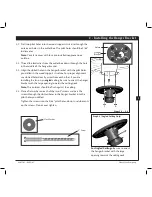
Page 5: ...proper alignment use slotted holes directly across from each other If you are installing the fan on an angled ceiling be sure to orient the hanger bracket with the large opening towards the ceiling p...

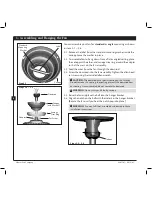
Page 6: ...fan assembly Tighten the allen head set screw using the included allen wrench CAUTION e downrod has a special coating on the threads Do not remove this coating the coating prevents the downrod from un...

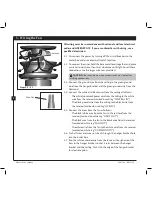
Page 7: ...r switches in the remote transmitter and receiver so that they match 4 1 Change the position of the jumper switches in the transmitter and the receiver Be sure the position of the jumper switches matc...

Page 8: ...Connect the white and black wires from the ceiling as follows e white common power wire from the ceiling to the white wire from the receiver marked on red tag NEUTRAL IN e black power wire from the ce...

Page 9: ...the hook first Align partially installed screws with key slots in canopy 6 3 Twist canopy clockwise to secure 6 4 Install third canopy screw in round hole on canopy Securely tighten all three screws 6...

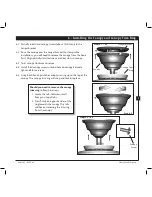
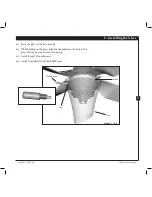
Page 10: ...Insert blade into slot Align the holes on the blade with the holes on the blade iron 7 2 Attach the blade to the motor using the blade assembly screws Note Do not use the middle hole on the blade 7 3...

Page 11: ...8 1 Raise the glass to the fan assembly 8 2 While holding up the glass align the thumbscrew the hole in the glass and the post on the motor housing 8 3 Install three 3 thumbscrews 8 4 Install 1 stand...

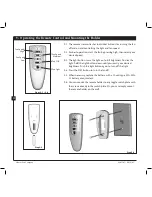
Page 12: ...ull brightness To dim the light hold the light button down until you reach your desired brightness Push the light button again to turn off the light 9 4 Press the OFF button to turn the fan off 9 5 Wh...

Page 13: ...clockwise blade rotation will distribute the warmer air trapped at the ceiling around the room without causing a draft 10 4 For cleaning finishes use a soft brush or lint free cloth to prevent scratc...

Page 14: ...ghten the blade screws until snug 2 Check to see if the blade is cracked If so replace all the blades 3 Be sure that the glass is secure Problem Excessive wobbling 1 If your fan wobbles when operating...

Reviews: