Install&User Manual
25
[HVRM-T1600M/ T800M/ T400M]
[HVRM-T1600Q/ T800Q]
Page 1: ...HVRM T1600M T800M T400M T1600Q T800Q Install User s Guide English...
Page 2: ...ormance Product Warranty and Limits of Responsibility The manufacturer does not assume any responsibility concerning the sale of this product and does not delegate any right to any third party to take...
Page 3: ...d used in accordance with the instruction manual may cause harmful interference to radio communications Operation of this equipment in a residential area is likely to cause harmful interference in whi...
Page 4: ...ed after installation 6 Product is made of metal Therefore you can hurt human beings if you throw it to them or hit on them When installing product be cautious to locate on safe places where children...
Page 5: ...erloading of the circuits might have on overcurrent protection and supply wiring Appropriate consideration of equipment nameplate ratings should be used when addressing this concern E Reliable Earthin...
Page 6: ...tion Function 1 2 1 Front 1 2 2 Rear 1 2 3 REMOTE CONTROLLER 2 INSTALLATION 2 1 Installation and Connection 2 1 1 Connecting Running 2 2 Running OSD menu 2 2 1 OSD menu configuration 2 2 2 Setting rem...
Page 7: ...Single Fll Screen Mode 4 3 Multi Screen Mode 4 4 Screen Description 4 5 Auto Switch Mode 4 5 1 System Standard Mode 4 5 2 User Sequence Mode 4 6 Event Screen 4 7 Zoom Screen Mode 4 8 Pause Live Screen...
Page 8: ...5 2 2 Schedule Search 5 2 3 Event Search 5 2 4 Thumbnail Search 5 3 Copy 5 3 1 CD DVD 5 3 2 RE4 5 3 3 AVI 6 CONFIGURATION 6 1 Recording Structure 6 2 System Setup 6 2 1 Date Time 6 2 2 Disk 6 2 3 Use...
Page 9: ...7 1 System requriement 7 2 Login 7 3 User Setup 7 4 Browser available 7 5 Monitor 7 5 1 Screen division and changing video position 7 5 2 Move to Playback 7 5 3 Channel On Off 7 5 4 Sensor Indication...
Page 10: ...king Rec Capacity 7 6 7 Searching Calander 7 6 8 Functional function at the buttom of monitor 8 JAVA VIEWER 9 USER MANUAL FOR MOBILE VIEWER 9 1 Log In page 9 2 Monitoring page TROUBLE SHOOTING AVAILAB...
Page 11: ...M 1 4 channel mode HVRM T1600Q 1 4 9 10 16 channel mode HVRM T800Q 1 4 9 channel mode Auto Switching HVRM T1600M Composite x 2 DVI x 1 HVRM T800M Composite x 2 DVI x 1 HVRM T400M Composite x 2 DVI x 1...
Page 12: ...800Q HALF 704x240 240ips Supprots manual schedule recording Video loss detection Supprots archiving event list Sensor Video Loss Motion detection Text Available record Max 5 seconds before triggering...
Page 13: ...riggering an event Live monitoring form remote site Whole screen or available to select quad screen Available to playback recording search and DVR management thru network viewer in PC Available to rec...
Page 14: ...ser Manual Install Manual 1 Feature 1 1 Supplied Accessories Unpack and check all the items as below 1 1 1 HVRM T1600M T800M T400M AC Cord Remocon Setup CD DVI Converter SATA Cable HDD Fixing Screw Qu...
Page 15: ...Install User Manual 1 1 2 HVRM T1600Q T800Q AC Cord Remocon Setup CD SATA Cable HDD Fixing Screw Quick Guide...
Page 16: ...s copy status HDD LED Displays HDD running NETWORK LED Displays network connection EVENT LED Displays event detection 4 Power Turn on off power 5 USB port Use connecting USB memory or Mouse 6 REC To s...
Page 17: ...REW To move or select in menu and change replay speed to reverse direction in playback mode 19 FWD To move or select in menu and change replay speed to forward direction in playback mode 20 Pause To...
Page 18: ...ays event detection 4 Power Turn on off power 5 USB port Use connecting USB memory or Mouse 6 REC To start or stop manual recording 7 Multi To change DVISION in live or playback mode 8 SEQ To run or s...
Page 19: ...change replay speed to reverse direction in playback mode 19 FWD To move or select in menu and change replay speed to forward direction in playback mode 20 Pause To move or select in menu and pause l...
Page 20: ...ot BNC connection for monitor output 5 Audio Input RCA RCA connection for Audio input 6 Audio Output Speaker output terminal 7 Ethernet For network connection RJ 45 8 eSATA eSATA external storage conn...
Page 21: ...Install User Manual Input Output name Descrtiption 1 Ground Ground between DVR external device 15 Power connector Socket for AC100V AC240V power cord...
Page 22: ...EA HVRM T800Q 8EA 4 Monitor Spot BNC connection for monitor output 5 Audio Input RCA RCA connection for Audio input 6 Audio Output Speaker output terminal 7 Ethernet For network connection RJ 45 8 RS...
Page 23: ...ler it is necessary to set ID first which want use Keep pressing ID button repetedely Up to Max 16 times and use it matching DVR ID No Iten Description 1 ID To select Remote Controller ID 2 LOCK Not u...
Page 24: ...ting menu to bottom direction STOP 22 ENTER PLAY Menu selection Playback 23 ENTER To select menu 24 EXIT To cancel setting escape from menu 25 FAST REWIND Speedy replay to reverse direction 26 REWIND...
Page 25: ...L not be combined both DVR sets video signal s impedance 75 automatically Impedence is set as 75 basically If connecting a dvice to video output impedance will be Hi z status Video Type NTSC PAL shoul...
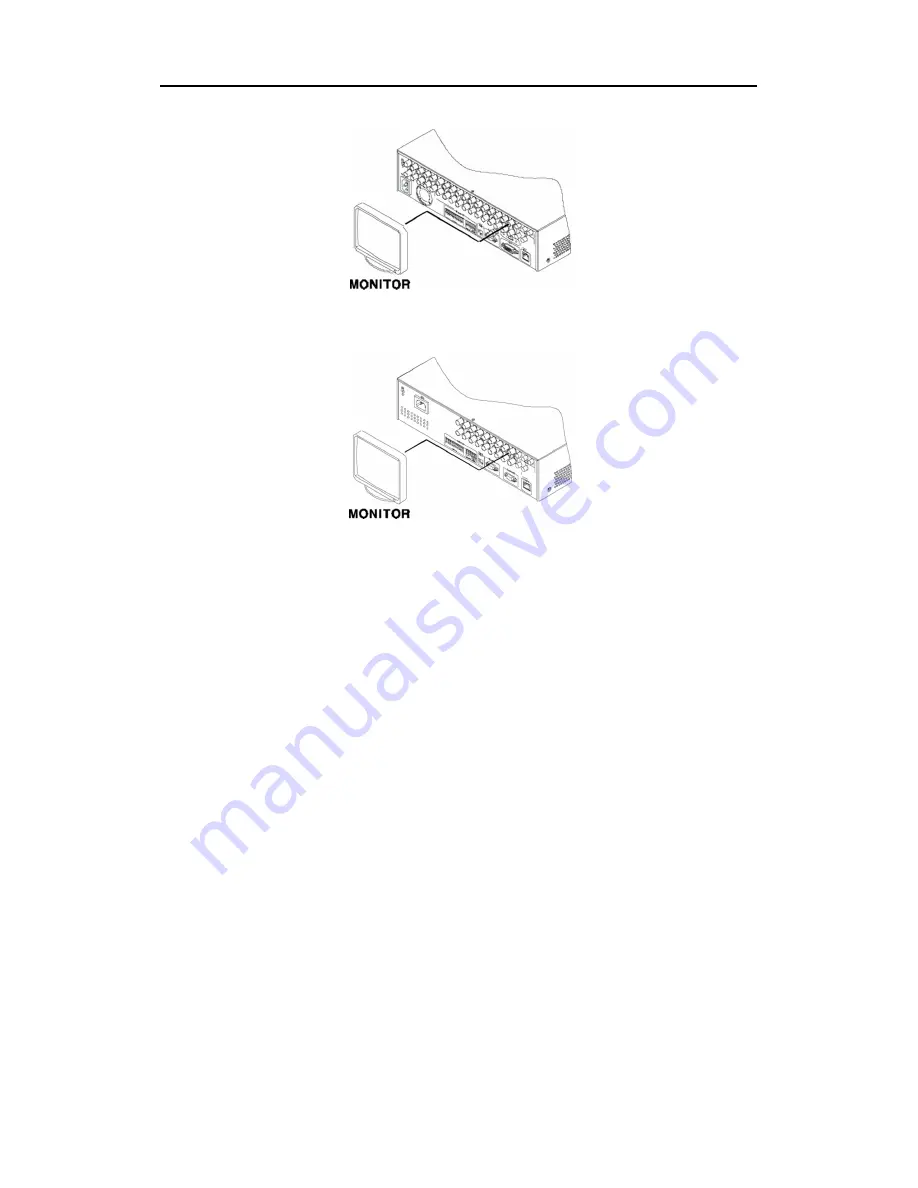
Page 26: ...Install User Manual HVRM T1600M T800M T400M HVRM T1600Q T800Q...
Page 27: ...nual 2 1 1 3 Connecting Audio Connect audio signal to DVR with using RCA cable or D SUB as below HVRM T1600M T800M T400M HVRM T1600Q T800Q 2 1 1 4 Supplying Power Connect power cable as below HVRM T16...
Page 28: ...power DVR starts booting automatically In order to cut off power press power switch on DVR front during 5 seconds then select YES after appearing a pop up window For supplying power again push the Po...
Page 29: ...ous next tab use the arrow buttons To move to the related setting press Enter To move to upper main menu press ESC button 3 Setting page The selected tab is shown as orange To move to the previous nex...
Page 30: ...DVRs with one remote controller set Remote Control ID as follws 1 Press the MENU button 2 Select system with using arrow button and press Enter or button 3 Select Utility with using arrow button and...
Page 31: ...l a buzzer sounds during 2 seconds 2 2 2 3 Operaable range of remote controller 2 2 2 4 Loading the batteris into the remote controller Remote controller required two AAA type batteries Please refer t...
Page 32: ...Install User Manual HVRM T1600Q T800Q 2 2 3 2 Advance configuration HVRM T1600M T800M T400M HVRM T1600Q T800Q...
Page 33: ...Install User Manual 2 2 3 3 External storage Back up configuration HVRM T1600M T800M T400M HVRM T1600Q T800Q 2 2 3 4 Internet Intranet configuration HVRM T1600M T800M T400M...
Page 34: ...When power is on eDVR starts automatically and displayed in basic 16ch split screen after booting Reference If user password is set a prompt for entering the password will be appeared Factory default...
Page 35: ...lick This is the same for all OSD menus Daylight saving This menu is linked with time zone setting For example if the countries applied for daylight saving in time zone setting menu then daylight savi...
Page 36: ...ess ESC after finshing value setting Time 1 Select Time using or arrow button and press Enter button 2 Select Date Time using arrow button and set value using arrow button 3 Press ESC after finshing v...
Page 37: ...anual To cancel press ESC button 2 2 4 3 Record Setting Select Record pressing menu button in front Program Setting Set resolution frame rate quality by each channel that user want record in Program o...
Page 38: ...nce If recodrding setting is finished correctly REC LED in front is flickering In addition it is marked S indicating that all channels are recroding 2 3 Connecting and configuring DIO ports 2 3 1 Wire...
Page 39: ...in the diagram to the below 2 3 3 Connecting and configuring sensor 2 3 3 1 Specification In order to run sensor input DVR normally the following conditions are required Spec Input Ch Transistor input...
Page 40: ...rring the following image It shows to connect a dry contact Please refer Wire Handling HVRM T1600M T800M T400M HVRM T1600Q T800Q Setting Sensor 1 Press Menu button and select Event when OSD menu is ap...
Page 41: ...ser want set and set type 3 Press ESC after finishing value setting 2 3 3 2 Connecting relat and setting Specification In order to run relay output of DVR normally the following conditions are require...
Page 42: ...y selecting from sensor motion detection Video Loss which is normal event source and Disk error Disk full authentication fail WRS registration fail which is system event source Also user can set worki...
Page 43: ...o connect PTZ camera and control it For a list of supported protocols please refer to the list on the OSD configuration menu The following figure shows how to connect PTZ camera to RS485 COM2 COM3 Whe...
Page 44: ...Install User Manual HVRM T1600Q T800Q Serial communication port diagram COM1 Connection RS 232 COM2 COM3 Connection RS 485...
Page 45: ...Electric Panasonic WV CS850 Panasonic SDZ160 330 Samsung SPD Keyboard SCC3000 Samsung SRX 100B Samsung Techwin LG GAC PT2 LG Merit Lilin FastDome Merit Elmo PTC200C Elmo Canon VC C4 Canon HTC 230S Don...
Page 46: ...annel from camera menu and setting up PTZ Home PTZ Idle Time PTZ Port and PTZ address 2 3 3 4 Connection to external device via Seria port Text input device connection ATM POS Access Control Using COM...
Page 47: ...Deice on OSD and move to sub menu 2 Select Text and configure relevant text information Reference Since external device can not be recognized before installing please ask to the shop 2 3 3 5 USB Devi...
Page 48: ...T1600M T800M T400M HVRM T1600Q T800Q Reference It should be formatted by FAT32 In case of normal connection if executing Copy menu disk will be recognized same as below and Set copy range Select Drive...
Page 49: ...ognized 2 3 3 6 Video In Out connection Video Input Output is Loop through and check the connectivity automatically and set end resistance For instance if connected by Video input end resistance is co...
Page 50: ...n Out connection There are 4 RCA Audio Input and 1 RCA output 2 3 4 HDD Please refer to Appendix for available HDD list 2 3 4 1 HDD registration and format After mounting HDD and booting system Disk M...
Page 51: ...select Yes to delete it from the list 4 Select the new HDD from the list and press Enter key 5 Select Yes when the system asking do you want to format 6 After complete above procedure then Press ESC...
Page 52: ...r can access with PC 2 3 5 1 Ethernet connection HVRM T1600M T800M T400M HVRM T1600Q T800Q 1 Cut Power 2 Connet Ethernet cable to DVR and Hub 3 Input Power Reference To protect DVR demage after connec...
Page 53: ...eel PPPoE Set type xDSL and move to xDSL menu First change Ethernet Port Please input ID and Password for PPPoE WRS After changing interval over 1 min register WRS address and product and input Group...
Page 54: ...orting FireWire using eSATA port on the rear part And since DVR does not support power to eSATA eSATA device should be one external power is supported Note Basically eSATA is connected to DVR while DV...
Page 55: ...nu click the right button of mouse or select FUNC button on front panel The Function menu can be controlled by mouse Each function can be executed by clicking right button of mouse and click desired i...
Page 56: ...ppear click Yes to reset the DVR value to factory Default Value from Factory System Date Time Time Zone UTC 00 00 Dublin Daylight Saving Off NTP Function Sync With NTP Off NTP Mode Client NTP Server L...
Page 57: ...ctory Reset Network Network Type Ethernet DHCP Off IP addr Default IP Net Mask Default Net Mask Gateway Default Gateway DNS1 4 2 2 1 Additional DNS Port 80 Band Width Limit Mbps 0 0 xDSL User ID Guest...
Page 58: ...ion SEQ Time Sec 5 Covert Multi Moce 4E VGA Mode 800x600 56Hz Infor Level Audio Audio Channel Audio Recording Audio Gain Sync Video Channel Audio Mix Text Recording Off Sync Test With Ch1 Device Manua...
Page 59: ...O Preset Channel Mumber Ch1 Preset Sensor1 Preset1 Record Record Record Mode Manual Event Program ProgramK Event Duration Playback Deinterlace On Program Normal Resolution All D1 Frame Rate All 6 Qual...
Page 60: ...D1 2 Q5 C D1 1 Q5 D1 1 Q5 D Half 7 Q5 Half 7 Q5 E Half 4 Q5 Half 4 Q5 F Half 2 Q5 Half 2 Q5 G CIF 15 Q5 CIF 15 Q5 H CIF 7 Q5 CIF 7 Q5 I CIF 4 Q5 CIF 4 Q5 HVRM T400M Record mode Normal Event Division R...
Page 61: ...f 15 Q5 F Half 7 Q5 Half 7 Q5 G CIF 30 Q5 CIF 30 Q5 H CIF 15 Q5 CIF 15 Q5 I CIF 7 Q5 CIF 7 Q5 HVRM T1600M Record mode Normal Event Division Res Fps Q Res Fps Q Program A D1 7 Q5 D1 7 Q5 B D1 4 Q5 D1 4...
Page 62: ...M T400M 4screens If there is user password set Password input window will be displayed 4 2 Single Fll Screen Mode Press the channel number wanted or click mouse button Press MULTI button to return to...
Page 63: ...nd Users Sequence mode operates by the press SEQ button 4 5 1 System Standard Mode By Auto button it can monitor auto switching of all channels Press MENU for the setting switching term or using mouse...
Page 64: ...lay from status bar In case of M displayed the camera name will be turned to green color and it will turn to yellow when Motion Detection event finish In case of S displayed the camera name will be tu...
Page 65: ...mode press FUNC and D Zoom button then select button to activate zooming the image Default zoom screen locates to main center when press ZOOM button Zoom image can shift left right in 18 steps and top...
Page 66: ...menu Below lists are the protocol available in DVR Model Manufacturer BOSCH AutoDome TC8560X 4 Bosch PELCO P PELCO D Pelco Sony EVI D3x Sony VT VPT 4x VT AD SpeedDome AD SungJin SJ372R1 SungJin Samsu...
Page 67: ...used to control Pan Tilt function at real time monitoring mode Select Pan Tilt from PTZ mode Control Pan Tilt through directional key at front part 4 9 2 Zoom Focus This menu is used to control Zoom...
Page 68: ...wheel to select the Aux Number Press relevant Number button of specific function Aux function is available to max 16 functions 4 9 6 Auxiliary Off This menu is used to stop operation of specific func...
Page 69: ...emporary With mouse click Pause button in Function menu STOP Stop playback With mouse click Stop button in Function menu FWD Playback speed will be changed x1 x2 x4 x8 x16 x32 x64 x1 2 x1 x2 x4 in ord...
Page 70: ...sh Search button on the front panel or click in Function menu 5 2 1 Time Search Select date and time to search and playback video will be moved to the selected point Start REC Time The date and time o...
Page 71: ...scroll the mouse wheel after selecting area Searched result will be displayed on additional event window Select and push enter or scroll the mouse wheel to move to the wanted date and time area Start...
Page 72: ...e by direction key or mouse wheel Start Time Input the date and time for starting search and change the value using up down direction key or mouse wheel Interval Set Interval value by Up down button o...
Page 73: ...in Function menu In case to copy with RE4 and AVI format you need to use USB memory stick or USB HDD You must do Fat32 format first from PC before doing copy 5 3 1 CD DVD This is copy function by usin...
Page 74: ...ck the left button of the mouse Please refer to the supported media list below DVD R manufacturer CD R Manufacturer Mitsubishi 16 recomended Mitsubishi 52 recomended TDK 16 recomended TDK 52 recomende...
Page 75: ...sk list or click mouse Start Start copy Press Enter or click mouse Reference not perfectly finished backup file will not be played back in PC 5 3 3 AVI Use USB memory or HDD to copy certain part Type...
Page 76: ...elow each item for detailed recording configuration 6 2 System Setup Time and Disk and authority can be configured 6 2 1 Date Time Time set should be configured prior to the recording Time configurati...
Page 77: ...rection key or mouse wheel To return to previous menu press ESC or click right mouse button It is same as OSD menu Daylight saving This menu is synchronized with time zone configuration menu It means...
Page 78: ...HDD recording file system It doesn t record automatically To apply the changed value user must press apply button 6 2 1 2 NTP Setup NTP Network Time Protocol make time of connected devices synchroniz...
Page 79: ...er Enable configure server ip Input IP address of NTP server or DVR set by NTP server In local network Interval Configure interval of time sync Caution If use NTP client mode user must set NTP on 6 2...
Page 80: ...days period of data Disk Full Alarm Warning If mounted Disk is full alarm warning to user 6 2 2 1 Disk Manager This is menu for the management of internal or external HDD Manage status bad block size...
Page 81: ...nter or scroll mouse wheel and notice window pops up and show user the message like below Caution will you remove Disk If Yes user will find the message Disk is removed on the bottom and Enable status...
Page 82: ...ture User1 can use PTZ Relay off power On N mike functions are available user 2 just can use menu and N mike functions Reference Admin Password is 12345 in factory default and from user 1 to 10 in ord...
Page 83: ...s Yes Authority User can use only authorized functions If user 1 has PTZ use authority when pushing PTZ button authority check window will pop up and user should inpt the password and if it is correct...
Page 84: ...n manage 16 DVRs Registration order for Remote controller Make remote controller direction to DVR Press ID button and figure in accordance with configured remote controller ID If IDs are matached corr...
Page 85: ...Config Import Export This function can allow user to save the configuration DVR by USB and can export its value to other DVR Config Export can save the configuration value of DVR by USB Please run Con...
Page 86: ...mport the configuration value of the saved DVR Please insert USB memory which containing Export configuration data to USB port of the DVR click import button on Config Import Export menu All relevant...
Page 87: ...all User Manual System Information Display recording status and system configuration of DVR Caution This function is allowed only for system administrator 6 3 Network This is menu for configuring netw...
Page 88: ...IP Addr IP Address is for the connection between DVR and Control Center and also for web connectionfrom Webviewer But Net Mask Gateway should be configured Net Mask Net Mask makes range of IP address...
Page 89: ...nfigure user ID and Password Status It shows connection status of DVR 6 3 2 WRS If eDVR is connected to Cable modem or xDSL modem IP address is changed at every connection to ISP In this case changed...
Page 90: ...www webgateinc com or mycam to 6 3 3 Radius It makes to manage account information from several different DVRs to one account using Radius server Please ask to Administrator before you use it To set R...
Page 91: ...nfiguring each camera connected to DVR There are name Status Color balck or white Brightness Contrast PTZ etc Caution NTSC and PAL camera can not be used at the same time If changing the camera from N...
Page 92: ...rs press 6 4 1 2 Using Channel Configure wether using camera or not After pressing Enter select it using left right key or mouse wheel If user wants to enhance the recording or network monitoring spee...
Page 93: ...om 1 to 60seconds Multi mode HVRM T1600M HVRM T1600Q have predefined screen modes 4E 4channels 9B basic 7 channels and additional 2 channels 10A 10 channels In case of HVRM T800M HVRM T800Q it can use...
Page 94: ...Scan Monitor 6 4 3 Audio Setup With this menu user can configure Voice Channel Audio recording Volume Synchronization Mixing Voice Channel Select audio to use Recording Configure yes or no of using a...
Page 95: ...f configured certain channel input audio will be out on the selected channel only 6 4 4 Text Setup Configure Text in Device menu Recording Set On Off of recording against Text input Sync Text with Sel...
Page 96: ...an be different according to the manufacturer please refer to the product manual or seller Time out Following lines defined here means maximum number of text line from one data Even if there is standi...
Page 97: ...ity Stop Bit Data Bit In put suitable value according to external device 6 4 5 1 PTZ Setup Additional configuration for PTZ Address PoirtPTZ PTZ Home Shift to Preset assigned if it has no movement in...
Page 98: ...imezone with similar configuration window like schedule user can configure event per weekday time INDEX Schedule configuration from 1 to 50 Weekday Time Delete delete INDEX How to configure If configu...
Page 99: ...ly weekday time 6 5 2 Sync Event Configuration for Event synchronization Event Action There are 6 actions relay 1 to 4 buzz E Mail Action Duration Action Duration runs if relay and buzz are configured...
Page 100: ...Manual System Event source System Event source can configure Bad block Disk full Fan error authorization failure WRS registeration failure E Mail E mail address Input E mail address to get event alar...
Page 101: ...mail account should be SMTP authentication type For instance If SMTP server address is xxx test com e mail address should be xxxx test com Authentication Select USE SMTP AUTH SMTP Server SMTP Server a...
Page 102: ...authentication E Mail Address Input E mail address of receiver Sender Address Not mandatory but necessary for receiver to find out which DVR sends event Authentication Select NOT USE Including Pictur...
Page 103: ...or FTP server access FTP Directory Please configure the saving location of FTP server If user does not configure any directory value for saving Image will be saved as default route For custom saving p...
Page 104: ...n area User can select all or certain channel User Area When selecting per channel it can be configured 1 grid size is 22x15 and factory default value is All If pushing user area configuration window...
Page 105: ...M T800Q have 8 inputs and HVRM T400M has 4 inputs Sensor has 2 types Normal Open N O and Normal Close N C 6 5 5 Preset In PTZ function make configured preset work according to sensor input Please conf...
Page 106: ...vent recording one channel can record up to its max frame rate and if setting 2 channels as event recording their recording frame rate will be adjusted automatically Program There are 26 programs from...
Page 107: ...d as 0 fps Another channel can not use resource room as much as CIF 30fps It is because the channel configured as 0 fps needs 2 3fps at least for network Reference the relation in between general reco...
Page 108: ...rdance with the program 6 6 2 1 Manual Recording Only in manual event recording manual recording runs and when pressing REC button recording starts If you want schedule recording recording mode should...
Page 109: ...am Set recording program A Z Time Set time applicable Cancel Cancel per INDEX Configuration Configure INDEX weekday program time If selecting recording start time and end time on the table by mouse it...
Page 110: ...interlace On Off It works on Full Dq recording In On status screen vibration of paused Full D1 video will be reduced 6 6 2 3 Event recording setup Select resolution and frame rate and quality for even...
Page 111: ...o 50 Weekday Set weekday applicable Time Set time applicable Deletion Delete per INDEX Configuration Configured INDEX weekday time will be shown at once Select recording start time and end time in ord...
Page 112: ...rded images 7 1 System requriement Minimum Recommendation CPU Intel Pentium 4 3 0GHz Core2duo E6750 or higher Main Memory 1GB 2GB or higher Video Memory 128MB 512MB or higher Display 1280 x 1024 with...
Page 113: ...count menu user password can be changed Basic admin password is 12345 and user password is like 11111 22222 user10 is 00000 Valid password is 5 digit Authority configuration is almost all the same in...
Page 114: ...it is authorized with User ID Password input at Login page it moves to Monitor page At Monitor page monitor real time image of cameras connected to DVR or it can control PTZ camera Relay and use Micr...
Page 115: ...1channel mode double click on screen to return to previous division channels At division screen it can change screen location If 3channel image moves to 6ch drag 3ch image and drop on 6ch location so...
Page 116: ...or number of video 7 5 5 Relay opeartion It can On or Off Relay of the unit Click the number button to activate Ralay On then the incon changes from Blue to Orange color Disabled Relay button refers t...
Page 117: ...nutes of video by click Quick Recording button During Quick Recording recording time is indicated on video During video recording if click Quick Recording button to stop recording and open the dialogu...
Page 118: ...image to operate Pan Tilt At the middle click Left Right direction to control Pan and Click Up Down direction to control Tilt Click as far from the middle to activate Pan Tilt faster Zoom Focus Contr...
Page 119: ...r activate Audio listen button First default is Mute In case of listening Audio select pop up menu or button After cancelling mute control audio volume It can mix several channels of audio 7 5 10 Clos...
Page 120: ...le 1 2 2 Video Division Changing Channel Playback supports 1 4 9 and 16 divisional screens It can select division using menu on tip of page as above picture 32ch DVR can call the channel using Group m...
Page 121: ...mouse for the channel to print image saved and then click Print button Window comes to input Memo and click OK button to print the image through the printer connected Print material includes Printing...
Page 122: ...and relate to this unit 7 6 6 Saving time Checking Rec Capacity It indicates total capacity of HDD remains and shows Starting date Last date of recording Also it shows percentage for HDD capacity 7 6...
Page 123: ...ward Stop Play Move a frame forward It is the function to set play speed After click the button it can set the play speed 0 5x 1x 2x 4x 16x 32x 64x and All It is the function to set play area After cl...
Page 124: ...led in login screen to use Java viewer After an installation of Java manually select Java in below of Password window and login Then single screen of video channel 1 is displayed Multi screen display...
Page 125: ...w picture is Mobile viewer log in page To access log in page via mobile viewer please type the address like http IP mvmenu html Below image is accessed login page to http 211 53 133 187 mvmenu html To...
Page 126: ...page 1 CH Move to the previous channel 2 UP Move to upside of Pan Tilt movement 3 WIDE Zoom Out action 4 Move to left side of Pan Tile movement 6 Move to right side of Pan Tile movement 7 CH Move to...
Page 127: ...vity configuration of Screen 12 Check Covert configuration of Monitor 4 No recording 13 Check Disk Manager if HDD is mounted or not 14 Check recording configuration 5 No playback 15 Check recording co...
Page 128: ...ssary to contact the shop 30 In case of extraordinary working ex noise smell or fume 31 Connetor breakage of power cable 32 In case that rain or water is in the product 33 In case that liquid or forei...
Page 129: ...Internal check number internal check number Model number 1 1 2 digits Identify Model name of product 2 3 8 8 12 digits Webgate internal number 3 5 6 digits Manufacturing year 4 7 digits Manufacturing...
Page 130: ...ctors HVRM T1600M 16ch HVRM T800M 8ch HVRM T400M 4ch analog video inputs BNC connector Loop out Auto terminated loop out Main Video output Main output output via BNC DVI HVRM T1600M 1 4 9 10 16 mode H...
Page 131: ...input POS ATM support AVE VSI Pro Hydra support System Alarm Alarm source HDD fail HDD almost full Fan fail Pwd fail DDNS fail Alarm action Warning message buzzer e mail relay Audio Input output 4 RC...
Page 132: ...erature and Health Serial I O Serial port 1 RS 232C 2 RS 485 Sensor input HVRM T1600M 16 dry contact HVRM T800M 8 dry contact HVRM T400M 4 dry contact Relay output 2 relay Controller Device Front pane...
Page 133: ...5 levels Mode Manual Event Schedule Event Scheulde 24hrs 7day Playback Mode Instant playback Search Speed 240 fps without network playback 30fps with network playback Search Type Time Calender Event...
Page 134: ...aller than recording 1 JPEG for e mail sending or mobile Security User Level 1 admin 10 users User privilege Menu PTZ Relay PB Power on off Backup IP Filtering supported Storage Backup Storage Devices...
Page 135: ...layback Mobile Viewer Monitoring with PTZ iPhone BB supported CMS Control Center Standard max 1000 clients SDK ActiveX COM SDK Environmental Physical Dimension W 359 0 L 413 3 H 88 0 Operating tempera...
Page 136: ...Install User Manual Product size HVRM T1600M T800M T400M...
Page 137: ...Install User Manual HVRM T1600Q T800Q...
Page 138: ...Install User Manual HUNT ELECTRONIC USA INC 11790 Jersey Blvd Rancho Cucamonga CA 91730 Tel 888 993 4868 909 987 6999 Fax 909 987 6997 techsupport huntcctv com www huntcctv com...