background image


9. Displaying the Data Log; 
Factory setting: Off 


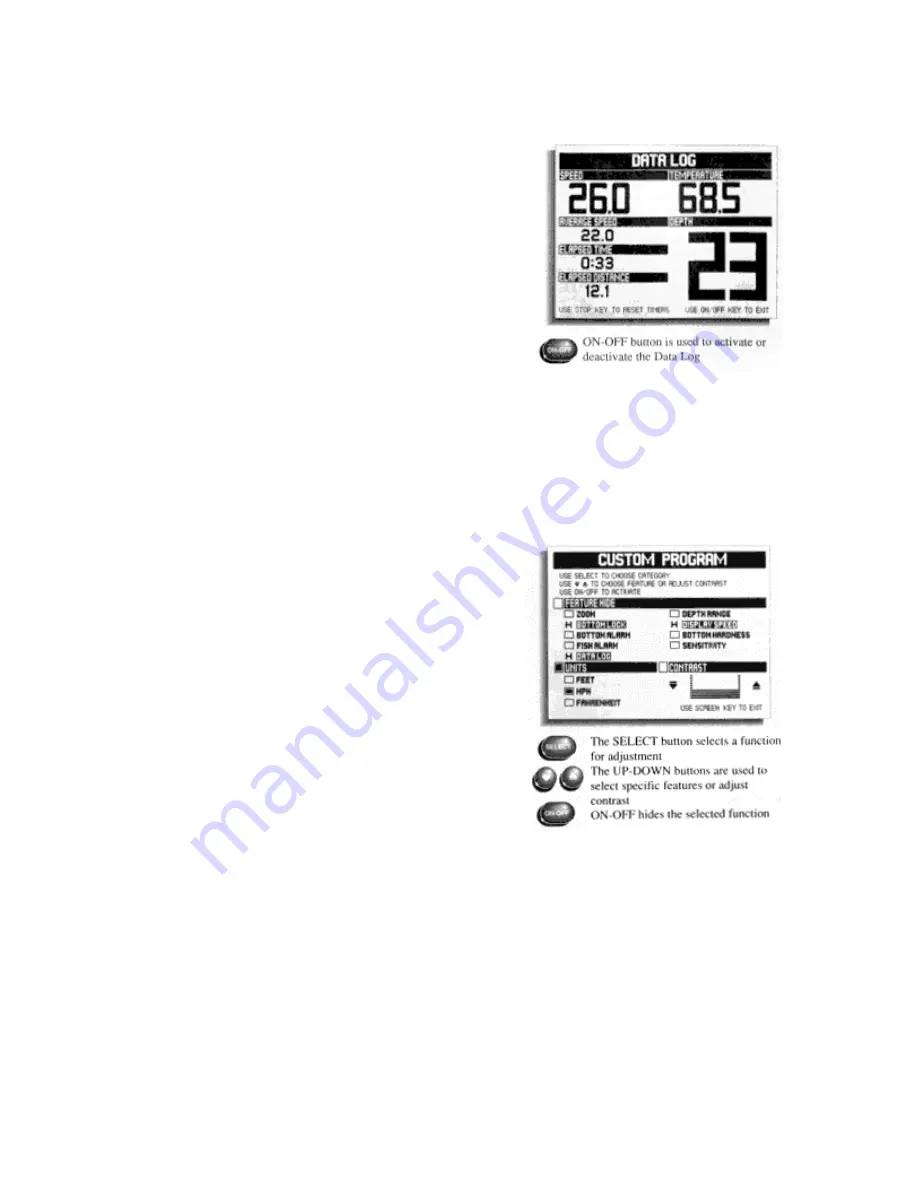
The Dimension 3 Data Log provides a full screen of 

information on current conditions. To display it, select DATA 
LOG and press ON-OFF. 
 

All log information is continuously updated as long as 

the Dimension 3 remains powered on. If you want to reset 
Average Speed, Elapsed Time, and Elapsed Distance, press the 
STOP button. 
 

Pressing ON-OFF exits the Data Log and returns you 

to normal Dimension 3 operation. 
 

NOTE: Data Log requires proper input from the temp 

and speed accessories on the transom of the boat. 


USING THE CUSTOM PROGRAM 


The Dimension 3 lets you customize three aspects of its operation: 

 
1. You can "hide" from the Select System any feature you 
never select. This means that, when you press the SELECT 
button, only those functions you use appear for further 
adjustment. 2. You can choose whether distances are 
measured in feet, meters, or fathoms; whether speed is shown 
as miles per hour, kilometers per hour, or knots; and whether 
temperatures are displayed in fahrenheit or centigrade. 3. You 
can adjust screen contrast to optimize viewability for your 
mounting location. 


To do any of these, press the SCREEN button and 

hold it for 3 seconds. Release it when the Custom Program 
menu appears. 
 
The SELECT button selects a function for adjustment The 
UP-DOWN buttons are used to select specific features or 
adjust contrast ON-OFF hides the selected function 


As noted on the top of the Custom Program screen, you can press the SELECT button to choose a 

category. Proceed as follows: 


You can "hide" seldom used features to reduce the features or menus accessed by the Select 

button. This allows you quicker access to those features you use frequently. To hide a feature, press the 
SELECT button until the box before FEATURE HIDE is blacked in. Then, press the Up or Down arrow to 
select the feature you want to hide, and press ON-OFF. When you move to another selection with the Up or 
Down arrow, notice that "H" now appears before the feature to remind you it is hidden. (You can repeat the 
process of selecting an item if you decide later that you want to restore it.) 


Summary of Contents for Piranha 3

Page 1: ......

Page 2: ...uding aluminum Please carefully consider the following before installing your transducer TRANSDUCER MOUNTING OPTIONS A Transom Mount The Humminbird high speed transducer allows the transducer element...

Page 3: ...bronz thru hull transducer has a threaded stem which installs through a hole drilled in the boat hull leaving the housing exposed under the boat This type of installation must be used for many boats...

Page 4: ...use a silicone sealant between the screwhead and bracket in order to prevent leaking See Figure C Step 2 BRACKET INSTALLATION Fiberglass Boats If your boat has a stepped transom located below and und...

Page 5: ...cally in the three slots found in the bracket It is important to use a silicone sealant between the screwhead and bracket in order to prevent leaking Step 3 TRANSDUCER PIVOT ASSEMBLY Assemble the pivo...

Page 6: ...the bracket Slide the O ring on to the headed pin and insert it through the two parts Assemble by screwing the x3 8 allen head screw into the end of the pin and tighten See Figure G Step 5 ANGLE ALLIG...

Page 7: ...h this type installation it is important that the transducer be mounted by someone familiar with the use of two part epoxy adhesives For this reason Techsonic Industries Inc will not be responsible fo...

Page 8: ...ye of the transducer The bubbles will disappear in a short time or can be removed by rubbing the transducer eye with your fingers while the transducer is in the water 4 If your instrument should fail...

Page 9: ...Install the mounting knobs and tighten snugly The unit can now be swiveled and tilted to any desired position...

Page 10: ...cket can also be mounted directly to the dash without the swivel mount however this method is not recommended since the unit cannot be rotated INSTALLING THE CABLES Your LCR comes equipped with Hummin...

Page 11: ...ole cover after determining the necessary wire length from the hole The power cable has a red lead to the positive post and the black lead to the negative post Install a 1 amp fuse between the red cab...

Page 12: ...l mount aside and drill the holes as marked 5 Mount the bracket using the mounting hardware supplied with your Dimension 3 Note Twist the bracket 90 degrees on the swivel base to access the mounting s...

Page 13: ...ater images on the Dimension 3 screen You should read this section and Section S Selecting Dimension 3 Functions as you first learn to use the Dimension 3 Doing so will ensure you make the most of its...

Page 14: ...utton controls the 2 position backlight Press LIGHT once to turn the backlight on dim pressing a second time will turn the backlight to bright Pressing a third time will turn the light off In either a...

Page 15: ...verse angle as shown below is as if you were forward and to the right of your boat looking back on the area you have covered Normal view is the reverse of this so objects to the right of your boat app...

Page 16: ...Screen with Reverse Angle activated shows the bottom that would normally be blocked...

Page 17: ...he SCREEN button once displays a front view much like using a rearview mirror Press it a second time for a side view like conventional 2dimensional sonar products display Press it again to return to t...

Page 18: ...d off by simply pressing ON OFF The menu Select System works in all three views although the following descriptions arc illustrated in the 3 4 view unless there are significant differences in operatio...

Page 19: ...he depth you have set DEPTH LIMIT MESSAGE As the bottom depth approaches the depth limit 240 a depth limit message appears in front and 3 4 views or when a menu item such as zoom or depth range is adj...

Page 20: ...ted for depth so shallow fish don t appear linger than deeper fish 5 Using Zoom Factory setting OFF Zoom provides an up close view To activate it select ZOOM Press the Up and Down arrows to move the Z...

Page 21: ...and the same view after zoom is activated Vertical bars also indicate zoomarea in the straight on view Horizontal lines indicate zoom area in the side view...

Page 22: ...rter vertical bar To use this feature select BOTTOM HARDNESS and press ON OFF NOTE Bottom Hardness is factory set for average bottom hardness You can adjust the scale so a known bottom will read as ha...

Page 23: ...hour or knots and whether temperatures are displayed in fahrenheit or centigrade 3 You can adjust screen contrast to optimize viewability for your mounting location To do any of these press the SCREE...

Page 24: ...ON OFF until the unit you want is displayed To adjust the contrast of the Dimension 3 display press the SELECT button until the box before CONTRAST is blacked in Then press the Up or Down arrow until...

Reviews:

Related manuals for Piranha 3