Hughes GXCEBOT Upgrade Instructions Download Page 2

WeaKnees.com

http://www.weaknees.com/

2.


DISCONNECTING THE DRIVE BAY
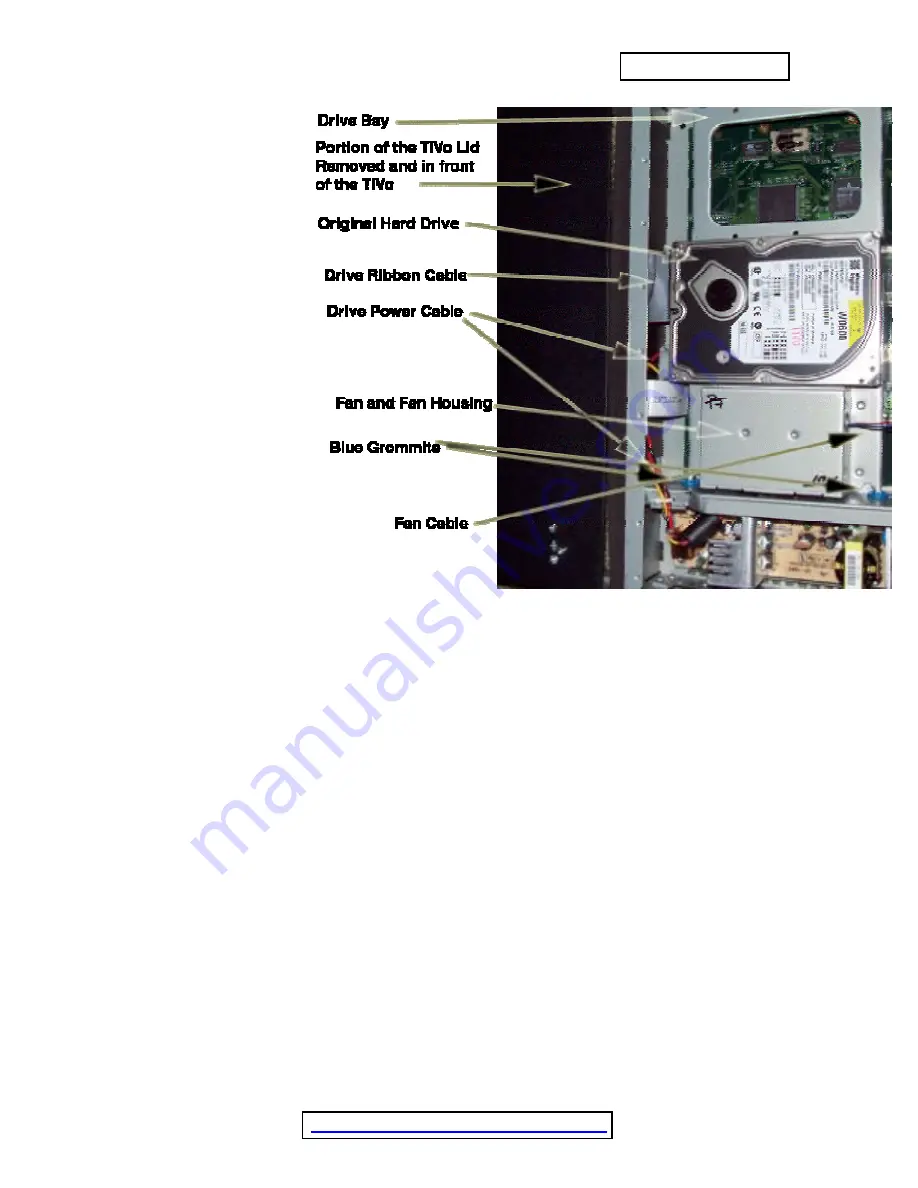
2.1.


With the cover off and looking underneath the front lip of the TiVo, you will

be able to see (1) one hard drive, (2) a ribbon cable that runs from the greenish
motherboard underneath the drive to the hard drive, (3) a multi-colored (red, black,
yellow) power cable that runs from the power supply to the hard drive, and (4) a fan cable
(two-wires; red/blue) that runs from the hard drive bay to the motherboard.

2.2.


Place the TiVo lid upright in front of the TiVo, forming a platform that will be

used to support the drive bay after you remove it.

2.3.


Gently remove the fan cable from the motherboard. Pull straight up and out.

2.4.


Using your larger Torx screwdriver, unscrew and remove the two screws on

the left-hand side of the drive bay (as you are looking at the front of the TiVo). Also
remove the gold inserts from the blue grommets and keep the two screws inside the gold-
colored inserts.

2.5.


Once the screws and inserts are removed, you will be able to lift the drive

bay up from the left side and slide it out of the two holes on the right side of the drive

Summary of Contents for GXCEBOT

Page 1: ...NEVER open the TiVo while the unit is plugged in and NEVER operate the TiVo if the lid is not securely fastened Please Note Opening the TiVo voids the warranty 1 OPENING THE TIVO 1 1 Unplug the power cord from the TiVo and wait five minutes for the TiVo to discharge Do not plug the TiVo back in until you are completely finished Be very careful of static electricity which can destroy your TiVo s in...

Page 2: ...herboard 2 2 Place the TiVo lid upright in front of the TiVo forming a platform that will be used to support the drive bay after you remove it 2 3 Gently remove the fan cable from the motherboard Pull straight up and out 2 4 Using your larger Torx screwdriver unscrew and remove the two screws on the left hand side of the drive bay as you are looking at the front of the TiVo Also remove the gold in...

Page 3: ... the hard drive ribbon cable longer gray cable with a blue or black connector from the hard drive by pulling on the hard plastic piece connected to the hard drive 3 FIXING THE JUMPER Pick up the hard drive bay and look at the hard drive with the label facing up and the empty power IDE cable connectors facing you Your TiVo s hard drive has a small white plastic jumper that is located between the ID...

Page 4: ...crewdriver and remove the four screws connecting the hard drive to the hard drive bay Do not confuse these screws with the four screws you removed from the back of the TiVo before removing the lid 4 3 Slide the hard drive that you just unscrewed to the end of the hard drive bay being sure that four screwholes in the drive are aligned with the four previously unused holes in the drive bay Reconnect...

Page 5: ... so that the drive connectors face the same way as the existing drive 5 2 You should now have two drives connected to the drive bay 6 REPLACING THE POWER CABLE AND IDE CABLE 6 1 Your upgrade kit contains two cables The first is a multi color black red yellow power splitter cable The second is a hard drive IDE cable You will first need to ADD the power cable to the end of the existing TiVo power ca...

Page 6: ... tuck the power cables down into the TiVo in front of the hard drives You will also want to tuck down the portion of the hard drive cable that is between the two drives You will also want to watch the fan cable the lone red blue cable to be sure that it hangs free 8 3 A word about the extra cables You will need to play with the excess cable to be sure that the excess cable is in front of or on top...

Page 7: ...hanced TiVo Please email us with any comments suggestions or complaints If you found the upgrade easy to install or even if you found it more difficult than you expected we d love to know If you found our service to be excellent or awful we want to know that too We re always looking to improve our products and services the more we hear from you the better Thanks very much ...

Reviews: