background image

IDU R2561 
User Guide 

4 Reference Manual 


Issue 01 (2019-02-28) 

Copyright ©  Huawei Technologies Co., Ltd. 

34 


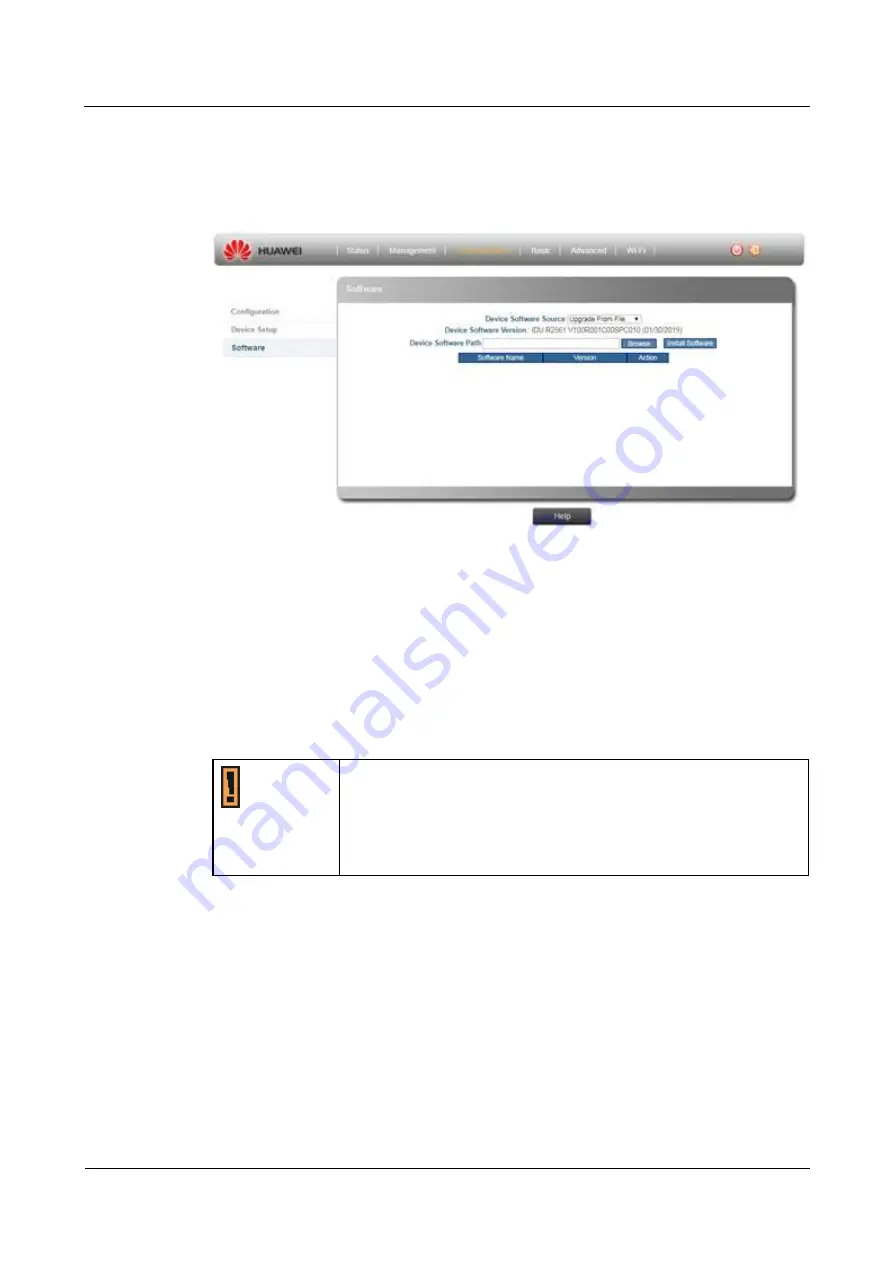
4.2.3 Personalization > Software 

Figure 4

22

 Software - Upgrade from file 


Upgrade From file:


a.


Click Browse button to select the IPK file. The IPK is the file with .ipkg, in each 
release you will get the ipk file release   
huawei-indoor-nomodem-unknown_V100R001C00SPCxxx_mips.ipk 

b.


Click Install Software button to install the selected IPK file. 


Upgrade From FOTA: (Remote management server):


Please manually press "

Check Version

" button and device will request the latest update 

from the remote access server. 

After checked, server will return message: 

Can't connect to Server/Latest Version, if your 

device SW is not up to date, you can do update or not.


While FW is upgrading, please keep your device powering on. Don't 
turn off the device to prevent the possible damage. 

The upgrade FW name must be alphabet (A-Z or a-z), digits (0-9), 
dot(.), minus sign (-), and underline (_). 

The upgrade FW file name extension must be ".ipk". 


4.3 Basic 

4.3.1 Basic > Firewall 

The modem provides extensive firewall protection by restricting connection parameters to 
limit the risk of intrusion and defending against a wide array of common hacker attacks. 

Summary of Contents for R2561

Page 1: ...IDU R2561 V100R001C00SPC012 User Guide Issue 01 Date 2020 07 06 HUAWEI TECHNOLOGIES CO LTD ...

Page 2: ...part of the products services and features described in this document may not be within the purchase scope or the usage scope Unless otherwise specified in the contract all statements information and recommendations in this document are provided AS IS without warranties guarantees or representations of any kind either express or implied The information in this document is subject to change without...

Page 3: ...terface 6 3 1 Login to Web GUI 6 3 2 Function Button 8 3 3 Status and device information 8 3 3 1 Status Device Status 8 3 3 2 Status Telephony Status 10 3 3 3 Status Network Status 11 3 3 4 Status About 12 3 4 Menu Structure 13 4 Reference Manual 15 4 1 Management 15 4 1 1 Management Setup Wizard 15 4 1 2 Management WAN Setup 17 4 1 3 Management LAN Setup 18 4 1 4 Management Telephony 21 4 1 5 Man...

Page 4: ...Port Forwarding 42 4 4 4 Advanced Port Triggering 43 4 4 5 Advanced Layer 7 Filtering 44 4 4 6 Advanced URL Filtering 45 4 4 7 Advanced ACL Filtering 46 4 4 8 Advanced Parental Control 48 4 4 9 Advanced Static Routing 49 4 5 Wi Fi 50 4 5 1 Wi Fi Basic 50 4 5 2 Wi Fi Advanced 53 4 5 3 Wi Fi WPS 55 4 5 4 Wi Fi Connected Client 56 4 6 Engineering 57 4 6 1 How to Login Engineering page 57 4 6 2 Engine...

Page 5: ... of basic electronics and mechanical assembly Network administrators should have a solid understanding of software installation procedures for network operating system and troubleshooting knowledge Please refer to the following pages for more detail 1 2 Conventions Used in this Document The following typographic conventions and symbols are used throughout this document Very important information F...

Page 6: ...IDU R2561 is an Indoor CPE Support 2 LAN ports and 1 VoIP port Support HTTPs Web GUI 2 2 Product Package Number Item Q ty 1 Indoor Router 1 2 Power Adapter 1 If any item of mentioned above is missing or damaged please contact our customer support immediately 2 3 Connectors WAN One RJ 45 connector for connecting to the ODU LAN port ...

Page 7: ...IDU R2561 User Guide 2 Introduction Issue 01 2019 02 28 Copyright Huawei Technologies Co Ltd 3 Figure 2 1 IDU Rear Panel Figure 2 2 IDU Front Panel ...

Page 8: ...nsmition Off Disable 2 4G Wi Fi 5 5G Green On Enable 5G Wi Fi Blinking Data transmition Off Disable 5G Wi Fi 6 Phone Green On Registered Blinking Busy Off De registered 2 5 Installation Before installing the IDU R2561 verify that you have all the items listed in the package checklist If any of the items is missing or damaged contact your service provider Only experienced installation professionals...

Page 9: ...pter to the IDU R2561 The PWR LED shines a steady green when device ready 4 Mounting the Device Step 2 Connect to the Internet Physical connection is as following Refer to Installing Device Instruction 1 Connect IDU R2561 WAN and ODU RJ45 via Ethernet cable 2 Use power adapter to connect IDU R2561 Power 3 Connect IDU R2561 ETHERNET PORTS and PC via Ethernet cable 4 PC will get default IP 192 168 1...

Page 10: ...awei to access advanced interface or enter the default Username user and Password LTE Endusr to access web management interface Default Log in information Username user Password LTE Endusr Log in protection If you key in the log in username or password error more than three times the device would locked you to enter username or password five minutes End You need to change the default Login passwor...

Page 11: ...e 3 Web Interface Issue 01 2019 02 28 Copyright Huawei Technologies Co Ltd 7 Figure 3 1 Web UI Normal Figure 3 2 Web UI V Incorrect Username or Password Figure 3 3 Web UI V Enter incorrect Username or Password three times ...

Page 12: ...ow steps 1 Open IE8 browser F12 developer tools 2 Browser Mode Internet Explorer 8 3 2 Function Button Function button is located at each Web UI page Top Right corner REBOOT Force device to initial a reboot LOGOUT Quickly logout the device device will back to log in page 3 3 Status and device information 3 3 1 Status Device Status This page is information only here displays the current status of t...

Page 13: ...rewall Here displayed your current firewall level there are three default configurations for you to select Low Medium High or you can select Custom to configure by your preference For more detail please refer to Basic Firewall section DMZ DMZ enabled or disabled UPnP UPnP enabled or disabled DDNS DDNS enabled or disabled Device Up Time The duration since the unit is powered on in format x day s ho...

Page 14: ...igure 3 5 Telephony Status SIP User IP Address IP address of the Session Initiation Protocol SIP an application layer control protocol that can establish modify and terminate multimedia sessions such as Internet telephony calls VOIP Status Registered or De registered in the SIP server This information also can be observing on the front panel voice line LED Account The SIP Account The account forma...

Page 15: ...ive WAN connection Connection Status Connected means Ethernet link is up and IP is obtained otherwise Disconnected is shown MAC Address The MAC address used for device s WAN network interface Connection Mode Determine how Ethernet ports behave for network connection IP Address WAN IP address of device Subnet Mask WAN subnet mask of device Default Gateway WAN default gateway of device Primary DNS S...

Page 16: ... 3 3 4 Status About This page displays the device default necessary information Those values are set by the manufacturer as the factory defaults Figure 3 7 About Product Name Product type 2 4GHz Wi Fi MAC 2 4GHz Wi Fi MAC address 5GHz Wi Fi MAC 5GHz Wi Fi MAC address Model Name Device model name Hardware Version Device HW version Software Version Device s SW FW version Serial Number Device s seria...

Page 17: ... can refer to the menu structure given below Status Device Status Telephony Status If VoIP is enabled Network Status About Management Setup Wizard WAN Setup LAN Setup Telephony Setup Diagnostics System Log Personalization Configuration Device Setup Software Basic Firewall DMZ UPnP Dynamic DNS VPN Passthrough Advanced MAC Filtering IP Filtering Port Forwarding Port Triggering Layer 7 Filtering URL ...

Page 18: ...IDU R2561 User Guide 3 Web Interface Issue 01 2019 02 28 Copyright Huawei Technologies Co Ltd 14 Advanced WPS Connected Client ...

Page 19: ... Guide 4 Reference Manual Issue 01 2019 02 28 Copyright Huawei Technologies Co Ltd 15 4 Reference Manual 4 1 Management 4 1 1 Management Setup Wizard Figure 4 1Setup Wizard Figure 4 2 Setup Wizard Set your Time Zone ...

Page 20: ...IDU R2561 User Guide 4 Reference Manual Issue 01 2019 02 28 Copyright Huawei Technologies Co Ltd 16 Figure 4 3 Setup Wizard Configure Security and Network Name Figure 4 4 Setup Wizard Summary ...

Page 21: ... Wi Fi Password then press Next The Service Set ID SSID that identifies the Wi Fi network The SSID is case sensitive and can consist of up to 32 alphanumeric characters Following characters is valid for Network Name SSID Step 4 Check your settings again and then press Save button to apply the change End Click the Next button to launch the Setup Wizard Click the Previous button to go back to the pr...

Page 22: ...ode One dedicated Ethernet port behaves as WAN connection via DHCP and the rest for LAN connection Set DNS Server Manually Use manually configured DNS server s for DNS query Primary DNS Server Primary DNS server for DNS query Secondary DNS Server Secondary DNS server for DNS query MTU Size Maximum transmission packet size of device s WAN interface 4 1 3 Management LAN Setup In this page you can ch...

Page 23: ...IDU R2561 User Guide 4 Reference Manual Issue 01 2019 02 28 Copyright Huawei Technologies Co Ltd 19 Figure 4 7 LAN Setup Disable Figure 4 8 LAN Setup Server Figure 4 9 LAN Setup Relay ...

Page 24: ...ervation The Lease Reservation page displays information on reserved IP addresses for leasing In this page you assign the specific IP addresses to the specific client device connected to the Ethernet ports and Wi Fi access point You can also add delete or modify the reservation settings Select Select an IP to delete Host Name Enter a name to the host MAC Address Add a device MAC address IP Address...

Page 25: ...leasing please click Apply button to confirm the Add or Del Click Undo to clear the changes that you have made to this window Click the Auto button auto update the current status 4 1 4 Management Telephony This chapter describes how to configure VoIP parameters Voice over Internet Protocol VoIP technology is a way of using the Internet to make phone calls You can make VoIP calls by connecting a re...

Page 26: ...User Guide 4 Reference Manual Issue 01 2019 02 28 Copyright Huawei Technologies Co Ltd 22 Figure 4 12 Telephony Tone Setting Selection Figure 4 13 Telephony Call Feature Settings Figure 4 14 Telephony Speed Dial ...

Page 27: ...heck box please checked to enable the VoIP function or un check to disable VoIP Account User account Username The SIP Session Initiation Protocol User name Its format depends on the SIP Server User Account The SIP Account Its format depends on the SIP Server Password The SIP user Password Password Confirm Enter the SIP user Password again Display Name ...

Page 28: ... DNS SRV mode When using the DNS SRV mode the behavior of the ability to maintain a list of resolved addresses that the application will be able to try one after the other in case of a send failure Registrar Port Port number of the SIP Server Outbound Proxy Port The number of the Port on which the outbound Proxy listens RTP Port Range Start Enter the listening start port number s for RTP traffic i...

Page 29: ...lue should between 300 800 Hz The device supports to set 1 or 2 frequency Dial Tone On Set dial tone continues for how long in a ring tone cycle please enter 0 4 seconds or asterisk to set continue on Dial Tone Off Set dial tone off for how long in a ring tone cycle please enter 0 10 seconds Busy Tone You can determine the busy tone sound here Frequency Quota You can set the busy tone frequency he...

Page 30: ...Flash Time Set the max Flash key press time if you press the Flash key over x seconds define in the column the action will be ignored Please enter 5 15 seconds Ring Tone TimeOut Set how long you want the ring tone exist Please enter 15 60 seconds Delay Time After On Hook Set a really hang up delay time When you hang up the call for x seconds the call will be really dropped Please enter 0 5 seconds...

Page 31: ...route to troubleshoot the network connection Figure 4 16 Diagnostics Ping Figure 4 17 Diagnostics Traceroute Diagnostic Tool Ping IP address Domain Name To issue a Test please enter the destination IP address and Domain name here Ping Count Please fill how many times the test need to be performed Range 1 50 Ping Packet Size Please fill how many buffer you want to add in a range of 4 1472 Bytes ...

Page 32: ...ddress and Domain name here TTL Time To Live value in the Traceroute test please fill in a test value for the packet path time and check what is the path time that a packet takes to the specified host Range 1 30 Example If the CPE fails to access the Internet run the traceroute command to preliminarily identify the problem To do so 1 Choose Management Diagnostics On the Diagnosis Tools set to Trac...

Page 33: ... the latest log If you just want to view the previously log please un checked it Export You can export your syslog out for the further analysis or issue tracking the export format will be the txt file with tar compress System Log Information System Start Reboot Reset Connection Manager WAN Connection WAN IP obtained VoIP Started Stopped Register to SIP server Call Out In Call session established W...

Page 34: ... connect to server Failed to download Packages or firmware TR069 Error FOTA Failed to upgrade firmware Failed to verify firmware TR069 Critical Operation Log Information Web login logout by user Web logout due to session timeout Web login password is changed DHCP server IP is changed Firewall level is changed Block Un block DHCP client FW upgrade from UI Wi Fi SSID is changed Wi Fi security is cha...

Page 35: ... parameters settings you had ever done All the changes different from factory default settings will be lost you will need to manually change the parameter again Restore Factory Settings To restore settings to factory defaults click the Restore Factory Settings button After applying factory defaults device will reboot Export Import Configuration File Import Export Password Before export the file or...

Page 36: ... ConfigurationFile You could browse a configuration file and import it back 1 UNABLE to export Configuration file on IE8 browser 2 The imported config file name must be alphabet A Z or a z digit 0 9 minus sign and underline _ 3 The imported config file name extension must be tar 4 2 2 Personalization Device Setup Figure 4 20 Device Setup Password Figure 4 21 Device Setup Device Time Device Name ...

Page 37: ...the device will keep the system log to recording meaningful dates and times for event entries The Device Time area displays the following information Enable NTP Allows user to connect what type of time server if any Current Local Time Displays the current time of the system clock Primary NTP Server You can change the Primary NTP server if the default NTP server is not work Secondary NTP Server You...

Page 38: ...ess Check Version button and device will request the latest update from the remote access server After checked server will return message Can t connect to Server Latest Version if your device SW is not up to date you can do update or not While FW is upgrading please keep your device powering on Don t turn off the device to prevent the possible damage The upgrade FW name must be alphabet A Z or a z...

Page 39: ...um standard High Custom If you chose Custom option you can customize the MAC Filtering IP Filtering and URL Filtering options Filtering Strategy The filtering rules you set will take precedence over the default inbound and outbound policies MAC Filtering Block or allow the client device s internet access via MAC address you can go Advanced MAC Filtering to edit whitelist and backlist IP Filtering ...

Page 40: ...ire unrestricted access to the Internet you can configure a specific client server as a demilitarized zone DMZ Figure 4 24 DMZ Enable DMZ Select this check box to enable or disable DMZ DMZ IP Address Set client server that acts as a neutral zone DMZ stands for Demilitarized Zone and separates an internal network from a public one in order to prevent outside access to private data The DMZ forwards ...

Page 41: ...enabled certain Windows applications would setup the port forwarding rule dynamically Click the Undo to clear the changes that you have made to this window Click the Apply to activate your changes 4 3 4 Basic Dynamic DNS Dynamic Domain Name System DNS is a mechanism used for translating host names for network nodes into IP addresses in real time This page allows enabling the Dynamic DNS and select...

Page 42: ...in name associated with an ever changing IP address When DDNS is enabled configure the following parameters Server Address Username Password Domain Name Service Provider Select the DDNS service provider from the drop down list Click the Undo to clear the changes that you have made to this window Clickthe Apply to activate your changes 4 3 5 Basic VPN Passthrough Figure 4 27 VPN Passthrough ...

Page 43: ...th an address suited to the foreign network Enable L2TP Passthrough Layer 2 Tunneling Protocol An open standard with multivendor interoperability and acceptance Click the Undo to clear the changes that you have made to this window Clickthe Apply to activate your changes 4 4 Advanced 4 4 1 Advanced MAC Filtering You can block access to the Internet from clients on the local network by MAC addresses...

Page 44: ...et Blacklist Whitelist MAC filtering Mode Select MAC filtering by Whitelist or Blacklist Blacklist Block internet access which listed on the blacklist Whitelist Will ONLY allow the units listed on the list to access the network Select Selecting this check box and press Del button to delete this row MAC address Please key in the client device which you want to do the MAC filtering MAC address Enabl...

Page 45: ...IP filtering Status Shows the IP filtering function is disable or enable To enable or disable you need to go to the Basic Firewall level to change the firewall setting Low Filtering disable Medium Filtering enable you can set filtering by blacklist or whitelist on IP filtering mode High Filtering enable you can set filtering by blacklist or whitelist on IP filtering mode Custom You can customize i...

Page 46: ...ply to activate your changes 4 4 3 Advanced Port Forwarding Port Forwarding instructs the router to which computer on the local area network to send data According to the port forwarding rules or setup the router sends the data from the external IP address port number to an internal IP address port number Port Forwarding rules are created per port The Port Forwarding page enables managing and setu...

Page 47: ...a way to automate port forwarding outbound traffic on predefined ports triggering ports causes inbound traffic to specific incoming ports to be dynamically forwarded to the initiating host while the outbound ports are in use This allows computers behind a NAT enabled router on a local network to provide services that would normally require the computer to have a fixed address on the local network ...

Page 48: ...ger for the specific application Use the Add or Del buttons to add the rule to the group or clear it from the group please click Apply button to confirm the Add or Del Click the Undo to clear the changes that you have made to this window Click the Apply to activate your changes 4 4 5 Advanced Layer 7 Filtering Figure 4 32 Layer 7 Filtering Select Select this check box and press Del button to delet...

Page 49: ...eed to go to the Basic Firewall level to change the firewall setting Low Filtering disable Medium Filtering enable you can set filtering by blacklist or whitelist on URL filtering mode High Filtering enable you can set filtering by blacklist or whitelist on URL filtering mode Custom You can customize if you want to Disable or set Blacklist Whitelist URL filtering mode Select URL filtering by White...

Page 50: ...se the Add or Del buttons to add the rule to the group or clear it from the group please click Apply button to confirm the Add or Del Click the Undo to clear the changes that you have made to this window Click the Apply to activate your changes 4 4 7 Advanced ACL Filtering Figure 4 34 ACL Filtering 1 Figure 4 35 ACL Filtering 2 Figure 4 36 ACL Filtering 3 ...

Page 51: ...irection for the filter LAN to Device LAN to WAN WAN to LAN WAN to Device Src IP Please define the start and end source IP address that the filter rule applies Src Port Please fill in the source port number range Dst IP Please define the start and end destination IP address that the filter rule applies Dst Port Please fill in the destination port number range Protocol Please select which type of p...

Page 52: ...your changes 4 4 8 Advanced Parental Control Figure 4 37 Parental Control Select Select this check box and press Del button to delete this row Type Which type you want to control Source Please fill in the source IP MAC address for the route Block Time Choose time to control the out going traffic Use the Add or Del buttons to add the rule to the group or clear it from the group please click Apply b...

Page 53: ...ll in the subnet mask of the destination IP network Gateway Please fill in Gateway IP of the destination IP network Only for LAN Interface The gateway may be a router or switch on the same network segment as the device s LAN WAN interface Please indicate the interface for setting the route rule Use the Add or Del buttons to add the rule to the group or clear it from the group please click Apply bu...

Page 54: ...4 40 Wi Fi Basic 2 Enable Wi Fi Enables disables the Wi Fi radio 2 4GHz Wi Fi Enable 2 4GHz Wi Fi Enables disables the 2 4GHz Wi Fi radio Network Name SSID1 SSID2 SSID3 SSID4 The Service Set ID SSID that identifies the Wi Fi network The SSID is case sensitive and can consist of up to 32 alphanumeric characters Following characters is valid for Network Name SSID ...

Page 55: ... and management resources available and the software support provided on wireless clients There are security options available When you select the security type from the list the required settings are displayed The option None together with encryption disabled is equivalent to no security all clients will be able to immediately connect to the Wi Fi network The following security options are availa...

Page 56: ...ms The security mechanism employed depends on the level of security required the network and management resources available and the software support provided on wireless clients There are security options available When you select the security type from the list the required settings are displayed The option None together with encryption disabled is equivalent to no security all clients will be ab...

Page 57: ... g n is supported HT Mode The HT mode is channel bandwidth You can select 20MHz or 20 40MHz to affect the performance on your network Radio Channel The radio channel is used by the unit and its clients to communicate with each other This channel must be the same on the unit and all of its wireless clients The available channel settings are limited by local regulations Power Level The power level H...

Page 58: ...o affect the performance on your network Radio Channel The radio channel is used by the unit and its clients to communicate with each other This channel must be the same on the unit and all of its wireless clients The available channel settings are limited by local regulations Power Level The power level High Middle Low stands for Wi Fi Tx power you can adjust it base on your environment condition...

Page 59: ...ected Setup networks a unique PIN Personal Identification Number will be required for each device to join the network PIN code Another client would provide 4 or 8 PIN codes Please insert the specific WPS client PIN code accordingly and the start icon would show up Start After input the PIN code then press the start WPS will start and trying to connecting with the available clients 5GHz Wi Fi 5G su...

Page 60: ...nsert the specific WPS client PIN code accordingly and the start icon would show up Start After input the PIN code then press the start WPS will start and trying to connecting with the available clients 4 5 4 Wi Fi Connected Client Figure 4 44 Connected Client Device Name Wi Fi client s name IP Address Wi Fi client gotten IP address from device MAC Address Wi Fi client s MAC address Mode Wi Fi cli...

Page 61: ...er and enter the default IP address of the device which is 192 168 1 1 Figure 4 45 Login page Step 2 Enter the advanced user login credentials to access web management interface Default Log in information Username admin Password IDU huawei Step 3 Click the Engineering menu End You need to change the default Login password while the first time log in Pleasechange the default passwordto protect your...

Page 62: ...IDU R2561 User Guide 4 Reference Manual Issue 01 2019 02 28 Copyright Huawei Technologies Co Ltd 58 4 6 2 Engineering DM Settings Figure 4 47 DM Settings TR069 Figure 4 48 DM Settings FOTA ...

Page 63: ...eriodic Inform Interval This field is enabled only when Periodic Inform Enabled is enabled It defines the time in seconds between a successful connection with ACS and a new attempt to connect to ACS Connection Request User Name Enter the user name for authenticate incoming connection requests Connection Request Password Enter the password for authenticate incoming connection requests FOTA Packages...

Page 64: ... relocate the receiving antenna Increase the separation between the equipment and receiver Connect the equipment into an outlet on a circuit different from that to which the receiver is connected Consult the dealer or an experienced radio TV technician for help FCC Caution Any changes or modifications not expressly approved by the party responsible for compliance could void the user s authority to...

Reviews: