background image

4

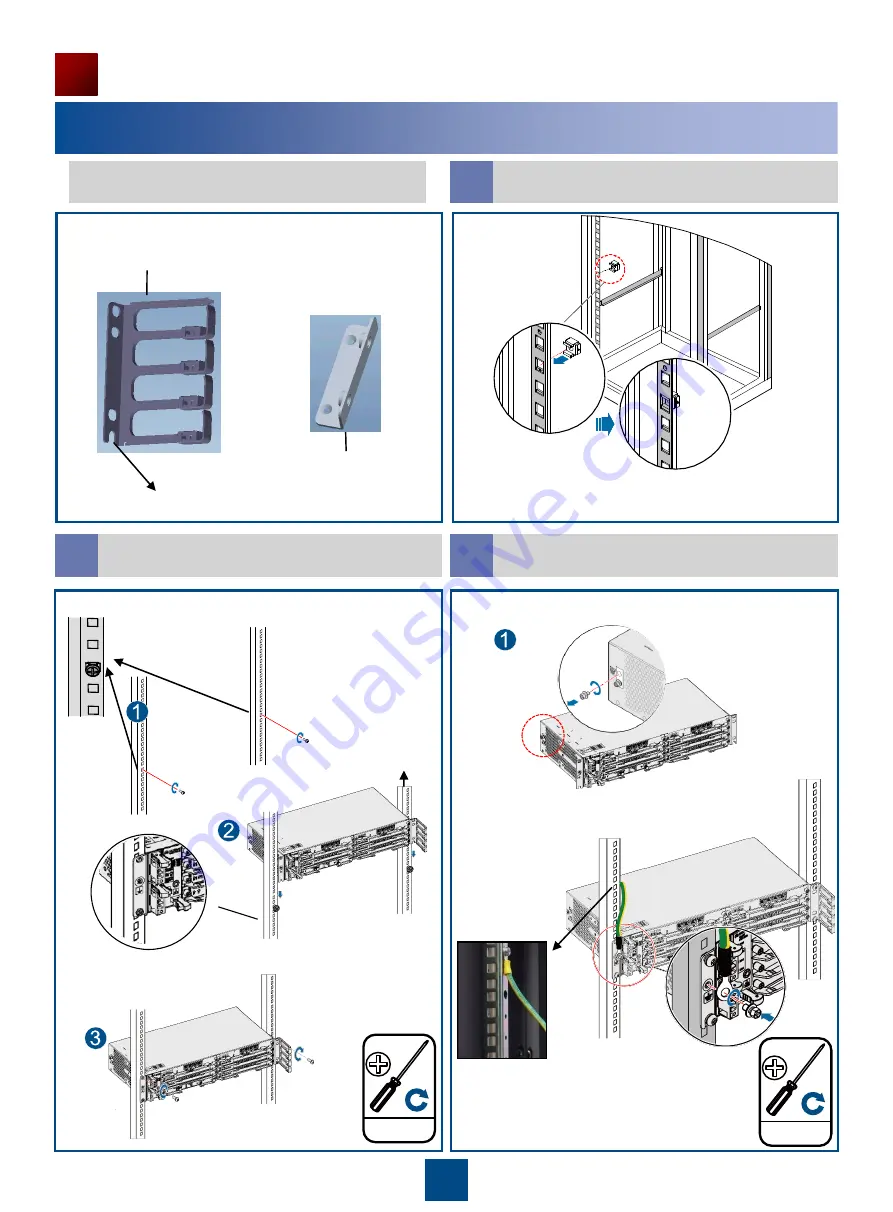
Installing the chassis

1

Scenario I

: Installing the Chassis in a 

19-Inch Cabinet

Installing the chassis in the cabinet

b

Installing the PGND cable

c

Introduction to the cable guiding frame

Fixing the floating nuts

a

Mark the positions where floating nuts are to be 
installed, and install four floating nuts on both sides of 
the rack.

Part 1 (cable 
guiding frame)

2. Place the chassis's 
mounting ears and 
cabling rack U-shaped 
slots over the screws, 
tighten the screws at the 
bottom.

1.Hang the screws of 
the mounting ears on 
the chassis to the rack 
loosely.

3. use screws to tighten 
the top of the chassis.

1. Remove one screw for installing PGND cable 

before 

installing the chassis in the cabinet

.

Part 1 (for 19-inch 
cabinets, ETSI cabinets, 
and open racks)

U-shaped interfaces 
used for prefixing

Part 3 (used to connect the 
cable tray to the chassis 
installed on the middle 
columns of an N63B 
cabinet)

3.0

±

0.3 N·M

M6

To the 
grounding point 
of the cabinet 
column

2. Install the PGND to the chassis.

1.2

±

0.12 N·M

M4

Summary of Contents for OptiX PTN 950

Page 1: ...HUAWEI TECHNOLOGIES CO LTD OptiX PTN 950 Packet Transport Platform of PTN Series Quick Installation Guide Issue 17 Date 2017 08 20 ...

Page 2: ... and features described in this document may not be within the purchase scope or the usage scope Unless otherwise specified in the contract all statements information and recommendations in this document are provided AS IS without warranties guarantees or representations of any kind either express or implied The information in this document is subject to change without notice Every effort has been...

Page 3: ...satllation Powering On the Equipment End Start Check Fiber Connection Powering on the Equipment Preparation for Installation Installing the Chassis in a 19 Inch Cabinet Installing the Chassis Checking Cable Connectivity Common Cables for the Chassis Installing the Protection Grounding Cable Mandatory Installing Power Cable Mandatory Installing the E1 Cable Installing the Ethernet Service Cable Ins...

Page 4: ...two horizontal beams If the cable trough does not contain any beams the binding intervals between cable ties cannot exceed 250 mm Verify that the equipment room power supply ground cables and optical cables are ready for installation Start the installation according to the engineering design documents after confirming that conditions are met Refer to the Installation Guide for information about sp...

Page 5: ...r Wire stripper Network cable crimping tool Diagonal pliers Crimping tool Needle nose pliers Bayonet wrench Paper knife Marker Soldering iron Heat gun Multimeter ESD gloves Binding strap Insulation tape ESD wrist strap Punching wire pliers Cleaner Tools for Installation COAX stripper Cable tester Optical power meter BER tester ...

Page 6: ...face E1 interface NM interface Ethernet service interface Installation holes for N63E 19 inch cabinet 10 The PTN 950 is available in two models common chassis and extended chassis which are 2 U and 3 U high respectively Installation modes of the two types of chassis are basically the same therefore the common chassis is used as an example to describe the installation of the PTN 950 in this documen...

Page 7: ...d cabling rack U shaped slots over the screws tighten the screws at the bottom 1 Hang the screws of the mounting ears on the chassis to the rack loosely 3 use screws to tighten the top of the chassis 1 Remove one screw for installing PGND cable before installing the chassis in the cabinet Part 1 for 19 inch cabinets ETSI cabinets and open racks U shaped interfaces used for prefixing Part 3 used to...

Page 8: ...in the cabinet d To the grounding point on the rear rack column of the cabinet Part 1 cable guiding frame M6 screw assembly with flat washers Before installing the chassis in an ETSI cabinet adjust the mounting holes according to the cabinet type 3 0 0 3 N M M6 Mark the positions where floating nuts are to be installed and install four floating nuts on both sides of the rack 1 2 0 12 N M M4 3 0 0 ...

Page 9: ...of the chassis If the PGND cable is installed in the19 inch cabinet connect the PGND cable to the grounding point of the left mounting ear of the chassis Installing and Routing Cables 1Common Cables for the Chassis 2Installing the PGND Cable Mandatory PGND cable Power cable Non shielded network cable Shield network cable 120 ohm E1 cable 75 ohm E1 cable Fiber ...

Page 10: ...Allowable Voltage Range When installing or routing cables refer to the engineering document on site to install and connect the power cable at the opposite end 0 22 0 03 N M It is recommended that one circuit breaker fuse in the power distribution cabinet corresponds to one set of equipment subrack That is one circuit breaker in the power distribution cabinet outputs one channel of power supply whi...

Page 11: ...ment on site to install and connect the E1 cable service network cable and fiber at the opposite end After inserting the power connector tighten the latches on both sides to prevent the connector from disconnected Among the four power cables the upper two form one pair and the lower two the other pair Either pair of power cables corresponds to a power supply Therefore these power cables must be pr...

Page 12: ...adius The minimum curvature radius of a 2 mm fiber is 40 mm As the Ethernet service interfaces support the adaptive function the network cable can be either crossover cable or straight through cable The straight through cable is recommended If the equipment needs to install telephone wires install them after installing the Ethernet service cable The installation is similar 5Installing the Ethernet...

Page 13: ...ignals Green 4 Tx negative of external clock Grounding Grounding Blue 5 Tx positive of external clock White blue 6 Not defined RS422 input output positive of 1PPS signals RS422 input output positive of DCLS time signals White brown 7 RS422 input output negative of time information Not defined Brown 8 RS422 input output positive of time information Installing the NM Cable 8Installing the External C...

Page 14: ... Effect of Installation in a 19 Inch Cabinet The figure above shows expected cabling for the PTN 950 in a 19 inch open rack and it can only be used for reference Cabling for the PTN 950 in other cabinet is similar ...

Page 15: ...he DDF and connect the receive end RX of the BER tester to the transmit end TX of the trunk cable on the DDF Then observe the indicator on the E1 cable tester corresponding to each channel and check whether each indicator is on as expected and whether bit errors are displayed on the BER tester When the indicator on the E1 cable tester is on green it indicates that the connectivity of the E1 cable ...

Page 16: ...al cables should be routed correctly in the cabinet 12 The cables outside the cabinet should be routed as follows The cables should be placed tidily and be free of crossover In the case of a cable ladder the cables should be bound onto the ladder beam tidily If the cable tray is 0 8 m or more higher than the cabinet top a cable ladder should be available on the cabinet top to support the cables an...

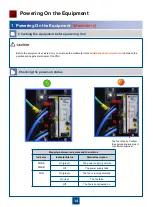
Page 17: ...it on Before the equipment is powered on you must use the multimeter to test whether a short circuit occurs between the positive and negative terminals of the PDU Mapping between indicators and their status Indicator Indicator Status Status Description PWRA PWRB On green The power supply is normal Off The power supply fails FAN On green The fan is running normally On red The fan fails Off The fan ...

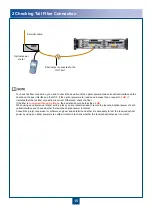
Page 18: ... the tail fiber connection is correct Otherwise check the fiber If the fiber is connected through a flange the deviation should be less than 2 dB When using an optical power meter during a test you are recommended to record the launched optical power of each optical interface and check whether the launched optical power is normal Consult the project supervisor or software engineer and determine wh...

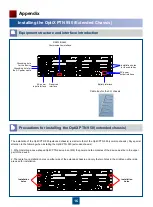
Page 19: ... are four installation holes on either side of the extended chassis and only the two holes in the middle on either side are used for installation 1 When installing a case shaped OptiX PTN device in an IMB the power and fan modules of the device must be in the upper part of the device DC power output interface AC power input interface Battery interface RS232 RS485 Communication interface Installati...

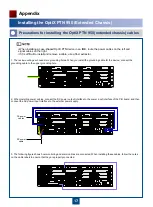
Page 20: ...d OptiX PTN device in an IMB route the power cables on the left and signal cables on the right If it is difficult to install and remove a cable use a fiber extractor 1 The rack mounting ear houses two grounding holes When you install the grounding cable for the device connect the grounding cable to the upper grounding hole 2 When installing power cables connect the DC power output interface to the...

Page 21: ...HUAWEI TECHNOLOGIES CO LTD Huawei Industrial Base Bantian Longgang Shenzhen 518129 People s Republic of China www huawei com ...

Reviews: