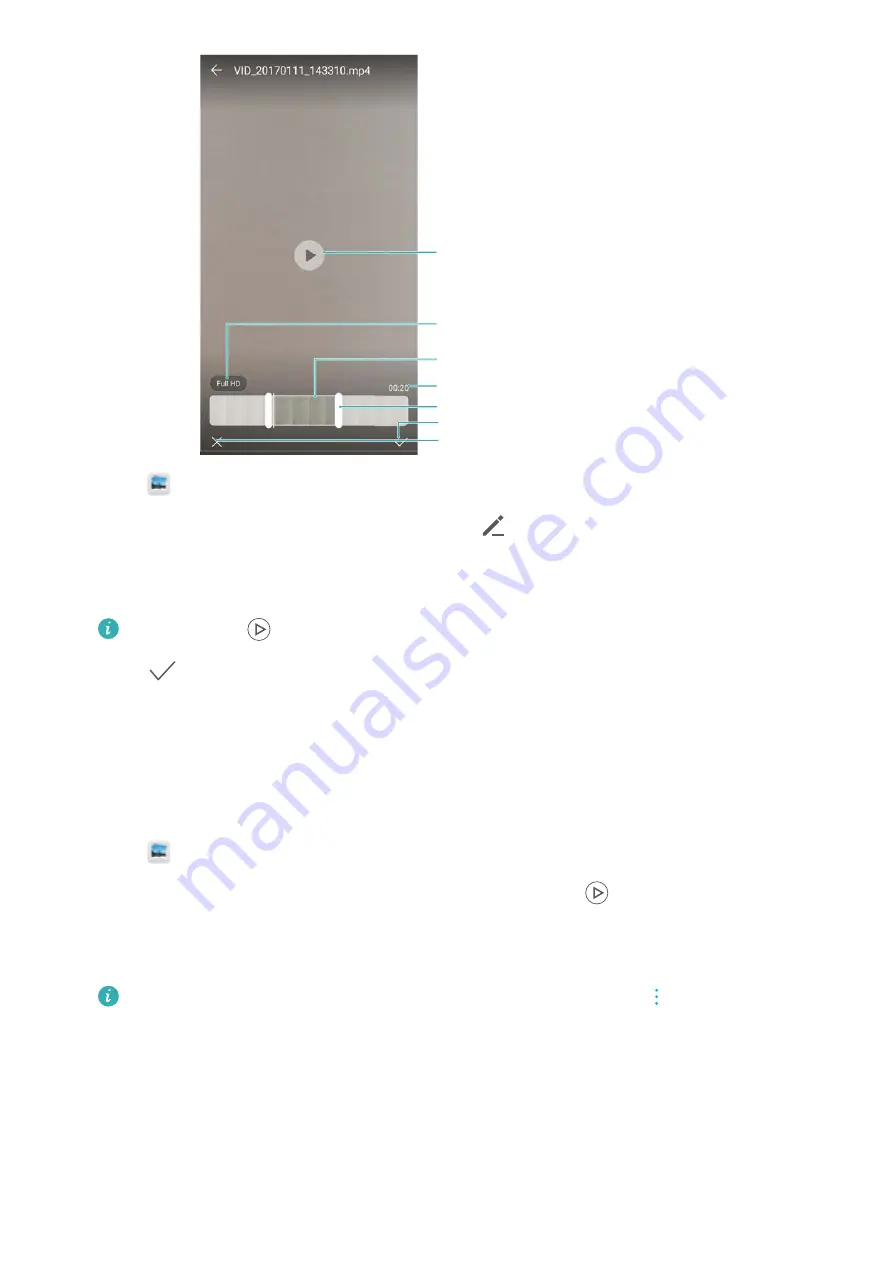
background image

Length of trimmed video

Abandon changes

Save changes

Play/pause key

Resolution settings

Trimmed video

Video trim slider

1

Open 

Gallery

.

2

Select the video that you want to edit and touch 

.

3

On the video editing screen, drag the sliders to select the portion of the video that you want to
keep.

You can touch 

 to preview the video.

4

Touch 

 to crop and save the video.

To change the resolution, select a resolution on the video editing screen. Videos with higher
resolution occupy more space of your device.

Cropping slow-motion videos

Use the video editing tool in Gallery to crop slow-motion videos.

1

Open 

Gallery

.

2

Touch the slow-motion video that you want to edit, and touch 

 to start playback.

3

Touch the screen to display the slow-motion editing interface. Drag the sliders to select the
portion you want to view in slow motion.

To save the edited slow-motion video as a separate video, touch 

 > 

Save slow-mo

file

 on the editing interface.

Configuring Gallery

Displaying the capture time and location

You can see the capture time and location when viewing the photos.

Camera and Gallery

73

Summary of Contents for Honor 9

Page 1: ...User Guide ...

Page 2: ...o the Internet 7 Viewing Recommended Settings 8 Screen and Display Home screen 9 Locking and unlocking the screen 18 Notification panel and status bar 20 Themes 23 Global search 23 Screenshot 25 Screen recording 30 Split screen mode 32 Using motion gestures 36 Eye comfort mode 37 Display settings 38 Network and Sharing Mobile Internet 40 Wi Fi 42 Bluetooth 44 NFC 46 Multi screen 47 VPNs 48 Using H...

Page 3: ...s 66 Viewing photos and videos 68 Organizing albums 69 Editing a photo 70 Editing Videos 72 Configuring Gallery 73 Calls and Contacts Making calls 75 Answering calls 77 Making a conference call 78 In call options 79 Managing call logs 80 Call settings 81 Creating a contact card 83 Creating a new contact 84 Importing and exporting contacts 85 Managing contacts 86 Searching for contacts 88 Sharing c...

Page 4: ...ng emails 96 Configuring Mail 97 Calendar and Notepad Changing the calendar view 98 Viewing global holidays 98 Birthday reminders 98 Creating an event 99 Sharing events 99 Deleting an event 99 Searching for events 100 Sending event invitations 100 Creating a note 100 Managing notes 101 Music and Video Listening to music 102 Searching for music 102 Deleting songs 103 Creating a playlist 103 Playing...

Page 5: ...g the system language 112 Changing the input method 112 Input method settings 113 Editing text 113 Airplane mode 114 Configuring the sound settings 114 One handed UI 115 Do not disturb mode 116 Viewing memory and storage information 117 Setting the date and time 117 Enabling location access 117 Restoring factory settings 118 OTA updates 118 Viewing product information 119 Accessibility features 12...

Page 6: ...es in this guide may not be supported by certain devices or carriers Symbols and definitions Description Highlights important information and tips and provides additional information Reminder Indicates potential problems that may arise if proper care or attention is not given such as device damage or data loss Warning Warns you about potential hazards that could cause serious injury 1 ...

Page 7: ...cidental swallowing or injury l The SIM eject pin should only be used to eject the SIM card tray Inserting the SIM eject pin into other holes may damage your device 1 Touch and hold the power button and touch to turn off your device 2 To remove the card tray insert the SIM eject pin included with your device into the small hole next to the card tray N a n o S I M microSD N a n o S I M N a n o S I ...

Page 8: ...n selected swipe down from the status bar to open the notification panel Touch File transfer via USB and then select Charge only Using your USB Type C port to charge other devices USB Type C connectors are reversible and can be inserted either way up It is possible to use your device to charge another device with a USB Type C cable 1 Use a USB Type C cable to connect your device to the other devic...

Page 9: ...ed by your device s indicator light and the battery icon in the status bar Status indicator Battery icon Battery status Blinking or steady red Less than 4 remaining Red Charging less than 10 remaining Orange Charging 10 90 remaining Green Charging at least 90 remaining If 100 is displayed next to the battery icon in the status bar or a charging complete message is displayed on the lock screen this...

Page 10: ...and usage time Displaying the remaining battery percentage in the status bar You can display the remaining battery percentage in the status bar in two ways l Open Phone Manager Touch and switch on Remaining battery percentage l Open Settings Touch Notification status bar Battery percentage Select Next to icon or In icon to display the remaining battery percentage in the chosen location Select Do n...

Page 11: ...restore from a backup l Follow the onscreen instructions to copy data from another device or touch SKIP OK to skip this step If you choose to skip this step you can still import data from another device later by touching Settings Advanced settings Data transfer 7 Follow the onscreen instructions to add your fingerprint You must also set a PIN or Password to unlock the screen before adding your fin...

Page 12: ...management 3 Toggle the switch Default mobile data next to the selected SIM card Setting the default SIM card You can select a default SIM card for outgoing calls This feature is only available on dual SIM phones 1 Open Settings 2 Touch Dual SIM management 3 Touch Default calling SIM and select your desired SIM card After you have selected the default SIM card SIM 1 and SIM 2 will no longer be dis...

Page 13: ...r to open the notification panel 2 Touch to enable mobile data Disable mobile data when not required so as to save battery power and reduce data usage Viewing Recommended Settings After you have completed the initial setup process your device will display a list of recommended settings Open Settings l Touch a recommended setting to configure it l Touch next to a recommended setting to remove it fr...

Page 14: ...es which home screen is displayed Dock bar Displays frequently used apps Basic screen gestures Use simple touchscreen gestures to perform a variety of tasks such as launch apps scroll through lists and enlarge images Touch Touch an item once For example touch to select an option or open an app Double touch Touch the target area of the screen twice in quick succession For example double touch an im...

Page 15: ...t on the screen For example spread two fingers apart to zoom in on a picture or web page Pinch fingers together Pinch two fingers together on the screen For example pinch two fingers together to zoom out on an image Enabling the Drawer home screen Use the Drawer home screen to store app icons in a separate app drawer Enabling the Drawer home screen 1 Open Settings 2 Touch Home screen style Drawer ...

Page 16: ... or free up some space Reverting to the standard home screen 1 Open Settings 2 Touch Home screen style Standard Switching to simple home screen Simple home screen uses a simple layout and large icons for easier use 1 Open Settings 2 Touch Advanced settings Simple mode and touch Screen and Display 11 ...

Page 17: ... appear in the top right corner of app icons The badge number indicates the number of new notifications Open the corresponding app to view notification details 1 On the home screen pinch two fingers together to open the home screen editor 2 Touch Settings Badge app icons 3 Toggle the corresponding switch to enable or disable notification badges Setting the home screen wallpaper Choose from a wide ...

Page 18: ... that your wallpaper can change automatically at the specified interval Managing home screen icons You can easily move or uninstall apps on the home screen Moving home screen icons On the home screen touch and hold an app icon or widget until your device vibrates You can then drag the app icon or widget to the desired location Uninstalling apps from the home screen On the home screen touch and hol...

Page 19: ...ome screen pinch two fingers together to open the home screen editor 2 Touch Settings and switch on Shake 3 Return to the home screen and open the home screen editor again Shake your device to rearrange apps so that gaps are filled Managing home screens You can customize home screens to your liking Adding home screens 1 On the home screen pinch two fingers together to open the home screen editor 2...

Page 20: ...ouch on a blank screen to delete it You cannot delete a home screen if it contains apps or widgets Moving home screens 1 On the home screen pinch two fingers together to open the home screen editor 2 Touch and hold the home screen you want to move and drag it to the desired location Screen and Display 15 ...

Page 21: ...ct a widget and drag it to a blank area on the home screen You must have enough space on the home screen If there is not enough space add another home screen or free up some space Moving widgets On the home screen touch and hold a widget until your device vibrates and then drag the widget to the desired location Deleting widgets On the home screen touch and hold a widget until your device vibrates...

Page 22: ...ame a folder open it and touch the folder name Adding apps to a folder 1 Open the folder 2 Touch 3 Select the apps you want to add and touch OK Removing apps from a folder 1 Open the folder 2 Touch 3 Deselect the apps you want to remove and touch OK You can also touch and hold an icon and drag it outside a folder to remove it Deleting folders 1 Open the folder 2 Touch 3 Deselect all of the apps an...

Page 23: ...ructions to create a password containing at least four characters and then touch OK l You can also use your fingerprint to unlock the screen Touch Enroll in the popup dialog to add your fingerprint For more information on using your fingerprint to unlock the screen see Set fingerprint l To remove the screen lock password touch None and follow the onscreen instructions Locking the screen Lock the s...

Page 24: ... Magazine unlock wallpapers with your friends 1 Swipe up from the bottom of the lock screen to display the Magazine unlock options 2 Touch and then select how you want to share the wallpaper and follow the onscreen instructions Adding offline wallpapers 1 Swipe up from the bottom of the lock screen to display the Magazine unlock options 2 Touch to access the subscriptions list 3 Touch Added by me ...

Page 25: ...he lock screen to directly open the camera Configuring your lock screen signature Configure a lock screen signature to personalize your lock screen 1 Open Settings 2 Touch Screen lock passwords Lock screen signature 3 Enter your lock screen signature and touch Save Your lock screen signature will be displayed on the lock screen Notification panel and status bar About the status bar Use the status ...

Page 26: ...nd tell you about your device s status including network connections signal strength battery and time Status icons may vary according to your region or carrier Signal strength No signal Connected over 4G Connected over 3G Connected over 2G Connected over HSPA Connected over HSPA Connected over LTE VoLTE enabled NFC enabled Roaming Airplane mode enabled Bluetooth enabled Connected over Wi Fi Wi Fi ...

Page 27: ...missing important information 1 Open Settings 2 Touch Notification status bar 3 Toggle the Notifications turn on screen switch Configuring the status bar Open Settings touch Notification status bar Toggle the Display carrier name Display network speed or Battery percentage switches to configure which information is displayed in the status bar Using shortcut switches to access settings Use shortcut...

Page 28: ...ur home screen by changing the wallpaper app icons and more Changing the theme 1 Open Themes 2 You can l Select a theme and follow the onscreen instructions to configure the settings l Touch Customize to mix and match lock screen methods wallpapers app icons and more Global search About global search Use global search to find apps contacts and messages on your device Swipe down on the home screen ...

Page 29: ...splay the search bar 2 Enter one or more keywords The results will be displayed underneath the search bar Alternatively open Messaging and enter one or more keywords in the search bar Searching for emails 1 Swipe down on the home screen to display the search bar 2 Enter one or more keywords such as the email subject The results will be displayed underneath the search bar Searching for apps 1 Swipe...

Page 30: ...ngs will be displayed under the search bar Screenshot Capturing the entire screen Taking a screenshot with the power and volume down buttons Press the Power button and Volume down button to take a full screenshot Screenshot shortcut Open the notification panel and then touch in the Shortcuts tab to take a full screenshot Screen and Display 25 ...

Page 31: ...ature allows you to capture part of the screen and save it as an image Knock the screen with your knuckle Keep your knuckle on the screen and draw the area you want to capture The area inside the blue line will be captured To use a predefined shape select the screenshot box at the top of the screen and then touch to save the screenshot Screen and Display 26 ...

Page 32: ...ture content that does not fit on the screen This is useful for sharing chat conversations web pages or large images Using the shortcuts tab 1 Open the notification panel and then touch to take a standard screenshot 2 After taking the screenshot touch to take a scrolling screenshot 3 The screen will scroll down automatically as your device captures a screenshot Screen and Display 27 ...

Page 33: ...ith your knuckle and hold it down Draw an S shape on the screen and lift your knuckle The screen will scroll down automatically as your device captures a screenshot Touch the screen to stop scrolling and capture the previous content Viewing editing deleting and sharing screenshots Screen and Display 28 ...

Page 34: ...e image 3 Touch to save the changes Sharing a screenshot 1 Open Gallery 2 On the Albums tab touch Screenshots 3 Select the screenshot you want to share and touch 4 Choose how you want to share the screenshot and follow the onscreen instructions Deleting a screenshot 1 Open Gallery 2 On the Albums tab touch Screenshots 3 Select the screenshot you want to delete and touch Screen and Display 29 ...

Page 35: ...to record footage and share it with friends Screen recorder Using the screen recorder shortcut switch To start a screen recording open the notification panel and touch Pressing buttons to record Press the Volume up button and Power button simultaneously Screen and Display 30 ...

Page 36: ...ll stop automatically when you make or receive a call l When making a screen recording you will not be able to use the recording feature in other applications l Longer recordings will take up more space on your device s internal storage so ensure there is enough space before recording You can stop a screen recording in three ways l Knock the screen twice with two knuckles Screen and Display 31 ...

Page 37: ...creen instructions Deleting screen recordings 1 Open Gallery 2 On the Albums tab touch Screenshots or Screen recordings 3 Touch and hold the screen recording that you want to delete and select 4 Touch Delete Configuring the default storage location for screen recordings Not all devices support microSD cards 1 Insert a microSD card into your device 2 Open Settings 3 Touch Memory storage Default loc...

Page 38: ... your knuckle and draw a line across the screen If the screen is in portrait view draw a horizontal line if the screen is in landscape view draw a vertical line Using swipe gestures to enable split screen mode Open an app that supports split screen mode and then swipe up from the bottom of the screen with two fingers Screen and Display 33 ...

Page 39: ...g to full screen mode In split screen mode touch and hold and swipe up or down to switch to full screen mode Swapping screens In split screen mode touch and then touch to switch the position of the screens Screen and Display 34 ...

Page 40: ...n the notification panel Touch to enable automatic screen rotation in split screen mode Accessing the home screen In split screen mode touch to access the home screen If navigation with one button is enabled touch and hold to access the home screen Screen and Display 35 ...

Page 41: ...sier to control your device Open Settings Touch Smart assistance Motion control and select the motions you want to enable l Flip Mute sounds and disable vibrations for incoming calls alarms and timers l Pick up Pick up your phone to reduce the ringtone volume for incoming calls alarms and timers Screen and Display 36 ...

Page 42: ...omfort When eye comfort mode is enabled will be displayed in the status bar Adjusting the color temperature Eye comfort mode reduces the amount of blue light emitted from the screen which may give the screen a slightly yellow hue You can adjust the color temperature to control the amount of blue light When Eye comfort is enabled swipe left or right on the color temperature slider to make the scree...

Page 43: ...re you go to bed 1 Open Settings 2 Touch Display Eye comfort 3 Switch on Schedule and configure the Start time and End time Display settings Changing the font size 1 Open Settings 2 Touch Display Font size and choose a font size Touch to decrease font size Touch to increase font size Drag slider to adjust font size Screen and Display 38 ...

Page 44: ...le or disable automatic screen brightness You can also manually adjust the screen brightness by dragging the slider The screen brightness will not change in different lighting conditions if automatic mode is not enabled Configuring the screen rotation settings When you rotate your device some apps will automatically adjust the screen orientation to make them easier to use 1 Open Settings 2 Touch D...

Page 45: ... a 4G SIM card 1 Open Settings 2 Touch More and switch on Enable 4G Enabling VoLTE Enable VoLTE Voice over LTE to make high quality audio and video calls over 4G networks l Features may vary depending on your carrier l Switch on 4G before enabling VoLTE l Make sure your device supports VoLTE and you have activated this feature from your carrier 1 Open Settings 2 Touch More Mobile network 3 Switch ...

Page 46: ...ttings interface touch Data limit and set the data limit When the shared data reaches the set value your device will stop sharing data and disable the hotspot automatically Sharing mobile data using a USB cable Due to the differences in operating systems you may need to install a device driver or set up a corresponding network connection before using this function Refer to your operating system gu...

Page 47: ...your personal data and financial information always exercise caution when connecting to public Wi Fi networks Connecting to the Internet using Wi Fi Connecting to a Wi Fi network 1 Go to Settings 2 Touch Wi Fi and turn on the Wi Fi switch Your device will display a list of available Wi Fi networks l Refresh the list Touch Scan to refresh the list of available Wi Fi networks l Manually add a networ...

Page 48: ... location This information is then used to enable or disable Wi Fi and connect to the Wi Fi network with the strongest signal Using a QR code to share your Wi Fi hotspot Create a QR code to share your device s Wi Fi hotspot with friends l QR codes can be generated for the following wireless encryption methods WPA WPA2 WEP WPA PSK and WPA2 PSK You cannot use a QR code to connect to WLAN networks th...

Page 49: ...e 3 On the receiving device select Accept from the popup dialog to accept the file transfer request Open the notification panel to view file transfer progress By default received files are saved to the Wi Fi Direct folder in Files Bluetooth Connecting to other devices using Bluetooth Enabling Bluetooth and pairing with other devices 1 Go to Settings 2 Touch Bluetooth and switch on Turn on Bluetoot...

Page 50: ...evice will search for nearby available Bluetooth devices 3 Select the receiving device 4 On the receiving device select Accept from the popup dialog to accept the file transfer request Open the notification panel to view file transfer progress By default received files are saved to the Bluetooth folder in Files Bluetooth settings Renaming your device When you enable Bluetooth your device model is ...

Page 51: ...abled SIM card from your carrier 1 Go to Near Field Communication NFC 2 Under Default payment app select your carrier s payment app and follow the onscreen instructions to add a bank card and add credit To make payments place your device against an NFC sensor at a payment terminal You can also make payments when your device is switched off To do this first ensure that Near Field Communication NFC ...

Page 52: ...am folder in Files Using NFC to pair two devices You can use NFC to rapidly connect two devices over Bluetooth or Wi Fi Direct or to share a Wi Fi or mobile data connection Check that the screen is unlocked on both devices and that NFC and Huawei Beam are both enabled 1 Enable Bluetooth on both devices 2 Hold your device and the receiving device back to back so that the NFC sensors on each device ...

Page 53: ...set top box 1 Go to Settings 2 Touch Smart assistance MirrorShare Select your display device or set top box from those listed Your device s screen will be mirrored to that device To use this feature you must first enable the Miracast feature on your display device or set top box For more information see the manual for your device To stop mirroring your screen touch Disconnect VPNs About VPNs A VPN...

Page 54: ... transfers Enabling Huawei Share 1 Swipe down from the status bar to open the notification panel 2 Touch Huawei Share l Touch the Huawei Share switch This enables Wi Fi and Bluetooth automatically l If you disable Wi Fi or Bluetooth the Huawei Share switch will turn off automatically Using Huawei Share to transfer files Ensure that Huawei Share is supported on both devices Huawei Share must be ena...

Page 55: ...ur computer Swipe down from the status bar to open the notification panel and then set the USB connection mode to Device file manager MTP Your computer will automatically install the necessary drivers To view files stored on your phone wait until the drivers have been installed and then click the new drive icon that appears on your computer the drive is named after your phone model If you are usin...

Page 56: ...eaders and other storage devices using a USB OTG cable l This feature is only available on phones that support USB OTG cables l If your phone has a USB Type C port purchase a micro USB to USB Type C adapter or use a USB OTG cable with a USB Type C connector 1 Connect your phone to a USB flash drive with a USB OTG cable USB On The Go cable 2 Touch Files Local USB drive to browse data on the flash d...

Page 57: ...ent parts of your fingertip 5 Touch OK To unlock the screen place your fingertip on the fingerprint sensor You will be asked to enter your backup PIN or password when you restart your device or if fingerprint recognition fails Adding deleting or renaming a fingerprint You can add five fingerprints You can also delete or rename fingerprints 1 Touch Settings 2 Touch Fingerprint ID 3 Enter the screen...

Page 58: ...ouch Phone Manager App lock once you have completed the settings and then place your finger on the fingerprint sensor To access a locked app from the home screen touch the app icon and place your fingertip on the fingerprint sensor Front facing Fingerprint Sensor The front facing fingerprint sensor serves as a navigation button and allows you to easily perform basic navigation gestures l Touch the...

Page 59: ...to share with others After the space is created you can install and use apps in this space and keep them away from the access of others Create user accounts Create multiple user accounts to keep your work and personal life separate 1 Open Settings 2 Touch Advanced settings Users 3 Touch Add user Enter a nickname and then touch ADD 4 Once you have added a user switch to the new user account and fol...

Page 60: ...ect Choose photo from Gallery to choose a profile picture from Gallery 5 Enter a new name and touch OK Creating a guest account Create a guest account so your friends can use your phone 1 Open Settings 2 Touch Advanced settings Users 3 Touch Add guest ADD You can also create a guest account from the lock screen Under Lock screen settings switch on Add users when device is locked and then swipe dow...

Page 61: ...n instructions to complete the settings and enroll a fingerprint for your PrivateSpace 5 Once set up is complete touch Switch to go to your PrivateSpace If the type of password you use for your PrivateSpace and MainSpace is the same you can quickly switch back and forth between the MainSpace and PrivateSpace from the lock screen with the password or fingerprint You can also touch Settings Advanced...

Page 62: ...ur microSD card touch Decrypt SD card and follow the onscreen instructions Setting microSD card password Encrypt your microSD card to prevent unauthorized access to your data You will be prompted to enter a password when the microSD card is inserted into another device l Not all microSD cards can be encrypted An error message may be displayed when you attempt to encrypt or unlock unsupported cards...

Page 63: ...the list of shooting modes Swipe left on the viewfinder to access the camera settings Photos and video recordings Taking a photo Geotagging photos Enable geotagging to record the location of photos and video recordings In Gallery you can view the shooting location of photos and videos In Gallery you can display all photos and videos on a map 1 Open Camera When opening Camera for the first time ena...

Page 64: ...o the ambient brightness A higher exposure produces brighter images Manually adjust the exposure In the viewfinder touch the screen and swipe up or down to adjust the exposure Turning on the flash Touch the flash icon in the top left corner of the viewfinder to turn on the flash Touch to display the four options l Automatically enables or disables the flash based on the ambient brightness l Disabl...

Page 65: ...r of captured photos will be displayed above 3 Release to stop the burst shooting You can take up to 100 photos in one burst sequence provided that there is enough storage space on your phone Select the best shot Touch the image thumbnail to view the image in Gallery and then touch to select a photo Touch and follow the onscreen instructions to save the photo Self timer Use a self timer to include...

Page 66: ... device detects a loud sound Shooting a video Shooting a video 1 Open Camera 2 Touch to switch to recording mode 3 Touch to start recording 4 In the process you can perform the following l Touch to pause recording Touch to continue recording l Touch to save the current scene as a photo 5 Touch to complete recording Zooming in and out Spread two fingers apart to zoom in or pinch them together to zo...

Page 67: ...camera to adjust the ISO automatically or you can adjust it manually Adjusting the shutter speed Touch S and drag the slider to set the shutter speed By default the shutter speed is set to Auto Adjusting the exposure compensation Touch EV to set the exposure compensation Select an exposure setting to increase or decrease the brightness Touch and hold the icon to lock the current exposure setting T...

Page 68: ... Wide aperture mode Use wide aperture mode for close up shots of objects and people You can adjust the focal point after taking a photo to blur the background and make the subject stand out For optimal results ensure that the subject is no more than 2 meters 6 ft from the camera 1 Open Camera 2 Touch on the upper screen to enter the wide aperture mode The wide aperture mode is only available in th...

Page 69: ... a higher value for a more noticeable effect Touch to save your settings To design you beauty solution you can perform the following l Modify your personal information In the camera settings touch Perfect selfie Edit personal info to update photos of your face from the front side and with your head lowered l Adjust your beauty settings In the camera settings touch Perfect selfie Set beauty effects...

Page 70: ...o photos Add watermarks to personalize your photos and help you remember where they were taken 1 Open Camera 2 Swipe right and touch Watermark When you add a watermark for the first time you will be prompted to connect to the Internet to obtain weather and location information 3 Touch and select the desired watermark type such as time or location You can add text to some watermarks Touch the flash...

Page 71: ... an update is available Touch and select the shooting mode that you want to update Your phone will download and install the latest version Deleting shooting modes Delete unwanted shooting modes to free up storage space Pre installed shooting modes cannot be deleted 1 Open Camera 2 Swipe right to display the list of shooting modes and touch 3 Shooting modes that can be deleted are indicated by the ...

Page 72: ...us Open Camera Swipe left on the screen Touch Volume button function and select Shutter Zoom or Focus as desired Configuring the touch and hold settings for the shutter By default touch and hold the shutter to take burst shots You can change the function of the shutter to adjust the focus Open Camera Swipe left on the screen Touch Touch hold shutter icon and select Burst shoot or Lock focal length...

Page 73: ... the Photos tab Photos and videos are automatically displayed in chronological order Touch Settings and switch on Show time to display the date when the photo was taken In the Photos tab zoom in or out to switch between month and day view Viewing photos and videos by location If GPS tag is switched on in Camera you can view photos and videos by location in Gallery Go to the Photos tab and touch to...

Page 74: ...tion album Files are deleted from their original album after they have been moved Highlights Your device will select photos and videos from Gallery to create personalized albums from which slideshows will then be automatically created Revisiting your fondest moments has never been easier l Enable GPS tag before taking a picture to enable geotagging l This feature requires an Internet connection l ...

Page 75: ...uch to restore the album to its original location Rearranging albums Change the order in which albums are displayed so you can always find your favorite photos You cannot rearrange Camera or Screenshots 1 Open Gallery 2 Go to the Albums tab and then touch and hold an album until appears on the left of all your albums 3 Touch and hold next to the album that you want to move and drag it to the desir...

Page 76: ...ally Mirror image Swipe screen to rotate image Portion of image to preserve after rotation l Crop an image Touch to select the crop ratio Drag the dotted edges to crop the image to the desired size Crop proportions Crop selection Crop grid corner l Add a filter Touch and select the desired filter l Accentuate colors Touch Select an area of the image to accentuate the color All other areas will be ...

Page 77: ...mage You can choose from various skin and eye enhancement effects l Apply mosaic effects Touch and select the desired mosaic effect l Draw graffiti Touch to select the brush and color l Add a watermark Touch to add a watermark and personalize your photo You can choose from time location weather activity and other watermarks l Add a label Touch and then select the desired label type and font You ca...

Page 78: ...eos with higher resolution occupy more space of your device Cropping slow motion videos Use the video editing tool in Gallery to crop slow motion videos 1 Open Gallery 2 Touch the slow motion video that you want to edit and touch to start playback 3 Touch the screen to display the slow motion editing interface Drag the sliders to select the portion you want to view in slow motion To save the edite...

Page 79: ... the following two settings l Switch on Show location When viewing a geotagged photo the photo s location will be displayed l Switch on Show time When viewing a photo the date and time at which the photo was taken will be displayed Camera and Gallery 74 ...

Page 80: ... the results above the dialer Hide dialer Backspace 3 Select the contact you want to call from the list If your device has dual SIM support touch 1 or 2 to make a call The call status will be displayed on the screen for example ringing or call forwarding 4 Touch to end the call To end a call using the power button go to Dialer touch Settings and then switch on Power button ends call Making a call ...

Page 81: ... the name of the contact you want to call The device will dial their number Making an emergency call In the event of an emergency you can make emergency calls from your device even without a SIM card However you must be in an area with cellular coverage 1 Open Dialer You can also touch Emergency from the lock screen 2 Enter the emergency number for your location in the dialer and then touch If you...

Page 82: ...e call l Touch to reject the call l Touch to reject the call and send an SMS l Touch to configure a callback reminder If you receive a call when you are entering text or using full screen mode for example when you are viewing an image or playing a game the incoming call will be displayed at the top of the screen in a floating window Touch to answer the call or to decline the call Switching between...

Page 83: ...ensure you have activated this service For details contact your carrier 1 Call the first participant 2 Once the call is connected touch and then dial the second participant s number The first participant will be placed on hold 3 When the second call is connected touch to start a conference call 4 Repeat steps 2 and 3 to add more people to the conference 5 During a call touch to view the list of pa...

Page 84: ...hree way call Show hide dialer End call Display your contacts View your notes View your calendar Place the current call on hold Enable hands free mode l Start a three way call Contact your carrier to find out how to use this feature l Adjust the volume Press the volume up button to increase the volume or the volume down button to decrease the volume Calls and Contacts 79 ...

Page 85: ...uch Send number to send the number as a text message Merging call logs Merge call logs belonging to the same contact or number to keep your call log organized 1 Open Dialer 2 Touch Settings Merge call log 3 Touch By contact Your device will automatically merge call logs belonging to the same contact or number Touch next to a call log to view detailed call log information Clearing the call log Open...

Page 86: ... allows you to take an incoming call when you are already in a call and switch between the two conversations You may need to contact your carrier to enable this feature 1 Open Dialer 2 Touch Settings 3 Touch Additional settings and switch on Call waiting If your device has dual SIM support touch SIM 1 or SIM 2 then Additional settings and switch on Call waiting When you receive an incoming call wh...

Page 87: ...e Send a predefined text message when you re not available to take a call 1 Open Dialer 2 Touch Settings Reject calls with SMS 3 Touch a predefined text message to edit the message content Once you have finished touch OK to save the message When you are unavailable to take an incoming call touch and select a predefined message to send to the caller Configuring the harassment filter The harassment ...

Page 88: ...lternatively go to Settings Sound touch Call ringtone vibration and then configure the ringtone settings Creating a contact card Create a contact card to quickly share your contact information You can share your contact information by scanning the QR code or by sending the contact card using an instant messaging service such as WhatsApp 1 Open Contacts 2 Touch Me 3 Set your profile picture Enter y...

Page 89: ...tion and then touch l If you add the contact s birthday your device will automatically create a birthday reminder in Calendar l The contact s photo will be displayed when the contact calls you Other contact information such as company name and job title will also be displayed You can also add phone numbers email addresses and other contact information in to your contacts in call log Messaging or E...

Page 90: ...d to Business cards Sharing your QR code Share your QR code with your friends so that they can add you to their contacts quickly On the contact details screen touch the QR code at the top of the screen to display your personal QR code Importing and exporting contacts Importing contacts from a storage device 1 Open Contacts 2 Touch Import Export Import from storage Calls and Contacts 85 ...

Page 91: ...atically import the contacts Exporting contacts to a SIM card 1 Open Contacts 2 Touch Import Export Export to SIM If your device has dual SIM support touch Import Export and choose the SIM card you want to export your contacts to 3 Select the contacts you want to export and touch 4 Touch Continue Managing contacts Editing a contact After creating a contact you can edit their contact information at...

Page 92: ...elete to delete the contact Deleting contact history Delete call records and text messages by contact to protect your privacy 1 Open Contacts 2 Select a contact and touch Erase traces Erase Your device will delete all call records and text messages for the selected contact Adding contacts to the blacklist 1 Open Contacts 2 Touch and hold the contact that you want to add to the blacklist and then t...

Page 93: ... in the search bar at the top of the contact list Search results will be displayed underneath You can enter multiple keywords such as Tom New York The system will find the contacts that meet the search criteria 3 Select a contact You can call them send a text message or edit their contact information If an error message is displayed or you are unable to search for a contact touch Organize contacts...

Page 94: ...ct details touch to add the contact to your favorites l Add contacts to your favorites in batch Touch Add on the favorites screen and choose the contact you want to add and then touch If the contact has already been added touch to add the contact to your favorites l Edit your favorites Touch Edit on the favorites screen Drag next to a contact to adjust the position of the contact in your favorites...

Page 95: ... the desired contact and touch Phone ringtone 3 Select the desired ringtone or music file and then touch Contact groups Creating a group 1 Open Contacts 2 Touch Groups and select 3 Enter the group name for example Family or Friends and touch OK 4 Touch Select the contacts you want to add to the group and touch Using smart groups Use smart groups to automatically group contacts by company location ...

Page 96: ...ouch Remove members to remove members from the group l Touch Delete group to delete the group l Touch Rename to edit the group name Sending a group text message or email 1 Open Contacts 2 Touch Groups and select which group you want to send a message or email to 3 Touch to send a message or to send an email Calls and Contacts 91 ...

Page 97: ...then turn on Cancel sending Your can cancel a message up to 6 seconds after it was sent Replying to a message 1 Open Messaging 2 Touch a message to view the message content Your device will automatically highlight phone numbers web addresses email addresses times and other information Touch highlighted information to access a range of shortcuts You can also l Save message attachments Touch and hol...

Page 98: ... threads touch and hold one of the threads that you want to delete Select the other threads and touch Delete Managing messages Delete unwanted messages forward messages to other contacts copy and paste message content and lock messages or add them to your favorites to prevent them from being deleted by accident 1 Open Messaging 2 In the list of message threads touch a contact name or phone number ...

Page 99: ...all as read l Mark a message as read Swipe left on the message that you want to mark as read and then touch Blocking spam messages 1 Open Messaging 2 In the list of message threads touch Blocked 3 Touch to configure the harassment filter settings and the blacklist Alternatively open Phone Manager and touch Blocked to configure the harassment filter settings and the blacklist Adding a message signa...

Page 100: ...hange account Microsoft Exchange is a corporate email management solution Some email service providers also provide individual and family Exchange accounts 1 Open Email 2 Touch Exchange 3 Enter your email address user name and password Touch Sign in 4 Follow the onscreen instructions to configure your account The system will automatically connect to the server and verify your settings Your Inbox w...

Page 101: ...r the email 3 You can check reply forward or delete your emails Open an email and swipe left or right on the screen to view the previous or next email To delete multiple emails go to the Inbox screen Select a contact picture or touch and hold an email to activate the email management interface Select the emails you want to delete and touch Saving email attachments Open an email and touch to previe...

Page 102: ... Enter a signature and touch OK Configuring email notifications 1 On the inbox screen touch Settings 2 Select the account you want to configure and switch Email notifications on 3 Select a notification sound or enable vibration alerts Configuring the email view On the inbox screen touch Settings General You can configure the following l Only download attachments over Wi Fi Switch Don t download im...

Page 103: ...he settings l Configure the first day of the week Touch Week starts on and configure the settings Viewing global holidays Enable global holidays to view public holiday information for different countries This feature requires an Internet connection 1 Open Calendar 2 Touch Settings Global holidays 3 Turn on the switch next to the country whose holidays you want to view Your phone will automatically...

Page 104: ... screen to create an event for the corresponding date and time Sharing events You can share events with your contacts 1 Open Calendar 2 Open the event that you want to share and touch 3 Choose how you want to share the event and follow the onscreen instructions You cannot share birthday reminders that are created automatically To share birthday information manually create an event and then share t...

Page 105: ...tending Before using this feature log in to your Exchange account 1 Open Calendar 2 Touch Enter the event name location and start and end time 3 Touch More Under Guests enter the exchange accounts of the people that you want to invite 4 Touch to save the event and send the invitations Event invitations are displayed in the notification panel To respond to an invitation touch Email guests Creating ...

Page 106: ...ctions Deleting a note You can delete a note in three ways l In the list of notes swipe left on the note that you want to delete and touch l Touch and hold a note to activate the note management interface Select the notes that you want to delete and touch l Touch the note that you want to delete and touch Delete Searching your notes You can search your notes in two ways l In the list of notes touc...

Page 107: ...ay or pause music Add the current song to favorites Play the next song Play the previous song Add to playlist Swipe left or right to view the track list or song lyrics Searching for music Searching for music on your internal storage or microSD card Sort your music by category or search with a keyword to find your music files quickly 1 Open Music 2 Touch All songs 3 Touch to search for and view mus...

Page 108: ... want to add and touch Touch next to the playlist to Rename or Delete the playlist Playing a video Playing a video 1 Open Videos 2 Touch the thumbnail to start the video During playback you can l Adjust the playback speed Touch 1 0X and drag the speed slider l Adjust the screen brightness Swipe up or down on the left hand side of the screen Swipe up to increase the brightness or swipe down to decr...

Page 109: ... trash To free up more storage space you can l Touch Storage manager to clear large files images and app data l Restore an app to its default settings Touch Application restore Select the app you want to restore and touch Delete The app will be restored to its default settings and all app specific data will be deleted 3 Touch Finish to exit Managing data usage Phone Manager comes with a data manag...

Page 110: ...e billing period you specify When you have used up your monthly allowance you will receive a reminder or your phone will disable mobile data l Data saver Enable data saver and choose the apps that you do not want to restrict data for Harassment filter Phone Manager comes with a harassment filter feature which can help you block unwanted calls and messages Open Phone Manager Touch Blocked and follo...

Page 111: ...o view the hardware and software using the most power l Touch Optimize to check for power consumption problems and optimize performance l Switch on Remaining battery percentage to display the remaining battery percentage in the status bar Reducing power consumption How can I effectively reduce my device s power consumption Use Phone Manager to optimize performance and reduce power consumption Open...

Page 112: ...er Phone Manager comes with a virus scanner feature that helps you remove malware 1 Open Phone Manager 2 Touch Virus scan Your device will automatically identify and remove malware Touch You can l Enable Cloud scan to scan your device using the latest antivirus database An Internet connection is required to access the online database l Enable Scan reminder to receive a notification when you have n...

Page 113: ...obile data usage 1 Open Phone Manager 2 Touch Lock screen cleanup 3 Turn on the switch next to the apps that you want to close The selected apps will close automatically when the screen is locked You may not receive new messages from email messaging and social networking apps after they are closed Configuring Phone Manager Adding shortcut for Phone Manager Create home screen shortcuts for frequent...

Page 114: ...ome screen allowing you log in to two accounts at the same time l Press and hold the App twin icon to disable the feature Clock Configuring the world clock Add multiple clocks to view the time in various cities around the world 1 Open Clock 2 From the World clock tab you can l Add a city Touch Enter a city name or select a city from the list l Set the system date and time Touch Date time and confi...

Page 115: ...ime zone is the same as the home time zone Sound recorder Recording sound 1 Open Recorder 2 Touch Start to start recording 3 Touch Pause or Resume to pause or resume the recording Add a tag Add a Quick tag or Photo tag for easy reference 4 Touch Stop and enter the name Then touch Save l Your device will not ring if you receive a call during a recording l When the Recorder app is recording sound in...

Page 116: ... the Recorder app is playing a recording in the background use the controller in the notification panel to play pause or cancel the recording Managing recordings Share rename and sort recordings 1 Open Recorder 2 Select Recordings 3 On the file management screen you can sort share and rename recordings Sort audio recordings Swipe down to open search box Touch to toggle speaker and earpiece playbac...

Page 117: ...nsure optimal performance To restart your device press and hold the power button for 3 seconds and then touch Restart To force your device to restart press and hold the power button until your device vibrates Changing the system language 1 Open Settings 2 Touch Advanced settings Language input 3 Touch Language and select the desired language If the language you are looking for is not listed touch ...

Page 118: ...methods touch Default keyboard and select the desired input method Your device will automatically enable the default input method when you enter text Editing text Select cut copy paste and share text l Selecting text Touch and hold the text until appears Drag and to select a section of text or touch Select all to select all text l Copying text Select the text you want to copy and touch Copy to cop...

Page 119: ... Fi manually Use any of the following methods to enable or disable airplane mode l Use the shortcut switch Swipe down from the status bar to open the notification panel Touch to display all shortcut switches and then switch on l Go to Settings Open Settings and toggle the Airplane mode switch When airplane mode is enabled the airplane mode icon will display in the status bar Configuring the sound ...

Page 120: ...one Choose a preset ringtone or a music file as the notification tone for messages emails and other notifications 1 Open Settings 2 Touch Sound Default notification sound and choose a new notification Ringtone or a Music on storage file Configuring dialpad touch tones 1 Open Settings 2 Touch Sound Dialer touch tones and select Default Melody or None One handed UI Enable Mini screen view or Shiftin...

Page 121: ...ming call and message settings Select Allow only priority interruptions Touch Define priority interruptions and then touch Calls and Messages to set the contact range from whom you want to receive calls or messages Selecting Whitelist only only sets the contact range Select Call message whitelist to set specific contacts l Enable alarm ringtones in do not disturb mode Select Alarms only to only al...

Page 122: ... sets the date and time using network provided values You can also set the time manually and display it in 12 hour or 24 hour formats 1 Open Settings 2 Touch Advanced settings Date time You can l Set the time and date automatically using network provided values Switch on Automatic date time l Set the time zone automatically using network provided values Switch on Automatic time zone l Set time for...

Page 123: ...ocation apps and services will search for Bluetooth devices for more accurate positioning Restoring factory settings Restore factory settings if your device crashes or is slow to respond Restoring factory settings will erase your personal data from your device including account information downloaded apps and system settings Back up important data on your device before restoring factory settings 1...

Page 124: ... System update Your device will automatically check for updates 3 Select the latest version to download the update package 4 Once the download is complete touch QUICK UPDATE The update process may take a while to complete Do not use your device before it has finished updating Your device will restart automatically when it has finished updating Viewing product information Renaming your device Renam...

Page 125: ...a third party speech synthesis engine For more information see Text To Speech TTS output 1 Open Settings 2 Touch Advanced settings Accessibility TalkBack 3 Switch on TalkBack and touch OK A tutorial will be played when you enable TalkBack for the first time To replay the tutorial touch to access TalkBack Settings and then select the tutorial 4 Touch and switch on Explore by touch When Explore by t...

Page 126: ... selection from the previous step For example if you want to open Settings touch the Settings icon once using one finger and then touch twice on any part of the screen Configuring the TalkBack settings 1 Open Settings 2 Touch Advanced settings Accessibility TalkBack 3 Follow the onscreen instructions to adjust the feedback volume audible feedback settings control gestures and more System Features ...

Page 127: ...ech synthesis engine and voice speed Color correction Color correction mode adjusts colors to make it easier for color vision impaired users to distinguish between different parts of the screen Enable this mode with caution as it may affect your device s performance 1 Open Settings 2 Touch Advanced settings Accessibility Color correction and switch on Color correction 3 Touch Correction mode and s...

Page 128: ...Obtaining help Read the Quick Start Guide included with your phone Touch Settings About phone Legal information to read the legal information Visit http consumer huawei com en for more information 123 ...

Page 129: ...ternet do not visit websites that might pose a security risk to avoid your personal information from being stolen l If you use services such as the portable Wi Fi hotspot or Bluetooth set passwords for these services to prevent unauthorized access Turn these services off when they are not in use l Install device security software and regularly scan for viruses l Be sure to obtain third party appli...

Page 130: ...pam messages Use the harassment filter and blacklist in Phone Manager to block spam calls and messages For more information see Blocking spam messages VPNs You can use a VPN to connect to your company network and email server For more information see VPNs Harassment filter Use the harassment filter and blacklist in Phone Manager to block spam calls and messages For more information see Harassment ...

Page 131: ...es described herein rely on the software installed capacities and settings of local network and therefore may not be activated or may be limited by local network operators or network service providers Thus the descriptions herein may not exactly match the product or its accessories which you purchase Huawei reserves the right to change or modify any information or specifications contained in this ...

Page 132: ...ters DISCLAIMER ALL CONTENTS OF THIS MANUAL ARE PROVIDED AS IS EXCEPT AS REQUIRED BY APPLICABLE LAWS NO WARRANTIES OF ANY KIND EITHER EXPRESS OR IMPLIED INCLUDING BUT NOT LIMITED TO THE IMPLIED WARRANTIES OF MERCHANTABILITY AND FITNESS FOR A PARTICULAR PURPOSE ARE MADE IN RELATION TO THE ACCURACY RELIABILITY OR CONTENTS OF THIS MANUAL TO THE MAXIMUM EXTENT PERMITTED BY APPLICABLE LAW IN NO EVENT S...

Page 133: ...d screen layout may vary All statements information and recommendations in this guide do not constitute a warranty of any kind express or implied Please visit http consumer huawei com en support hotline for recent updated hotline and email address in your country or region Model STF L09 V100R001_01 ...

Reviews: