background image

Step 4 Remove the disc nut from the filter, remove the filter.
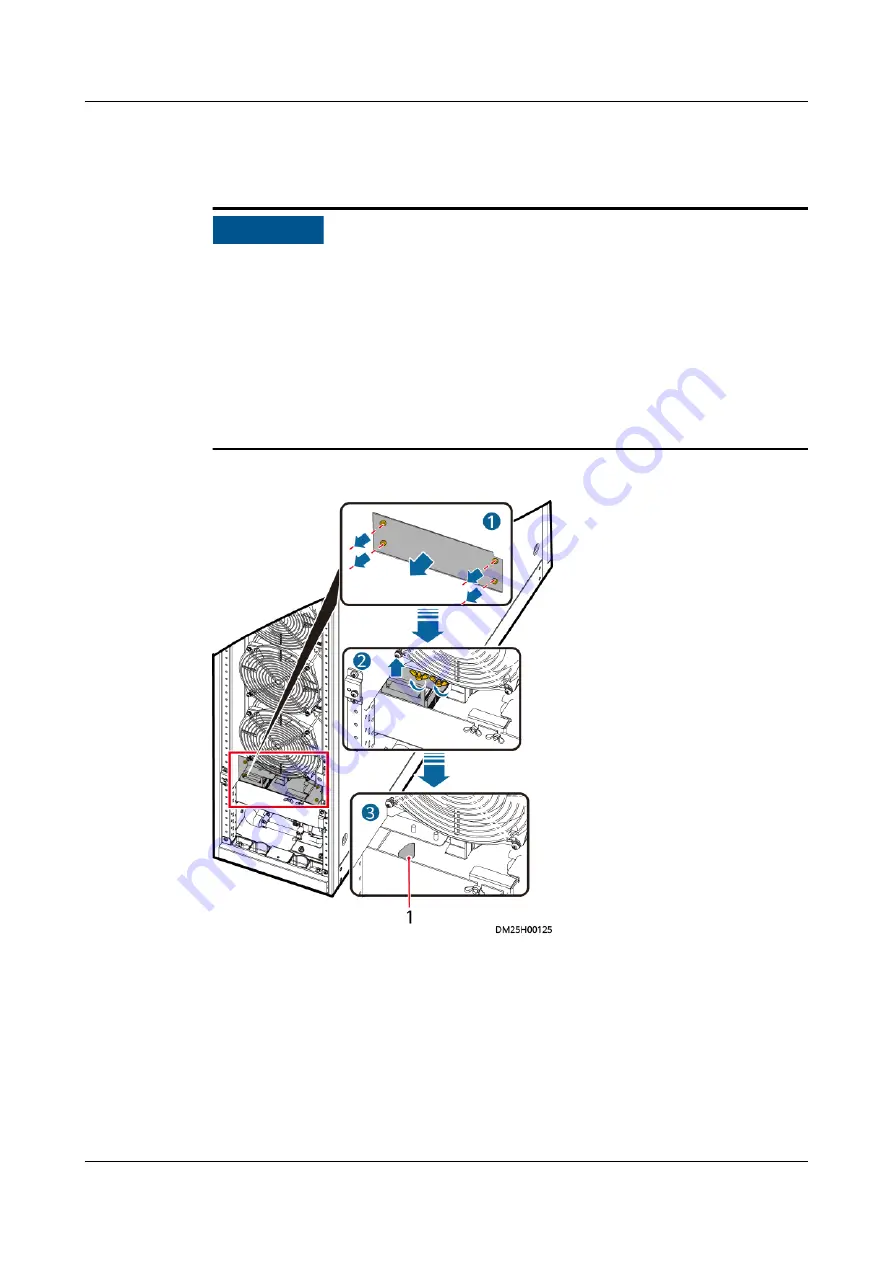
Step 5 Block the inlet and outlet of the water pump.

NO TICE

● Before removing the water pump, block the water inlet pipe and drainpipe of

the water pump to prevent water overflowing out of the water pan and water

pipe.

● At the front end of the water pump, block the drain outlet (shown in 

Figure

4-35

) of the water pan using a proper object, such as a cloth based on the

actual condition.

● At the rear end of the water pump, bend the white drainpipe (shown in 

Figure

4-36

) and tie it securely using a proper object, such as a cable tie or rope based

on the actual condition.

Figure 4-35 Water pan hole

(1) Water pan hole

FusionDC1000A Prefabricated All-in-One Data

Center

Maintenance Guide (IT Scenario)

4 Parts Replacement

Issue 01 (2021-04-20)

Copyright © Huawei Technologies Co., Ltd.

92

Summary of Contents for FusionDC1000A

Page 1: ...FusionDC1000A Prefabricated All in One Data Center V100R021C00 Maintenance Guide IT Scenario Issue 01 Date 2021 04 20 HUAWEI TECHNOLOGIES CO LTD ...

Page 2: ...s document may not be within the purchase scope or the usage scope Unless otherwise specified in the contract all statements information and recommendations in this document are provided AS IS without warranties guarantees or representations of any kind either express or implied The information in this document is subject to change without notice Every effort has been made in the preparation of th...

Page 3: ...tion engineers Commissioning engineers Data configuration engineers Symbol Conventions The symbols that may be found in this document are defined as follows Symbol Description Indicates a hazard with a high level of risk which if not avoided will result in death or serious injury Indicates a hazard with a medium level of risk which if not avoided could result in death or serious injury Indicates a...

Page 4: ... the main text NOTE is used to address information not related to personal injury equipment damage and environment deterioration Change History Changes between document issues are cumulative The latest document issue contains all the changes made in earlier issues Issue 01 2021 04 20 This issue is the first official release FusionDC1000A Prefabricated All in One Data Center Maintenance Guide IT Sc...

Page 5: ...8 3 Routine Maintenance 20 3 1 Pre fab Module Repainting 20 3 2 Sliding Cabinets 24 3 3 Daily Maintenance 25 3 4 Monthly Maintenance 26 3 4 1 Power Supply and Distribution System 27 3 4 2 Cooling System 28 3 4 3 Monitoring System 29 3 4 4 Fire Extinguishing System Standard 32 3 4 5 Fire Extinguishing System CE 33 3 4 6 Other Systems 34 3 5 Quarterly Maintenance 35 3 5 1 Power Supply and Distributi...

Page 6: ...sor 73 4 2 2 2 Replacing an Electric Heating Belt 75 4 2 2 3 Replacing the Air Filter 75 4 2 2 4 Replacing the Indoor Fan 76 4 2 2 5 Replacing an Outdoor Fan 77 4 2 2 6 Replacing the Differential Pressure Switch 79 4 2 2 7 Replacing the High Pressure Switch 81 4 2 2 8 Replacing the Compressor 83 4 2 2 9 Replacing the Welded Filter Dryer Welding Connection 86 4 2 2 10 Optional Replacing the Liquid ...

Page 7: ...Replacing the Emergency Start Abort Switch 131 4 4 10 Replacing Batteries for the Fire Alarm Control Panel 133 4 4 11 Replacing a Fire Cylinder 135 4 4 12 Replacing a Fire Alarm Control Panel 140 4 4 13 Replacing an Emergency Light 143 4 4 14 Replacing Batteries for the ASD Power Box 144 4 5 Replacing Fire Extinguishing System Components CE 145 4 5 1 Replacing a Smoke Detector CE 145 4 5 2 Replaci...

Page 8: ... 5 1 Repairing Pre fab Modules 169 6 Acronyms and Abbreviations 171 FusionDC1000A Prefabricated All in One Data Center Maintenance Guide IT Scenario Contents Issue 01 2021 04 20 Copyright Huawei Technologies Co Ltd vii ...

Page 9: ...w local laws and regulations when installing operating or maintaining the equipment The safety instructions in this document are only supplements to local laws and regulations Huawei will not be liable for any consequences of the following circumstances Operation beyond the conditions specified in this document Installation or use in environments which are not specified in relevant international o...

Page 10: ...n operation and maintenance Before handling a conductor surface or terminal measure the contact point voltage and ensure that there is no risk of electric shock After installing the equipment remove idle packing materials such as cartons foam plastics and cable ties from the equipment area In the case of a fire immediately leave the building or the equipment area and turn on the fire alarm bell or...

Page 11: ...uring equipment transportation or installation in a timely manner Equipment with scratches cannot be exposed to an outdoor environment for a long period of time Before operations ensure that the equipment is firmly secured to the floor or other solid objects such as a wall or an installation rack Do not use water to clean electrical components inside or outside of a cabinet Do not change the struc...

Page 12: ...onals personnel who are trained or experienced in equipment operations and are clear of the sources and degree of various potential hazards in equipment installation operation maintenance Trained personnel personnel who are technically trained have required experience are aware of possible hazards on themselves in certain operations and are able to take protective measures to minimize the hazards ...

Page 13: ...ties must be performed by qualified personnel Cabling When routing cables ensure that a distance of at least 30 mm exists between the cables and heat generating components or areas This prevents damage to the insulation layer of the cables Do not route cables behind the air intake and exhaust vents of the equipment Ensure that cables meet the VW 1 or ZB flame spread rating requirements or higher B...

Page 14: ...ing materials before storing or transporting them Figure 1 1 Wearing an ESD wrist strap Neutral Ground Voltage It is recommended that the three phase loads be equalized and the neutral ground voltage be kept at less than 2 V to meet power distribution requirements 1 4 Installation Environment Requirements To prevent fire due to high temperature ensure that the ventilation vents or heat dissipation...

Page 15: ...ear personal protective equipment such as the safety helmet and safety belt or waist rope and fasten it to a solid structure Do not mount it on an insecure moveable object or metal object with sharp edges Make sure that the hooks will not slide off Set a restricted area and eye catching signs for working at heights to warn away irrelevant personnel Carry the operation machinery and tools properly ...

Page 16: ...erglass ladders when you need to perform live working at heights When a step ladder is used ensure that the pull ropes are secured and the ladder is held firm Before using a ladder check that it is intact and confirm its load bearing capacity Do not overload it Ensure that the ladder is securely positioned The recommended angle for a ladder against the floor is 75 degrees as shown in the following...

Page 17: ...inside Metal shavings from drilling may short circuit boards inside the equipment Obtain the consent from the customer and subcontractor before drilling Wear goggles and protective gloves when drilling holes When drilling holes protect the equipment from shavings After drilling clean up any shavings that have accumulated inside or outside the equipment Moving Heavy Objects DANGER When removing a h...

Page 18: ... Safety Welding At least two persons are required on a welding site A welder must have a work permit A welding site must be free from inflammables Ensure that a fire extinguisher wet wiper and water container are available A burning welding torch must not be placed on a component or on the floor and must not be placed in a metal container with acetylene and oxygen Otherwise the gas may leak and ca...

Page 19: ...must be solid without spongy or soft soil and is not prone to subsidence The site must be clean and far away from dust oil fume and harmful gas The site must be far away from corrosive flammable and explosive materials The site must be far away from sources of strong variation loud noises and strong electromagnetic interference The site must not be located in a low lying land or an area prone to w...

Page 20: ...insulated tools Move batteries in the required direction Do not place a battery upside down or tilt it Keep the battery loop disconnected during installation and maintenance Use batteries of specified models Using batteries of other models may damage the batteries Dispose of waste batteries in accordance with local laws and regulations Do not dispose of batteries as household waste If a battery is...

Page 21: ...atteries with power on Flammable Gas NOTICE Do not use unsealed lead acid batteries To prevent fire or corrosion ensure that flammable gas such as hydrogen is properly exhausted for lead acid batteries Lead acid batteries emit flammable gas when used Ensure that batteries are kept in a well ventilated area and take preventive measures against fire Battery Leakage NOTICE Battery overheating causes ...

Page 22: ...charging is forbidden at 0 C Low temperature charging may cause crystallization which will result in a short circuit inside the battery Use batteries within the allowed temperature range otherwise the battery performance and safety will be compromised Do not throw a lithium battery in fire When maintenance is complete return the waste lithium battery to the maintenance office 1 9 Others Exercise c...

Page 23: ...wdriver Adjustable wrench Electrician s knife Needle nose pliers Diagonal pliers Crimping tool Wire stripper RJ45 crimping tool FusionDC1000A Prefabricated All in One Data Center Maintenance Guide IT Scenario 2 Operation and Maintenance Preparations Issue 01 2021 04 20 Copyright Huawei Technologies Co Ltd 15 ...

Page 24: ...at gun Utility knife Step ladder 2 m Cable tie Insulation tape ESD wrist strap ESD gloves Protective gloves Clamp meter Vacuum cleaner FusionDC1000A Prefabricated All in One Data Center Maintenance Guide IT Scenario 2 Operation and Maintenance Preparations Issue 01 2021 04 20 Copyright Huawei Technologies Co Ltd 16 ...

Page 25: ...ser Manual 300 mm Width ECC800 Pro ECC800 Data Center Controller V100R21C00 User Manual for ECC800 Pro NetEco iManager NetEco Product Documentation V600R021C00 NOTE The ECC800 Pro NetEco version depends on the version in use Click on the ECC800 Pro NetEco WebUI to obtain the current version For NetEco maintenance see the NetEco documents 2 3 Pre fab Module Entry and Working Requirements The follow...

Page 26: ...equirements Accept the operations and make records about any operations performed Check before leaving Check the items to be taken out Sign out Follow up procedure Return the ESD clothes and shoes If any faulty component is replaced dispose of the removed faulty component NOTICE Replace maintain and troubleshoot components of the FusionDC1000 only in the presence of qualified engineers 2 4 O M Per...

Page 27: ...alifications Fire extinguishi ng system Familiar with the fire extinguishing system configurations and the operations for each core device in the FusionDC1000 With fire engineer qualifications Lighting and structural systems Familiar with the overall configurations and layout of the FusionDC1000 Experienced in maintaining the FusionDC1000 FusionDC1000A Prefabricated All in One Data Center Maintena...

Page 28: ...le check that no obvious edge exists between the repainted area and its surrounding The paint should also be free from bulges scratches flake off or cracks The outdoor area without shelters is not subject to bad weather conditions such as raining sandstorm strong wind or snowing during paint repair You have prepared the required paint that matches the color palette delivered with equipment Context...

Page 29: ...rust that cannot be wiped off Deep scratch primer damaged steel base material exposed Spray paint or paint zinc rich primer brush required for repainting a small area fine sandpaper anhydrous alcohol cotton cloth painting gun required for repainting a large area Steps 1 2 3 and 4 LOGO and pattern damage Seek help from Huawei headquarters for a detailed painting solution Frontline personnel can tur...

Page 30: ... alcohol with a clean and dry cotton cloth Figure 3 2 Wiping a polished or damaged area using anhydrous alcohol Step 3 Paint one layer of zinc rich primer on the damaged coat using a brush or painting gun Figure 3 3 Zinc rich primer FusionDC1000A Prefabricated All in One Data Center Maintenance Guide IT Scenario 3 Routine Maintenance Issue 01 2021 04 20 Copyright Huawei Technologies Co Ltd 22 ...

Page 31: ...revent undamaged areas and those with different colors as the damaged area from being polluted during repainting cover such areas using white paper and adhesive tape before repairing paint Figure 3 4 Manual paint spray Figure 3 5 Repainting using a brush FusionDC1000A Prefabricated All in One Data Center Maintenance Guide IT Scenario 3 Routine Maintenance Issue 01 2021 04 20 Copyright Huawei Techn...

Page 32: ...If the maintenance space on the rear door of an IT cabinet is insufficient in the N X or 2N scenario slide the cabinet to expand the maintenance space Figure 3 7 Sliding direction and distance 1 IT cabinet 2 UPS cabinet Procedure Step 1 Remove the bolts securing the cabinet sliding base fasteners using an adjustable wrench and remove the fasteners FusionDC1000A Prefabricated All in One Data Center...

Page 33: ...t status indicator Observe the indicator luminance the indicators are on If the input voltage is abnormal check the power grid status and input cable connection If the power supply is normal but an indicator is off or generates dim light replace the indicator ECC800 Pro WebUI FusionDC1 000 alarms On the ECC800 Pro WebUI choose Home Active Alarms or Query Historical Alarms No alarm is displayed in ...

Page 34: ... 1 Connect the camera cable again 2 If the cable is properly connected replace the camera The coverage of the camera is optimal If the camera coverage does not meet the monitoring requirement adjust the camera coverage Option al ASD ASD and its power supply Check the working status of the ASD and its power supply The ASD and its power supply are normal If the ASD or its power supply is abnormal tr...

Page 35: ...proof baffle plates at the door of the UPS equipment room Check that the equipment room is airtight and not in a direct ventilation environment Power grid environment Input voltage 380 V AC 400 V AC or 415 V AC line voltage Output voltage 380 V AC 400 V AC or 415 V AC tolerance 1 line voltage Frequency 40 70 Hz If the input voltage is abnormal check the power grid status and input cable connection...

Page 36: ...y maintenance checklist for the cooling system Item Method Check Standard Troubleshooting Thermal insulation foam for the humidifier condensate drainpipe Check whether the thermal insulation layers are in good condition without condensation The thermal insulation layers are in good condition and free from condensation If there is condensation under a pipe replace the thermal insulation foam by fol...

Page 37: ...device successfully registers with the ECC800 Pro and the software runs properly the indicator blinks at 0 5 Hz on for 1s and then off for 1s Blinking at short intervals The communication is disconnected or the device fails to register with the ECC800 Pro the indicator blinks at 4 Hz on for 0 125s and then off for 0 125s Blinking The indicator blinks at super short intervals for 0 5s blinking at 1...

Page 38: ... indicator blinks at 2 Hz on for 0 5s and then off for 0 5s See the ECC800 Pro documents AC actuator Power input Input voltage 90 240 V AC Check the input power cables if the input voltage is abnormal Power output Output voltage 90 240 V AC For details contact Huawei technical support PWR indicator Steady on The power supply is normal Off No power supply is available Check the input power cables A...

Page 39: ...ocuments RF_Z indicator On No network parameters exist A network is waiting to be created Blinking slowly A network is set up and node access is not allowed the indicator blinks at 0 5 Hz on for 1s and then off for 1s Blinking at super short intervals A network is set up and node access is allowed the indicator blinks at 10 Hz on for 0 05s and then off for 0 05s Blinking at super short intervals i...

Page 40: ...place the fire cylinder by following instructions in Replacing a Fire Cylinder For details about how to replace other devices contact Huawei technical support All devices of the fire extinguisher are free from rust on the exterior and the coating is intact Repaint the device The lead seal and safety signs on hand operated devices are intact Replace the electromagnetic valve Read the pressure shown...

Page 41: ...umatic switch fire extinguishing pipeline and nozzle All devices of the fire extinguisher are intact free from deformation and mechanical damage Replace the fire cylinder For details about how to replace other devices contact Huawei technical support All devices of the fire extinguisher are free from rust on the exterior and the coating is intact Repaint The lead seal and safety signs on hand oper...

Page 42: ...ct Huawei technical support 3 4 6 Other Systems Table 3 8 Monthly maintenance checklist for other systems Item Method Check Standard Troubleshooting Pre fab module repainting Check the pre fab module exterior for damage or corrosion The pre fab module and bases are free from paint flake off rust or corrosion Maintain or replace the rusty or damaged part of the pre fab modules Repaint areas with pa...

Page 43: ...m Device Method Check Standard Maintenance Guide SmartLi Battery module appearance The battery modules are clean Clean the battery modules using dry cotton cloth Exercise caution when cleaning a battery module because its voltage is high Connections Each terminal is securely connected Check the bolt at every terminal If any bolt is loose tighten it 3 5 2 Monitoring System Table 3 10 Quarterly main...

Page 44: ...rvals for 0 5s blinking at 10 Hz on for 0 05s and then off for 0 05s and then turns off for 0 5s The cycle lasts for 10s Check the power supply If the RUN indicator blinks fast check whether the communications cable is normal If not replace the cable RF_Z indicator On No network parameters exist A network is waiting to be created Blinking slowly A network is set up and node access is not allowed t...

Page 45: ...re runs properly the indicator blinks at 0 5 Hz on for 1s and then off for 1s Blinking at short intervals The communication is disconnected or the device fails to register with the ECC800 Pro the indicator blinks at 4 Hz on for 0 125s and then off for 0 125s Blinking The indicator blinks at super short intervals for 0 5s blinking at 10 Hz on for 0 05s and then off for 0 05s and then turns off for ...

Page 46: ... the ECC800 WebUI If no alarm is raised when a door with a status sensor is opened replace the door status sensor 3 5 3 Fire Extinguishing System Standard Table 3 11 Quarterly maintenance checklist for the fire extinguishing system Device Method Check Standard Troubleshooting Fire alarm control panel batteries 1 Switch off the power input circuit breaker of the fire alarm control panel so that the...

Page 47: ...the exterior is damaged replace the emergency start abort switch 3 5 4 Fire Extinguishing System CE Table 3 12 Quarterly maintenance checklist for the fire extinguishing system Device Method Check Standard Maintenance Guide Extinguishant control panel batteries 1 Switch off the power input circuit breaker of the fire alarm control panel so that the batteries power the panel 2 Measure the battery v...

Page 48: ...r is blocked The air filter is not blocked If an air filter is slightly blocked clean the air filter and reinstall it If more than 50 of the meshes are blocked replace the air filter Pre fab module body Check the pre fab module The pre fab module is clean 1 Clean the pre fab module using a long handled soft brush and alkaline or neutral detergent 2 Wash the pre fab module with clean water Pre fab ...

Page 49: ...displayed fuzzy or blank verify that the power cable is properly connected 2 Replace the ATS by following instructions in documents delivered with the ATS SmartLi Measure voltages Measure and record the busbar voltage and the voltage between the positive and negative terminals of the SmartLi when charging is about to complete Ensure that the voltages are the same If the voltages are different chec...

Page 50: ...ox before maintaini ng the internal compone nts Check that all circuit breakers and fuses work properly Switches and fuses are working properly Replace faulty circuit breakers and fuses Check that the cable connection is secure and correct Cables are securely connected Secure loose cables Check that the electrical components control components SPDs and voltage detection boards are not dusty The co...

Page 51: ...r the water detector cable is securely connected The water sensor cable is securely connected Connect the cable properly 3 6 3 Monitoring System Table 3 16 Semi annual maintenance checklist for the monitoring system Check Item Operation Check Standard Troubleshooting Smart ETH gateway Power input Input voltage 45 55 V DC Check the input power cables if the input voltage is abnormal Power output Ou...

Page 52: ...m is raised Off No fault alarm is raised Clear alarms by referring to the ECC800 Pro documents Water sensor point type Dip the water sensor into water and view alarms in the management system An alarm is raised on the ECC800 WebUI If no alarm is raised replace the water sensor 3 6 4 Fire Extinguishing System Standard NOTICE Semi annual maintenance of the fire extinguishing system involves system c...

Page 53: ...release indicator blinks once every 6s If the fault persists replace the heat detector If the temperature exceeds the alarm threshold the gas release indicator is steady on The fire alarm control panel generates an alarm and triggers the fire alarm sounder If the fault persists replace the heat detector Smoke detector Release smoke onto the smoke detector using a smoke pistol If the smoke density ...

Page 54: ...ered with the ASD Release smoke to the furthest end of an ASD sampling pipe The ASD generates an alarm in 120s See documents delivered with the ASD The ASD sends an alarm signal to the host See documents delivered with the ASD Check the ASD operation panel All indicators are normal See documents delivered with the ASD Check whether the backup power is working properly and whether the VESDA restart...

Page 55: ...ethod Check Standard Maintenance Guide Fire extinguishing system commissioni ng Commission the fire extinguishing system by following the instructions in the Fire Extinguishing System Commissioning CE section in the commissioning guide for the solution in use Devices work properly and the management system displays related alarms Replace the corresponding component Fire alarm bell Flip the key to ...

Page 56: ...and the extinguishant control panel raises a corresponding alarm and triggers the fire alarm bell Replace the smoke detector Extinguishant abort button 1 After the manual gas release button is pressed on the extinguishant control panel the gas release countdown starts Then press the extinguishant abort button 2 Reset the extinguishant abort button by rotating it counterclockwise 1 After the exting...

Page 57: ...wer is disconnected See documents delivered with the ASD ASD power supply Check the power indicator The power indicator turns on 1 Check the power cables 2 Replace the ASD power supply 3 6 6 Other Systems Table 3 19 Semi annual maintenance checklist for other systems Item Method Check Standard Troubleshooting Lights Check whether the lights can be switched on normally The lights turn on normally 1...

Page 58: ...re securely connected without bare terminals Secure terminal connections and replace terminals that do not meet requirements For details see the installation guide for the corresponding solution Check whether cables are intact Cable jackets are free from damage or cracks No cable overheats due to overload and the loads are within the rated capacity of the cables the cables works only a very short ...

Page 59: ...eplacement the system may need to be powered off Take measures to prevent device overheating For details about replacing parts for the integrated UPS see the section Parts Replacement in the UPS user manual Table 4 1 Components that can be replaced for the power supply and distribution system Device Component Name Integrated UPS 3 0 Fuse Indicator 4 1 2 Replacing SmartLi Components FusionDC1000A P...

Page 60: ...he MDU using the Phillips screwdriver and set them aside Step 4 Hold the MDU front panel by one hand and push out the MDU from the fastener on the front panel by the other hand Step 5 Install the new MDU and secure it Step 6 Reinstall the communications cable to the new MDU Step 7 Upload the software package and click Activate All Step 8 Set parameters Method 1 Power on the MDU tap Settings on the...

Page 61: ...2s The green indicator of the BCU blinks at 4 Hz NOTICE If the Version incompatible alarm is generated you need to upgrade the version before switching on the battery circuit breaker Step 7 After the green indicator of the BCU blinks at 10 Hz switch on the battery circuit breaker on the SmartLi End 4 1 2 3 Replacing a Battery Module Prerequisites Tools insulated socket wrench insulation gloves Phi...

Page 62: ...e battery module above Step 5 Remove the cables and copper bars that are connected to the faulty battery module Step 6 Remove the battery baffle plate and pull out the faulty battery module Step 7 Install the new battery module and secure the baffle plate Step 8 Reinstall the cables copper bars and front covers to the battery modules Step 9 Reinstall the BCU and turn on the ready switch Step 10 Pr...

Page 63: ...of the rPDU using a Phillips screwdriver until the rPDU can be removed Step 6 Lift the faulty rPDU and take it out Step 7 Remove the support and screws from the faulty rPDU and install them on a new rPDU Step 8 Mount the new rPDU with a support into the cabinet and tighten the fastening screws of the rPDU using a Phillips screwdriver Step 9 Connect the rPDU power cable on the top of the cabinet St...

Page 64: ...lacement do not touch any end of the light with bare hands You will get an electric shock if you touch bare electrodes Step 4 Install the new light in the original position End 4 1 5 Replacing the Power PDB Prerequisites A spare power PDB of the same model is available and functional Impact on the System None Preparations Tools Phillips screwdriver socket wrench Material spare power PDB Documents ...

Page 65: ... components During smart cooling product parts replacement the system may need to be powered off Take measures to prevent device overheating For details about parts replacement for smart cooling products see the section Parts Replacement in the smart cooling product user manual Table 4 2 Replacing cooling system components Device Component Name NetCol5000 A025 In row Air Cooled Smart Cooling Produ...

Page 66: ...eep the indoor environment clean during the replacement The indoor unit of the in row air cooled smart cooling product can be replaced only in the cold aisle of the pre fab module To replace smart cooling product A1 or B1 you need to push cabinets A1 A2 B1 and B2 on both sides of cold aisle A to the extremities towards the hot aisle and replace the smart cooling product in cold aisle A Smart cooli...

Page 67: ...oling engineer Procedure Step 1 Locate the cold aisle containment where maintenance is to be performed based on the position of the faulty smart cooling product Step 2 Switch off the integrated UPS circuit breaker that supplies power to the smart cooling product indoor unit and verify that the smart cooling product indoor unit is powered off using a multimeter before proceeding with the following ...

Page 68: ...rk together to push up the suspended ceiling at the cabinet side to unhook the suspended ceiling and remove the suspended ceiling from the lower right corner Step 4 Remove the ESD floors under the front and rear of the smart cooling product Figure 4 3 Removing ESD floors FusionDC1000A Prefabricated All in One Data Center Maintenance Guide IT Scenario 4 Parts Replacement Issue 01 2021 04 20 Copyrig...

Page 69: ...an be reinstalled after the water refill and drainage pipes of the smart cooling product are removed Adjust the height of the floor tray to ensure that the reinstalled floor panels are flush with other floor panels Step 7 Remove fasteners at the top and bottom of the smart cooling product FusionDC1000A Prefabricated All in One Data Center Maintenance Guide IT Scenario 4 Parts Replacement Issue 01 ...

Page 70: ...r you need to remove the ground cable terminals at the bottom of the front door Place the removed front door with the LCD side facing upwards in an open area and protect it with sponge if necessary to prevent scratches FusionDC1000A Prefabricated All in One Data Center Maintenance Guide IT Scenario 4 Parts Replacement Issue 01 2021 04 20 Copyright Huawei Technologies Co Ltd 62 ...

Page 71: ...agonal pliers NOTICE Verify that the thermal insulation foam is not damaged during the operation 3 Remove the front door rear door and hinge bases from smart cooling product C1 4 Unfasten the eight rotating baffle plates in the upper middle and lower positions of the air filters and remove the upper and lower air filters FusionDC1000A Prefabricated All in One Data Center Maintenance Guide IT Scena...

Page 72: ...tely out of the smart cooling product indoor unit to facilitate smart cooling product replacement 1 Use a Phillips screwdriver to remove the active and standby input power cables for the smart cooling product indoor unit from ports AC1 and AC2 on the smart cooling product PDB and remove the corresponding cables from the integrated UPS circuit breaker FusionDC1000A Prefabricated All in One Data Cen...

Page 73: ... 2 Remove the power cable for the smart cooling product outdoor unit from port AC3 on the smart cooling product indoor unit PDB FusionDC1000A Prefabricated All in One Data Center Maintenance Guide IT Scenario 4 Parts Replacement Issue 01 2021 04 20 Copyright Huawei Technologies Co Ltd 65 ...

Page 74: ...ve the communications cables between the indoor and outdoor units of the smart cooling product 4 Remove the water sensor cable FusionDC1000A Prefabricated All in One Data Center Maintenance Guide IT Scenario 4 Parts Replacement Issue 01 2021 04 20 Copyright Huawei Technologies Co Ltd 66 ...

Page 75: ...trol port for the outdoor unit X301 7 8 water sensor port 5 Remove the teamwork control cable from the FE_1 port on the smart cooling product main control module FusionDC1000A Prefabricated All in One Data Center Maintenance Guide IT Scenario 4 Parts Replacement Issue 01 2021 04 20 Copyright Huawei Technologies Co Ltd 67 ...

Page 76: ...air return side of the smart cooling product from the RS485_OUT port Figure 4 12 Removing the remote T H sensor cable Step 10 Discharge refrigerant FusionDC1000A Prefabricated All in One Data Center Maintenance Guide IT Scenario 4 Parts Replacement Issue 01 2021 04 20 Copyright Huawei Technologies Co Ltd 68 ...

Page 77: ...o the hose outlet to a tension not squeezing the hose 2 Slowly open the valve on the pressure gauge to start discharging refrigerant NOTE When discharging the refrigerant verify that refrigerant oil does not flow out of the hose If a small amount of refrigerant oil continually flows out of the hose place a vessel or rag under the hose to catch the refrigerant oil 3 Keep the pressure gauge valve op...

Page 78: ...t cooling product drainpipe completely out of the smart cooling product after removing the drainpipe Coil the water refill hose inside the smart cooling product after removing it to avoid influence on the smart cooling product movement Drag the copper pipe that goes inside the smart cooling product completely out of the smart cooling product after cutting the copper pipe to avoid influence on the ...

Page 79: ... certain distance away from the pre fab module side wall to prevent scratching the side wall 1 Take the fittings for moving the smart cooling product from the pre fab module fitting bag NOTE The fittings required for moving the smart cooling product include one 3 mm thick steel plate and five 0 5 m long DN32 steel pipes 2 Place the 3 mm thick steel plate on the raised floor in the cold aisle 3 Pla...

Page 80: ... the two steel pipes Step 13 Pull the smart cooling product 1 Slide the smart cooling product to the cold aisle 2 Place the three 0 5 m long steel pipes evenly in the long aisle near the entrance of cold aisle B 3 Push the smart cooling product completely onto the three 0 5 m long steel pipes and move the smart cooling product along the long aisle to the pre fab module side door FusionDC1000A Pref...

Page 81: ...at the new smart cooling product is working properly For details see documents delivered with the smart cooling product 3 Reinstall the removed components End 4 2 2 1 Replacing a T H Sensor Prerequisites A T H sensor needs to be replaced A spare T H sensor of the same model is available and functional Context A T H sensor can be maintained only from the rear door FusionDC1000A Prefabricated All in...

Page 82: ... correct position Step 5 Set the DIP switch on the T H sensor Table 4 3 DIP switch settings on T H sensors Locati on Display Name Addr ess DIP Switch No 1 2 3 4 5 6 Air return side Return air 2 temp humid 1 ON OFF OFF OFF OFF OFF Cold aisle Cold aisle 1 temp humid 11 ON ON OFF ON OFF OFF Cold aisle 2 temp humid 12 OFF OFF ON ON OFF OFF Cold aisle 3 temp humid 13 ON OFF ON ON OFF OFF Hot aisle Hot ...

Page 83: ... to the reserved interconnection terminal End Follow up Procedure Dispose of the removed electric heating belt that is confirmed faulty 4 2 2 3 Replacing the Air Filter Prerequisites The air filter needs to be replaced A spare air filter of the same model is available and functional Context Each smart cooling product has two air filters located in the upper and lower parts The air filters need to ...

Page 84: ... The indoor fan needs to be replaced A spare indoor fan of the same model is available and functional Tools protective gloves Phillips screwdriver diagonal pliers cable ties Context The indoor fan can be maintained only from the front Procedure Step 1 On the controller home screen tap Shutdown and turn off the smart cooling product switch in the upstream PDC Step 2 Open the front door and turn off...

Page 85: ... Step 6 Turn on the switch for the faulty fan and close the front door Step 7 On the LCD home screen choose Maint Performance Maint and clear the indoor fan runtime Step 8 When the device is in the Startup status manually clear the alarm Ensure that the smart cooling product is running normally without any alarms End 4 2 2 5 Replacing an Outdoor Fan Prerequisites Recommended tools and materials he...

Page 86: ...n and guard Step 4 Loosen the waterproof cable terminal as shown by 2 in Figure 4 20 and pull the cable out of the wiring box Step 5 Remove the four screws that secure the fan guard using a socket wrench as shown by 3 in Figure 4 20 and take off the fan and guard Step 6 Remove the four screws that connect the fan and guard using a hex key and take off the faulty fan Figure 4 21 Separating the fan ...

Page 87: ...ode End 4 2 2 6 Replacing the Differential Pressure Switch Prerequisites The differential pressure switch needs to be replaced A spare differential pressure switch of the same model is available and functional Tool Phillips screwdriver Context The differential pressure switch can be maintained only from the rear door Procedure Step 1 On the controller home screen tap Shutdown and turn off the smar...

Page 88: ... cables Step 5 Use a Phillips screwdriver to remove the three screws and remove the differential pressure switch as shown by 3 in Figure 4 22 Step 6 Set the new differential pressure switch to 250 Pa Figure 4 23 Setting values for a differential pressure switch FusionDC1000A Prefabricated All in One Data Center Maintenance Guide IT Scenario 4 Parts Replacement Issue 01 2021 04 20 Copyright Huawei ...

Page 89: ...read sealant Context The high pressure switch can be maintained only from the rear NOTE The procedure for replacing a high or low pressure sensor is similar to that for replacing the high pressure switch Procedure Step 1 On the controller home screen tap Shutdown and turn off the smart cooling product switch in the upstream PDC NOTICE Exercise caution because the device is still energized after it...

Page 90: ...gh pressure switch 1 Pipe nut 2 Adjustable nut WARNING Exercise caution when removing the high pressure switch because a small amount of refrigerant will be sprayed when you remove the switch Step 5 Apply sealant on the outer side of the air valve connected to the pipe nut FusionDC1000A Prefabricated All in One Data Center Maintenance Guide IT Scenario 4 Parts Replacement Issue 01 2021 04 20 Copyr...

Page 91: ... hose filter dryer and torque wrench Context The compressor can be maintained only from the rear door CAUTION Reclaim or dispose of the refrigerant in accordance with local laws and regulations Do not discharge the refrigerant to the atmosphere The composition of R410A may change during the recycling process Therefore you are not advised to refill the refrigerant to the cooling system When replaci...

Page 92: ... system If a low temperature component is used recycle the refrigerant from the liquid pipe needle valve low pressure needle valve and exhaust pipe needle valve Step 4 Remove the electric heating belt Step 5 Remove the compressor 1 Use a flat head screwdriver to clamp the buckle of the compressor connection box remove the cover of the connection box and disconnect cables from the compressor 2 Heat...

Page 93: ...e the new compressor to the support using a solid wrench secure the compressor support to the cabinet interior using a 13 socket wrench and install an electric heating belt in the cabinet Step 8 Apply red glue from the second to fourth circles of the inner screw threads of the discharge angle valve Use two 30 adjustable wrenches to secure the angle valve nut and pipe nut on the discharge side and ...

Page 94: ...reparation Power off the indoor unit and reclaim all refrigerant from the system Context Figure 4 27 shows the position of the filter dryer Figure 4 27 Position of the filter dryer 1 Liquid pipe NTC temperature sensor 2 Welding point A 3 Filter dryer 4 Welding point B 5 Welding point C Procedure Step 1 Tap Shutdown on the LCD home screen and turn off the smart cooling product switch in the PDC and...

Page 95: ...you are not advised to refill the refrigerant to the cooling system Step 3 Remove the liquid pipe NTC temperature sensor shown by 1 in Figure 4 27 Step 4 Remove the filter dryer as shown in Figure 4 28 NOTICE Use copper welding rods to weld the connection ports and check that the welding joints are in good condition without poor soldering To avoid burning the internal components other pipes therma...

Page 96: ...nstalling the filter dryer 1 Remove the rubber plug sealing the port of the new filter dryer 2 Weld the removed entrance elbow and the new filter dryer to form a new assembly 3 Weld the assembly to the original position 4 Secure the hold hoop in reverse order of removing it Step 6 Reinstall the liquid pipe NTC temperature sensor Step 7 Perform a leakage test with nitrogen again Step 8 After checki...

Page 97: ...the contact on off conversion signal to control the liquid level detector The liquid level detector can be maintained only from the front Figure 4 30 Liquid level detector 1 High liquid level detector 2 Low liquid level detector Procedure Step 1 Tap Shutdown on the LCD home screen NOTICE Exercise caution because the NetCol5000 A is still energized when it is being shut down over the LCD Step 2 Ope...

Page 98: ...fastener of the liquid level detector Figure 4 33 Removing screws from the sheet metal fastener of a liquid level detector Step 5 Use a Phillips screwdriver to remove the screws that secure the high liquid level detector and remove the high liquid level detector the low liquid level detector can be taken out by rotating it FusionDC1000A Prefabricated All in One Data Center Maintenance Guide IT Sce...

Page 99: ...t wrench Before removing the water pump drain water from the water pan completely Context The water pump can be maintained only from the front Procedure Step 1 Tap Shutdown on the LCD home screen and turn off the smart cooling product switch in the PDC NOTICE Exercise caution because the NetCol5000 A is still energized when it is being shut down over the LCD Step 2 Open the front door and disconne...

Page 100: ...lock the drain outlet shown in Figure 4 35 of the water pan using a proper object such as a cloth based on the actual condition At the rear end of the water pump bend the white drainpipe shown in Figure 4 36 and tie it securely using a proper object such as a cable tie or rope based on the actual condition Figure 4 35 Water pan hole 1 Water pan hole FusionDC1000A Prefabricated All in One Data Cent...

Page 101: ...ate pump as shown in Figure 4 37 Figure 4 37 Removing hose clamps from a pipe Step 7 Use a socket wrench to remove the two M6 screws from the sheet metal fastener of the water pump and pull out the water pump assembly as shown in Figure 4 38 FusionDC1000A Prefabricated All in One Data Center Maintenance Guide IT Scenario 4 Parts Replacement Issue 01 2021 04 20 Copyright Huawei Technologies Co Ltd ...

Page 102: ...mp and reinstall the water pump assembly in the cabinet as shown in by 3 in Figure 4 39 Connect the water pipe and secure it using a hose clamp Connect the water pump power cable Step 10 Remove the blockage from the water pan reinstall the water pan cover and then close the front door End FusionDC1000A Prefabricated All in One Data Center Maintenance Guide IT Scenario 4 Parts Replacement Issue 01 ...

Page 103: ... caution because the device is still energized after it is shut down on the LCD Step 2 Open the rear door and remove the air filter Step 3 Remove the hose clamp from the water inlet pipe of the wet film humidifier and remove the water inlet pipe Figure 4 40 Removing the water inlet pipe Step 4 Remove the screws that secure the humidifier sheet metal to the driver remove the sheet metal move the we...

Page 104: ...aulty LCD Context Recommended tool Phillips screwdriver M4 and ESD gloves Preparation Maintain from the front door Procedure Step 1 Optional Back up data If the web or ECC is not configured skip its step 1 Insert the USB flash drive into the side of the controller panel Choose Maint USB Operations Export as an admin user to back up data to the USB flash drive 2 Log in to the WebUI of the smart coo...

Page 105: ...nt damaging the controller cables 2 Remove cables from the controller panel 3 Remove the four screws from the controller panel using a Phillips screwdriver and remove the gaskets then pull out the controller panel and remove it NOTICE Be aware of the fasteners when pushing the controller panel from the right or left side to prevent damaging the controller panel The gasket is used to adjust the dis...

Page 106: ...controller panel Choose Maint USB Operations Import Config as an admin user to import the back up data in the USB flash drive 2 Log in to the WebUI of the smart cooling product as an administrator user Choose Maintenance Configuration and choose the backup data After optional tapping Configuration File Decryption Password tap Upload to import the backup data from the computer End 4 2 2 14 Replacin...

Page 107: ...e caution because the NetCol5000 A is still energized when it is being shut down over the LCD Step 2 Open the rear door and remove the air filter Step 3 Flip the clip on the module downwards as shown by 1 in Figure 4 44 Figure 4 44 Removing a module FusionDC1000A Prefabricated All in One Data Center Maintenance Guide IT Scenario 4 Parts Replacement Issue 01 2021 04 20 Copyright Huawei Technologies...

Page 108: ...lable and functional Tool Phillips screwdriver Procedure Step 1 Tap Shutdown on the LCD home screen Turn off the smart cooling product switch in the PDC and check whether the port is electrified Use a multimeter to check that the AC voltage of the port is 0 V NOTICE Exercise caution because the NetCol5000 A is still energized when it is being shut down over the LCD Step 2 Open the rear door and re...

Page 109: ...ing the electric control box Step 6 Replace the electric control box NOTICE Ensure that the four screws are tightened when installing the electric control box Step 7 Place a new electric control box and the protective cover in the installation position and tighten them Step 8 Reconnect cables and terminals FusionDC1000A Prefabricated All in One Data Center Maintenance Guide IT Scenario 4 Parts Rep...

Page 110: ...oor Procedure Step 1 On the controller home screen tap Shutdown and turn off the smart cooling product switch in the upstream PDC NOTICE Exercise caution because the device is still energized after it is shut down on the controller home screen Step 2 Open the rear door and remove the air filter Step 3 Remove the two M4 screws from the front panel of the transformer and remove the front panel Figur...

Page 111: ...ten the two M4 screws on the front panel Step 8 Reinstall the air filter and close the rear door Step 9 Power on the device and tap Startup on the home screen Ensure that the smart cooling product is running normally without any alarms End 4 3 Replacing Monitoring System Components 4 3 1 Replacing an ECC800 Pro Main Control Module Prerequisites NOTICE The ECC800 Pro main control module is hot swap...

Page 112: ...ss permission management device access certificate log and user configuration information Step 2 Label each cable and antenna based on the corresponding ports on the ECC800 Pro main control module Step 3 Remove cables USB flash drive USB to WiFi module and antennas from the ECC800 Pro main control module Step 4 Loosen the screws on both sides of the ECC800 Pro main control module and pull the hand...

Page 113: ...ro PSU Prerequisites DANGER Do not touch the terminals in the rear of a removed PSU to avoid electric shocks Tool insulation gloves Materials a reserved undamaged and undeformed PSU of the appropriate model Context The PSU is hot swappable Procedure Step 1 Push the locking latch in the upper right corner of the PSU panel leftwards Step 2 Pull out the handle of the PSU to remove the PSU from the su...

Page 114: ...les connected to the ports on the ECC800 Pro as shown in Figure 4 51 Figure 4 51 Removing antennas Step 2 Install the spare 4G antenna cables and RF_Z antenna cables in the original positions and connect them to the ECC800 Pro End 4 3 4 Replacing a SIM Card Prerequisites Tools ESD wrist strap ESD gloves FusionDC1000A Prefabricated All in One Data Center Maintenance Guide IT Scenario 4 Parts Replac...

Page 115: ...le Step 3 Pull the handles on both sides of the ECC800 Pro main control module and to remove the main control module Figure 4 52 Removing the ECC800 Pro main control module Step 4 Remove the SIM card from the card slot Figure 4 53 Removing a SIM card Step 5 Insert the spare SIM card into the card slot Figure 4 54 Installing a SIM card FusionDC1000A Prefabricated All in One Data Center Maintenance ...

Page 116: ... Skill requirement extra low voltage ELV engineer Procedure Step 1 Label each cable based on the corresponding ports on the smart ETH gateway Step 2 Disconnect cables from the smart ETH gateway Step 3 Remove the faulty smart ETH gateway from the guide rails of the cable trough Step 4 Install the spare smart ETH gateway in the original position and connect the cables End 4 3 6 Replacing a Camera Pr...

Page 117: ...e inner cover Figure 4 55 Removing the inner cover NOTE In the scenario with an SD card remove the SD card and install it in a new camera Step 3 Use a Phillips screwdriver to remove the screws that fasten the camera to its base Figure 4 56 Removing the camera base FusionDC1000A Prefabricated All in One Data Center Maintenance Guide IT Scenario 4 Parts Replacement Issue 01 2021 04 20 Copyright Huaw...

Page 118: ...roperly End 4 3 7 Replacing a Water Sensor Point Type Prerequisites Spare water sensors of the same model are available and functional Impact on the System None Preparations Tools Phillips screwdriver protective gloves Material spare water sensor Documents monitoring drawings and parameters Skill requirement ELV engineer Procedure Step 1 Locate the water sensor to be replaced based on the alarm in...

Page 119: ...erminal generates an alarm the water sensor is working properly End 4 3 8 Replacing Access Control System Components 4 3 8 1 Replacing a Card Reader Prerequisites A spare IC card reader of the same model is available and functional Impact on the System None Preparations Tools Phillips screwdriver protective gloves Materials access card spare IC card reader Skill requirement ELV engineer FusionDC10...

Page 120: ... from the bottom of the new IC card reader and remove the front cover Step 6 Reconnect the interconnection terminals and close the door of the IC card reader box Step 7 On the Authorization Operations tab page click Synchronize to Device select the modified access control devices and click Start Synchronization Step 8 When Synchronization Status is Synchronization completed for the related devices...

Page 121: ... A spare exit button of the same model is available and functional Impact on the System None Preparations Tools insulation tape Phillips screwdriver small flat head screwdriver protective gloves Material spare exit button Skill requirement ELV engineer Procedure Step 1 Disassemble the faulty exit button remove cables and remove the faulty exit button FusionDC1000A Prefabricated All in One Data Cen...

Page 122: ...4 3 8 3 Replacing an Emergency Door Release Button Prerequisites A spare emergency door release button of the same model is available and functional Impact on the System None Preparations Tools insulation tape step ladder 2 m Phillips screwdriver protective gloves Material spare emergency door release button Skill requirement ELV engineer FusionDC1000A Prefabricated All in One Data Center Maintena...

Page 123: ...bles 2 Tighten the screws on the base 3 Install the glass panel 4 Tighten the screws Step 3 Check that the new emergency door release button is working properly NOTE Remove the cover of the emergency door release button using a screwdriver press the button and rotate the door handle clockwise to open the pre fab module door If the door can be opened the emergency door release button is working pro...

Page 124: ...available and functional Impact on the System None Preparations Tools insulation tape step ladder 2 m Phillips screwdriver flat head screwdriver protective gloves Material spare door status sensor Documents monitoring drawings and parameters Skill requirement ELV engineer Procedure Step 1 Open the pre fab module door where the door status sensor to be replaced is installed NOTE Obtain permission f...

Page 125: ...r ensure that the upstream AC input power is off Impact on the System Lights in the data center will turn off Preparations Tools insulation gloves Phillips screwdriver step ladder label marker Materials spare AC actuator Skill requirement ELV engineer Procedure Step 1 Switch off the upstream AC input circuit breaker for the AC actuator Step 2 Label each cable based on the corresponding ports on th...

Page 126: ...After removing cables wrap exposed terminals with insulation tape and do not block cable labels If cable labels are blocked cables may be connected incorrectly Step 3 Install a new T H sensor onto the base NOTICE Before removing a T H sensor remember the DIP switch setting on it When you install a new T H sensor you need to set the same DIP switch setting for the new one Step 4 Reconnect cables to...

Page 127: ...ap ESD gloves label marker Material new PAD of the same model Skill requirement ELV engineer Procedure Step 1 Install the app on the spare PAD and connect the PAD to the network over the WiFi hotspot of the data center Step 2 Specify the user name and password for the app on the spare PAD and log in to check that the app works properly Step 3 Remove the old PAD from the support and install the spa...

Page 128: ...he cable connection and terminal type are correct and then perform the encoding again If an incorrect address is entered press Delete to delete the address and enter the address to be encoded again 3 On the screen of the fire alarm control panel choose Operation Auto Login to register the preset address code in the fire alarm control panel 4 Choose Bus Setting Detector Module Setting Check that th...

Page 129: ...2 Hold the smoke detector by hand and rotate it counterclockwise to remove it from the base Figure 4 65 Removing a smoke detector Step 3 Remove cables from the base using a Phillips screwdriver Step 4 Remove the screws on the base using a Phillips screwdriver and remove the base Step 5 Install the new base in the same position and reconnect the cables Step 6 Hold the smoke detector body align the ...

Page 130: ... same model is available and functional Impact on the System The fire extinguishing system stops working during the replacement Prerequisites Tools protective gloves step ladder Phillips screwdriver Material spare heat detector Document fire extinguishing device layout diagram standard Skill requirement fire engineer NOTE Before replacing the heat detector inform the related administration departm...

Page 131: ...s screwdriver and remove the base Step 5 Install the new base in the same position and reconnect the cables Step 6 Hold the heat detector body align the heat detector indicator with the position shown by 1 in Figure 4 68 and turn the detector body clockwise to the position shown by 2 in Figure 4 68 to install the heat detector Figure 4 68 Reference line for heat detector installation FusionDC1000A...

Page 132: ...nguishing drawings and parameters Skill requirement fire engineer NOTICE Before replacing the input output module inform the related administration department of the temporary downtime of the fire extinguishing system After the replacement inform the administration department that the system has become operational Procedure 1 Switch off the active and standby power supplies to the fire alarm contr...

Page 133: ...s release indicator Document fire extinguishing device layout diagram standard Skill requirement fire engineer NOTICE Before replacing the gas release indicator inform the related administration department of the temporary downtime of the fire extinguishing system After the replacement inform the administration department that the system has become operational Procedure Step 1 Switch off the activ...

Page 134: ...s release indicator is working properly 1 Disconnect the red and black cables from the pressure announciator as shown by 1 in Figure 4 71 2 Short circuit the cables from the fire alarm control panel to the pressure announciator as shown by 2 in Figure 4 71 NOTE If the gas release indicator turns on it is working properly Figure 4 71 Short circuiting the pressure announciator 1 Red and black cables...

Page 135: ...quirement fire engineer NOTE Before replacing the fire alarm horn strobe inform the related administration department of the temporary downtime of the fire extinguishing system After the replacement inform the administration department that the system has become operational Procedure Step 1 Switch off the active and standby power supplies to the fire alarm control panel Step 2 Pry open a seam at t...

Page 136: ...e End Follow up Procedure Dispose of the removed fire alarm horn strobe that is confirmed faulty 4 4 7 Replacing an Internal Fire Alarm Horn Strobe Prerequisites A spare fire alarm horn strobe of the same model is available and functional Impact on the System The fire extinguishing system stops working during the replacement Prerequisites Tools Phillips screwdriver step ladder Material spare fire ...

Page 137: ...omplete the address encoding Step 6 Install the new fire alarm horn strobe connect the cables and install the cover Figure 4 73 Connecting cables End 4 4 8 Replacing a Fire Alarm Sounder Prerequisites A spare fire alarm sounder of the same model is available and functional Impact on the System The fire extinguishing system stops working during the replacement Prerequisites Tools needle nose pliers...

Page 138: ...e alarm sounder out of the base Figure 4 74 Removing the fire alarm sounder Step 3 Cut off the power cable of the fire alarm sounder as shown in Figure 4 75 Figure 4 75 Cutting off the power cable Step 4 Connect the input wires with the two wires polarity insensitive of the spare fire alarm sounder and wrap the connection points using insulation tape NOTE Cord end terminals are recommended if appl...

Page 139: ...s Tools Phillips screwdriver flat head screwdriver protective gloves Material spare emergency start abort switch Document fire extinguishing device layout diagram standard Skill requirement fire engineer NOTE Before replacing the emergency start abort switch inform the related administration department of the temporary downtime of the fire extinguishing system After the replacement inform the admi...

Page 140: ...Switch on the power supply only after verifying that the cables are correctly connected Step 8 Use a Phillips screwdriver to tighten the screws at the upper and lower parts of the new emergency start abort switch Step 9 Switch on the active and standby power supplies to the fire alarm control panel Step 10 Check that the new emergency start abort switch is working properly NOTE If the run indicato...

Page 141: ...ing device layout diagram standard Skill requirement fire engineer Procedure Step 1 Switch off the standby power supply to the fire alarm control panel Figure 4 77 Positions of the active and standby power switches Step 2 Use a Phillips screwdriver to remove the battery fastening plates CAUTION Do not short circuit the positive and negative terminals during the operation FusionDC1000A Prefabricate...

Page 142: ...nect the battery cables to the fire alarm control panel in the same way Figure 4 79 Connecting battery cables NOTE Distinguish the positive and negative battery terminals when connecting battery cables Step 6 Use a Phillips screwdriver to secure the battery fastening plates FusionDC1000A Prefabricated All in One Data Center Maintenance Guide IT Scenario 4 Parts Replacement Issue 01 2021 04 20 Copy...

Page 143: ...y 4 4 11 Replacing a Fire Cylinder Prerequisites A spare fire cylinder of the same model is available and functional Impact on the System The fire extinguishing system stops working during the replacement Prerequisites Tools pallet truck Phillips screwdriver protective gloves adjustable wrench Materials spare fire cylinder sealing tape Document fire extinguishing device layout diagram standard Ski...

Page 144: ...tandby power supplies to the fire alarm control panel Figure 4 81 Switching off the active and standby power supplies Step 2 Disconnect the interconnection cables between the electromagnetic valve and the fire alarm control panel as shown in Figure 4 82 Disconnect cables from the electromagnetic valve as shown in Figure 4 83 FusionDC1000A Prefabricated All in One Data Center Maintenance Guide IT S...

Page 145: ...cables to the electromagnetic valve Step 3 Disconnect the cables from the pressure announciator as shown in Figure 4 84 FusionDC1000A Prefabricated All in One Data Center Maintenance Guide IT Scenario 4 Parts Replacement Issue 01 2021 04 20 Copyright Huawei Technologies Co Ltd 137 ...

Page 146: ... position Step 7 Move the new fire cylinder to the installation position using a pallet truck and tighten the fire cylinder steel straps NOTE Do not impact or strike the fire cylinder during transportation or installation Assign sufficient people for transportation and installation if no auxiliary tool is available Keep the pressure gauge panel outward so that people can view the reading FusionDC1...

Page 147: ...ect the cables to the pressure announciator Step 10 Reinstall the adapter and high pressure hose Step 11 Connect the cables between the electromagnetic valve and the fire alarm control panel Step 12 After installing the fire cylinder remove the safety pin on the fire cylinder FusionDC1000A Prefabricated All in One Data Center Maintenance Guide IT Scenario 4 Parts Replacement Issue 01 2021 04 20 Co...

Page 148: ...stem The fire extinguishing system stops working during the replacement Prerequisites Tools diagonal pliers insulation tape gloves Phillips screwdriver Material spare fire alarm control panel Documents documents delivered with the fire alarm control panel Skill requirement fire engineer NOTICE Before replacing the fire alarm control panel inform the related administration department of the tempora...

Page 149: ...he cables from the batteries and take out the batteries Step 5 Remove all cables connected to the fire alarm control panel terminals and move the corrugated pipes and cables outside of the pre fab module NOTE Keep labels on the cables intact so that cables can be connected to the correct terminals later Step 6 Remove the screws using a Phillips screwdriver and take out the faulty fire alarm contro...

Page 150: ...y fastening plates Step 11 Switch on the circuit breaker in the fire extinguishing PDB Step 12 Switch on the active and standby power supplies to the fire alarm control panel Step 13 Check that the new fire alarm control panel is working properly NOTE If the power indicator is on and the alarm indicator is off the fire alarm control panel is working properly End Follow up Procedure Dispose of the ...

Page 151: ...ncy light with the screw on the wall and pull down the emergency light to secure it Step 6 Loosen the emergency panel using a flat head screwdriver and remove the panel Step 7 Remove screws from the emergency light base using a Phillips screwdriver and remove the base Step 8 Install the new emergency light base and the panel in the same way Step 9 Remove the red pin and reinstall the protective co...

Page 152: ...batteries to the installation position indicated on the fire extinguishing device layout diagram Step 2 Switch off the standby power supply for the ASD Figure 4 93 Switching off the standby power supply Step 3 Disconnect cables from the faulty ASD batteries Step 4 Use a Phillips screwdriver to remove screws on the battery protective panel and remove the protective panel Step 5 Replace the batterie...

Page 153: ...ishing System Components CE 4 5 1 Replacing a Smoke Detector CE Prerequisites A spare smoke detector of the same model is available and functional Impact on the System The fire extinguishing system stops working during the replacement Preparations Tools protective gloves step ladder Phillips screwdriver Materials spare smoke detector Documents fire extinguishing drawings and parameters Skill requi...

Page 154: ... parallel remove the terminal resistor from the faulty smoke detector and connect the resistor to the new smoke detector when you replace the smoke detector Step 4 Remove the screws on the base using a Phillips screwdriver and remove the base Step 5 Install the new base to the same position and reconnect the cables Step 6 Insert the new smoke detector into the base and rotate it clockwise until it...

Page 155: ...orm the related administration department of the temporary downtime of the fire control system After the replacement inform the administration department that the system has become operational Procedure Step 1 Disconnect the battery cables and switch off the input circuit breaker of the extinguishant control panel Step 2 Hold the heat detector and rotate it counterclockwise to remove it from the b...

Page 156: ...ing properly End 4 5 3 Replacing Warning Signs CE Prerequisites A spare warning sign of the same model is available and functional Impact on the System The fire extinguishing system stops working during the replacement Preparations Tools Phillips screwdriver protective gloves step ladder Materials spare warning sign Documents fire extinguishing drawings and parameters Skill requirement fire engine...

Page 157: ...st button on the pneumatic switch to short circuit the cables inside to simulate an extinguishant release and trigger the warning sign NOTE If the warning sign turns on the warning sign is working properly 2 Flip the key Enable Control rightward Reset the extinguishant control panel by pressing Reset on it Then reset the key Enable Control leftward End 4 5 4 Replacing an Internal Horn Strobe CE Pr...

Page 158: ...ng terminal ports for later connection As a terminal resistor is connected to the last internal horn strobe in parallel remove the terminal resistor from the faulty horn strobe and connect the resistor to the new horn strobe when you replace the horn strobe Step 4 Remove screws from the horn strobe base using a Phillips screwdriver and remove the base Step 5 Install the new horn strobe in the same...

Page 159: ...tes A spare horn strobe is available and functional Impact on the System The fire extinguishing system stops working during the replacement Preparations Tools Phillips screwdriver step ladder Materials spare horn strobe key to the control box Documents fire extinguishing drawings and parameters Skill requirement fire engineer NOTICE Before replacing the horn strobe inform the related administrativ...

Page 160: ...t the cables Install the new base and cover Figure 4 100 Connecting cables Step 6 Switch on the input circuit breaker of the extinguishant control panel and connect the battery cables Step 7 Check that the new horn strobe is working properly 1 Disconnect the wiring terminals from the electrical actuator on the fire cylinder FusionDC1000A Prefabricated All in One Data Center Maintenance Guide IT Sc...

Page 161: ...xtinguishing system stops working during the replacement Preparations Tools hex key Phillips screwdriver protective gloves step ladder Materials spare fire alarm bell Documents fire extinguishing drawings and parameters Skill requirement fire engineer NOTICE Before replacing the fire alarm bell inform the related administrative departments of the temporary downtime of the fire extinguishing system...

Page 162: ...es Step 7 Check whether the new fire alarm bell is working properly 1 Flip the key to Enable Control rightward and set the access level of the extinguishant control panel to 2 2 Press Silence Sound Alarm to start or abort the fire alarm bell NOTE If the alarm bell starts and aborts normally and rings loud and clear when it is started the alarm bell is working properly 3 Reset the key to Enable Con...

Page 163: ...ent that the system has become operational Procedure Step 1 Disconnect the battery cables and switch off the input circuit breaker of the extinguishant control panel Step 2 Remove the screws on the panel of the extinguishant abort button using a Phillips screwdriver Figure 4 102 Removing the extinguishant abort button Step 3 Disconnect the cables from the extinguishant abort button and remove the ...

Page 164: ... the extinguishant abort button base using a Phillips screwdriver and remove the base Figure 4 104 Removing the base Step 5 Install the new extinguishant abort button base in the same way Step 6 Connect the cables to the panel of the new extinguishant abort button Connect cables to the correct terminals Step 7 Install the new extinguishant abort button panel in the same way FusionDC1000A Prefabric...

Page 165: ...e it counterclockwise NOTE If you press the extinguishant abort button the countdown stops After you reset the extinguishant abort button the countdown starts from zero again This indicates that the extinguishant abort button is working properly 4 Reset the manual gas release button 5 Flip the key Enable Control counterclockwise rightward Reset the extinguishant control panel by pressing Reset on ...

Page 166: ...e extinguishant control panel Step 4 Connect battery cables to the extinguishant control panel in the same way Figure 4 106 Connecting battery cables NOTICE Distinguish the positive and negative battery terminals when connecting battery cables End 4 5 9 Replacing a Fire Cylinder CE Prerequisites A spare fire cylinder of the same model is available and functional Impact on the System The fire extin...

Page 167: ...rative departments that the system has become operational Figure 4 107 Position of the 2ND STAGE NO terminal Procedure Step 1 Disconnect the battery cables and switch off the input circuit breaker of the extinguishant control panel Step 2 Move the new fire cylinder using a pallet truck to a position near the pre fab module door NOTICE Do not impact or strike the fire cylinder during transportation...

Page 168: ...TICE Wrap the threads with sealing tape to ensure air tightness 1 Connect the threaded adapter to the fire cylinder 2 Connect the I shaped connection pipe to the threaded adapter 3 Connect the high pressure hose Step 10 Reinstall the electrical actuator to the container valve of the fire cylinder 1 Verify that the electrical actuator ejector is reset If the ejector is not reset press the ejector N...

Page 169: ...ch insulation gloves Phillips screwdriver key to the cabinet door torque wrench pipe cutter and pipe holder Materials Check the fire cylinder and all components for any damage abrasion or corrosion If there is any visible abrasion or corrosion replace the damaged components and all corroded components Check that the valve is closed vertical to the cylinder Fill the fire cylinder with extinguishant...

Page 170: ... fire cylinder fastener 4 Take out the fire cylinder Figure 4 110 Removing the fire cylinder Step 3 Install a new fire cylinder Keep it upright Step 4 Install the fire trace tube on the fire cylinder NOTICE Do not bend or twist the fire trace tube Otherwise the fire cylinder may fail 1 Cut off the end of the fire trace tube evenly FusionDC1000A Prefabricated All in One Data Center Maintenance Guid...

Page 171: ...he end of the fire trace tube to the threaded nozzle using a pipe holder NOTICE Hold the pipe holder close to the end to avoid bending the tube during pipe insertion Figure 4 112 Installing the fire trace tube 3 Tighten the connection nut to 7 N m using an adjustable torque wrench FusionDC1000A Prefabricated All in One Data Center Maintenance Guide IT Scenario 4 Parts Replacement Issue 01 2021 04 ...

Page 172: ...r observe the pressure gauge again The pressure reading should remain unchanged End 4 5 11 Replacing an Extinguishant Control Panel CE Prerequisites A spare extinguishant control panel of the same model is available and functional Impact on the System The fire extinguishing system stops working during the replacement Preparations Tools Phillips screwdriver protective gloves Materials spare extingu...

Page 173: ...with their corresponding port numbers for later connection Step 4 Remove the corrugated pipes and cables from the extinguishant box Step 5 Remove the screws using a Phillips screwdriver and take out the faulty extinguishant control panel Figure 4 114 Removing the extinguishant control panel Step 6 Install the new extinguishant control panel in the same position Step 7 Put the corrugated pipes and ...

Page 174: ...spare emergency light Skill requirement fire engineer Procedure Step 1 Turn off the upstream switch of the emergency light power cable Figure 4 115 Emergency light Step 2 Remove the protective cover of the emergency light Step 3 Loosen the emergency panel using a flat head screwdriver and remove the panel Step 4 Remove screws from the emergency light base using a Phillips screwdriver and remove th...

Page 175: ...er box batteries of the same model are available and functional Impact on the System None Preparations Tools Phillips screwdriver protective gloves Materials spare ASD power box batteries Documents fire extinguishing drawings and parameters Skill requirement fire engineer Procedure Step 1 Move the ASD power box batteries to the installation position indicated on the fire extinguishing device layou...

Page 176: ...the positive and negative battery terminals when connecting battery cables Figure 4 118 Connecting battery cables Step 6 Reinstall the battery protective panel Step 7 Check whether the new ASD batteries are working properly NOTE Turn on the standby power switch If the power fault indicator is off the batteries are working properly End FusionDC1000A Prefabricated All in One Data Center Maintenance ...

Page 177: ...tep 1 Cut the damaged part into a regular rectangle Figure 5 1 Cutting the damaged part into a regular rectangle Step 2 Use a polishing machine to polish the paint on the cut surface and ensure that the polishing width is 10 20 mm Step 3 Cut the prepared material into the same size as the hole to be welded Step 4 Fully weld along the joints FusionDC1000A Prefabricated All in One Data Center Mainte...

Page 178: ...with alcohol and apply paint epoxy zinc rich primer epoxy intermediate paint polyurethane topcoat according to the procedure After the primer is dry apply the epoxy intermediate paint After the intermediate paint is dry apply the polyurethane topcoat End FusionDC1000A Prefabricated All in One Data Center Maintenance Guide IT Scenario 5 Appendixes Issue 01 2021 04 20 Copyright Huawei Technologies C...

Page 179: ...tch C CAN control area network CE Conformite Europende E ECC energy control center L LCD liquid crystal display M MDU monitor display module FusionDC1000A Prefabricated All in One Data Center Maintenance Guide IT Scenario 6 Acronyms and Abbreviations Issue 01 2021 04 20 Copyright Huawei Technologies Co Ltd 171 ...

Page 180: ...unit R rPDU rack power distribution unit S SIM subscriber identity module U UPS uninterruptible power system FusionDC1000A Prefabricated All in One Data Center Maintenance Guide IT Scenario 6 Acronyms and Abbreviations Issue 01 2021 04 20 Copyright Huawei Technologies Co Ltd 172 ...

Reviews: