background image

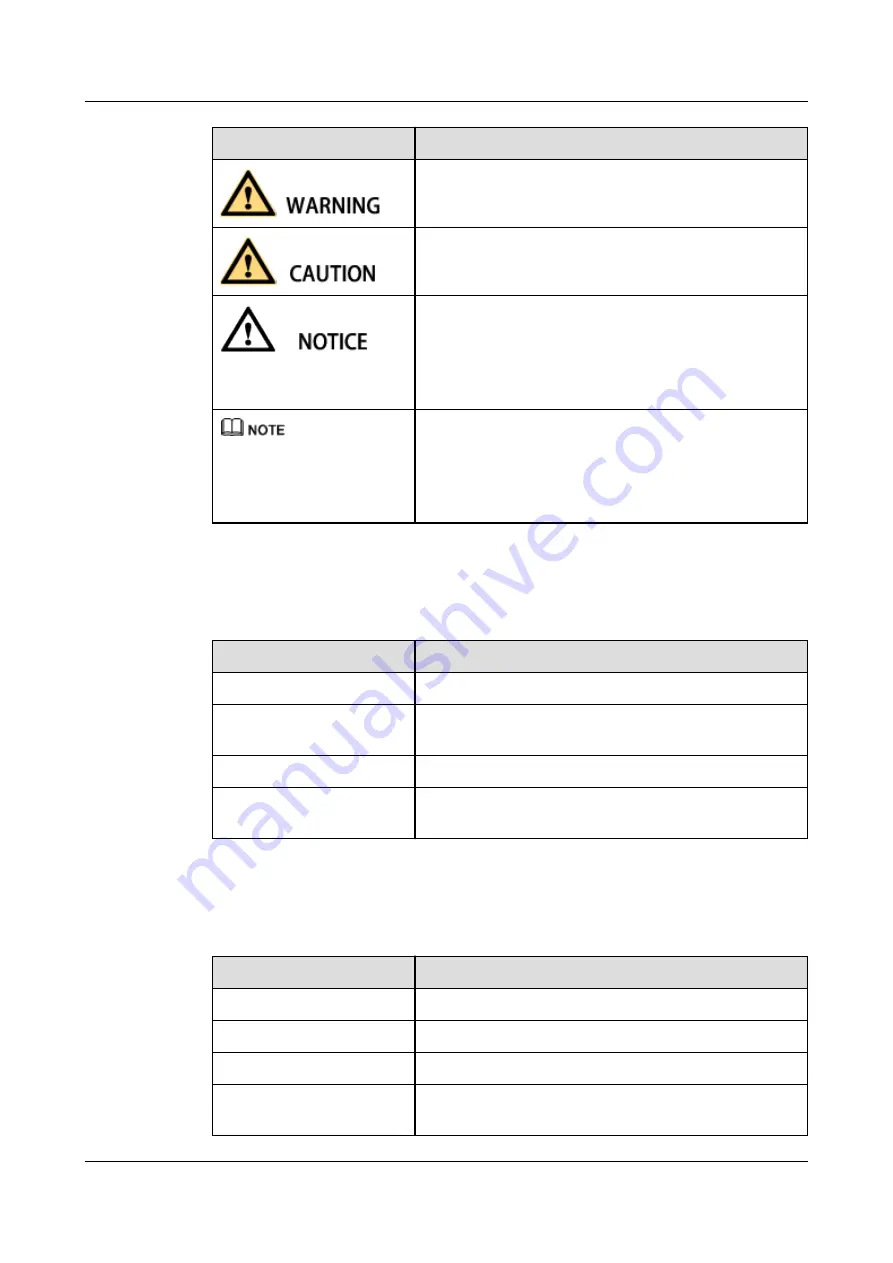
Symbol

Description

Indicates a potentially hazardous situation which, if not
avoided, could result in death or serious injury.

Indicates a potentially hazardous situation which, if not
avoided, may result in minor or moderate injury.

Indicates a potentially hazardous situation which, if not
avoided, could result in equipment damage, data loss,
performance deterioration, or unanticipated results.
NOTICE is used to address practices not related to personal
injury.

Calls attention to important information, best practices and
tips.
NOTE is used to address information not related to
personal injury, equipment damage, and environment
deterioration.


General Conventions

The general conventions that may be found in this document are defined as follows.

Convention

Description

Times New Roman

Normal paragraphs are in Times New Roman.

Boldface

Names of files, directories, folders, and users are in

boldface

. For example, log in as user 

root

.

Italic

Book titles are in 

italics

.

Courier New

Examples of information displayed on the screen are in
Courier New.


Command Conventions

The command conventions that may be found in this document are defined as follows.

Convention

Description

Boldface

The keywords of a command line are in 

boldface

.

Italic

Command arguments are in 

italics

.

[ ]

Items (keywords or arguments) in brackets [ ] are optional.

{ x | y | ... }

Optional items are grouped in braces and separated by
vertical bars. One item is selected.

EP650
User Guide

About This Document

Issue 11 (2016-12-05)

Huawei Proprietary and Confidential

Copyright © Huawei Technologies Co., Ltd.

iv

Summary of Contents for EP650 Series

Page 1: ...EP650 V200R002C00 User Guide Issue 11 Date 2016 12 05 HUAWEI TECHNOLOGIES CO LTD ...

Page 2: ... be within the purchase scope or the usage scope Unless otherwise specified in the contract all statements information and recommendations in this document are provided AS IS without warranties guarantees or representations of any kind either express or implied The information in this document is subject to change without notice Every effort has been made in the preparation of this document to ens...

Page 3: ...gineers l Field engineers Organization 1 Change History This section describes the changes between versions of the EP650 User Guide 2 Safety Information This section contains important information pertaining to the operating instructions of your device It also contains information about how to use the device safely Read this information carefully before using your device 3 EP650 Overview 4 Getting...

Page 4: ...ribes how to customize phone settings 14 Multi user Login EP650 support multi user login 15 Batch Install APK You can install an application software to several EP650s in a batch on the eOMC910 16 Certification Information This section describes the certification that EP650 has passed 17 Glossary This table provides the related glossary for reference Conventions Symbol Conventions The symbols that...

Page 5: ... conventions that may be found in this document are defined as follows Convention Description Times New Roman Normal paragraphs are in Times New Roman Boldface Names of files directories folders and users are in boldface For example log in as user root Italic Book titles are in italics Courier New Examples of information displayed on the screen are in Courier New Command Conventions The command co...

Page 6: ... For example choose File Create Folder Keyboard Operations The keyboard operations that may be found in this document are defined as follows Format Description Key Press the key For example press Enter and press Tab Key 1 Key 2 Press the keys concurrently For example pressing Ctrl Alt A means the three keys should be pressed concurrently Key 1 Key 2 Press the keys in turn For example pressing Alt ...

Page 7: ...Drag Press and hold the primary mouse button and move the pointer to a certain position EP650 User Guide About This Document Issue 11 2016 12 05 Huawei Proprietary and Confidential Copyright Huawei Technologies Co Ltd vi ...

Page 8: ...19 4 1 3 Charging the Battery 19 4 2 Attaching the Antenna 20 4 3 Installing the Back Clip 21 4 4 Attaching the Strap 22 4 5 Powering On or Off 23 4 6 Connecting an EP650 to a Computer 24 5 Trunking 25 5 1 Group Call 25 5 2 PTP Call 27 6 DMO 28 7 Video Monitoring 30 8 Video Uploading 31 9 Messaging 32 10 Contacts 33 11 Media 34 12 Tools 36 EP650 User Guide Contents Issue 11 2016 12 05 Huawei Propr...

Page 9: ...14 Multi user Login 40 15 Batch Install APK 42 16 Certification Information 43 17 Glossary 44 EP650 User Guide Contents Issue 11 2016 12 05 Huawei Proprietary and Confidential Copyright Huawei Technologies Co Ltd viii ...

Page 10: ... Group Call 15 Batch Install APK Added APK compatibility requirements 3 3 Specifications Added the software specifications Compared with V200R002C00 10 2016 08 02 no information is deleted 10 2016 08 02 This is the tenth release of V200R002C00 Compared with V200R002C00 09 2016 05 30 this issue has no new information Compared with V200R002C00 09 2016 05 30 this issue has the following changes Topic...

Page 11: ...s deleted 08 2015 09 20 This is the eighth release of V200R002C00 Compared with V200R002C00 07 2015 06 30 this issue has no new information Compared with V200R002C00 07 2015 06 30 this issue has the following changes Topic Description 3 1 Appearance Added the description about the mute function 6 DMO Added the description about DMO group function Compared with V200R002C00 07 2015 06 30 no informat...

Page 12: ...with V200R002C00 05 2015 05 15 no information is deleted 05 2015 05 15 This is the fifth release of V200R002C00 Compared with V200R002C00 04 2015 04 10 this issue has the following new information l 15 Batch Install APK Compared with V200R002C00 04 2015 04 10 this issue has the following changes Topic Description 3 3 Specifications Added the description about the working hours Compared with V200R0...

Page 13: ...cription about power saving mode Compared with V200R002C00 02 2014 12 30 no information is deleted 02 2014 12 30 This is the second release of V200R002C00 Compared with V200R002C00 01 2014 03 12 this issue has no new information Compared with V200R002C00 01 2014 03 12 this issue has the following changes Topic Description 4 5 Powering On or Off Added the description about powering on the phone for...

Page 14: ... with your device or its accessories which may include parts that can be detached from the device may be dangerous as it may present a choking hazard Ensure that small children are kept away from the device and accessories Potentially Explosive Atmosphere l Power off your device in any area with a potentially explosive atmosphere and comply with all signs and instructions Areas that may have poten...

Page 15: ...e handed over to a certified collection point for recycling or proper disposal at the end of their life Accessories Use ONLY original batteries chargers and accessories supplied by the device manufacturer The use of any other type of battery charger or accessory may invalidate any warranty for the device may be in violation of local rules or laws and may be dangerous Battery and Charger l Use ONLY...

Page 16: ...ny chemical detergent powder or other chemical agents such as alcohol and benzene to clean the device and the charger Otherwise parts of the device may be damaged or a fire can be caused You can clean the device and the charger with a piece of damp and soft antistatic cloth l Do not dismantle the device or accessories Otherwise the warranty on the device and accessories is invalid and the manufact...

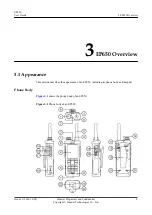
Page 17: ...ce of an EP650 including its phone body and keypad Phone Body Figure 3 1 shows the phone body of an EP650 Figure 3 1 Phone body of an EP650 EP650 User Guide 3 EP650 Overview Issue 11 2016 12 05 Huawei Proprietary and Confidential Copyright Huawei Technologies Co Ltd 8 ...

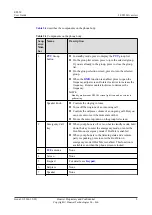
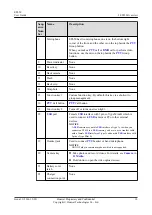
Page 18: ...knob l Controls the ringing volume l Turns off the ringtone of an incoming call l Controls the earpiece volume of an ongoing call But you can not enter or exit the mute state with it l Moves the cursor up down on the group list screen 2 Emergency Call key l When your phone is off or is on but in standby mode hold down the key to enter the emergency mode or enter the Hot Mic on emergency mode if Ho...

Page 19: ...SB port Female USB interface with 5 pins of type Mini B which is used to connect to USB camera or PC or other external devices NOTICE A USB camera uses a male USB interface of type A so when you connect an EP650 to a USB camera you have to use a transfer cable with a female USB interface of type A and a male USB interface with 5 pins of type Mini B 19 Headset jack Used to connect PTT headset or ha...

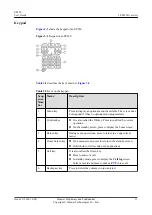
Page 20: ...tandby screen press to display the home screen 3 Return key During menu operations press to return to an upper level menu 4 Home Screen key l On a menu screen press to return to the standby screen l Hold down to list recently used applications 5 Call key It is also called the Green key l Press to answer a call l In standby mode press to display the Call log screen Select a record and press to make...

Page 21: ...eys Press to move the cursor during text editing The Up Left Right key can function as a hot key after being set By default the Up key is the hot key for the messaging function For details see Language keyboard 9 Alphanumeric keypad The Alphanumeric keypad consists of twelve keys arranged in a specific order Ten of them are numeric keys from 0 to 9 and the other two are and Hold down to lock or un...

Page 22: ...e service area The more blue bars the stronger the signal Network signal strength icon Your phone is not in the service area no signal DMO icon Your phone is working in DMO mode Profiles icon silent mode on Profiles icon vibration mode on GPS icon EP650 is locating When is filled EP650 is located Notification icon EP650 receives new information Messaging icon EP650 receives new messages EP650 User...

Page 23: ...ery Battery capacity mAH 3000 Protection rating IP67 LTE operating bands MHz l EP650 C71 1 4 G 1447 to 1467 1 8 G 1785 to 1805 l EP650 C72 2 3 G 2300 to 2400 DMO operating band MHz 400 to 470 Power level dBm l 1 4G 1 8G 2 3G 23 to 27 l DMO 28 to 32 Screen size 2 4 inch Screen resolution 240 320 Resolution of video calls 288 352 CIF Touchscreen Not supported Front camera Not supported Back camera 1...

Page 24: ...l Supported Half duplex PTP call Supported Group call broadcast mode and emergency mode Supported Hot mic call in emergency mode Supported Later entry Supported Dynamic regrouping Supported Speaker displaying Supported Remotely enabling disabling terminal Supported Time limited call Supported Temporary group call Supported Fallback mode Supported Incoming outgoing call barring Supported Maximum su...

Page 25: ...olution QCIF CIF D1 720P 1080P Data rate 25 frames second Automatic bit rate adjustment Supported 3 4 Accessory This section describes information about EP650 accessories Table 3 6 lists the accessories of EP650 To obtain more information contact the device provider Table 3 6 EP650 Accessory List No Name Description 1 Hand speaker shoulder speaker An optional accessory 2 Lightweight neck band in e...

Page 26: ...00mAh 9 Rotatable Holster An optional accessory 10 Audio Accessories Transfer Cable An optional accessory To connect audio accessories with general Hirose interface 11 Analog DV Transfer Cable An optional accessory DV analog signal to USB interface 12 USB HD Camera An optional accessory Used with a USB cable 13 USB cable An optional accessory 14 Low Temperature Battery An optional accessory It is ...

Page 27: ... to install the battery 1 Align the battery top with the battery compartment 2 Press the battery down until it clicks into place 3 Replace the battery cover a Align the tabs on the battery cover with the slots in the battery compartment b Press down the battery cover until it clicks into place c Fit the latches into the holes and turn them tight as shown EP650 User Guide 4 Getting Started Issue 11...

Page 28: ...battery cover a On the lower corners of the battery cover turn and remove the latches as shown b Pull the cover up and off the phone 2 Lift the battery up and out of the phone using the slot at battery bottom 4 1 3 Charging the Battery This section describes how to charge the battery Figure 4 3 illustrates how to charge the battery using the supplied charger EP650 User Guide 4 Getting Started Issu...

Page 29: ...s bar on stops blinking and is steady gray your phone is fully charged 3 Remove the charger NOTICE l You MUST shake the phone body forward and backward slowly and softly when removing the phone from the charger after the phone is fully charged l Charge the battery at least once per six months Otherwise the battery will be damaged 4 2 Attaching the Antenna This section describes how to attach the a...

Page 30: ...in the phone body and screw the antenna tightly into place 4 3 Installing the Back Clip This section describes how to install the back clip Figure 4 5 illustrates how to install the back clip EP650 User Guide 4 Getting Started Issue 11 2016 12 05 Huawei Proprietary and Confidential Copyright Huawei Technologies Co Ltd 21 ...

Page 31: ... the ear holes of the back clip with the screw in holes in the phone body Tighten the screws 4 4 Attaching the Strap This section describes how to attach the strap Figure 4 6 illustrates how to attach the strap EP650 User Guide 4 Getting Started Issue 11 2016 12 05 Huawei Proprietary and Confidential Copyright Huawei Technologies Co Ltd 22 ...

Page 32: ... power on and power off an EP650 Powering On When an EP650 is off hold down to power on the phone Choose a language and the time zone when you power on the phone for the first time Powering Off When an EP650 is on hold down to power off the phone EP650 User Guide 4 Getting Started Issue 11 2016 12 05 Huawei Proprietary and Confidential Copyright Huawei Technologies Co Ltd 23 ...

Page 33: ... of an EP650 as a USB flash drive without the need for installing an EP650 driver on the computer NOTE Before connecting an EP650 to a computer ensure that the phone is off or on Do not connect an EP650 to a computer when the phone is being started Otherwise the start up tone of the phone may fail to be properly played If you connect an EP650 that is off to a computer the phone will be charged An ...

Page 34: ...an list is terminated the EP650 can listens to the group it joins in again Set the group scan list as follows 1 On the home screen press to select Group and press 2 Select the Start group scan list option to enable the group scan function 3 Press and select Edit Scan List Press Up Down to select groups and press 4 Press Save to finish the setting Joining a Group Before making a group call join a g...

Page 35: ...ll fail to initiate a group call The time interval of continuously pressing the PTT Call button must be more than 1 second Receiving a Group Call An EP650 in standby mode or listening to a group automatically receives calls in the subscribed group When receiving a group call the standby screen displays group and speaker information If EP650 receives a temporary group call the screen displays tempo...

Page 36: ...nter the call log interface and select a record from the call log then press Or enter the Contacts to select a contact and make a PTP voice call Answering a PTP Call Press to answer a PTP call After you answer a PTPcall the standby screen displays information about the calling party Making an Emergency Call If you have subscribed to an emergency call number hold down the Emergency Call key on top ...

Page 37: ...e adjusted value is saved 2 Press the PTT Group button or to save the adjusted value and exit the frequency adjust screen Setting DMO Parameters On the DMO screen press to set the parameters and press again to save settings l Base Freq Base Freq is the base frequency which ranges from 400 0125 MHz to 469 9875 MHz l Diff Freq The default value of Diff Freq is 0 which means relay function is disable...

Page 38: ...more sensitive the signal the larger the DMO coverage and the higher the noise You can adjust the noise level according to the DMO coverage and calling quality Making a DMO Call 1 Press the PTT Call button on the side of the EP650 body and speak after hearing a beep tone 2 Release the PTT Call button to terminate the call An EP650 automatically receives the DMO calls within its frequency range Swi...

Page 39: ...elect a record from the call log Hold down and select Video monitor Enter the desired number using numeric keys press and select Video monitor 2 On the home screen press to select V_Monitor press to set the following parameters Video Resolution settings The default value is D1 Restore defaults To restore original settings select this option 3 To stop video monitoring press EP650 User Guide 7 Video...

Page 40: ...tion l The superimposed watermark function of a terminal can be enabled by delivering OTA parameter settings on the eOMC910 2 Press Left to switch to the video library and select file to upload You can press Right to switch photograph or camera mode 3 On the video capture screen press and set White balance Video resolution Open Close Torch Voice on off Dispatcher number Show service status Do not ...

Page 41: ...ect New Message to create a new message 4 Enter a phone number or contact name in the recipient text box Or press and select contacts from the Contact list 5 Compose a message in the message text box NOTE l The maximum size of the message is 1000 bytes l To send a multimedia message press Select Add subject and enter a message subject Select Add attach and attach a file Available attachment file t...

Page 42: ...screen create modify delete or collect favorite contacts You can also import contacts from the serving network Contacts downloaded from the serving network cannot be deleted and you can only add a remark name EP650 User Guide 10 Contacts Issue 11 2016 12 05 Huawei Proprietary and Confidential Copyright Huawei Technologies Co Ltd 33 ...

Page 43: ...hoto viewfinder screen press to perform focusing or hold down to take a photo On the video viewfinder screen press to start or stop recording a video On the camera menu screen press to confirm your selection l Press the Right key of to switch between taking photos and recording videos l Press the Left key of to switch local or upload mode In the upload mode you can set the dispatcher number and up...

Page 44: ...Albums Songs and Playlists tabs You can perform any of the following operations l Press to open the music menu l If music is being played press to play the music in the background If no music is played press to return to an upper level menu l press to select a desired menu option Left key When the cursor is on the progress slider press to rewind music Right key When the cursor is on the progress s...

Page 45: ...ify the settings l Configuring alarm parameters Press and select Settings set the following parameters Alarm in silent mode Press to select or deselect this option If the option is selected and your phone is in silent mode the alarm will sound at the specified time If the option is deselected and your phone is in silent mode the alarm is silenced Alarm volume Press Left Right to set the alarm volu...

Page 46: ...ss to select the add subtract multiply x or divide sign l Press to obtain the calculation result l Press to clear the entered content or calculation result EP650 User Guide 12 Tools Issue 11 2016 12 05 Huawei Proprietary and Confidential Copyright Huawei Technologies Co Ltd 37 ...

Page 47: ...ot access an LTE network l VPN settings This parameter allows you to add VPNs and configure the VPNs The current version does not support this parameter Power saving mode Set to open or close the power saving features Keyboard lock Set the interval to automatically lock the keypad The default interval is 30s Display Set screen brightness whether to enable automatic screen rotation whether to enabl...

Page 48: ... as location the power on password and storage security Language keyboard Set your phone language and the input method You can also customize a hot key function for the Up Left Right key or Function key 1 Date time Set date time zone time and 24 hour time format for an EP650 If Automatic is selected EP650 will update the time from the network More Clear the data and cache on your EP650 and view sy...

Page 49: ... settings on the eOMC910 l Before you log in to a terminal the terminal cannot perform P2P calls group calls or video services and it can only receive short messages or multimedia messages However the GIS information reporting and DMO functions work normally l One account can be used to log in to only one terminal If an account is used to log in to another terminal this account is forced to log ou...

Page 50: ...l with a new username Changing Passwords 1 On the home screen press to select U_Manage and press The user management screen is displayed 2 Select Change password 3 Enter the current password and then enter a new password EP650 User Guide 14 Multi user Login Issue 11 2016 12 05 Huawei Proprietary and Confidential Copyright Huawei Technologies Co Ltd 41 ...

Page 51: ...equirements compatible with Android SDK version 10 l File size is less than 30M l Rename the file in accordance with the following format EP650V200R002C00BXXXCFGXXXX zip Where EP650V200R002C00BXXX is the current version of the software CFGXXXX can be sequentially numbered such as CFG0001 CFG0002 Batch installation Create a Upgrade Config task in the terminal management client to install APK to sev...

Page 52: ...e directive 73 23 EEC issued by European Commission The CE mark is a mandatory conformity mark for products placed on the market in the European Economic Area RoHS RoHS restricts the use of certain hazardous materials in the manufacturing of electronic and electrical equipment in consideration of human health and environmental protection RoHS is enforced in each member state of the European Union ...

Page 53: ...P Internet Protocol LTE Long Term Evolution MAC Media Access Control MP3 MPEG audio layer 3 OTA Over the Air PC Personal Computer PIN Personal Identification Number PTP Point To Point PTT Push To Talk RoHS Restriction of the Use of Certain Hazardous Substances SAR Specific Absorption Rate SSID Service Set Identifier TMO Trunking Mode Operation EP650 User Guide 17 Glossary Issue 11 2016 12 05 Huawe...

Page 54: ...tual Private Network Wi Fi Wireless Fidelity WLAN Wireless Local Area Network WMA Windows Media Audio WPS Wi Fi Protected Setup EP650 User Guide 17 Glossary Issue 11 2016 12 05 Huawei Proprietary and Confidential Copyright Huawei Technologies Co Ltd 45 ...

Reviews: