background image


4 Configuring the WAN Interface 


4-5 


Table 4-3


Parameters for the 

PPP Username and Password 

page 

Parameter 

Description 

PPP Username 

The user name of the PPP, which is provided by the 
Internet Service Provider. 

PPP Password 

The user name of the PPP, which is provided by the 
Internet Service Provider. 

PPP's MTU:[296-1492] 

The maximum length of the transported IP package 
with the selected PPPoA protocol. 

PPP's LCP Echo-req 
Interval:[10-60] 

It specifies the time interval of the two echo-requests. 

Authentication Method 

The authentication method of the PPP protocol. 


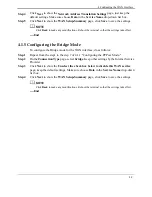
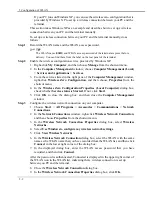
Step 10


Click 

Next

 to show the 

Enable WAN Service 

page, just keep the default settings. Make 

sure choose 

Data

 in the 

Service Name 

drop-down list box. 

Step 11


Click 

Next

 to show the 

WAN Setup-Summary 

page, click 

Save

 to save the settings. 


Click 

Back

 to make any modifications. Reboot the terminal so that the settings take effect. 

Summary of Contents for EchoLife HG553

Page 1: ...EchoLife HG553 Home Gateway HUAWEI TECHNOLOGIES CO LTD User Manual ...

Page 2: ...with comprehensive technical support and service For any assistance please contact our local office or company headquarters Huawei Technologies Co Ltd Website http www huawei com Huawei Proprietary and Confidential Copyright Huawei Technologies Co Ltd User Manual ...

Page 3: ...ed or may be limited by local network operators or network service providers Thus the descriptions herein may not exactly match the product or its accessories you purchase Huawei Technologies Co Ltd reserves the right to change or modify any information or specifications contained in this manual without prior notice or obligation NO WARRANTY THE CONTENTS OF THIS MANUAL ARE PROVIDED AS IS EXCEPT AS...

Page 4: ...ng the PPPoE Mode 4 5 4 1 3 Configuring the MER Mode 4 7 4 1 4 Configuring the IPoA Mode 4 8 4 1 5 Configuring the Bridge Mode 4 9 4 2 Selecting HSPA uplink mode 4 9 5 Configuration of WLAN 5 1 5 1 Setting Up a Wireless Connection by the Wi Fi Button 5 1 5 2 Setting Up a Wireless Connection Manually 5 1 6 Configuring Frequently Used Functions 6 1 6 1 Configuring Multiple PCs to Access the Internet...

Page 5: ...y Specified PCs to Be Connected to a WLAN 6 11 6 6 Controlling the Internet Access Rights of PCs 6 13 7 Maintenance Guide 7 1 7 1 Changing the Administrator Password 7 1 7 2 Configuring the LAN Interface 7 2 7 3 Backing Up or Updating a Configuration File 7 3 7 4 Restoring Default Settings 7 3 7 5 Restarting the Terminal 7 4 7 6 Updating Software 7 5 8 FAQs 8 1 A Technical Specifications A 1 B Def...

Page 6: ... Figure 4 4 PPP Username and Password page for PPPoA 4 4 Figure 4 5 PPP Username and Password page for PPPoE 4 6 Figure 4 6 WAN IP Settings page for IPoA 4 8 Figure 6 1 Home storage connection 6 3 Figure 6 2 Share folder 6 3 Figure 6 3 USBDisk_1 folder 6 4 Figure 6 4 Map Network Drive page 6 5 Figure 6 5 USB printer connection 6 6 Figure 6 6 Welcome to the Add Printer Wizard page 6 7 Figure 6 7 Ad...

Page 7: ... interface 4 1 Table 4 2 Parameter for the ATM PVC Configuration page 4 2 Table 4 3 Parameters for the PPP Username and Password page 4 5 Table 4 4 Parameters for the PPP Username and Password page 4 6 Table 4 5 Parameters for the WAN IP Settings page 4 7 Table 4 6 Parameters for the WAN IP Settings page for IPoA 4 8 Table 6 1 Rules for setting the password used for accessing a WLAN 6 11 Table 7 1...

Page 8: ...ns The following table lists the product versions related to this document Product Name HG553 Intended Audience This document is intended for z Installation and commissioning engineers z Technical support engineers Organization This document is organized as follows Chapter Describes 1 Safety Precautions The safety precautions to be followed during the use of the terminal 2 Product Overview The fun...

Page 9: ...se of the terminal and the related solutions A Technical Specifications The technical specifications of the terminal B Default Settings The default settings of the terminal C Acronyms and Abbreviations The acronyms and abbreviations involved in this document Conventions Symbol Conventions The symbols that may be found in this document are defined as follows Symbol Description Indicates a hazard wi...

Page 10: ...mand line are in boldface Italic Command arguments are in italics Items keywords or arguments in square brackets are optional x y Optional items are grouped in braces and separated by vertical bars One item is selected x y Optional items are grouped in brackets and separated by vertical bars One item is selected or no item is selected x y Optional items are grouped in braces and separated by verti...

Page 11: ...currently For example pressing Ctrl Alt A means the three keys should be pressed concurrently Key 1 Key 2 Press the keys in turn For example pressing Alt A means the two keys should be pressed in turn Mouse Operations The mouse operations that may be found in this document are defined as follows Action Description Click Select and release the primary mouse button without moving the pointer Double ...

Page 12: ...ents transportation colliding with other objects mantle the d assistance or repair thorization no organization performance design of the device device observe rights of other people Environmental Requirements for Using the Device efore connecting and disconnecting cables stop using the device and the from the power supply Ensure that your hands are dry during operation z Keep the device far from s...

Page 13: ...cal plant Otherwise explosions or fires may occur In addition follow the instructions indicated in text or symbols z Do not store or transport the device in the same box as inflammable liquids gases or explosives Accessory Requirements z Use only the accessories supplied or authorized by the device manufacturer Otherwise the performance of the device may get affected the warranty for the device or...

Page 14: ...nt for recycling or proper disposal at the end of its life For more detailed information about the recycling of the device or batteries contact your local city office the household waste disposal service or the retail store where you purchased this device The disposal of this device is subject to the Waste from Electrical and Electronic Equipment WEEE Directive of the European Union The purpose fo...

Page 15: ... est conforme aux exigences essentielles et aux autres dispositions pertinentes de la directive 1999 5 CE Deutsch Huawei Technologies Co Ltd erklärt hiermit dass dieses Produkt die erforderlichen Bestimmungen und andere relevante Verordnungen der Richtlinie 1999 5 EG einhält Ελληνικά Δια της παρούσης η Huawei Technologies Co Ltd δηλώνει ότι αυτή η συσκευή συμμορφώνεται με τις βασικές απαιτήσεις κα...

Page 16: ... bistvenimi zahtevami in drugimi ustreznimi določbami Direktive 1999 5 ES Español Europeo Con el presente documento Huawei Technologies Co Ltd declara que este dispositivo cumple con los requisitos esenciales y con las demás disposiciones correspondientes de la Directiva 1999 5 CE Svenska Huawei Technologies Co Ltd förklarar härmed att denna produkt överensstämmer med de grundläggande kraven och a...

Page 17: ...is the core component of the digital home In addition to the high speed WAN interface the terminal also provides abundant LAN interfaces to facilitate flexible LAN networking of business terminals and interworking between household terminals The terminal can function as a print server when connected to a dicators describes the indicators of t able 2 1 Ind ators of terminal Indicator Color Status M...

Page 18: ...inal is powered on Off The diagnostic button is not pressed LAN Green On The Ethernet connection is in good condition Red On The LAN connection is not connected The four LAN indicators are off by default When dicators turn red or green 2 2 2 Interfaces and Buttons 2 2 describes Table 2 2 Interfaces terminal the diagnostic button is pressed the four LAN in Table the interfaces and buttons of the te...

Page 19: ... hold more than 5 seconds NOTE After you restore the factory lost Therefore press the RESET button with caution POWER wer adapter Connects a po RESTART Restarts the terminal if this button is pressed and hold more than 0 5 seconds z The initial configuration for the Wi Fi function of the terminal is enabled z Press and hold the Wi Fi button for less than four seconds to disable the Wi Fi function ...

Page 20: ...art 3 1 Co Figure 3 1 terminal nnecting Cables shows the cable connections of the Figure 3 1 Cable connections of the terminal on the wall ro filter 1 Telephone jack 2 Mic 3 Splitter 4 Telephone 5 PC 6 Set top box 7 Power adapter ...

Page 21: ...ro filter to the wall socket rting the USB Stick Remove the SIM card holder from the US Insert the SIM card into the card holder 3 Reinsert the SIM card holder into the USB stick 4 Remove the lid on the back of the terminal and insert the USB stick into the slot The previous USB stick is just the sample for your reference you can choose other kind of USB stick that assigned by the Internet Service...

Page 22: ...ollowing steps Step 1 Sta e any Tak use 1 2 tab in the Internet Options dialog box and then click LAN e Proxy Server area ensure that Use the proxy server for LAN is cleared If N Step 2 p 192 168 0 1 in the address bar of the Internet Explorer and then press Enter Step 3 Enter the administrator account User name is admin and password is VF EShg553 e Login dialog box and then click OK E rt the Inte...

Page 23: ... use the PPPoA encapsulation mode PPP over Ethernet PPPoE z The terminal serves as a router z Dialing is performed through the embedded PPP dialer software of the terminal z Data packets are encapsulated in PPPoEoA mode MAC Encapsulation Routing MER z pper layer DHCP z The terminal serves as a router z Data packets use the IPoEoA encapsulation mode WAN IP address of the terminal can be a static IP...

Page 24: ...t requirement is imposed on the network transmission capability z UBR With PCR It refers to an unspecified bit rate with a peak cell rate CBR It refers to a constant bit rate Fixed requirements are imposed on the bandwidth rate This type is applicable to real time transmission of audio and video signals Non Realtime VBR It refers to a non real time variable bit rate No stringent requirement is imp...

Page 25: ...s follows Step 1 Logging in to the Web based configuration utility For details see section 3 3 Logging In to the Web Based Configuration Utility Step 2 Choose Advanced Setup WAN in the navigation tree Step 3 Select ADSL Uplink Step 4 Click Next to show the Wide Area Network WAN Setup page Step 5 Press Next button to proceed ...

Page 26: ... the Internet Service Provider Step 7 Click Next to show the Connection Type page Figure 4 3 Connection Type page Step 8 Select PPP over ATM PPPoE Step 9 Click Next to show the PPP Username and Password page for PPPoE set the parameters refer to Table 4 3 Figure 4 4 PPP Username and Password page for PPPoE ...

Page 27: ...he transported IP package with the selected PPPoA protocol PPP s LCP Echo req Interval 10 60 It specifies the time interval of the two echo requests Authentication Method The authentication method of the PPP protocol Step 10 Click Next to show the Enable WAN Service page just keep the default settings Make sure choose Data in the Service Name drop down list box Step 11 Click Next to show the WAN S...

Page 28: ...et mask of the PVC When the method for obtaining an IP address is set to using a static IP address the terminal provides this parameter Primary DNS server It specifies the IP address of the primary DNS server used by the PVC When the method for obtaining an IP address is set to using a static IP address the terminal provides this parameter Secondary DNS server It specifies the IP address of the se...

Page 29: ...ifies the WAN IP address of the PVC This parameter is provided by the Internet Service Provider WAN Subnet Mask It specifies the WAN subnet mask of the PVC This parameter is provided by the Internet Service Provider Remote WAN IP address It specifies the remote WAN IP address of the PVC This parameter is provided by the Internet Service Provider Primary DNS server It specifies the IP address of th...

Page 30: ... Mode To configure the Bridge mode for the WAN interface do as follows Step 1 Repeat from the step1 to the step 7 of 4 1 1 Configuring the PPPoA Mode Step 2 On the Connection Type page select bridge Keep other settings by the Internet Service Provider Step 3 Click Next to show the Unselect the check box below to disable this WAN service page keep the default settings Make sure choose Data in the S...

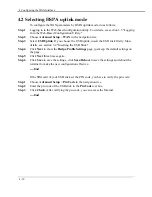
Page 31: ...ils see section 3 2 Inserting the USB Stick Step 4 Click Next to show the Hsdpa Profile Settings page just keep the default settings on the page Step 5 Click Next three times again Step 6 Click Save to save the settings click Save Reboot to save the settings and reboot the terminal to make the new configuration effective End If the SIM card of your USB stick set the PIN code you have to verify the...

Page 32: ...t k bar of the PC End 5 2 Se lly To manually set up a wireless z panel and hold it for less than four seconds to disable the Wi Fi function and hold it for more than four seconds to enable the WPS function f the Wi Fi indicator does not bl Note that the WPS function can be used only when the security mode to WPA PSK or WPA2 PSK Access the WLAN through the wireless network adapter on your PC After ...

Page 33: ...ou PC and the terminal 8 Close the Wireless Network Connection dialog box 9 In the Wireless Network Connection Properties dialog box click OK Right click My Computer and then choose Manage from the shortcut menu In the Computer Management window choose Computer Management Local Services and From the services listed in the right pane of the Computer Management window right click Wireless Zero Confi...

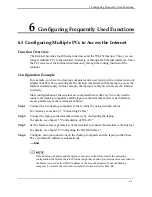
Page 34: ... simultaneously In this example the laptop is configured to access the Interne wirelessly Most configurations of the terminal are completed before delivery You only need to connect the desktop computers and the laptop to the terminal and set certain In acc ss parameters of the terminal as follows e Connect the two desktop computers to the terminal For details see section 3 1 Connecting Cables Conn...

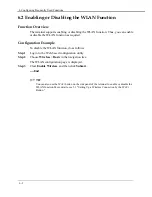
Page 35: ...ation Example To disable the WLAN function do as follows Step 1 Log in to the Web based configuration utility Step 2 Choose Wireless Basic in the navigation tree The WLAN configuration page is displayed Step 3 Clear Enable Wireless and then click Submit End You can also use the Wi Fi button on the side panel of the terminal to enable or disable the WLAN function More details see 5 1 Setting Up a W...

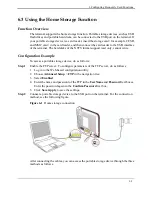
Page 36: ...rite Configuration Example To access a portable storage device do as follows 1 2 3 4 5 Figure 6 1 Step 1 Enable the FTP server To configure parameters of the FTP server do as follows Log in to the Web based configuration utility Choose Advanced Setup FTP in the navigation tree Select Enabled Enter the name and password of the FTP in the UserName and Password text boxes Enter the password again in ...

Page 37: ...assword and then click Login Step 3 After the password is verified you can read and write the contents on the portable storage device connected to the terminal End Accessing the Storage Device by the Samba Function To access the portable storage device by the Samba Function do as follows Step 1 Launch the Internet Explorer and enter 192 168 0 1 in the address bar then press Enter to display the Sh...

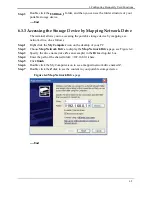
Page 38: ...ive do as follows Step 1 Right click the My Computer icon on the desktop of your PC Step 2 Choose Map Network Drive to display the Map Network Drive page see Figure 6 4 Step 3 Specify the drive name take Z as an example in the Drive drop list box Step 4 Enter the path of the shared folder 192 168 0 1 share Step 5 Click finish Step 6 Double click the My Computer icon to see a mapped network drive n...

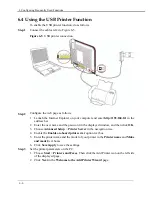
Page 39: ...4 5 6 1 2 Enter the user name and the password in the displayed window and then click OK Choose Advanced Setup Printer Server in the navigation tree Enable the Enable on board print server option text box Enter the printer name and the model of your printer in the Printer name and Make and model text boxes Click Save Apply to save the settings Step 3 Set the printer parameters on the PC Choose Sta...

Page 40: ...uring Frequently Used Functions 6 7 Figure 6 6 3 Figure 6 7 Welcome to the Add Printer Wizard page Select A network printer or a printer attached to another computer and then click Next Add Printer Wizard page ...

Page 41: ...preset and cannot be changed myprinter is the printer name that you specified Choose the printer model that you want 6 7 8 If there is no printer model for you to choose please install the printer driver on your PC first Click OK to set the current printer as the default printer Click Finish to complete the settings Open the files you want to print on your PC Then you can choose the printer just i...

Page 42: ...After this function is enabled the wireless signals transmitted from the terminal do not carry the SSID Thus it is not possible for unauthorized people to obtain the SSID from the wireless signals In addition the user of a PC needs to enter the correct SSID manually to add the PC to the WLAN Thus the security of the WLAN is increased The terminal also provides the multi SSID function You can confi...

Page 43: ...nect to the WLAN Therefore the security of the WLAN can be improved if the SSID is difficult to be predicted An SSID consists of 1 32 American Standard Code for Information Interchange ASCII characters When the terminal is delivered the SSID is preset You can find this preset SSID on the label on the real panel of the terminal In addition the terminal supports the change of the SSID You can change...

Page 44: ...ncryption Standard Table 6 1 lists the rules for setting the password used for accessing a WLAN in different security modes Table 6 1 Rules for setting the password used for accessing a WLAN Security Mode Password Setting Rule WEP encryption z It uses 64 bit encryption also referred to as 40 bit encryption The password consists of five visible ASCII characters entered through a keyboard or 10 hexa...

Page 45: ...e following modes z Blacklist The PCs whose MAC addresses are listed in the filtering list are prohibited from being connected to the WLAN z Whitelist The PCs whose MAC addresses are listed in the filtering list are allowed to be connected to the WLAN You can select either of the preceding modes for the wireless MAC filtering function The wireless MAC filtering function controls the option of allo...

Page 46: ...line window enter ipconfig all Then press Enter Multiple lines of information is displayed You can find a line of information that is similar to Physical Address 00 11 09 11 04 DD 00 11 09 11 04 DD is the MAC address of the PC Step 2 Log in to the Web based configuration utility Step 3 Choose Wireless MAC Filter in the navigation tree The WLAN configuration page is displayed Step 4 Select MyNewSSI...

Page 47: ...terminal through a wireless network Configuration Example For example you have bought a PC for your child who is in a primary school To restrict the Internet access period of the child to from 19 00 to 20 00 in each evening and to protect your PC from being restricted you can use the blacklist mode of the MAC address filtering function Suppose the MAC address of the PC of your child is 00 11 09 11...

Page 48: ...e 2 z User name Internet access after 20 00 in the evening z Other MAC address 00 11 09 11 04 DD z Click to select Select from Monday to Sunday z Start Blocking Time hh mm 19 59 z End Blocking Time hh mm 23 59 Step 8 Click Save Apply End z Make sure enable auto synchronization with network time If not contact the Internet Service Provider z To delete a rule select the rule from the rule list In th...

Page 49: ...e RESET button for more than 3s In this case the login password of the Web based configuration utility is restored to VF IRhg55 When the default settings are restored your customized data is lost Therefore use the RESET Config r example to change the password to tion tree ord MyWebPassword in New Password text box Enter the new assword again in Confirm Password text box Step 6 e Apply button with ...

Page 50: ...nterface of the terminal are in the same network se this case you need to enter the new IP address in the bar of an explorer Subnet Mask It specifies the subnet mask of the LAN interface LAN Domain It specifies the domain to enter the web Web based configuration utility LAN MTU 296 1500 length of the transported IP package of the The maximum LAN interface Enable IGMP Snooping n of It specifies whe...

Page 51: ...a Configuration File By using the parameter of the terminal to a PC If the configuration file of the terminal is modified by mista you can import the backup file to the terminal uration Example For example you have modifi requirements and you need to modify the paramete a network access failure due to mis operations the terminal Once the modification of the parameters fails you can terminal to the...

Page 52: ...login password of the Web based configuration utility and quickly restore the default settings of the terminal When the terminal is powered on press and hold the RESET button for more than 3s and then release it Then the terminal automatically restarts and the default settings a restored If your operations fail after multiple configurations and if you need to cancel preceding configurations you ca...

Page 53: ...wise the terminal may get damaged Confi uration Exam g ple vider the terminal do as follows Step 1 the Web based configuration utility Step 2 Choose Management Update Software in the navigation tree Step 3 Click Browse Step 4 In the displayed dialog box select the upgrade file Then click OK Step 5 Click Update Software End You can download the latest software from your Internet Service Pro To upda...

Page 54: ...ered the correct user name and user accessing the terminal configuration page If the problem persists restore the default se End Question 4 What can I do if Web pages often cannot be displayed during Web page browsing and can be displayed after the terminal is restarted Step 1 En rminal and other devices such as telephones or fax machines are ted description in the manual Step 2 tability of the ne...

Page 55: ...d In this case enable the WLAN function For details about how to enable the WLAN function see the manual of the terminal Step 3 See the description of the wireless network adapter that is installed on the computer and check whether the wireless network adapter supports the 802 11b 802 11g and 802 11n protocols If the wireless network adapter does not support the 802 11b 802 11g and 802 11n protoco...

Page 56: ...agnetic or electric fields Step 2 Place your terminal in an open position Although radio signals can pass through obstacles the transmission effects of WLAN radio signals are affected if radio signals pass through too many obstacles such as cement or wooden walls Step 3 Place your computer close to your terminal If your computer is far from your terminal the effects of the WLAN are affected Step 4...

Page 57: ... select the latest wireless network connection saved on your computer Then click Remove Delete all the other wireless network connections from the Preferred Networks group box Click OK Step 2 Create a wireless network connection that is not encrypted End ...

Reviews: