background image

§

Restart Mars.

Why can't I see the incoming video feed in the Camera
Calibration Tool?

Depending on how your video capture device is configured, the Camera Calibration Tool might
not display the incoming video feed.

If the Camera Calibration Tool doesn't display the incoming video feed after you select a video
source, try reconfiguring your video capture device. For example, if you're using a 

Blackmagic

DeckLink 8K Pro

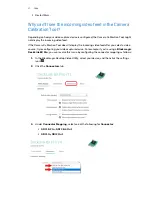
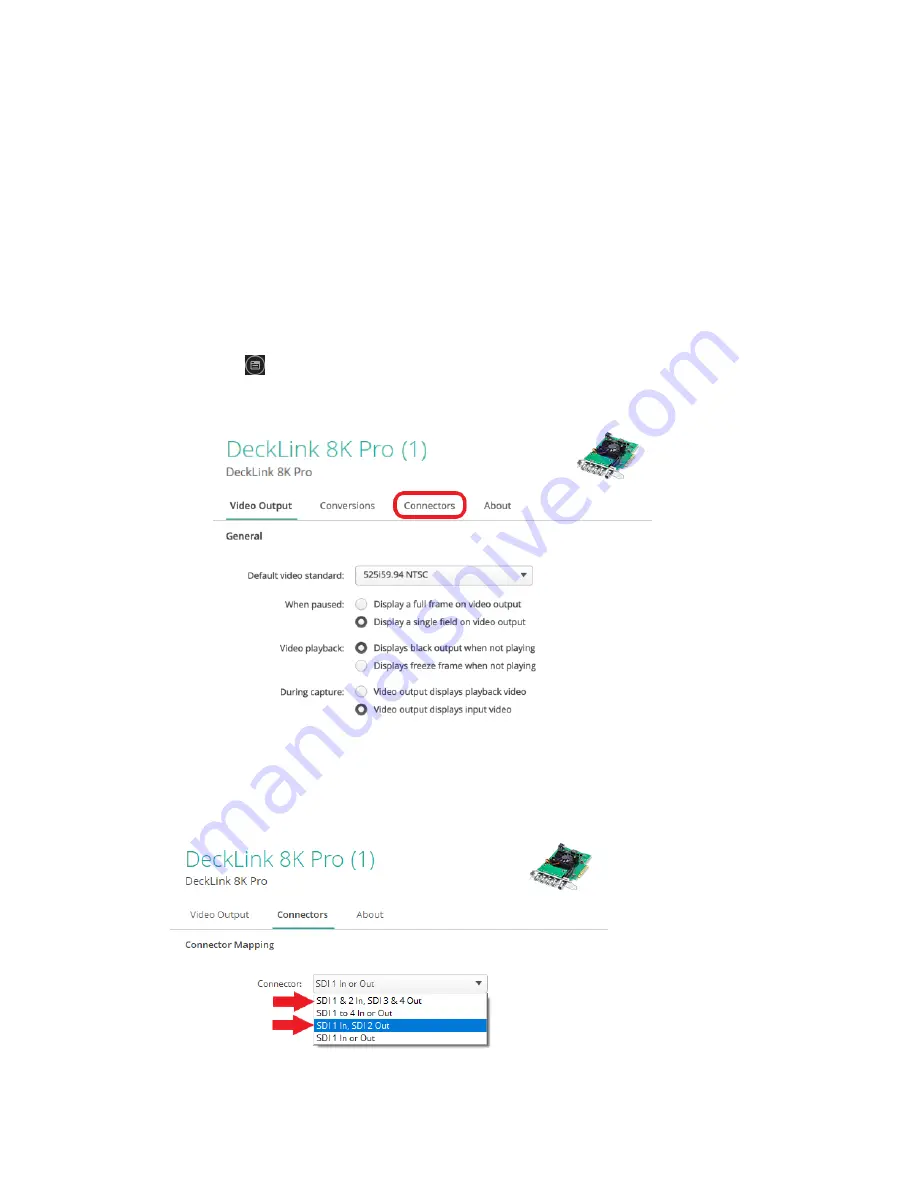
, you can resolve this issue by configuring the connector mapping as follows:

1.

In the Blackmagic Desktop Video Utility, select your device, and then click the settings
icon 

.

2.

Click the 

Connectors

 tab.

3.

Under 

Connector Mapping

, select one of the following for 

Connector

:

§

SDI 1 & 2 In, SDI 3 & 4 Out

§

SDI 1 In, SDI 2 Out

27

FAQs

Summary of Contents for VIVEMARS CAMTRACK

Page 1: ...User Guide...

Page 2: ...ne 20 Camera calibration Assembling the calibration board 21 Camera Calibration Tool 22 Calibrating your camera 22 FAQs How many base stations can I use 25 Can I use an odd number of base stations 25...

Page 3: ...specific situations Tips provide supplemental information or alternative methods you may find helpful for particular steps or procedures Important notes provide information needed to complete certain...

Page 4: ...ase Station 2 0 and a suite of other devices and tools to help you incorporate VR tracking technology into your virtual production projects What s inside the box The packaging includes everything you...

Page 5: ...ick Start Guide 1 Safety guide 1 Warranty certificate 1 3 SteamVR Base Station 2 0 2 4 Channel changing pin for base station 1 5 VIVE Tracker 3 0 2 6 Mars 1 7 Power cord for Mars 1 8 AC adapter for Ma...

Page 6: ...ation 2 14 Rover 3 Items may vary according to country or region A third VIVE Tracker 3 0 must be purchased separately If you have questions or concerns about VIVE Mars CamTrack or if you want to repo...

Page 7: ...The signals transmitted by the base stations may interfere with nearby infrared sensors including those used by infrared remote controls 1 Status light 2 Front panel 3 Power port 4 Threaded mounting h...

Page 8: ...ion pad 5 Standard camera mount 6 Stabilizing pin recess 7 Status light 8 Power button Visit VIVE Support to learn more about VIVE Tracker 3 0 Rover Rover sends tracking data from VIVE Tracker 3 0 to...

Page 9: ...data can be transmitted through this port 3 USB Type A port 3 Focus data can be transmitted through this port 4 USB Type A port 4 Iris data can be transmitted through this port 5 Ethernet port For co...

Page 10: ...erator Mars dashboard The Mars dashboard displays the connection status of each connected hardware device and other system related information You can also access several system configuration options...

Page 11: ...stem logs for system diagnostics and analysis Calibration kit The calibration kit includes items for assembling the calibration board which is placed inside the tracking area during the camera calibra...

Page 12: ...an IP router See Connecting Mars to your PC on page 14 2 Connect Mars to a power outlet using the included AC adapter and power cord 3 Power on Mars 4 Mount VIVE Tracker 3 0 to Rover See Mounting VIVE...

Page 13: ...eck the status icon on the Mars dashboard to confirm the tracking status See What does the status light on VIVE Tracker 3 0 mean on page 26 for details 7 Set up the base stations but do not connect th...

Page 14: ...uses a 1 4 inch screw Connecting Mars to your PC Mars processes positioning data and sends it to your PC through an IP router 1 Connect one end of the 5 m LAN cable to the Ethernet port labeled PC LA...

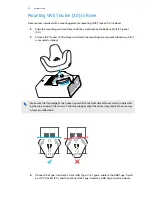
Page 15: ...ounting screw counterclockwise until it is securely fastened Make sure the front edge of the tracker is parallel to the front side of Rover which is indicated by the blue arrow on the chassis Failure...

Page 16: ...one for your camera and one for the calibration board 1 Connect one end of a 15 m LAN cable to the Ethernet port on Rover 2 Connect the other end of the 15 m LAN cable to an Ethernet port on Mars Do...

Page 17: ...he base stations using the mounting kit you can attach them to tripods or place them on a stable surface as long as it s high enough For details on using the mounting kit visit VIVE Support 2 Adjust t...

Page 18: ...ke sure it s detected The base station status icon should turn blue 5 Do the same with the second base station See Mars on page 9 to learn more about the Mars dashboard If Mars doesn t detect the seco...

Page 19: ...d down between 30 and 45 degrees For optimal tracking make sure VIVE Tracker 3 0 is at least 0 5 m 1 6 ft away from each base station and that each base station is at least 0 5 m 1 6 ft high The heigh...

Page 20: ...and then click 2 Enter the Mars IP address and port number in this example 6666 You can find the Mars IP on the Mars dashboard and the port number in the network settings Just tap the network button...

Page 21: ...ach the base supports to the calibration board 2 Attach a Rover and VIVE Tracker 3 0 to the calibration board under the chessboard pattern using the screw included in the box 3 Place the calibration b...

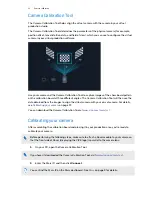
Page 22: ...the images to align the virtual camera with your on set camera For details see Calibrating your camera on page 22 You can download the Camera Calibration Tool at www vive com mars cct Calibrating your...

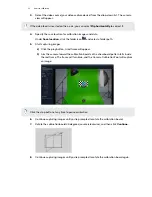
Page 23: ...lick the play button A red frame will appear b Aim the camera toward the calibration board so the chessboard pattern falls inside the red frame The frame will turn blue and the Camera Calibration Tool...

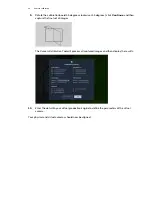
Page 24: ...the final set of images The Camera Calibration Tool will process all captured images and then display the results 10 Enter the data into your virtual production engine to define the parameters of the...

Page 25: ...o base stations are required for minimum tracking coverage and you can use a maximum of four base stations the only possible setup with an odd number of base stations would have a total of three base...

Page 26: ...When VIVE Tracker 3 0 is detected the VIVE Tracker 3 0 icon will flash blue When the icon turns solid blue VIVE Tracker 3 0 is detected and actively tracking What does the status light on VIVE Tracker...

Page 27: ...coming video feed after you select a video source try reconfiguring your video capture device For example if you re using a Blackmagic DeckLink 8K Pro you can resolve this issue by configuring the con...

Page 28: ...tion with or endorsement of or by HTC Corporation Not all marks listed necessarily appear in this User Guide Screen images contained herein are simulated HTC shall not be liable for technical or edito...

Reviews: