background image

8  

Quick Start Guide


5.  Get Started

After installing your SIM card and battery and charging the battery, you can now power on 

and start using your phone. 

Turning on the power

Press and hold the END/POWER button for a few seconds. When you turn on the phone 

the first time, the phone installs customization settings and then restarts. 
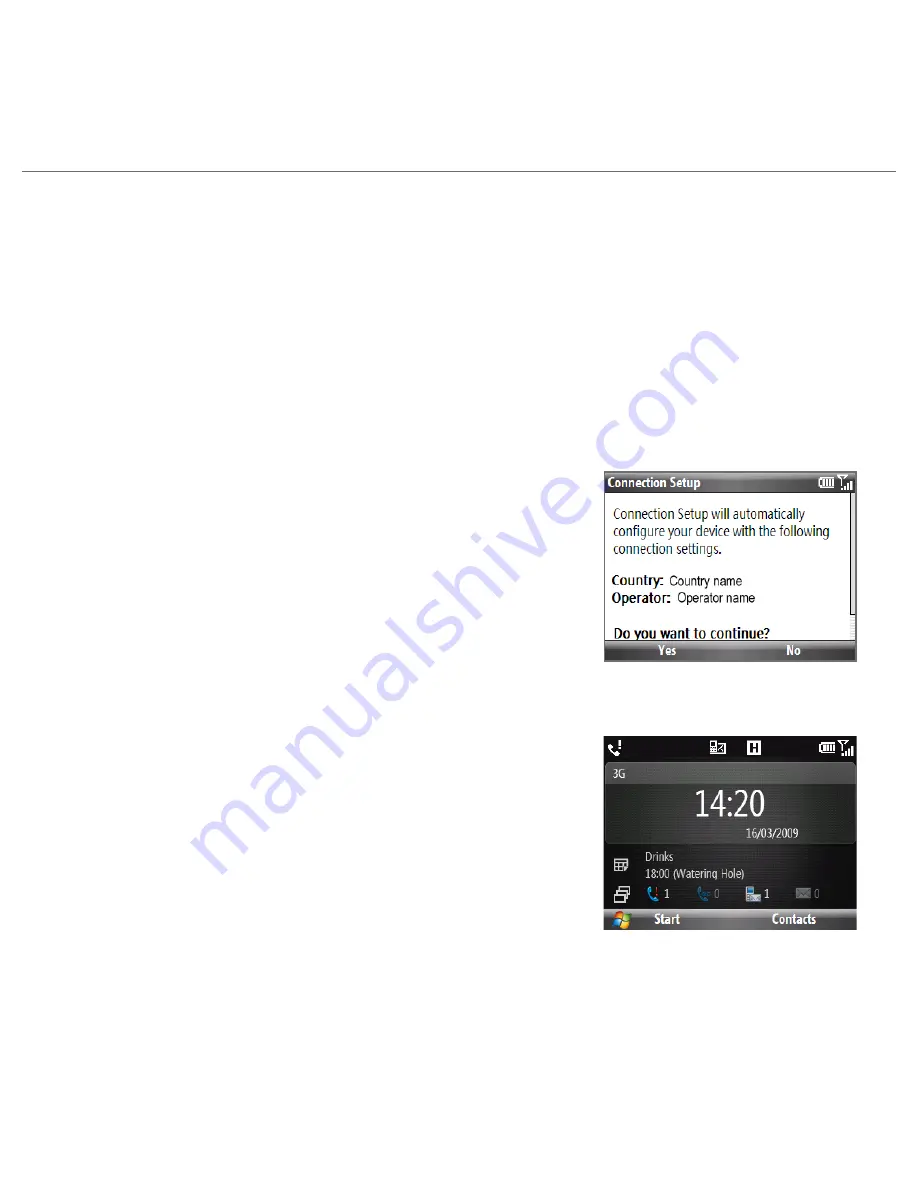
After the phone restarts, you will be asked if you want to automatically configure your 

phone’s data connections.  By letting the phone configure the data connection settings, 

you do not need to enter the settings for 3G/GPRS and WAP manually.

When you see the Connection Setup screen, click 

Yes

.

Connection Setup then configures your phone’s 

data connection settings.

Note


For step 1, if your SIM card supports multiple network 

operator profiles, a message will appear with network 

profile choices.  

Select the profile you want to use and click 

OK

1.

2.

The Home Screen

After the phone restarts from configuring your data 

connections, you are taken to the HTC Home™. HTC Home 

lets you quickly access various information, applications, 

and settings on the phone.
Navigate through the panels on HTC Home by scrolling 

up or down with the TRACKBALL. When a panel is 

selected, scroll left/right to go through the available 

options of that HTC Home panel. Open any panel by 

pressing CENTER OK.
For more information about HTC Home, refer to the User Manual PDF in the Getting 

Started disc. 

Summary of Contents for HTC Maple

Page 1: ...Quick Start Guide...

Page 2: ...feature of your PDA Phone LIMITATION OF DAMAGES To the maximum extent permitted by applicable law in no event shall HTC or its providers be liable to user or any third party for any indirect special...

Page 3: ...HTC Maple 10 7 Use HTC Home 11 8 Add Contacts 14 9 Take Charge of Your Inbox with Inner Circle 15 10 Make Calls 17 11 Send Text and Multimedia Messages 18 12 Set Up and Use E mail 19 13 Keeping Track...

Page 4: ...you through the features we feel you will want to learn right away when you use your HTC Maple For a more complete guide in using your HTC Maple please refer to the User Manual PDF in the User Manual...

Page 5: ...Microphone 2 0 Megapixel Camera Speaker Volume Up Volume Down Sync Connector Earphone Jack Inner Circle Using the Trackball Roll the TRACKBALL to scroll left right up or down Pressing the center acts...

Page 6: ...up the bottom of the back cover 1 2 3 SIM card To install the SIM card Locate the SIM card slot and unlock the SIM card lock by pressing it towards the battery compartment Insert the SIM card with it...

Page 7: ...AC adapter to an electrical outlet to start charging the battery Note Only the AC adapter and USB sync cable provided with your device must be used to charge the battery 1 2 Sync connector Storage Car...

Page 8: ...Setup screen click Yes Connection Setup then configures your phone s data connection settings Note For step 1 if your SIM card supports multiple network operator profiles a message will appear with n...

Page 9: ...ess the corresponding key To continuously enter numbers or symbols labelled in brown press twice Press again to exit continuous input mode To open the Symbol table while entering text press Press and...

Page 10: ...CENTER OK Select the picture you want to use by scrolling right left and then clicking Done Note To use personal photos for the Home screen wallpaper copy the photos to My Documents My Pictures on you...

Page 11: ...panels on HTC Home by scrolling up or down with the Trackball When a panel is selected scroll left right to go through the available options of that particular HTC Home panel Open the item by pressing...

Page 12: ...roll left right to go through your unread messages Email View snippets of your unread emails or create a new email Click the email to open the full email Tip Scroll left right to go through your unrea...

Page 13: ...r music right on the Home screen Press CENTER OK to play pause music playback Getting Started Scroll right left to go through the available tutorials to learn basic features and settings of your phone...

Page 14: ...ect SIM Contact to create the contact on the SIM card Enter information for the new contact Click Done To copy SIM card contacts to your phone Copying the contacts on your SIM card to the phone will r...

Page 15: ...r Circle screen Do one of the following Click Start Inner Circle Press the Inner Circle key Inner Circle The first time you run Inner Circle a tutorial explains how to use the program To add members o...

Page 16: ...to delete and click Delete Click Yes on the confirmation screen To search for a member in the Inner Circle In the Inner Circle Member list select a member and click Menu Search Member Start entering...

Page 17: ...TALK SEND 1 2 1 2 Phone screen Making a call from Call History On the Home screen click Start Call History Select a name or number and press TALK SEND Receiving and Ending a Call When you receive a p...

Page 18: ...lick Text message Enter the mobile phone number of one or more recipients separating them with a semicolon Enter your message You can enter up to 160 characters in one message Click Send Sending an MM...

Page 19: ...nect to the Internet and try to download the settings If it cannot find the settings online you need to enter the settings manually Click Next Enter Your name and the Account display name and then cli...

Page 20: ...pose your message Click Send 13 Keeping Track of Appointments Keep track of your important appointments by adding them on the Appointments panel To enter an appointment into your phone On the Home scr...

Page 21: ...TER OK when a link is highlighted to access it While browsing the Web click Menu to open a list of options that will let you change the view save Favorites and set Internet Explorer Mobile preferences...

Page 22: ...o stop recording video To learn more about the other capture modes and functions of the Camera refer to Chapter 10 of the User Manual PDF To view photos and videos Use Album to browse photos and play...

Page 23: ...Bluetooth and WLAN settings and to switch phone profiles For more information about using Wi Fi connecting to a wireless network and connecting a Bluetooth headset refer to Chapter 8 in the User Manua...

Page 24: ...ith a server running Microsoft Exchange Server check box then click Next Select the information types that you want to synchronize and then click Next Click Finish To synchronize your phone with a Win...

Page 25: ...device Turning on and using wireless functions such as Bluetooth or Wi Fi will use up the battery faster Long duration calls camera usage Internet connection and more will use up the battery faster B...

Page 26: ...ourse of dealing or course of performance Without limiting the foregoing it is further understood that HTC and its Providers are not responsible for Your use or misuse of the Weather Information Data...

Page 27: ...earthed before connecting this product to the computer The power supply cord of a desktop or notebook computer has an equipment grounding conductor and a grounding plug The plug must be plugged into...

Page 28: ...only connected to products that bear the USB IF logo or have completed the USB IF compliance program Do not use a battery that appears damaged deformed or discolored or the one that has any rust on it...

Page 29: ...or NF EN 50332 2 2003 standards as required by French Article L 5232 1 Earphone manufactured by HTC Model HS S200 SAFETY IN AIRCRAFT Due to the possible interference caused by this product to an aircr...

Page 30: ...nclude fueling areas below deck on boats fuel or chemical transfer or storage facilities and areas where the air contains chemicals or particles such as grain dust or metal powders ROAD SAFETY Vehicle...

Page 31: ...aids In the event of such interference you may want to consult your service provider or call the customer service line to discuss alternatives NONIONIZING RADIATION Your device has an internal antenna...

Page 32: ...aging them and remove the device from your pants pocket before sitting down It is also recommended that you store the device in a protective case Cracked display screens due to improper handling are n...

Page 33: ...e When you move your device between environments with very different temperature and or humidity ranges condensation may form on or within the device To avoid damaging the device allow sufficient time...

Page 34: ...before cleaning Do not use liquid cleaners or aerosol cleaners Use a damp cloth for cleaning but NEVER use water to clean the LCD screen Regulatory Agency Identifications For regulatory identificatio...

Page 35: ...o minimize the potential for interference If you have any reason to suspect that interference is taking place turn the phone OFF immediately Hearing Aids Some digital wireless phones may interfere wit...

Page 36: ...pecified collection point for recycling of such hazardous waste Isolated collection and proper recovery of your electronic and electrical waste equipment at the time of disposal will allow us to help...

Reviews: