TP585 User Manual
17
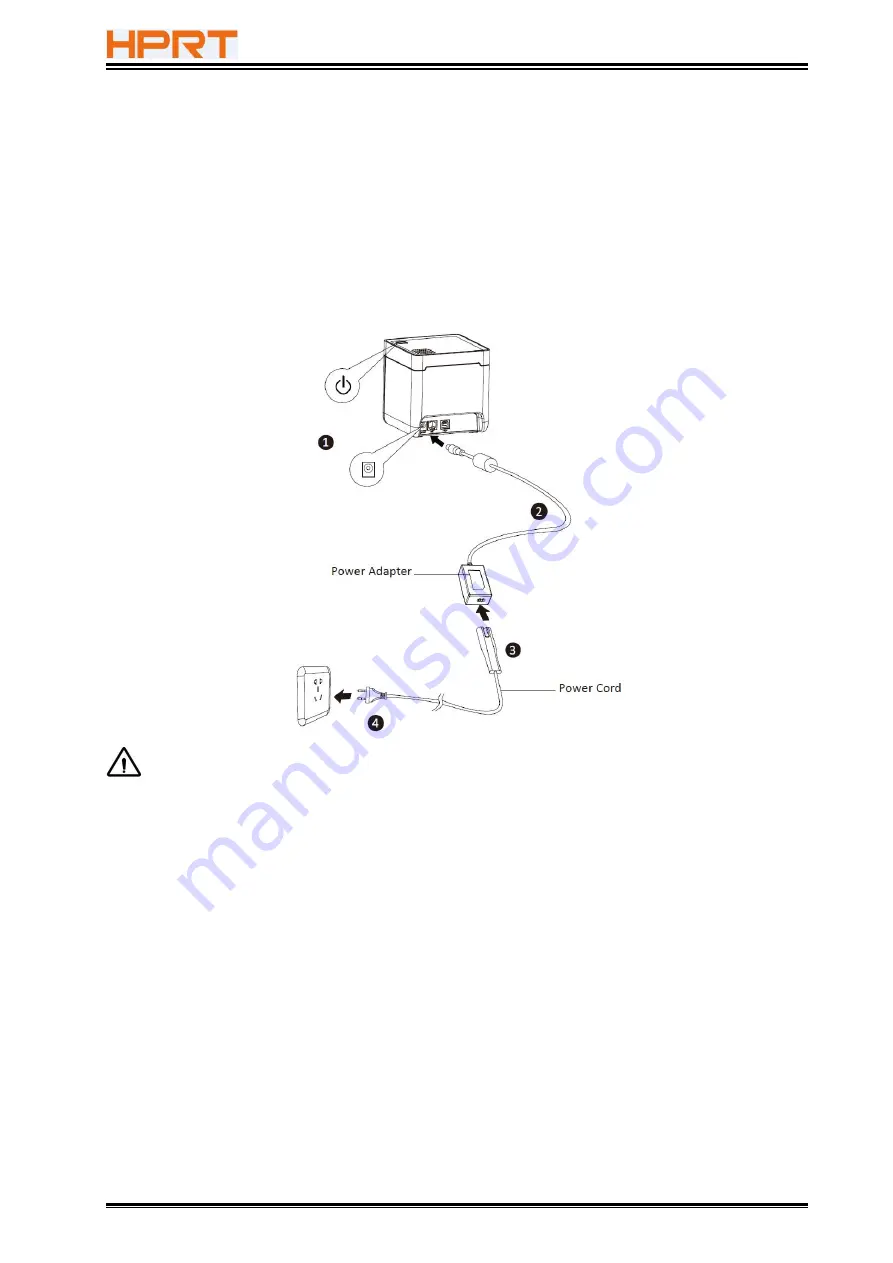
4.2 Power Connection
1) Make sure the printer power is turned off.
2) Connect power adapter to printer
3) Connect power adapter to power cord.
4) Plug the other side of power cord into the socket outlet.
Notes:
1) Please only use the power adapter recommended by supplier or equivalent products.
2) When disconnecting the power adapter plug, handhold plug connector housing, to avoid
the pulling on the cable in force.
3) Avoid dragging the power adapter cable, otherwise it will damage the cables, causing fire
and shock.
4) Avoid putting power adapter around a heating device, otherwise the cable may melt,
causing fire and shock.
5) If you do not use the printer in a long time, disconnect the power supply of printer power
adapter.
Summary of Contents for TP585
Page 27: ...TP585 User Manual 27 4 Click Next 5 Select start menu folder Click Next...
Page 28: ...TP585 User Manual 28 6 Click Install 7 Click Finish Utility is installed successfully...
Page 33: ...TP585 User Manual 33 8 2 1 4 Connection Test 1 Choose the printer Click Connection Test...
Page 51: ...TP585 User Manual 51 Arabic Transform Vietnamese transform...
Page 56: ...TP585 User Manual 56 Return to the printer utility and click Modify Printer COM2...
Page 57: ...TP585 User Manual 57...
Page 58: ...TP585 User Manual 58 Change the port to COM2 COM2...
Page 63: ...TP585 User Manual 63 8 3 Firmware Update 1 Click FW Update...
Page 67: ...TP585 User Manual 67 3 Click Next...
Page 75: ...TP585 User Manual 75 Cash Drawer Custom Command...
Page 77: ...TP585 User Manual 77 Click Download Click Add to add a logo BMP format is recommended...
Page 79: ...TP585 User Manual 79 Select Printer properties in Devices and Printers then click Preference...
Page 80: ...TP585 User Manual 80 Click the Advanced then click Logo...
Page 82: ...TP585 User Manual 82 Then click OK...
Page 83: ...TP585 User Manual 83 Click Print Test Page to view the printing effect...
Page 85: ...TP585 User Manual 85 Compression Code Page...
Page 86: ...TP585 User Manual 86 Error Reprint...
Page 87: ...TP585 User Manual 87 3 Click Watermark Set watermark to print...
Page 88: ...TP585 User Manual 88 4 Click Halftone to set the halftone...
Page 91: ...TP585 User Manual 91 Add Barcode firstly...
Page 92: ...TP585 User Manual 92 Set the Font Name and the Barcode Option...
Page 93: ...TP585 User Manual 93 Click the Printer Setting Choose the Display Language for Properties...
Page 95: ...TP585 User Manual 95...
Page 96: ...TP585 User Manual 96...
Page 97: ...TP585 User Manual 97...
Page 100: ...TP585 User Manual 100 Select the System Font for example Arial...
Page 101: ...TP585 User Manual 101 Select the font to that you want to replace Click Set...
Page 102: ...TP585 User Manual 102...
Page 104: ...TP585 User Manual 104 3 Set the Ports 4 Click Advanced to set the printing time...
Page 105: ...TP585 User Manual 105...
Page 107: ...TP585 User Manual 107...


